
Getting Started with Citrix ADC
Deploy a Citrix ADC VPX instance
Optimize Citrix ADC VPX performance on VMware ESX, Linux KVM, and Citrix Hypervisors
Apply Citrix ADC VPX configurations at the first boot of the Citrix ADC appliance in cloud
Install a Citrix ADC VPX instance on Microsoft Hyper-V servers
Install a Citrix ADC VPX instance on Linux-KVM platform
Prerequisites for Installing Citrix ADC VPX Virtual Appliances on Linux-KVM Platform
Provisioning the Citrix ADC Virtual Appliance by using OpenStack
Provisioning the Citrix ADC Virtual Appliance by using the Virtual Machine Manager
Configuring Citrix ADC Virtual Appliances to Use SR-IOV Network Interface
Provisioning the Citrix ADC Virtual Appliance by using the virsh Program
Provisioning the Citrix ADC Virtual Appliance with SR-IOV, on OpenStack
Configuring a Citrix ADC VPX Instance on KVM to Use OVS DPDK-Based Host Interfaces
Deploy a Citrix ADC VPX instance on AWS
Deploy a VPX high-availability pair with elastic IP addresses across different AWS zones
Deploy a VPX high-availability pair with private IP addresses across different AWS zones
Configure a Citrix ADC VPX instance to use SR-IOV network interface
Configure a Citrix ADC VPX instance to use Enhanced Networking with AWS ENA
Deploy a Citrix ADC VPX instance on Microsoft Azure
Network architecture for Citrix ADC VPX instances on Microsoft Azure
Configure multiple IP addresses for a Citrix ADC VPX standalone instance
Configure a high-availability setup with multiple IP addresses and NICs
Configure a high-availability setup with multiple IP addresses and NICs by using PowerShell commands
Configure a Citrix ADC VPX instance to use Azure accelerated networking
配置HA-INC节点使用Citrix高availability template for internet-facing applications
Configure a high-availability setup with Azure external and internal load balancers simultaneously
Configure address pools (IIP) for a Citrix Gateway appliance
Upgrade and downgrade a Citrix ADC appliance
Solutions for Telecom Service Providers
Load Balance Control-Plane Traffic that is based on Diameter, SIP, and SMPP Protocols
Provide Subscriber Load Distribution Using GSLB Across Core-Networks of a Telecom Service Provider
Authentication, authorization, and auditing application traffic
Basic components of authentication, authorization, and auditing configuration
Authentication, authorization, and auditing configuration for commonly used protocols
Troubleshoot authentication and authorization related issues
-
-
-
-
-
Persistence and persistent connections
Advanced load balancing settings
Gradually stepping up the load on a new service with virtual server–level slow start
Protect applications on protected servers against traffic surges
Retrieve location details from user IP address using geolocation database
Use source IP address of the client when connecting to the server
Use client source IP address for backend communication in a v4-v6 load balancing configuration
Set a limit on number of requests per connection to the server
Use case 2: Configure rule based persistence based on a name-value pair in a TCP byte stream
Use case 3: Configure load balancing in direct server return mode
Use case 6: Configure load balancing in DSR mode for IPv6 networks by using the TOS field
Use case 7: Configure load balancing in DSR mode by using IP Over IP
Use case 10: Load balancing of intrusion detection system servers
Use case 11: Isolating network traffic using listen policies
Use case 14: ShareFile wizard for load balancing Citrix ShareFile
Use case 15: Configure layer 4 load balancing on the Citrix ADC appliance
-
-
-
Authentication and authorization for System Users
-
Configuring a CloudBridge Connector Tunnel between two Datacenters
Configuring CloudBridge Connector between Datacenter and AWS Cloud
Configuring a CloudBridge Connector Tunnel Between a Datacenter and Azure Cloud
Configuring CloudBridge Connector Tunnel between Datacenter and SoftLayer Enterprise Cloud
Configuring a CloudBridge Connector Tunnel Between a Citrix ADC Appliance and Cisco IOS Device
CloudBridge Connector Tunnel Diagnostics and Troubleshooting
-
Synchronizing Configuration Files in a High Availability Setup
Restricting High-Availability Synchronization Traffic to a VLAN
Understanding the High Availability Health Check Computation
Managing High Availability Heartbeat Messages on a Citrix ADC Appliance
Remove and Replace a Citrix ADC in a High Availability Setup
This content has been machine translated dynamically.
Dieser Inhalt ist eine maschinelle Übersetzung, die dynamisch erstellt wurde.(Haftungsausschluss)
Cet article a été traduit automatiquement de manière dynamique.(Clause de non responsabilité)
Este artículo lo ha traducido una máquina de forma dinámica.(Aviso legal)
此内容已动态机器翻译。放弃
このコンテンツは動的に機械翻訳されています。免責事項
이 콘텐츠는 동적으로 기계 번역되었습니다.책임 부인
This content has been machine translated dynamically.
This content has been machine translated dynamically.
This article has been machine translated.
Dieser Artikel wurde maschinell übersetzt.(Haftungsausschluss)
Ce article a été traduit automatiquement.(Clause de non responsabilité)
Este artículo ha sido traducido automáticamente.(Aviso legal)
この記事は機械翻訳されています.免責事項
이 기사는 기계 번역되었습니다.책임 부인
Este artigo foi traduzido automaticamente.
这篇文章已经过机器翻译.放弃
Translation failed!
How to record a packet trace on Citrix ADC
This troubleshooting article explains how an administrator can record a network packet trace using the Citrix ADC GUI.
Points to remember
Citrix recommends you to use the recent Wireshark version from the “automated build section” available in the following webpage:http://www.wireshark.org/download/automated.
In Citrix ADC version 10.5 or later, to decrypt the capture and ensure ECC (Elliptic Curve Cryptography), Session Reuse and DH parameters are disabled from the virtual server. You must do before you capture a trace.
Record packet trace on NetScaler version 11.1
- Navigate toSystem>Diagnosticspage.
click theStart new tracelink in theDiagnosticpage, as shown in the following screenshot.
Update the packet size to 0 in thePacket sizefield.

- ClickStartto start recording the network packet trace.
ClickStop and Downloadto stop recording the network packet trace after the test is complete.

Select the required file and clickSelectand clickDownload.

- Open the network packet trace file with the Wireshark utility to display the content of the file.


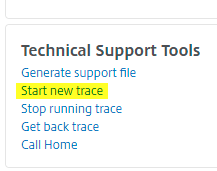
Record packet trace on NetScaler 10.5 appliance
Navigate toSystem>Diagnosticspage.

- Click theStart new tracelink underTechnical Support Tools as shown in the following screenshot.
Update the packet size to 0 in thePacket Sizefield.

Note: If appliance headers are not required then select Capture trace in .pcap format.
- ClickStartto start recording the network packet trace.
ClickOKto stop recording the network packet trace after the test is complete.

An nstrace.cap file is generated, which contains the network packet trace.
Highlight the required file and clickDownload.
- Specify a destination and save the packet trace.
Open the network packet trace file with the Wireshark utility to display the content of the file.
Note: Select Decrypted SSL packets (SSLPLAIN) to decrypt the packet trace without the private key.


Capture SSL master keys
在11.0,11.1版本以上option to capture the session keys which is valid for only for that particular session/nstrace and this option can be used if you do not want to share the private key or use SSLPLAIN mode. For more information, seehttps://support.citrix.com/article/CTX135889.
Export Session Keys without sharing Private key
In most of the scenarios the private key is not available or shared. In such scenarios we can suggest exporting theSSL sessionkeys instead of the private key. Read, [How to Export and Use SSL Session Keys to Decrypt SSL Traces Without Sharing the SSL Private Key, seehttps://support.citrix.com/article/CTX135889.
Filters
Also, it is always recommended to add IP based filters while taking traces. The process ensures that you capture only interested traffic which eases your troubleshooting. Adding filters also decreases the load on the appliance while taking traces.

Simple IP-based filters are enough to get the right captures. For more information aboutnstracefilters and examples, seeCitrix Documentationpage.
Use case to capture a packet trace with virtual server IP filter (both front-end and back end)
Using a filter of the virtual server IP address and enabling the option “–link” in CLI or selecting the option “Trace filtered connection peer traffic” in GUI (available 10.1 and above), you can capture both the front-end and back-end traffic for the IP address.
start nstrace -size 0 -filter "CONNECTION.IP.EQ(1.1.1.1)" -link ENABLED show nstrace State: RUNNING Scope: LOCAL TraceLocation: "/var/nstrace/24Mar2017_16_00_19/..." Nf: 24 Time: 3600 Size: 0 Mode: TXB NEW_RX Traceformat: NSCAP PerNIC: DISABLED FileName: 24Mar2017_16_00_19 Filter: "CONNECTION.IP.EQ(1.1.1.1)" Link: ENABLED Merge: ONSTOP Doruntimecleanup: ENABLED TraceBuffers: 5000 SkipRPC: DISABLED Capsslkeys: DISABLED InMemoryTrace: DISABLED 
Capturing cyclic traces
It is always challenging to troubleshoot an intermittent issue. Cyclic tracing is best suited for issues which are intermittent. The traces can be run over a span of few hours or days before the issue occurs. Also, you can use a specific filter and evaluate the size of the trace files that are generated before you run it for a longer time.
Run the following command from the CLI:
start nstrace -nf 60 -time 30 -size 0 This particular trace will create 60 files each of them for 30 sec. This means the files will start getting overwritten after 60 trace files or 30 mins Show nstrace à To check the status of the nstrace Stop nstrace à To stop the nstrace. Best Practices
On a unit handling GB of traffic per second, capturing traffic is a very resource intensive process. The impact to resources is mainly in terms of the CPU and the disk space. Disk space impact can be reduced by using filtering expressions. However, the impact on the CPU remains and sometimes causes a slight increase as the appliance now needs to process packets according to the filter before capturing them.
The best practice with regard to tracing is:
- The duration for which the trace is run must be as limited as possible when you still ensure the packets of interest are captured.
- Schedule the tracing activity to happen at a time when the number of users (and hence the traffic) is greatly reduced, such as during off hours.
More resources
Disable session reuse on virtual server from the GUI
Session reuse is disabled when you capture a trace to complete an SSL handshake in the trace. When it is enabled, you can capture a partial handshake in the trace. Ensure you enable the option after the trace collection. Do not disable an SSL session reuse when the persistence method is sslsession, as it breaks the persistence for existing connections. For more information refer tohttps://support.citrix.com/article/CTX121925.
- Open the virtual server and navigate to SSL Parameters.
Disable Enable Session Reuse if enabled.


Disable session reuse on virtual server from the CLI
- SSH to the appliance console.
Run the following command to disable DH Param from the virtual server:
set ssl vserver "vServer_Name" -sessReuse DISABLED
Disable DH parameter on virtual server from the GUI
Refer tohttps://support.citrix.com/article/CTX213335To understand about DH Parameter.
- Open the virtual server and navigate to SSL Parameters.
Disable DH Param if enabled.


Disable DH parameter on virtual server from the CLI
- SSH to the appliance console.
Run the following command to disable DH Param from the virtual server:
set ssl vserver "vServer_Name" -dh DISABLED
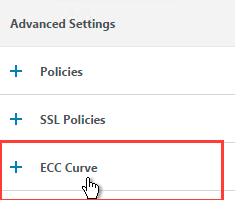
Disable ECC curve on virtual server from the GUI
ECC curve is disabled to decrypt the captured SSL trace with private key. You must not disable the keys if the related SSL ciphers are used. For more information about the ECC curve, seehttps://support.citrix.com/article/CTX205289
Open the virtual server and navigate to ECC Curve.
如果没有绑定到虚拟服务ECC曲线er then no other action is required.

If any ECC Curve is bound to the virtual server then click the ECC Curve and Unbind it from the virtual server.


Disable ECC curve on virtual server from the CLI
- SSH to the appliance console.
Run the following command for each ECC Curve bound to the virtual server:
unbind ssl vserver "vServer_Name" -eccCurveName "ECC_Curve_Name"
Share
Share
This Preview product documentation is Citrix Confidential.
你同意这个文档保密pursuant to the terms of your Citrix Beta/Tech Preview Agreement.
The development, release and timing of any features or functionality described in the Preview documentation remains at our sole discretion and are subject to change without notice or consultation.
The documentation is for informational purposes only and is not a commitment, promise or legal obligation to deliver any material, code or functionality and should not be relied upon in making Citrix product purchase decisions.
If you do not agree, select Do Not Agree to exit.