
Bot Detection
The NetScaler bot management system uses various techniques to detect the incoming bot traffic. The techniques are used as detection rules to detect the bot type. The techniques are as follows:
Note:
Bot management supports a maximum of 32 configuration entities for block list, allow list, and rate limiting techniques.
Bot Allowed list- A customized list of IP addresses (IPv4 and IPv6), subnets (IPv4 and IPv6), and policy expressions that can be bypassed as an allowed list.
Bot Blocked list- A customized list of IP addresses (IPv4 and IPv6), subnets (IPv4 and IPv6), and policy expressions that have to be blocked from accessing your web applications.
IP reputation- This rule detects if the incoming bot traffic is from a malicious IP address.
Device fingerprint- This rule detects if the incoming bot traffic has the device fingerprint ID in the incoming request header and browser attributes of an incoming client bot traffic.
Limitation:
- 在cli必须启用JavaScriptent browser.
- Does not work for XML responses.
Bot log expression- The detection technique enables you to capture additional information as log messages. The data can be the name of the user who requested the URL, the source IP address, and the source port from which the user sent the request or data generated from an expression.
Rate limit- This rule rate limits multiple requests coming from user-defined entities, including virtual servers, URLs, domains, and combinations of URLs and domains.
Bot trap- Detects and blocks automated bots by advertising a trap URL in the client response. The URL appears invisible and not accessible if the client is a human user. The detection technique is effective in blocking attacks from automated bots.
TPS- Detects incoming traffic as bots if the maximum number of requests and percentage increase in requests exceeds the configured time interval.
CAPTCHA- This rule uses a CAPTCHA for mitigating bot attacks. A CAPTCHA is a challenge-response validation to determine if the incoming traffic is from a human user or an automated bot. The validation helps block automated bots that cause security violations to web applications. You can configure CAPTCHA as a bot action in IP reputation and device fingerprint detection techniques.
Now, let us see how you can configure each technique to detect and manage your bot traffic.
How to upgrade your appliance to NetScaler CLI-based bot management configuration
If you are upgrading your appliance from an older version (NetScaler release 13.0 build 58.32 or earlier), you must first manually convert the existing bot management configuration to the NetScaler CLI based bot management configuration only once. Complete the following steps to manually convert your bot management configuration.
After upgrading to the latest version connect to the upgrade tool
upgrade_bot_config.pyby using the following commandAt the command prompt, type:
shell "/var/python/bin/python /netscaler/upgrade_bot_config.py > /var/bot_upgrade_commands.txt"Run the configuration using the following command.
At the command prompt, type:
batch -f /var/bot_upgrade_commands.txtSave the upgraded configuration.
save ns config
Configure NetScaler CLI-based bot management
The bot management configuration enables you to bind one or more bot detection techniques to a specific bot profile. You must complete the following steps to configure NetScaler-based bot management:
- Enable bot management
- Import bot signature
- Add bot profile
- Bind bot profile
- Add bot policy
- Bind bot policy
- Configure bot settings
Note:
If you are upgrading your appliance from an older version, you must first manually convert the existing bot management configuration. For more information, seeHow to upgrade to NetScaler CLI-based bot management configurationsection.
Enable bot management
Before you can begin, ensure that the Bot Management feature is enabled on the appliance. If you have a new NetScaler or VPX, you must enable the feature before you configure it. If you are upgrading a NetScaler appliance from an earlier version to the current version, you need to enable the feature before you configure it. At the command prompt, type:
enable ns feature Bot
Import bot signature
You can import the default signature bot file and bind it to the bot profile. At the command prompt, type:
import bot signature [
Where:
src- Local path name, or URL (protocol, host, path, and file name). Maximum Length: 2047. >Note:> > The import fails if the object to be imported is on an HTTPS server that requires client certificate authentication for access.
name- Name of the bot signature file object. This is a mandatory argument. Maximum Length: 31.
comment- Description about the signature file object. Maximum Length: 255.
overwrite- Action that overwrites the existing file. >Note:> > Use theoverwriteoption to update the content in the signature file. Alternately, use theupdate bot signature command to update the signature file on the NetScaler appliance.
Example
import bot signature http://www.example.com/signature.json signaturefile -comment commentsforbot –overwrite
Add bot profile
A bot profile is a collection of profile settings to configure bot management on the appliance. You can configure the settings to perform bot detection.
At the command prompt, type:
add bot profile
Example:
add bot profile profile1 -signature signature -errorURL http://www.example.com/error.html -trapURL /trap.html -whitelist ON -blacklist ON -ratelimit ON -deviceFingerprint ON -deviceFingerprintAction drop -ipReputation ON -trap ON
Bind bot profile
After you create a bot profile, you must bind the bot detection mechanism to the profile.
At the command prompt, type:
bind bot profile
Example:
The following example is for binding the IP reputation detection technique to a specific bot profile.
bind bot profile profile5 -ipReputation -category BOTNET -enabled ON -action drop -logMessage message
Add bot policy
You must add the bot policy for evaluating bot traffic.
At the command prompt, type:
add bot policy
Where,
Name- Name for the bot policy. Must begin with a letter, number, or the underscore character (_), and must contain only letters, numbers, and the hyphen (-), period (.) pound (#), space ( ), at (@), equals (=), colon (:), and underscore characters. Can be changed after the bot policy is added.
Rule- Expression that the policy uses to determine whether to apply the bot profile on the specified request. This is a mandatory argument. Maximum Length: 1499
profileName- Name of the bot profile to apply if the request matches this bot policy. This is a mandatory argument. Maximum Length: 127
undefAction- Action to perform if the result of policy evaluation is undefined (UNDEF). An UNDEF event indicates an internal error condition. Maximum Length: 127
Comment- Description about this bot policy. Maximum Length: 255
logAction- Name of the log action to use for requests that match this policy. Maximum Length: 127
Example:
add bot policy pol1 –rule "HTTP.REQ.HEADER(\"header\").CONTAINS(\"custom\")" - profileName profile1 -undefAction drop –comment commentforbotpolicy –logAction log1
Bind bot policy global
At the command prompt, type:
bind bot global -policyName
Example:
bind bot global –policyName pol1 –priority 100 –gotoPriorityExpression NEXT -type REQ_OVERRIDE
Bind bot policy to a virtual server
At the command prompt, type:
bind lb vserver
Example:
bind lb vserver lb-server1 –policyName pol1 –priority 100 –gotoPriorityExpression NEXT -type REQ_OVERRIDE
Configure bot settings
You can customize the default settings if necessary. At the command prompt, type:
set bot settings [-defaultProfile ] [-javaScriptName ] [-sessionTimeout ] [-sessionCookieName ] [-dfpRequestLimit ] [-signatureAutoUpdate ( ON | OFF )] [-signatureUrl ] [-proxyServer ] [-proxyPort ] Where,
defaultProfile- Profile to use when a connection does not match any policy. Default setting is “ “, which sends unmatched connections back to the NetScaler without attempting to filter them further. Maximum Length: 31
javaScriptName- Name of the JavaScript that the BotNet feature uses in response. Must begin with a letter or number, and can consist of from 1 to 31 letters, numbers, and the hyphen (-) and underscore (_) symbols. The following requirement applies only to the NetScaler CLI: If the name includes one or more spaces, enclose the name in double or single quotation marks (for example, “my cookie name” or ‘my cookie name’). Maximum Length: 31
sessionTimeout- Session times out, in seconds, after which a user session is terminated.
Minimum value- 1, Maximum value: 65535
sessionCookieName- Name of the SessionCookie that the BotNet feature uses it for tracking. Must begin with a letter or number, and can consist of from 1 to 31 letters, numbers, and the hyphen (-) and underscore (_) symbols. The following requirement applies only to the NetScaler CLI: If the name includes one or more spaces, enclose the name in double or single quotation marks (for example, “my cookie name” or ‘my cookie name’). Maximum Length: 31
dfpRequestLimit- Number of requests to allow without bot session cookie if device fingerprint is enabled. Minimum value: 1, Maximum Value: 4294967295
signatureAutoUpdate- Flag used to enable/disable bot auto update signatures. Possible values: ON, OFF. Default value: OFF
signatureUrl- URL to download the bot signature mapping file from the server. Default value:https://nsbotsignatures.s3.amazonaws.com/BotSignatureMapping.json. Maximum Length: 2047
proxyServer- Proxy Server IP to get updated signatures from AWS.
proxyPort- Proxy Server Port to get updated signatures from AWS. Default value: 8080
proxyUsername- User name to authenticate to the proxy server for downloading signature updates.
proxyPassword– Password to authenticate to the proxy server for downloading signature updates.
Example:
set bot settings –defaultProfile profile1 –javaScriptName json.js –sessionTimeout 1000 –sessionCookieName session -proxyServer 10.102.30.112 -proxyPort 3128 -proxyUsername defaultuser -proxyPassword defaultPassword
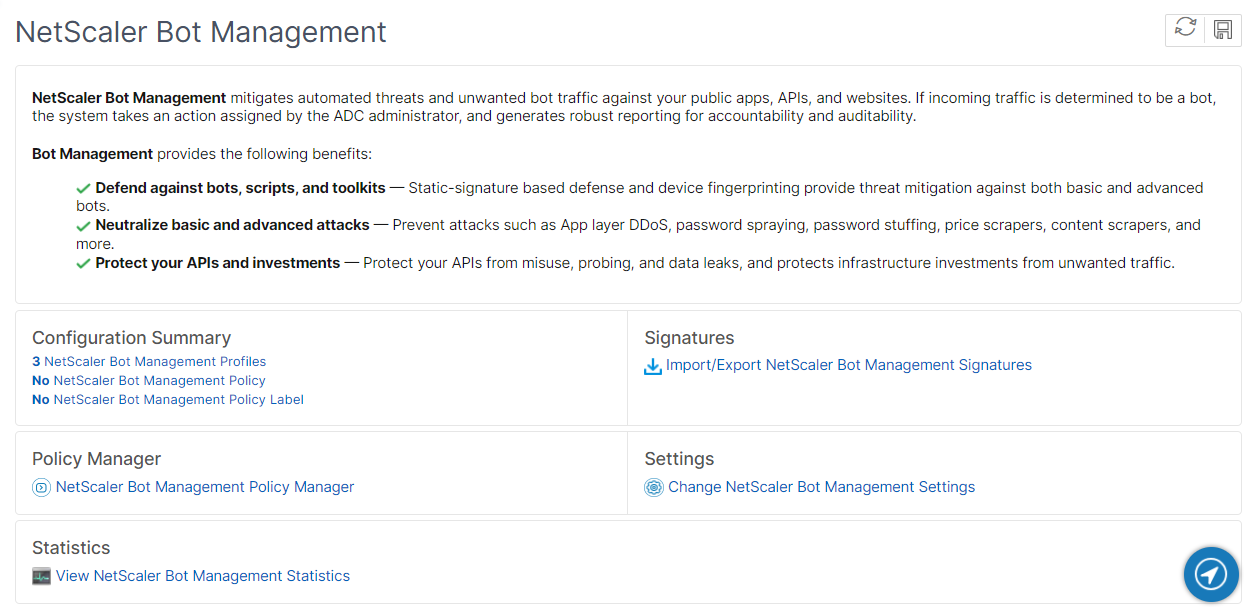
Configuring bot management by using NetScaler GUI
You can configure NetScaler bot management by first enabling the feature on the appliance. Once you enable, you can create a bot policy to evaluate the incoming traffic as bot and send the traffic to the bot profile. Then, you create a bot profile and then bind the profile to a bot signature. As an alternative, you can also clone the default bot signature file and use the signature file to configure the detection techniques. After creating the signature file, you can import it into the bot profile.
- Enable bot management feature
- Configure bot management settings
- Clone NetScaler bot default signature
- Import NetScaler bot signature
- Configure bot signature settings
- Create bot profile
- Create bot policy
Enable bot management feature
完成following steps to enable bot management:
- On the navigation pane, expandSystemand then clickSettings.
- On theConfigure Advanced Featurespage, select theBot Managementcheck box.
ClickOK, and then clickClose.

Configure bot management settings for device fingerprint technique
完成following step to configure the device fingerprint technique:
- Navigate toSecurity>NetScaler bot Management.
- In the details pane, underSettingsclickChange NetScaler bot Management Settings.
In theConfigure NetScaler bot Management Settings, set the following parameters.
- Default Profile - Select a bot profile.
- JavaScript Name - Name of the JavaScript file that bot management uses in its response to the client.
- Session Timeout - Timeout in seconds after which the user session is terminated.
- Session Cookie - Name of the session cookie that the bot management system uses for tracking.
- Device Fingerprint Request Limit. Number of requests to allow without a bot session cookie, if device fingerprint is enabled.
- Proxy Server - Proxy server IP address from where the latest signatures will be uploaded.
- Proxy Port – Port number of machine from where the latest signatures will be uploaded.
- Proxy Username – User name for the authentication of the proxy server
- Proxy Password - Password for the authentication of the proxy server.
Note:
Proxy Username and the Proxy Password fields are enabled if Proxy Server and Proxy Port fields are configured.

- ClickOK.
Clone bot signature file
完成following step to clone the bot signature file:
- Navigate toSecurity>NetScaler Bot ManagementandSignatures.
- In theNetScaler Bot Management Signaturespage, select the default bot signatures record and clickClone.
- In theClone Bot Signaturepage, enter a name and edit the signature data.
ClickCreate.

Import bot signature file
If you have your own signature file, then you can import it as a file, text, or URL. Perform the following steps to import the bot signature file:
- Navigate toSecurity>NetScaler Bot ManagementandSignatures.
- On theNetScaler Bot Management Signaturespage, select the default bot signatures record and clickImport.
- On theImport NetScaler Bot Management Signaturepage, set the following parameters.
- Select the import file type
- Based on the import type selected, enter the details.
- ClickContinue.

- On theImport NetScaler Bot Management Signaturepage, set the following parameters.
- Name - Name of the bot signature file.
- Comment - Brief description about the imported file.
- Overwrite - Allows overwriting of data during file update.
- Signature Data - Modify signature parameters
ClickDone.

Configure bot allow list by using NetScaler GUI
This detection technique enables you to bypass URLs that you configure an allowed listed one. Complete the following step to configure an allow list URL:
- Navigate toSecurity>NetScaler Bot ManagementandProfiles.
- On theNetScaler Bot Management Profilespage, select a file and clickEdit.
- On theNetScaler Bot Management Profilepage, go to theProfile Settingssection and clickAllow List.
- In theAllow Listsection, set the following parameters:
- Enabled - Select to validate the allow list URLs as part of the detection process.
- Configure Types - Configure an allow list URL. The URL is bypassed during bot detection. ClickAddto add a URL to the bot allow list.
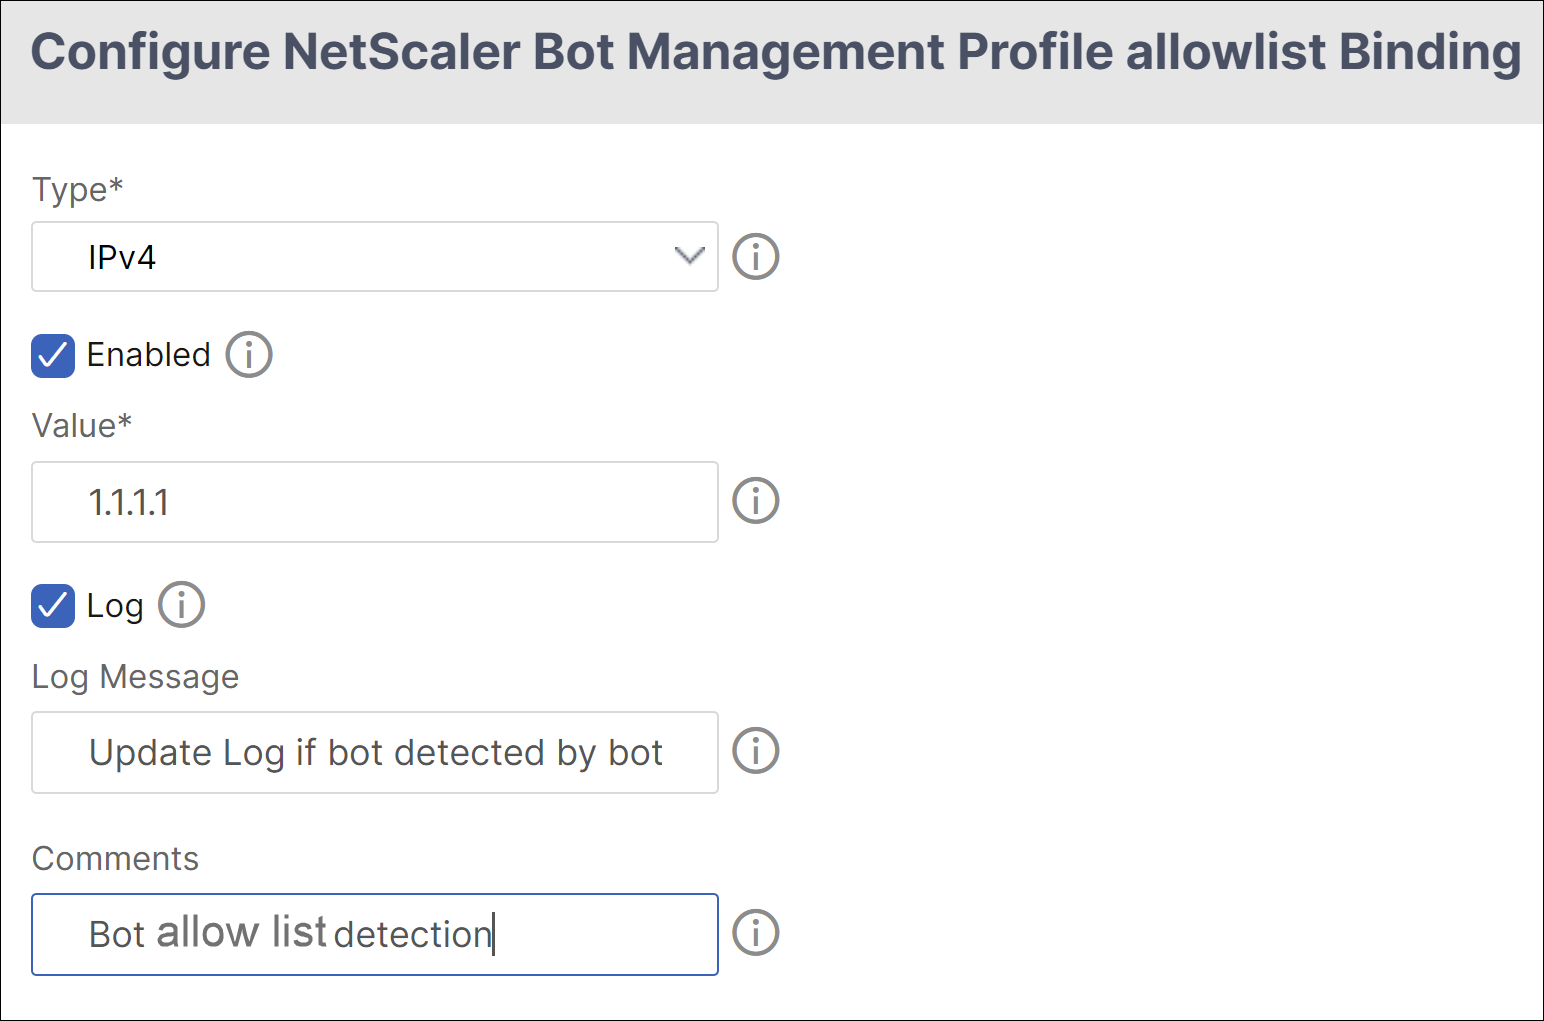
- In theConfigure NetScaler Bot Management Profile allowlist Bindingpage, set the following parameters:
- Type - Select the URL types.
- Enabled - Select to validate the URL.
- Value - Enter the URL.
- Log - Select to store the log entries.
- Log Message - Brief description of the log.
- Comments - Brief description about the allow list URL.
- ClickOK.
- ClickUpdate.
ClickDone.

Configure bot block list by using NetScaler GUI
This detection technique enables you to drop the URLs that you configure as block listed one. Complete the following step to configure a block list URL.
- Navigate toSecurity>NetScaler Bot ManagementandProfiles.
- On theNetScaler Bot Management Profilespage, select a file and clickEdit.
- On theNetScaler Bot Management Profilepage, go to theProfile Settingssection and clickBlock List.
In theBlock Listsection, set the following parameters:
- Enabled - Select to validate the block list URLs as part of the detection process.
- Configure Types - Configure a URL to be part of the bot block list detection process - These URLs are dropped during bot detection. ClickAddto add a URL to the bot block list
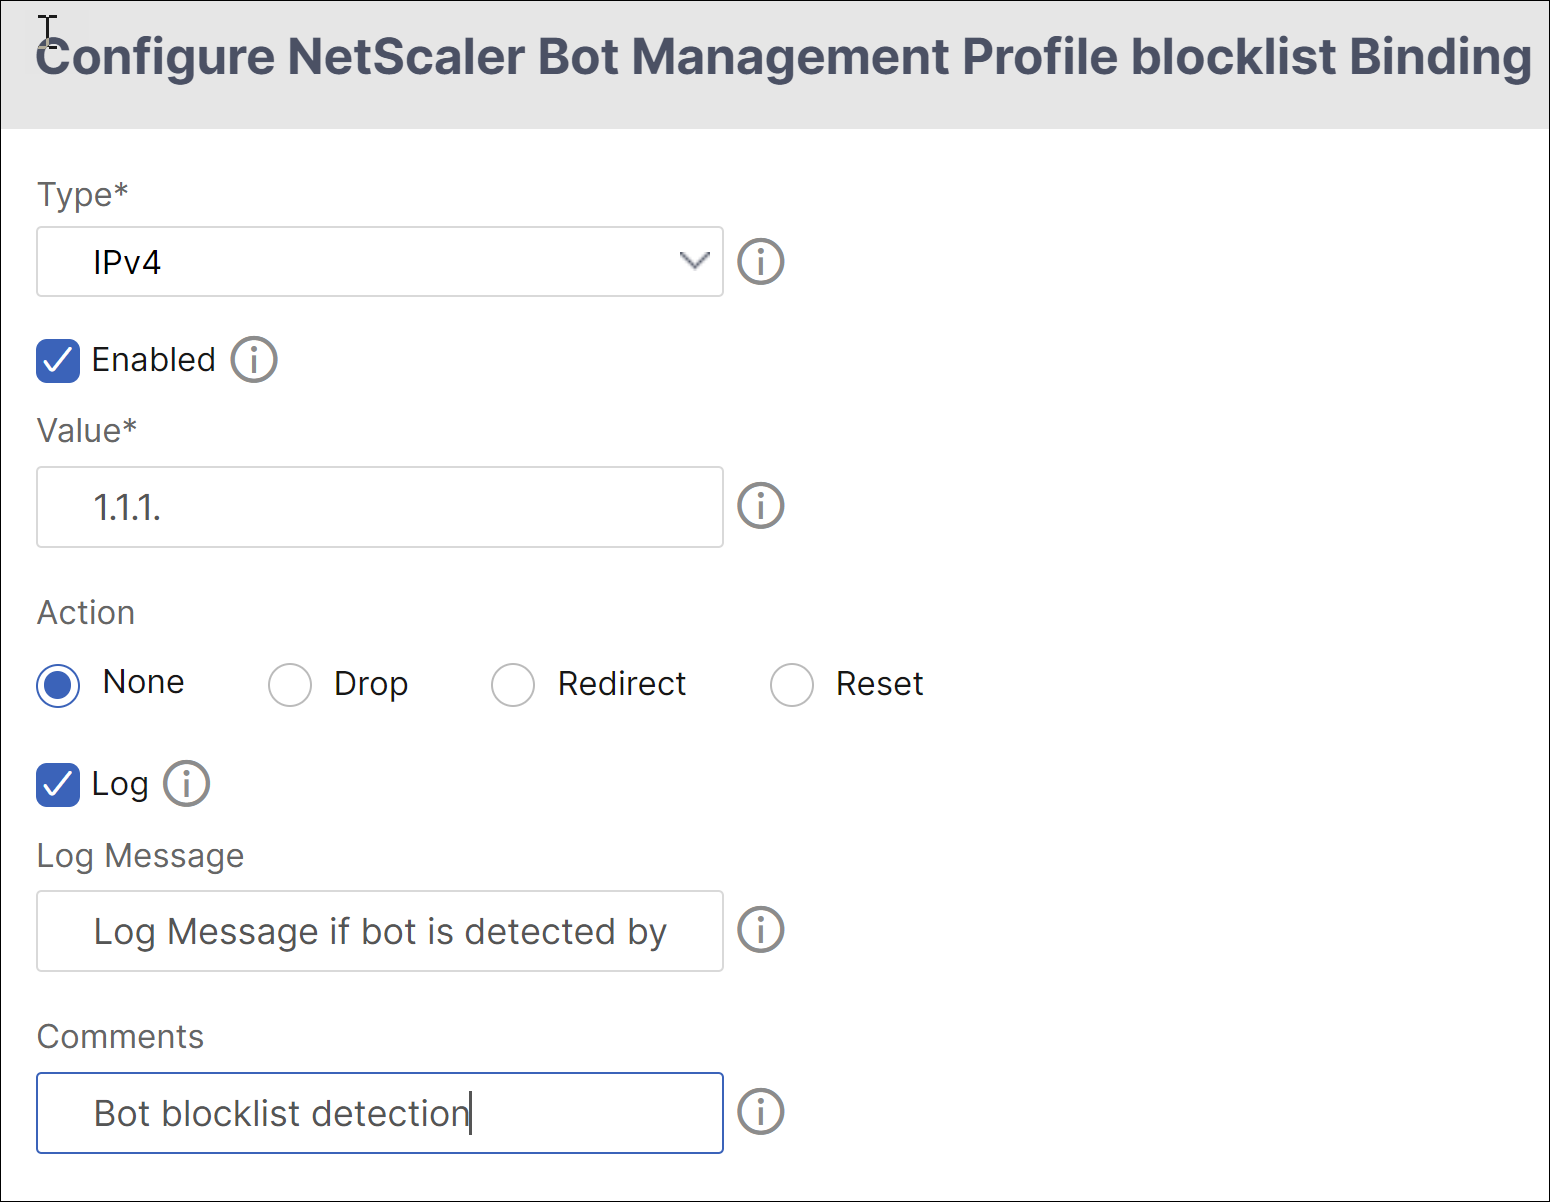
In theConfigure NetScaler Bot Management Profile blocklist Bindingpage, set the following parameters.
- Type - Select the URL types.
- Enabled - Select to validate the URL.
- Value - Enter the URL address.
- Log - Select to store the log entries.
- Log Message - Brief description of the log details.
- Comments - Brief description about the block list URL.
- ClickOK.
- ClickUpdate.
ClickDone.

Configure IP reputation by using NetScaler GUI
The IP reputation bot technique uses Webroot’s IP reputation database and cloud service provider database to verify if a client request is a malicious IP address or a public cloud IP address. As part of the bot categories is configured and then a bot action is associated to it. Complete the following steps to configure Webroot IP reputation and cloud service provider database categories.
- Navigate toSecurity>NetScaler bot ManagementandProfiles.
- On theNetScaler bot Management Profilespage, select a profile and clickEdit.
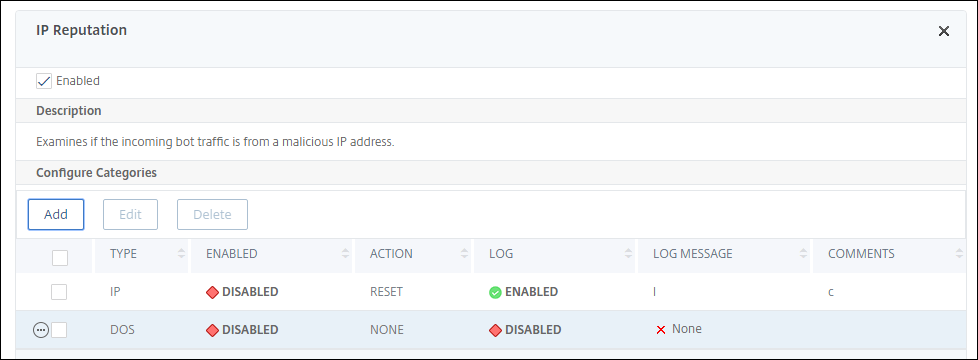
- On theNetScaler bot Management Profilepage, go to theProfile Settingssection and clickIP Reputation.
- On theIP Reputationsection, set the following parameters:
- Enabled - Select to validate incoming bot traffic as part of the detection process.
- Configure Categories. You can use the IP reputation technique for incoming bot traffic under different categories. Based on the configured category, you can drop or redirect the bot traffic. ClickAddto configure a malicious bot category.
In theConfigure NetScaler bot Management Profile IP Reputation Bindingpage, set the following parameters:
Category - Select a Webroot IP reputation bot category to validate a client request as a malicious IP address.
- IP_BASED - This category checks whether the client IP address (IPv4 and IPv6) is malicious or not.
- BOTNET - This category includes Botnet C&C channels, and infected zombie machines controlled by Bot master.
- SPAM_SOURCES - This category includes tunneling spam messages through a proxy, anomalous SMTP activities, and forum spam activities.
- SCANNERS - This category includes all reconnaissance such as probes, host scan, domain scan, and password brute force attack.
- DOS - This category includes DOS, DDOS, anomalous sync flood, and anomalous traffic detection.
- REPUTATION - This category denies access from IP addresses (IPv4 and IPv6) currently known to be infected with malware. This category also includes IP addresses with average low Webroot Reputation Index score. Enabling this category prevents access from sources identified to contact malware distribution points.
- PHISHING - This category includes IP addresses (IPv4 and IPv6) hosting phishing sites and other kinds of fraud activities such as ad click fraud or gaming fraud.
- PROXY - This category includes IP addresses (IPv4 and IPv6) providing proxy services.
- NETWORK - IPs providing proxy and anonymization services including The Onion Router aka TOR or dark net.
- MOBILE_THREATS - This category checks the client IP address (IPv4 and IPv6) with the list of addresses harmful for mobile devices.
Category. Select a Webroot public cloud service provider category to validate a client request is a public cloud IP address.
- AWS - This category checks client IP address with list of public cloud addresses from AWS.
- GCP - This category checks client IP address with list of public cloud addresses from the Google Cloud Platform.
- AZURE - This category checks client address with list of public cloud addresses from Azure.
- ORACLE - This category checks client IP address with list of public cloud addresses from Oracle
- IBM - This category checks client IP address with list of public cloud addresses from IBM.
- SALESFORCE - This category checks client IP address with list of public cloud addresses from Salesforce.
Possible values for Webroot IP reputation bot category: IP, BOTNETS, SPAM_SOURCES, SCANNERS, DOS, REPUTATION, PHISHING, PROXY, NETWORK, MOBILE_THREATS.
Possible values for Webroot public cloud service provider category: AWS, GCP, AZURE, ORACLE, IBM, SALESFORCE.
- Enabled - Select to validate the IP reputation signature detection.
- Bot action - Based on the configured category, you can assign no action, drop, redirect, or mitigation action.
- Log - Select to store the log entries.
- Log Message - Brief description of the log.
- Comments - Brief description about the bot category.
- ClickOK.
- ClickUpdate.
ClickDone.
Note
If you disableIP reputation,确保停止下载。完成following steps to stop the IP reputation downloads:
- Navigate toSecurity > NetScaler bot Management > Change NetScaler bot Management Settings
- Change theDefault Nonintrusive ProfiletoBOT_BYPASS.
Configure bot rate limit technique
The bot rate limit technique enables you to limit bot traffic within certain timeframe based on user’s geolocation, client IP address, session, cookie, or configured resource (URL). By configuring bot rate limit technique, you can ensure the following:
- Block malicious bot activity.
- Reduce traffic strain to web servers.
Configure bot rate limit by using NetScaler CLI
At the command prompt, type:
bind bot profile ... -ratelimit -type Geolocation -countryCode -rate -timeSlice [-action ...] [-limitType ( BURSTY | SMOOTH )] [-condition ] [-enabled ( ON | OFF )] Where,
*SOURCE_IP- Rate-limiting based on the client IP address.
*SESSION- Rate-limiting based on the configured cookie name.
*URL- Rate-limiting based on the configured URL.
*GEOLOCATION- Rate-limiting based on the configured country name.
Possible values- SESSION, SOURCE_IP, URL, GEOLOCATION
Example:
bind bot profile geo_prof -ratelimit -type Geolocation -countryCode IN -rate 100 -timeSlice 1000 -limitType BURSTY -condition HTTP.REQ.HEADER("User-Agent").contains("anroid") -action log,drop -enabled on Configure bot rate limit by using NetScaler GUI
完成following steps to configure bot rate limit detection technique:
- Navigate toSecurity > NetScaler Bot ManagementandProfiles.
- In theNetScaler Bot Management Profilespage, select a profile and clickEdit.
- In theNetScaler Bot Management Profilepage, go to theProfile Settingssection and clickRate Limit.
In theRate Limitsection, set the following parameters:
- Enabled - Select to validate the incoming bot traffic as part of the detection process. b. ClickAddto configure rate limit bindings.
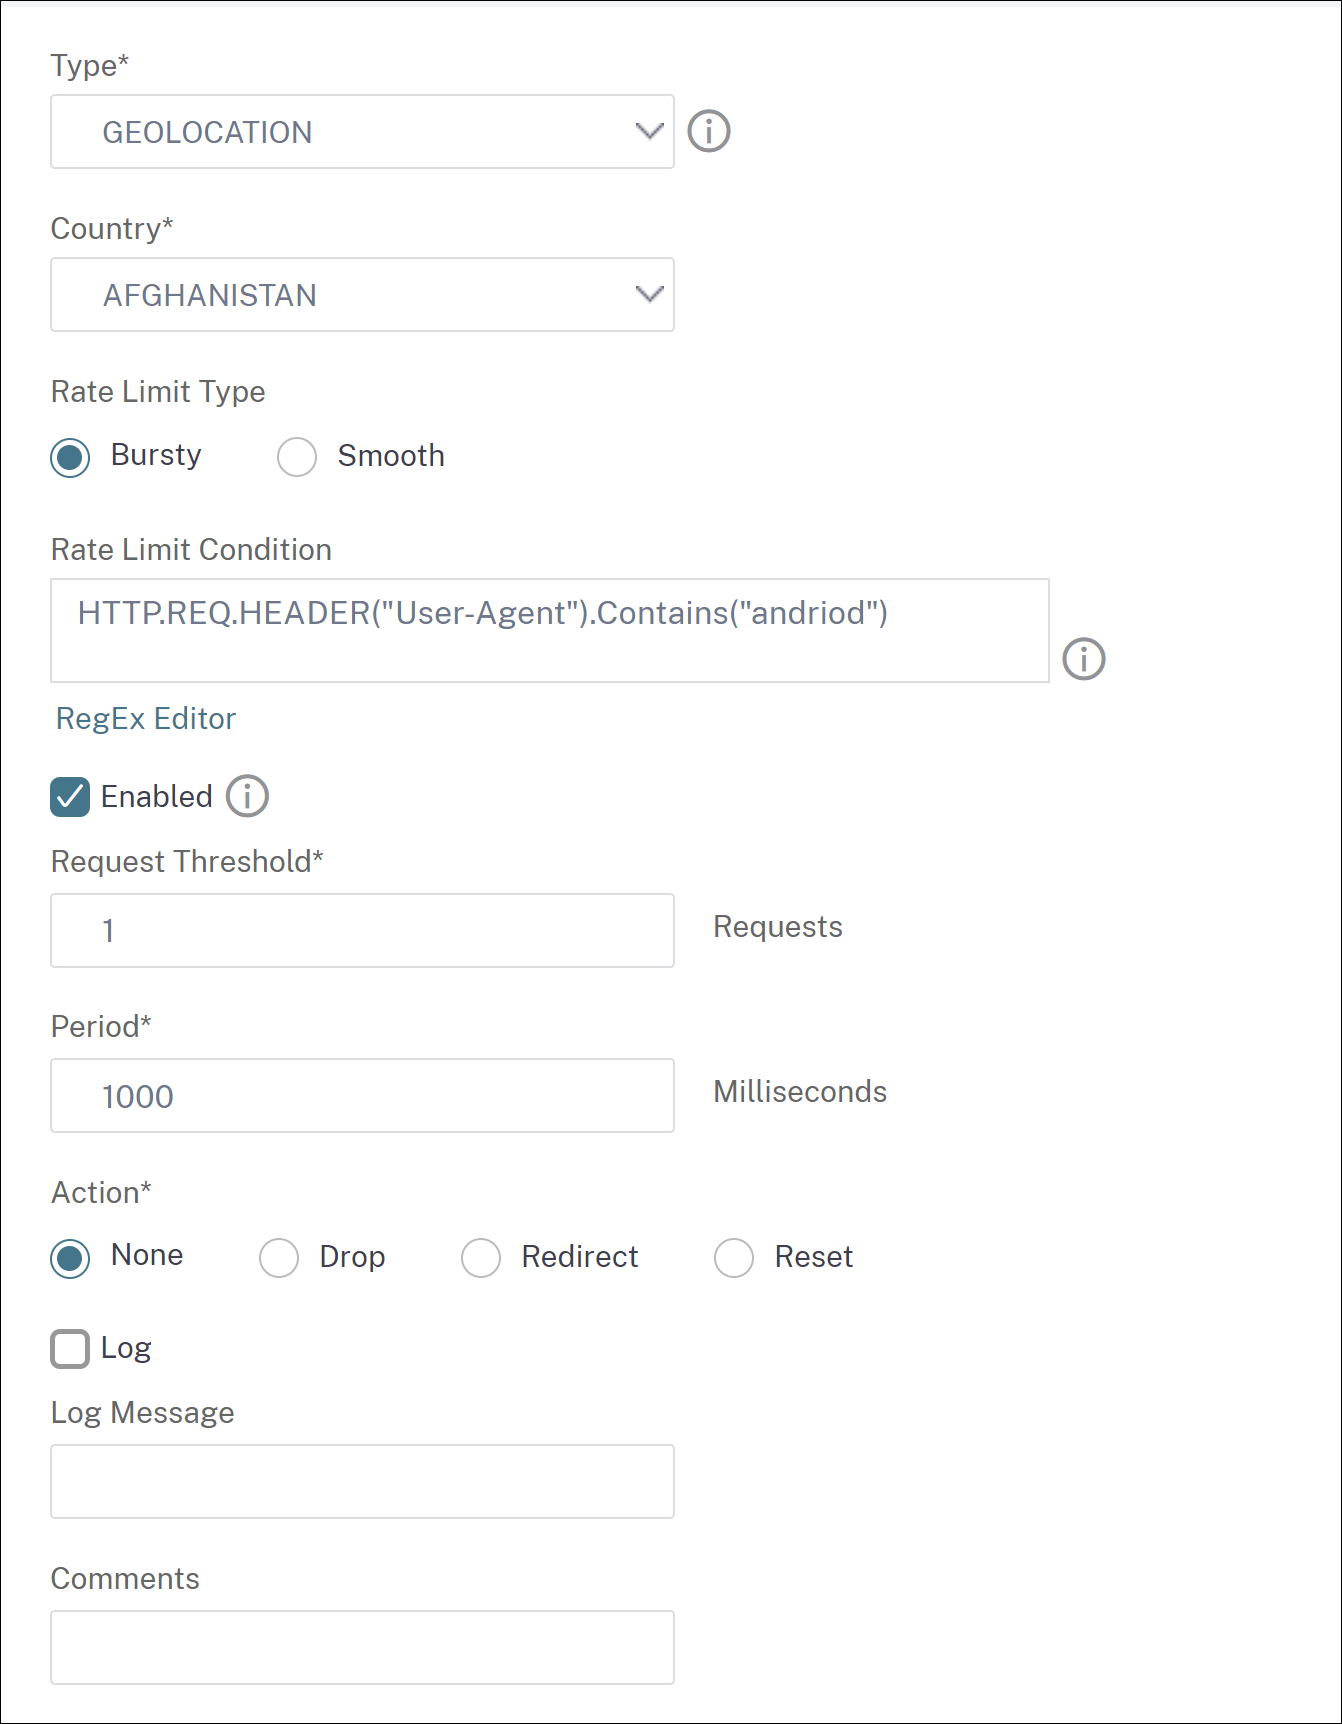
In theConfigure NetScaler Bot Management Rate Limitpage, set the following parameters.
Type - Rate limit bot traffic based on the following parameters:
- Geolocation - Rate limit based on user’s geographic location.
- Source_IP - Rate limit traffic based on client IP address.
- Session - Rate limit bot traffic based on session or cookie name.
- URL - Rate limit bot traffic based on the configured URL.
- Country - Select a geolocation as country or region.
- Rate Limit Type – Limits the type of traffic based on the following types.
- Bursty – Forward all requests that are within the set threshold and specified time period.
- Smooth – Forward the requests evenly across the specified time period.
- Rate Limit Connection - Allows you to create multiple rules for a condition.
- Enabled - Select to validate the incoming bot traffic.
- Request Threshold - Maximum number of requests allowed within certain timeframe.
- Period - Timeframe in milliseconds.
- Action - Choose a bot action for the selected category.
- Log - Select the check box to store log entries.
- Log Message - Brief description of the log.
- Comments - Brief description about the bot category.
- ClickOK.
- ClickUpdate.
- ClickDone.
Configure device fingerprint technique by using NetScaler GUI
This detection technique sends a java script challenge to the client and extracts the device information. Based on device information, the technique drops or bypasses the bot traffic. Follow the steps to configure the detection technique.
- Navigate toSecurity>NetScaler Bot ManagementandProfiles.
- On theNetScaler Bot Management Profilespage, select a signature file and clickEdit.
- On theNetScaler Bot Management Profilepage, go to theSignature Settingssection and clickDevice Fingerprint.
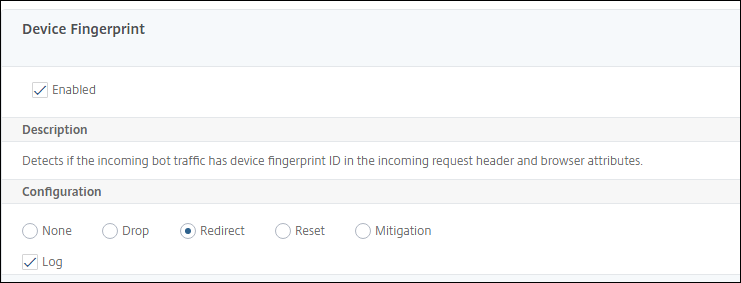
In theDevice Fingerprintsection, set the following parameters:
- Enabled - Select to enable the rule.
- Configuration - Select one of the following options:
- None - Allows the traffic.
- Drop - Drops the traffic.
- Redirect - Redirects the traffic to error URL.
- Mitigation, or CAPTCHA - Validates and allows the traffic.
Note:
During session replay attacks using the device fingerprint cookies, requests are dropped even if the device fingerprint configuration is set toMitigation.
- Log - Select to store log entries.
- ClickUpdate.
- ClickDone.
Configure device fingerprint technique for mobile (Android) applications
Device fingerprint technique detects an incoming traffic as a bot by inserting a JavaScript script in the HTML response to the client. The JavaScript script when invoked by the browser, it collects browser and client attributes and sends a request to the appliance. The attributes are examined to determine whether the traffic is a Bot or a human.
检测技术是进一步扩展为依据ect bots on a mobile (Android) platform. Unlike web applications, in mobile (Android) traffic, bot detection based on JavaScript script do not apply. To detect bots in a mobile network, the technique uses a bot mobile SDK which is integrated with mobile applications on the client-side. The SDK intercepts the mobile traffic, collects device details, and sends the data to the appliance. On the appliance side, the detection technique examines the data and determines whether the connection is from a Bot or a human.
How the device fingerprint technique for the mobile application works
The following steps explain the bot detection workflow to detect if a request from a mobile device is from a human or a bot.
- When a user interacts with a mobile application, the device behavior is recorded by the bot mobile SDK.
- Client sends a request to NetScaler appliance.
- When sending the response, the appliance inserts a bot session cookie with session details, and parameters to collect client parameters.
- When the mobile application receives the response, the NetScaler bot SDK which is integrated with the mobile application validates the response, retrieves the recorded device fingerprint parameters, and sends it to the appliance.
- The device fingerprint detection technique on the appliance side validates the device details and updates the bot session cookie if it is a suspected bot or not.
- When the cookie is expired or device fingerprint protection prefers to validate and collect device parameters periodically, the whole procedure or challenge is repeated.
Pre-requisite
To get started with the NetScaler device fingerprint detection technique for mobile applications, you must download and install the bot mobile SDK in your mobile application.
Configure fingerprint detection technique for mobile (Android) applications by using the CLI
At the command prompt, type:
set bot profile
Example:
set bot profile profile 1 –deviceFingerprintMobile Android
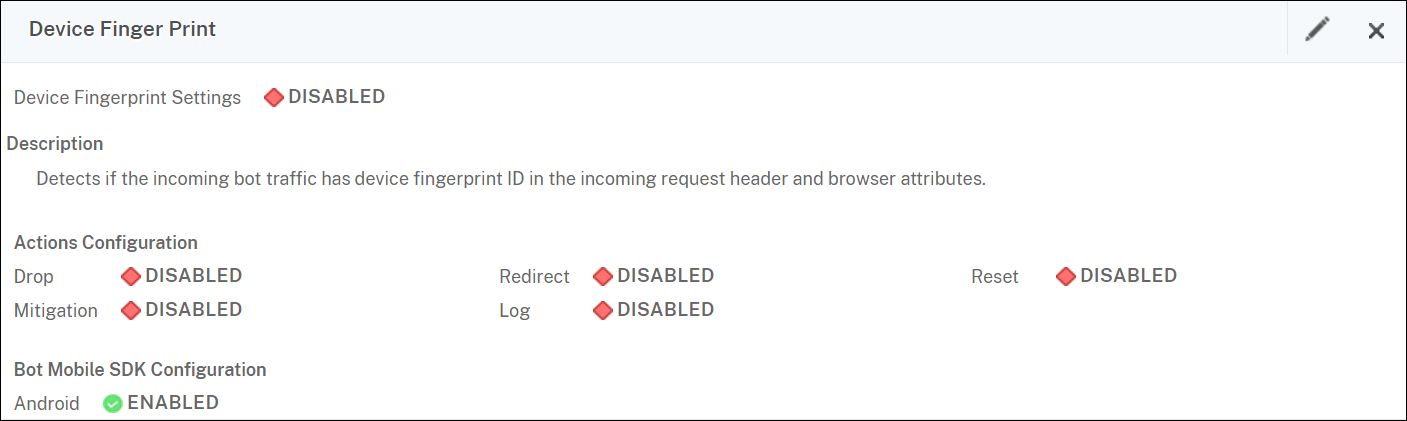
Configure device fingerprint detection technique for mobile (Android) applications by using the GUI
- Navigate toSecurity>NetScaler Bot ManagementandProfiles.
- On theNetScaler Bot Management Profilespage, select a file and clickEdit.
- On theNetScaler Bot Management Profilepage, clickDevice FingerprintunderProfile Settings.
- In theConfigure Bot Mobile SDKsection, select the mobile client type.
- ClickUpdateandDone.
Configure bot log expression
If the client is identified as a bot, the NetScaler bot management enables you to capture additional information as log messages. The data can be the name of the user who requested the URL, the source IP address, and the source port from which the user sent the request or data generated from an expression. To perform custom logging, you must configure a log expression in the bot management profile.
Bind the log expression in the bot profile by using the CLI
At the command prompt, type:
bind bot profile (-logExpression -name -expression [-enabled ( ON | OFF )]) -comment Example:
bind bot profile profile1 –logExpression exp1 –expression HTTP.REQ.URL –enabled ON -comment "testing log expression"
Bind log expression to bot profile by using the GUI
- Navigate toSecurity > NetScaler Bot Management > Profiles.
- On theNetScaler Bot Management Profilespage, selectBot Log Expressionsfrom theProfile Settingssection.
- In theBot Log Expression Settings* section, click **Add.
- In theConfigure NetScaler Bot Management Profile Bot Log Expression Bindingpage, set the following parameters.
- Log Expression Name - Name of the log expression.
- Expression - Enter the log expression.
- Enabled - Enable or disable the log expression binding.
- Comments - A brief description about the bot log expression binding.
- ClickOKandDone.

Configure bot trap technique
The NetScaler bot trap technique randomly or periodically inserts a trap URL in the server response. You can also create a trap URL list and add URLs for that The URL appears invisible and not accessible if the client is a human user. However, if the client is an automated bot, the URL is accessible and when accessed, the attacker is categorized as bot and any subsequent request from the bot is blocked. The trap technique is effective in blocking attacks from bots.
The trap URL is an alpha-numeric URL of configurable length and it is auto-generated at configurable interval. Also the technique allows you to configure a trap insertion URL for top visited websites or frequently visited websites. By doing this, you can mandate the purpose of inserting the bot trap URL for requests matching the trap insertion URL.
Note:
Although the bot trap URL is auto-generated, the NetScaler bot management still allows you to configure a customized trap URL in the bot profile. This is done to strengthen the bot detection technique and make it harder for attackers to access the trap URL.
To complete the bot trap configuration, you must complete the following steps.
- Enable bot trap URL
- Configure bot trap URL in bot profile
- 结合机器人陷阱URL插入to bot profile
- Configure bot trap URL length and interval in bot settings
Enable bot trap URL protection
Before you can begin, you must ensure that the Bot trap URL protection is enabled on the appliance. At the command prompt, type:
enable ns feature Bot
Configure bot trap URL in bot profile
You can configure the bot trap URL and specify a trap action in the bot profile.
At the command prompt, type:
add bot profile
Where,
trapURL- URL that Bot protection uses as the Trap URL. Maximum Length: 127trap- To enable bot trap detection. Possible values: ON, OFF. Default value: OFFtrapAction- An action to be taken based on bot detection. Possible values: NONE, LOG, DROP, REDIRECT, RESET, MITIGATION. Default value: NONE
Example:
add bot profile profile1 -trapURL www.bottrap1.com trap ON -trapAction RESET
结合机器人陷阱URL插入to bot profile
You can configure the bot trap insertion URL and bind it to the bot profile. At the command prompt, type:
bind bot profile
Where,
URL- The request URL regex pattern for which the bot trap URL is inserted. Maximum Length: 127
Example:
bind bot profile profile1 trapInsertionURL –url www.example.com –enabled ON –comment insert a trap URL randomly
Configure bot trap URL length and interval in bot settings
You can configure the bot trap URL length and also set the interval to auto generate the bot trap URL. At the command prompt, type:
set bot settings -trapURLAutoGenerate ( ON | OFF ) –trapURLInterval
Where,
trapURLInterval- The time in seconds after which the bot trap URL is updated. Default value: 3600, Minimum value: 300, Maximum value: 86400
trapURLLength- Length of the auto-generated bot trap URL. Default value: 32, Minimum value: 10, Maximum value: 255
Example:
set bot settings -trapURLAutoGenerate ON –trapURLInterval 300 -trapURLLength 60
Configure bot trap URL by using the GUI
- Navigate toSecurity > NetScaler Bot Management > Profiles.
- In theNetScaler Bot Management Profilespage, clickEditto configure the bot trap URL technique.
In theCreate NetScaler Bot Management Profilepage, enter the bot trap URL in the general section.

- In theCreate NetScaler Bot Management Profilepage, clickBot TrapfromProfile Settings.
In theBot Trapsection, set the following parameters.
a. Enabled. Select the check box to enable bot trap detection b. Description. Brief description about the URL. c. Configure Actions. Action to be taken for bot detected by bot trap access.

- In theConfigure Trap Insertion URLssection, clickAdd.
In theConfigure NetScaler Bot Management Profile Bot Trap Bindingpage, set the following parameters.
- Trap URL. Type the URL that you want to confirm as the bot trap insertion URL.
- Enabled. Enable or disable bot trap insertion URL.
- Comment. A brief description about the trap insertion URL.

- In theSignature Settingssection, clickBot Trap.
In theBot Trapsection, set the following parameters:
- Enabled - Select to enable bot trap detection.
In the Configure section, set the following parameters.
- Action - Action to be taken for bot detected by bot trap access.
- Log - Enable or disable logging for bot trap binding.
- ClickUpdateandDone.
Configure bot trap URL settings
完成following steps to configure bot trap URL settings:
- Navigate toSecurity > NetScaler Bot Management.
- In the details pane, underSettingsclickChange NetScaler Bot Management Settings.
In theConfigure NetScaler Bot Management Settings, set the following parameters.
- 陷阱URL间隔。时间在秒之后bot trap URL is updated.
- Trap URL Length. Length of the auto-generated bot trap URL.
- ClickOKandDone.

Client IP policy expression for bot detection
NetScaler机器人管理现在使您能够有限公司nfigure an advanced policy expression to extract the client IP address from an HTTP request header, HTTP request body, HTTP request URL, or using an advanced policy expression. The extracted value can be used by a bot detection mechanism (such as TPS, bot trap, or rate limit) to detect if the incoming request is a bot.
Note:
If you have not configured a client IP expression, the default or existing source client IP address is used for bot detection. If an expression is configured, then the evaluation result provides the client IP address that can be used for bot detection.
You can configure and use the client IP expression to extract the actual client IP address if the incoming request is coming through a proxy server and if the client IP address is present in the header. By adding this configuration, the appliance can use the bot detection mechanism in providing more security to software clients and servers.
Configure client IP policy expression in bot profile by using the CLI
At the command prompt, type:
add bot profile [-clientIPExpression ] Example:
add bot profile profile1 –clientIPExpression 'HTTP.REQ.HEADER("X-Forwarded-For") ALT CLIENT.IP.SRC.TYPECAST_TEXT_T'
add bot profile profile1 –clientIPExpression 'HTTP.REQ.HEADER("X-Forwarded-For") ALT CLIENT.IPv6.SRC.TYPECAST_TEXT_T'
Configure client IP policy expression in bot profile by using the GUI
- Navigate toSecurity > NetScaler Bot Management > Profiles.
- In the details pane, clickAdd.
- In theCreate NetScaler Bot Management Profilepage, set the Client IP Expression.
ClickCreateandClose.

Configure CAPTCHA for IP reputation and device fingerprint detection
CAPTCHA is an acronym that stands for “Completely Automated Public Turing test to tell Computers and Humans Apart”. CAPTCHA is designed to test if an incoming traffic is from a human user or an automated bot. CAPTCHA helps to block automated bots that cause security violations to web applications. In the NetScaler, CAPTCHA uses the challenge-response module to identify if the incoming traffic is from a human user and not an automated bot.
Configure bot static signatures
This detection technique enables you to identify the user agent info from the browser details. Based on user agent information, the bot is identified as a bad or a good bot and then you assign a bot action to it. Follow the steps below to configure the static signature technique:
- On the navigation pane, expandSecurity > NetScaler Bot Management > Signatures.
- On theNetScaler Bot Management Signaturespage, select a signature file and clickEdit.
- On theNetScaler Bot Management Signaturepage, go to theSignature Settingssection and clickBot Signatures.
- In theBot Signaturessection, set the following parameters:
- Configure Static Signatures. This section has a list of bot static signature records. You can select a record and clickEditto assign a bot action to it.
- ClickOK.
- ClickUpdate Signature.
- ClickDone.

Bot static signature delineation
NetScaler bot management protects your web application against bots. Bot static signatures help in identifying good and bad bots based on request parameters such as user-agent in the incoming request.
The list of signatures in the file is huge and also new rules get added and stale ones are removed periodically. As an administrator, you might want to search for a specific signature or list of signatures under a category. To filter signatures easily, theBot Signaturepage provides an enhanced search capability. The search function enables you to find signature rules and configure its property based on one or more signature parameters like action, signature ID, developer, and signature name.
Action - Select a bot action that you prefer to configure for a specific category of signature rules. Following are the available action types:
- Enable Selected - Enable all the selected signature rules.
- Disable Selected - Disable all the selected signatures rules.
- Drop Selected - Select the “Drop” action to all the selected signature rules.
- Redirect Selected - Apply the “Redirect” action to all the selected signature rules.
- Reset Selected - Apply the “Reset” action to all the selected signature rules.
- Log Selected - Apply the “Log” action to all the selected signature rules.
- Remove Drop Selected - Unset the drop action to all the selected signature rules.
- Remove Redirect Selected - Unset the redirect action to all the selected signature rules.
- Remove Reset Selected - Unset the reset action to all the selected signature rules.
- Remove Log Selected - Unset the log action to all the selected signature rules.
Category - Select a category to filter signature rules accordingly. Following is the list of categories that are available for sorting signature rules.
- Action - Sort based on bot action.
- Category - Sort based on bot category.
- Developer - Sort based on the host company publisher.
- Enabled - Sort based on signature rules that are enabled.
- Id - Sort based on signature rule ID.
- Log - Sort based on signature rules that have logging enabled.
- Name - Sort based on signature rule name.
- Type - Sort based on signature type.
- Version - Sort based on signature rule version.
Search bot static signature rules based on action and category types by using the NetScaler GUI
- Navigate toSecurity > NetScaler Bot Management > Signature.
- In the details page, clickAdd.
- In theNetScaler Bot Management Signaturespage, click edit in theStatic Signaturesection.
- In theConfigure Static Signaturesection, select a signature action from the drop-down list.
- Use the search function to select a category and filter the rules accordingly.
- ClickUpdate.

Edit the bot static signature rule property by using the NetScaler GUI
- Navigate toSecurity > NetScaler Bot Management > Signature.
- In the details page, clickAdd.
- In theNetScaler Bot Management Signaturespage, click edit in theStatic Signaturesection.
- In theConfigure Static Signaturesection, select an action from the drop-down list.
- Use the search function to select a category and filter the rules accordingly.
From the static signature list, select a signature to modify its property.

- ClickOKto confirm.
How CAPTCHA works in NetScaler bot management
NetScaler机器人管理,验证码验证configured as a policy action to be run after bot policy is evaluated. The CAPTCHA action is available only for IP reputation and device fingerprint detection techniques. Following are the steps to understand how CAPTCHA works:
- If a security violation is observed during IP reputation or device fingerprint bot detection, the ADC appliance sends a CAPTCHA challenge.
- The client sends the CAPTCHA response.
- The appliance validates the CAPTCHA response and if the CAPTCHA is valid, the request is allowed and it is forwarded to the back-end server.
- 如果CATCHA响应无效,该设备ends a new CAPTCHA challenge until the maximum number of attempts is reached.
- If the CAPTCHA response is invalid even after the maximum number of attempts, the appliance drops or redirects the request to the configured error URL.
- 如果您已经配置了日志行动,然后应用nce stores the request details in the ns.log file.
Configure CAPTCHA settings by using the NetScaler GUI
The bot management CAPTCHA action is supported only for IP reputation and device fingerprint detection techniques. Complete the following steps to configure theCAPTCHAsettings.
- Navigate toSecurity > NetScaler Bot Management and Profiles.
- On theNetScaler Bot Management Profilespage, select a profile and clickEdit.
- On theNetScaler Bot Management Profilepage, go to theSignature Settingssection and clickCAPTCHA.
- In theCAPTCHA Settingssection, clickAdd to configure CAPTCHAsettings to the profile:
- In theConfigure NetScaler Bot Management CAPTCHApage, set the following parameters.
URL. Bot URL for which the CAPTCHA action is applied during IP reputation and device fingerprint detection techniques.
- Enabled. Set this option to enable CAPTCHA support.
- Grace time. Duration until when no new CAPTCHA challenge is sent after the current valid CAPTCHA response is received.
- Wait time. Duration taken for the ADC appliance to wait until the client sends the CAPTCHA response.
- Mute Period. Duration for which the client which sent an incorrect CAPTCHA response must wait until allowed to try next. During this mute period, the ADC appliance does not allow any requests. Range: 60–900 seconds, Recommended: 300 seconds
- Request Length limit. Length of the request for which the CAPTCHA challenge is sent to the client. If the length is greater than the threshold value, the request is dropped. Default value is 10–3000 bytes.
- Retry Attempts. Number of attempts the client is allowed to retry to solve the CAPTCHA challenge. Range: 1–10, Recommended: 5.
- No Action/Drop/Redirect action to be taken if the client fails the CAPTCHA validation.
- Log. Set this option to store request information from the client when response CAPTCHA fails. The data is stored in
ns.logfile. - Comment. A brief description about the CAPTCHA configuration.
ClickOKandDone.

- Navigate toSecurity > NetScaler Bot Management > Signatures.
- On theNetScaler Bot Management Signaturespage, select a signature file and clickEdit.
- On theNetScaler Bot Management Signaturepage, go to theSignature Settingssection and clickBot Signatures.
In theBot Signaturessection, set the following parameters:
- ConfigureStatic Signatures. Select a bot static signature record and click Edit to assign a bot action to it.
- ClickOK.
- ClickUpdate Signature.
- ClickDone.

Auto update for bot signatures
The bot static signature technique uses a signature lookup table with a list of good bots and bad bots. The bots are categorized based on user-agent string and domain names. If the user-agent string and domain name in incoming bot traffic matches a value in the lookup table, a configured bot action is applied. The bot signature updates are hosted on the AWS cloud and the signature lookup table communicates with the AWS database for signature updates. The auto signature update scheduler runs every 1-hour to check theAWS databaseand updates the signature table in the NetScaler appliance.
The signature auto update URL to configure is,https://nsbotsignatures.s3.amazonaws.com/BotSignatureMapping.json
Note:
You can also configure a proxy server and periodically update signatures from the AWS cloud to the appliance through the proxy. For proxy configuration, you must set the proxy IP address and port address in the bot settings.
How bot signature auto update works
The following diagram shows how the bot signatures are retrieved from the AWS cloud, updated on NetScaler, and viewed on NetScaler ADM for signature update summary.
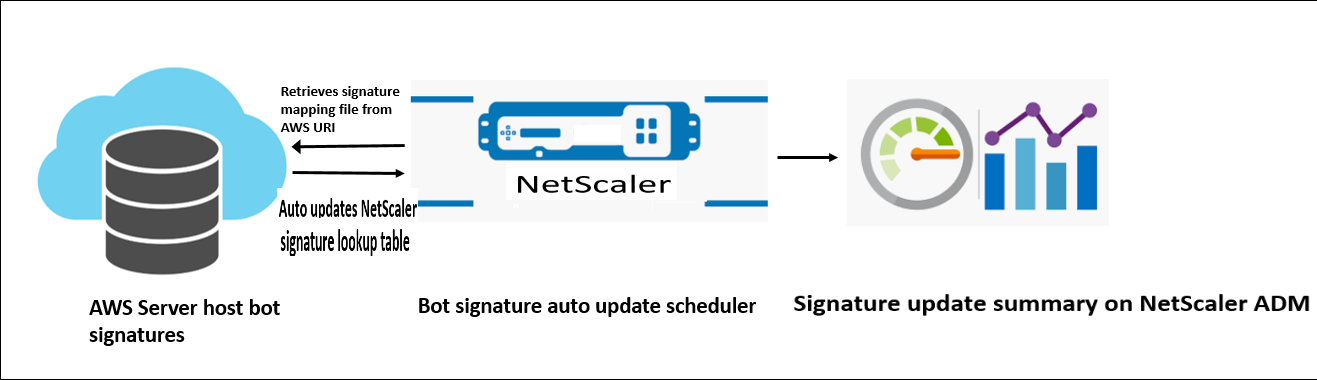
The bot signature auto-update scheduler does the following:
- Retrieves the mapping file from the AWS URI.
- Checks the latest signatures in the mapping file with the existing signatures in the ADC appliance.
- 下载AWS的新签名和验证the signature integrity.
- Updates the existing bot signatures with the new signatures in the bot signature file.
- Generates an SNMP alert and sends the signature update summary to NetScaler ADM.
Configure bot signature auto update
For configuring bot signature auto update, complete the following steps:
Enable bot signature auto update
You must enable the auto update option in the bot settings on the ADC appliance. At the command prompt, type:
set bot settings –signatureAutoUpdate ON
Configure proxy server settings (optional)
If you are accessing the AWS signature database through a proxy server, you must configure the proxy server and port.set bot settings –proxyserver –proxyport
Example:
set bot settings –proxy server 1.1.1.1 –proxyport 1356
Configure bot signature auto update using the NetScaler GUI
完成following steps to configure bot signature auto update:
- Navigate toSecurity > NetScaler Bot Management.
- In the details pane, underSettingsclickChange NetScaler Bot Management Settings.
In theConfigure NetScaler Bot Management Settings, select theAuto Update Signaturecheck box.

- ClickOKandClose.
Create bot management profile
A bot profile is a collection of bot management settings that are used for detecting the bot type. In a profile, you determine how the Web App Firewall applies each of its filters (or checks) to bot traffic to your websites, and responses from them.
完成following steps to configure the bot profile:
- Navigate toSecurity>NetScaler Bot Management>Profiles.
- In the details pane, clickAdd.
In theCreate NetScaler Bot Management Profilepage, set the following parameters.
- Name. Bot profile name.
- Signature. Name of the bot signature file.
- Error URL. URL for redirects.
- Comment. Brief description about the profile.
- ClickCreateandClose.

Create bot policy
The bot policy controls the traffic going to the bot management system and also to control the bot logs sent to the auditlog server. Follow the procedure to configure the bot policy.
- Navigate toSecurity>NetScaler Bot Management>Bot Policies.
- In the details pane, clickAdd.
- In theCreate NetScaler Bot Management Policypage, set the following parameters.
- Name. Name of the Bot policy.
- Expression. Type the policy expression or rule directly in the text area.
- Bot Profile. Bot profile to apply the bot policy.
- Undefined Action. Select an action that you prefer to assign.
- Comment. Brief description about the policy.
- Log Action. Audit log message action for logging bot traffic. For more information about audit log action, see Audit logging topic.
- ClickCreateandClose.

Bot Transactions Per second (TPS)
The Transactions Per Second (TPS) bot technique detects incoming traffic as a bot if the number of requests per second (RPS) and percentage increase in RPS exceeds the configured threshold value. The detection technique protects your web applications from automated bots that can cause web scraping activities, brute forcing login, and other malicious attacks.
Note:
The bot technique detects an incoming traffic as bot only if both the parameters are configured and if both values increase beyond the threshold limit. Let us consider a scenario, where the appliance receives many requests coming from a specific URL and you want the NetScaler bot management to detect if there is a bot attack. The TPS detection technique examines the number of requests (configured value) coming from the URL within 1 second and the percentage increase (configured value) in the number of requests received within 30 minutes. If the values exceed the threshold limit, the traffic is considered as bot and the appliance runs the configured action.
Configure bot transactions per second (TPS) technique
To configure TPS, you must complete the following steps:
- Enable bot TPS
- Bind TPS settings to bot management profile
Bind TPS settings to bot management profile
Once you enable the bot TPS feature, you must bind the TPS settings to the bot management profile.
At the command prompt, type:
bind bot profile
Example:
bind bot profile profile1 -tps -type RequestURL -threshold 1 -percentage 100000 -action drop -logMessage log
Enable bot transaction per second (TPS)
Before you can begin, you must ensure that the Bot TPS feature is enabled on the appliance. At the command prompt, type:
set bot profile profile1 –enableTPS ON
Configure bot transactions per second (TPS) by using the NetScaler GUI
完成following steps to configure bot transactions per second:
- Navigate toSecurity > NetScaler Bot Management > Profiles.
- In theNetScaler Bot Management Profilespage, select a profile and clickEdit.
- In theCreate NetScaler Bot Management Profilepage, clickTPSunderSignature Settingssection.
In theTPSsection, enable the feature and clickAdd.

InConfigure NetScaler bot Management Profile TPS Bindingpage, set the following parameters.
Type. Input types allowed by the detection technique. Possible values: SOURCE IP, GEOLOCATION, HOST, URL.
SOURCE_IP – TPS based on client IP address.
GEOLOCATION – TPS based on the client’s geographic location.
HOST - TPS based on client requests forwarded to a specific back-end server IP address.
URL – TPS based on client requests coming from a specific URL.
Fixed Threshold. Maximum number of requests allowed from a TPS input type within 1 second time interval.
Percentage Threshold. Maximum percentage increase in requests from a TPS input type within 30 minute time interval.
Action. Action to be taken for bot detected by TPS binding.
Log. Enable or disable logging for TPS binding.
Log Message. Message to log for bot detected by TPS binding. Maximum Length: 255.
Comments. A brief description about the TPS configuration. Maximum Length: 255
- ClickOKand thenClose.

Bot detection based on mouse and keyboard dynamics
To detect bots and mitigate web scraping anomalies, the NetScaler bot management uses an enhanced bot detection technique based on mouse and keyboard behavior. Unlike conventional bot techniques that require direct human interaction (for example, CAPTCHA validation), the enhanced technique passively monitors the mouse and the keyboard dynamics. The NetScaler appliance then collects the real-time user data and analyses the behavioral between a human and a bot.
The passive bot detection using mouse and keyboard dynamics has the following benefits over existing bot detection mechanisms:
- Provides continuous monitoring throughout the user session, and eliminates single checkpoint.
- Requires no human interaction and it is transparent to users.
How bot detection using mouse and keyboard dynamics works
The bot detection technique using keyboard and mouse dynamics consists of two components, a webpage logger and bot detector. The webpage logger is a JavaScript that records keyboard and mouse movements when a user is performing a task on the webpage (for example, filling a registration form). The logger then sends the data in batches to the NetScaler appliance. The appliance then stores the data as a KM record and sends it to the bot detector on the NetScaler ADM server, which analyses if the user is a human or bot.
The following steps explain how the components interact with each other:
- The NetScaler admin configures policy expression through the ADM StyleBook, CLI, or NITRO or any other method.
- The URL is set in the bot profile when the admin enables the feature on the appliance.
- When a client sends a request, the NetScaler appliance tracks the session and all requests in the session.
- The appliance inserts a JavaScript (webpage logger) in the response if the request matches the configured expression on the bot profile.
- The JavaScript then collects all the keyboard, mouse activity and sends the KM data in a POST URL (transient).
- The NetScaler appliance stores the data and sends it to the NetScaler ADM server at the end of the session. Once the appliance receives the complete data of a POST request, the data is sent it to the ADM server.
- The NetScaler ADM Service analyses the data and based on the analysis, the result is available on the NetScaler ADM service GUI.
The JavaScript logger records the following mouse and keyboard movements:
- Keyboard events – all events
- Mouse events - mouse move, mouse up, mouse down
- 剪贴板事件——粘贴
- Custom events - autofill, autofillcancel
- timestamp of each event
Configure bot detection using mouse and keyboard dynamics
NetScaler机器人管理配置包括s enabling or disabling the keyboard and mouse-based detection feature, and configures the JavaScript URL in the bot profile. Complete the following steps to configure bot detection using mouse and keyboard dynamics:
- Enable keyboard and mouse-based detection
- Configure expression to decide when the JavaScript can be injected in the HTTP response
Enable keyboard mouse-based bot detection
Before you begin the configuration, ensure you have enabled the keyboard and mouse-based bot detection feature on the appliance.
At the command prompt, type:
add bot profile -KMDetection ( ON | OFF ) Example:
add bot profile profile1 –KMDetection ON
Configure bot expression for JavaScript insertion
Configure bot expression to evaluate the traffic and insert JavaScript. The JavaScript is inserted only if the expression is evaluated as true.
At the command prompt, type:
bind bot profile -KMDetectionExpr -name -expression -enabled ( ON | OFF ) –comment Example:
bind bot profile profile1 -KMDetectionExpr -name test -expression http.req.url.startswith("/testsite") -enabled ON
Configure JavaScript file name inserted in the HTTP response for keyboard-mouse based bot detection
To collect the user action details, the appliance sends a JavaScript file name in the HTTP response. The JavaScript file collects all the data in a KM record and sends it to the appliance.
At the command prompt, type:
set bot profile profile1 – KMJavaScriptName Example:
set bot profile profile1 –KMJavaScriptName script1
Configure behavior biometrics size
You can configure the maximum size of mouse and keyboard behavior data that can be sent as KM record to the appliance and processed by the ADM server.
At the command prompt, type:
set bot profile profile1 -KMEventsPostBodyLimit Example:
set bot profile profile1 – KMEventsPostBodyLimit 25
After you have configured the NetScaler appliance to configure the JavaScript and collect keyboard and mouse behavior biometrics, the appliance sends the data to the NetScaler ADM server. For more information on how the NetScaler ADM server detects bots from behavior biometrics, seeBot Violationstopic.
Configure keyboard and mouse bot expression settings by using the GUI
- Navigate toSecurity > NetScaler Bot Management and Profiles.
- On theNetScaler Bot Management Profilespage, select a profile and clickEdit.
- In theKeyboard and mouse based bot detectionsection, set the following parameters:
- Enable detection. Enable this option to detect the bot based keyboard and mouse dynamics behavior.
- Event post body limit. Size of the keyboard and mouse dynamics data sent by the browser to be processed by the NetScaler appliance.
ClickOK.

- On theNetScaler bot Management Profilepage, go to theProfile Settingssection and clickKeyboard and Mouse Based Bot Expression Settings.
- In theKeyboard and Mouse Based Bot Expression Settingssection, clickAdd.
- In theConfigure NetScaler bot Management Profile Bot Keyboard and Mouse Expression Bindingpage, set the following parameters:
- Expression Name. Name of the bot policy expression for detection keyboard and mouse dynamics.
- Expression. Bot policy expression.
- Enabled. Select the check box to enable the keyboard and bot keyboard and mouse expression binding.
- Comments. A brief description about the bot policy expression and its binding to the bot profile.
- ClickOKandClose.
In theKeyboard and Mouse Based Bot Expression Settingssection, ClickUpdate.

Verbose logging for bot traffic
When an incoming request is identified as a bot, the NetScaler appliance logs more HTTP header details for monitoring and troubleshooting. The bot verbose logging capability is similar to the verbose logging in the Web App Firewall module.
Consider an incoming traffic from a client. If the client is identified as a bot, the NetScaler appliance uses the verbose logging functionality to log full HTTP header information such as domain address, URL, user-agent header, cookie header). The log details are then sent to the ADM server for monitoring and troubleshooting the purpose. The verbose log message is not stored in the “ns.log” file.
Configure bot verbose logging by using the CLI
To capture detailed HTTP header information as logs, you can configure the verbose logging parameter in the bot profile. At the command prompt, type:
set bot profile [-verboseLogLevel ( NONE | HTTP_FULL_HEADER ) ] Example:
set bot profile p1 –verboseLogLevel HTTP_FULL_HEADER
Configure bot verbose logging by using the NetScaler GUI
Follow the procedure below to configure the verbose log level in the bot profile.
- On the navigation pane, navigate toSecurity > NetScaler Bot Management.
- In theNetScaler Bot Management Profilespage, clickAdd.
- In theCreate NetScaler Bot Management Profilepage, select verbose log level asHTTP Full Header.
ClickOKandDone.

Request headers dropped by the NetScaler bot Management
Many of the request headers related to caching is dropped to view every request within the context of a session. Similarly, if the request includes an encoding header to allow the web server to send compressed responses, the bot management deletes this header so that contents in the uncompressed server response is inspected by the bot management to insert the JavaScripts.
The bot management drops the following request headers:
Range - Used to recover from a failed or partial file transfers.
If-Range - Allows a client to retrieve a partial object when it contains a part of that object in its cache already (conditional GET).
If-Modified-Since - If the requested object is not modified since the time specified in this field, an entity is not returned from the server. You get an HTTP 304 not modified error.
If-None-Match - Allows efficient updates of cached information with a minimum amount of overhead.
Accept-Encoding - Encoding methods that are allowed for a particular object, such as gzip.
In this article
- How to upgrade your appliance to NetScaler CLI-based bot management configuration
- Configure NetScaler CLI-based bot management
- Configuring bot management by using NetScaler GUI
- Configure bot management settings for device fingerprint technique
- Configure bot allow list by using NetScaler GUI
- Configure bot block list by using NetScaler GUI
- Configure IP reputation by using NetScaler GUI
- Configure bot rate limit technique
- Configure device fingerprint technique by using NetScaler GUI
- Configure device fingerprint technique for mobile (Android) applications
- How the device fingerprint technique for the mobile application works
- Configure bot log expression
- Configure bot trap technique
- Configure CAPTCHA for IP reputation and device fingerprint detection
- Configure bot static signatures
- Create bot management profile
- Create bot policy
- Bot detection based on mouse and keyboard dynamics
- Verbose logging for bot traffic
- Request headers dropped by the NetScaler bot Management