
Proxy protocol
Proxy protocol safely transports client details from client to server across Citrix ADC appliances. The appliance adds a proxy protocol header with client details and forwards it to the back-end server. Following are some of the usage scenarios for proxy protocol in a Citrix ADC appliance.
- Learning original client IP address
- Selecting a language for a website
- Block listing selected IP addresses
- Logging and collecting statistics.
Following are the three modes of operation:
- Insert. The appliance inserts the client details and sends it to the back-end server.
- Forward. The appliance forwards the client details to the back-end server.
- Stripped. The appliance stores the client details for logging purpose. Also, if the proxy protocol is not supported on the back-end server, sends the client details to the server by using the rewrite policy configuration
Limitations
The proxy protocol is not supported for the TCP Fast Open (TFO) and MultiPath TCP features. The feature is supported only for services for which the Citrix ADC appliance does TCP connection termination. It is not support for other services, for example, “ANY”.
How proxy protocol works in a Citrix ADC appliance
The following flow diagrams show how you can configure the proxy protocol across Citrix ADC appliances for Insert, Forwards, and Stripped operation:
Insert operation

The component interact is as follows:
- At the Citrix ADC instance, you must enable proxy protocol in the net profile and bind it to the service.
- In the Insert operation, Citrix ADC adds a proxy header with client connection details and forwards it to the back-end server.
- On the sending side, the appliance decides the proxy protocol version based on CLI configuration.
Forward operation

The component interact is as follows:
- A client sends a request along with the proxy header to the Citrix ADC. The appliance dynamically identifies the version.
- In the Citrix ADC appliance, it is a Forward operation. The proxy protocol is enabled on the load balancing virtual server or content switching virtual server and enabled on the service. The appliance receives the proxy header and forwards the header details to the back-end server.
- If the proxy header details are in invalid format, the appliance resets the connection.
- On the sending side, the appliance decides the proxy protocol version based on CLI configuration.
Stripped operation

The component interact is as follows:
- A client sends a request along with a proxy header to the Citrix ADC appliance.
- In the Citrix ADC appliance, if it is a Stripped operation, the appliance forwards the client information obtained from the proxy protocol and inserts it into the HTTP header using rewrite policy expressions.
- The client details such as source IP address, destination IP address, source port, and destination port are added in an HTTP header using rewrite policy expressions. The rewrite policy evaluates the expression and if “true,” the corresponding rewrite policy action is triggered. And the client details are forwarded to the back-end server in an HTTP header.
- If the proxy header details are in invalid format, the appliance resets the connection.
Proxy protocol version formats
The Proxy protocol version is available as two formats. The appliance decides to use a format based on the incoming data length. For detailed information, seeProxy ProtocolRFP.
Proxy protocol version-1 format
PROXY TCP4/TCP6/UNKNOWN- PROXY -> Unique string format for Proxy header version -1.
- Support protocols TCP over IPv4 and TCP over IPv6. For the remaining protocols, this is UNKNOWN.
- SRC IP – Source IP (Original Client IP) address of a packet.
- DST IP – Destination IP address of a packet.
- SRC port – Source port of a packet.
- DST port – Destination port of a packet.
Proxy protocol version-2 format
0D 0A 0D 0A 00 0D 0A 51 55 49 54 0A <13th byte> <14th byte> <15-16th byte> <17th byte onwards>- D 0A 0D 0A 00 0D 0A 51 55 49 54 0A -> Unique binary string for Proxy header version -2.
- Support protocols TCP over IPv4 and TCP over IPv6. For the remaining protocols, this is UNKNOWN.
- Thirteenth byte – protocol version and command.
- Fourteenth byte – address and protocol family.
- 15-16th byte – Address length in network order.
- Seventeenth byte onwards – Addresses info present in network order- src IP, dst IP, src port, dst port.
Configure Proxy protocol in Citrix ADC appliance
Complete the following steps to configure the Proxy protocol in your Citrix ADC appliance.
- Enable proxy protocol as global.
- Configure proxy protocol for Insert operation
- Configure proxy protocol for Forward operation
- Configure proxy protocol for Strip operation
- Configure proxy protocol for no operation
Enable the proxy protocol as global
At the command prompt, type the following:
set ns param –proxyProtocol ENABLED
Configure proxy protocol for Insert operation
To configure the proxy protocol for Insert operation, you must enable or disable the protocol on the load balancing virtual server and enable it on the service.
Add net profile with Proxy protocol disabled for load balancing virtual server
At the command prompt, type the following:
add netprofile
Example:
Add netprofile proxyprofile-1 –proxyProtocol DISABLED –proxyprotocoltxversion V1
Note:
If you disable proxy protocol on your appliance, you need not set the protocol version parameter.
Add net profile with a proxy protocol enabled for service
At the command prompt, type the following:
add netprofile
Example:
add netprofile proxyprofile-2 –proxyProtocol ENABLED –proxyprotocoltxversion V1
Add load balancing virtual server for Citrix ADC appliance in the proxy layer
At the command prompt, type the following:
add lb vserver
Example:
add lb vserver lbvserver-1 http 1.1.1.1 80
添加对Citrix ADC的HTTP服务设备的proxy layer
At the command prompt, type the following:
add service
Example:
Add service http-service-1 2.2.2.1 http 80
Set net profile with load balancing virtual server in Citrix ADC appliance
At the command prompt, type the following:
set lb vserver
Example:
set lb vserver lbvserver-1 –netprofile proxyProfile-1
设置网络配置文件在Citrix ADC美联社与HTTP服务pliance
At the command prompt, type the following:
set service
Example:
set service http-service-1 –netprofile proxyProfile-1
Configure proxy protocol for forward operation
To configure the proxy protocol for Forward operation for the next Citrix ADC instance in the proxy layer. You must enable or disable the protocol and bind to the virtual server or service.
Add net profile with proxy protocol enabled for load balancing virtual server
At the command prompt, type the following:
add netprofile
Example:
add netprofile proxyprofile-3 –proxyProtocol ENABLED –proxyprotocoltxversion V1
Add net profile with proxy protocol enabled for service
At the command prompt, type the following:
add netprofile
Example:
add netprofile proxyprofile-4 –proxyProtocol ENABLED –proxyprotocoltxversion V1
Add load balancing virtual server for Citrix ADC appliance in the proxy layer
At the command prompt, type the following:
add lb vserver
Example:
add lb vserver lbvserver-2 http 2.2.2.2 80
添加对Citrix ADC的HTTP服务设备的proxy layer
At the command prompt, type the following:
add service
Example:
Add service http-service-2 3.3.3.1 http 80
Set net profile with load balancing virtual server in Citrix ADC appliance
At the command prompt, type the following:
set lb vserver
Example:
set lb vserver lbvserver-2 –netprofile proxyProfile-3
设置网络配置文件在Citrix ADC美联社与HTTP服务pliance
At the command prompt, type the following:
set service
Example:
set service http-service-2 –netprofile proxyProfile-4
Configure proxy protocol for strip operation
To configure the proxy protocol for strip operation, you must enable the proxy protocol on the load balancing virtual server and disable the proxy protocol on the service.
Add net profile with proxy protocol enabled for virtual server
At the command prompt, type the following:
add netprofile
Example:
add netprofile proxyprofile-5 –proxyProtocol ENABLED –proxyprotocoltxversion V1
Add load balancing or content switching virtual server for Citrix ADC appliance in the proxy layer
At the command prompt, type the following:
add lb vserver
Example:
add lb vserver lbvserver-3 http 2.2.2.2 80
添加对Citrix ADC的HTTP服务设备的proxy layer
At the command prompt, type the following:
add service
Example:
Add service http-service-3 3.3.3.1 http 80
Set net profile with load balancing or content switching virtual server in Citrix ADC appliance
At the command prompt, type the following:
set lb vserver
Example:set lb vserver lbvserver-3 –netprofile proxyProfile-5
Configure Proxy protocol by using Citrix ADC GUI
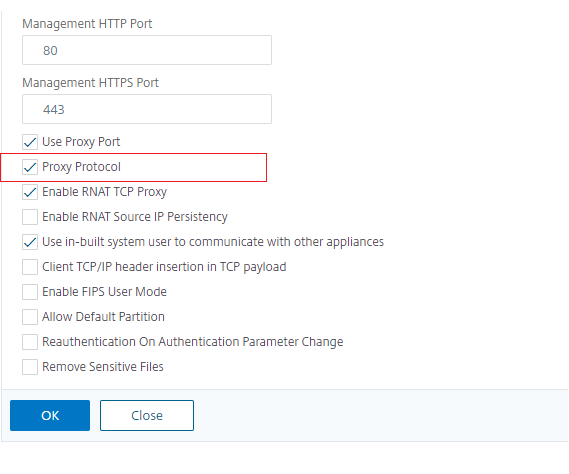
- Navigate toSystem>Settings>Change Global System Settings.
- In theConfigure Global System Settings Parameterspage, selectProxy Protocolcheck box.
ClickOKandClose.
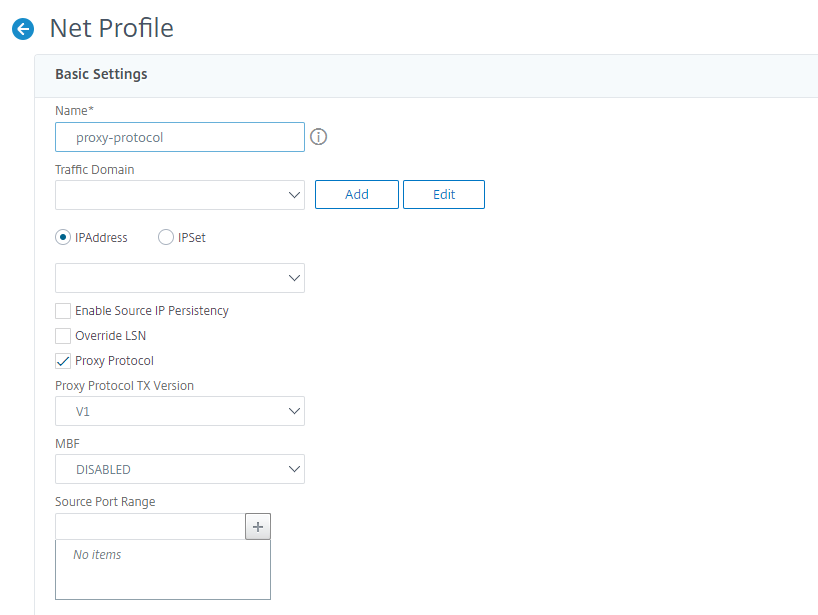
- Navigate toSystem>Network>Net Profiles.
- In the details pane, clickAdd创建一个网络负载平衡梵的概要文件tual server.
- In theNet Profilepage, set the following parameters:
- Name. Name of the net profile.
- Proxy Protocol. Enable or disable proxy protocol for the load balancing virtual server.
- Proxy Protocol TX Version. Set proxy protocol version as V1 or V2 based on incoming data format.
ClickOK.
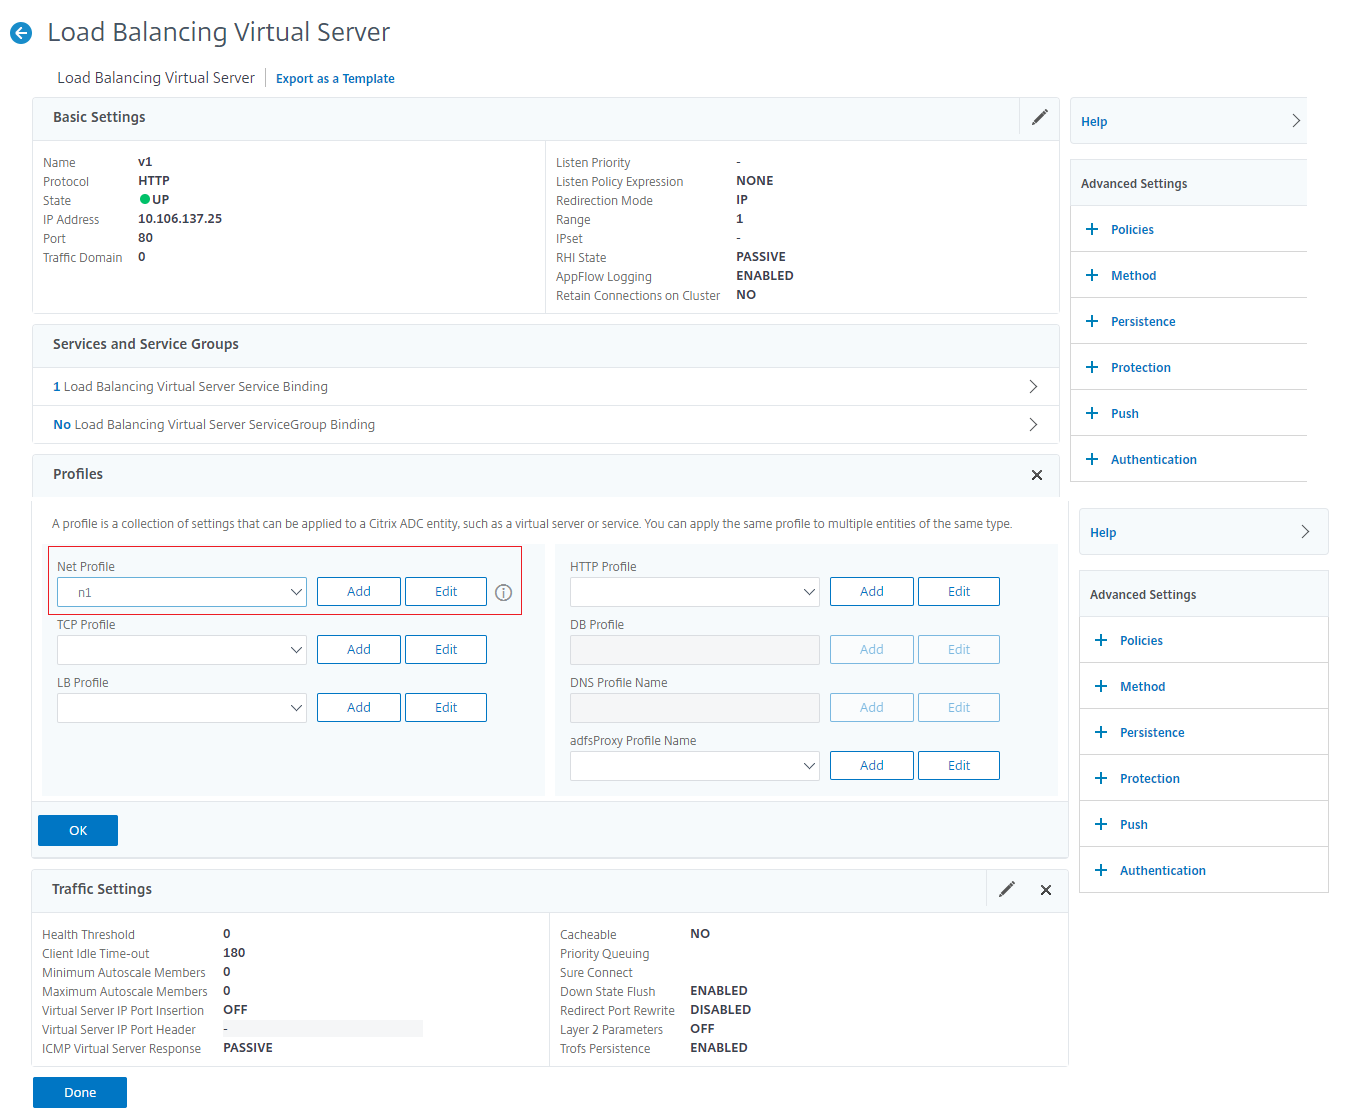
- Navigate toTraffic Management>Load Balancing>Virtual Servers.
- In the details pane, clickAdd.
- In theLoad Balancing Virtual Serverpage, the set the basic parameters.
- In theAdvanced Settingssection, selectProfiles.
- In theProfilessection, click the pencil icon.
- Select a net profile and clickOK.
ClickDone.
- Navigate toTraffic Management>Load Balancing>Services.
- In the details pane, clickAdd.
- In theLoad Balancing Servicepage, set the basic parameters.
- In theAdvanced Settingssection, selectProfiles.
- In theProfilessection, click the pencil icon.
- Select a net profile and clickOK.
- ClickDone.


Note:
If you have more than one Citrix ADC appliance as part of the proxy layer, you must set the proxy protocol configuration on each appliance for the Forward operation.
