
配置basic content switching
Before you configure content switching, you must understand how content switching is set up and how the services and virtual servers are connected.
To configure a basic, functional content switching setup, first enable the content switching feature. Then, create at least one content group. For each content group, create a content switching virtual server to accept requests to a group of websites that use content switching. Also create a load balancing setup, which includes a group of load balancing virtual servers to which the content switching virtual server directs requests. To specify which requests to direct to which load balancing virtual server, create at least two content switching policies, one for each type of request that is to be redirected. When you have created the virtual servers and policies, bind the policies to the content switching virtual server. You can also bind a policy to multiple content switching virtual servers. When you bind a policy, you specify the load balancing virtual server to which requests that match the policy are to be directed.
In addition to binding individual policies to a content switching virtual server, you can bind policy labels. If you create more content groups, you can bind a policy or policy label to more than one of the content switching virtual servers.
Note
After creating a content group, you can modify its content switching virtual server to customize the configuration.
Enabling content switching
To use the content switching feature, you must enable content switching. You can configure content switching entities even though the content switching feature is disabled. However, the entities will not work.
使内容切换使用CLI
在命令提示符下,键入以下命令to enable content switching and verify the configuration:
enable ns feature CS show ns feature Example:
> enable feature ContentSwitch Done > show feature Feature Acronym Status ------- ------- ------ 1) Web Logging WL OFF 2) Surge Protection SP ON 3) Load Balancing LB ON 4) Content Switching CS ON . . . 22) Responder RESPONDER ON 23) HTML Injection HTMLInjection ON 24) NetScaler Push push OFF Done To enable content switching by using the GUI
Navigate toSystem > Settingsand, in theModes and Featuresgroup, selectConfigure Basic Features, and selectContent Switching.
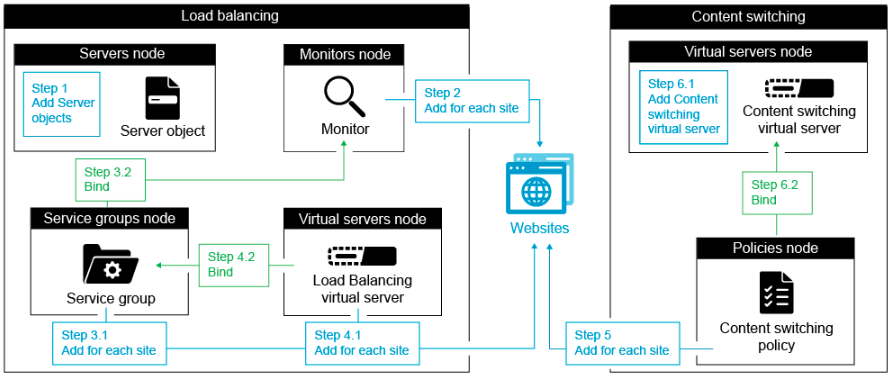
The following figure illustrates the step wise configuration of Content Switching.
Creating content switching virtual servers
You can add, modify, and remove content switching virtual servers. The state of a virtual server is DOWN when you create it, because the load balancing virtual server is not yet bound to it.
To create a virtual server by using the CLI
At the command prompt, type:
add cs vserver Example:
add cs vserver Vserver-CS-1 HTTP 10.102.29.161 80 To add a content switching virtual server by using the GUI
- Navigate toTraffic Management > Content Switching > Virtual Servers, and add a virtual server.
- Specify a name for content switching virtual server.
Note
There is different Content Switching virtual server for each protocol. (For example, HTTP and SSL).
- Populate the relevant fields and clickOK.
Content switching virtual server statistics
The content switching virtual server statistics display information such as virtual server select, request bytes, response bytes, total packets received, total packets sent, spillover threshold, spillover select, current client established connections, and virtual server down backup select.
The content switching virtual server statistics also display the summary details of the bound default load balancing virtual server.
To view statistics of content switching virtual server by using the CLI
At the command prompt, type:
stat cs vserver Example:
stat cs vserver CS_stats 
To view statistics of content switching virtual server by using the GUI
1. Navigate toTraffic Management>Content Switching>Virtual Servers.
2. Select the virtual server and clickStatistics.

配置负载均衡为瑞士内容设置tching
The content switching virtual server redirects all requests to a load balancing virtual server. You must create one load balancing virtual server for each version of the content that is being switched. It is true even when your setup has only one server for each version of the content, and you are therefore not doing any load balancing with those servers. You can also configure actual load balancing with multiple load-balanced servers that mirror each version of the content. In either scenario, the content switching virtual server needs to have a specific load balancing virtual server assigned to each version of the content that is being switched.
负载均衡虚拟服务器然后将the request to a service. If it has only one service bound to it, it selects that service. If it has multiple services bound to it, it uses its configured load balancing method to select a service for the request, and forwards that request to the service that it selected.
To configure a basic load balancing setup, you need to perform the following tasks:
- Create load balancing virtual servers
- Create services
- Bind services to the load balancing virtual server
For more information on load balancing, seeHow load balancing works.For detailed instructions on setting up a basic load balancing configuration, seeSet up basic load balancing.
配置a content switching action
You specify the target load balancing virtual server for a content switching policy when binding the policy to the content switching virtual server. Therefore, you have to configure one policy for each load balancing virtual server to which to direct traffic.
However, if your content switching policy uses a default syntax rule, you can configure an action for the policy. In the action, you can specify the name of the target load balancing virtual server, or you can configure a request-based expression that, at run time, computes the name of the load balancing virtual server to which to send the request. The action expression must be specified in the default syntax.
The expression option can drastically reduce the size of your content switching configuration, because you need only one policy per content switching virtual server. Content switching policies that use an action can also be bound to multiple content switching virtual servers, because the target load balancing virtual server is no longer specified in the content switching policy. The ability to bind a single policy to multiple content switching virtual servers helps to further reduce the size of your content switching configuration.
After you create an action, you create a content switching policy and specify the action in the policy, so that the action is performed when that policy matches a request.
Note
You can also, for a content switching policy that uses a default syntax rule, specify the target load balancing virtual server when binding the policy to a content switching virtual server, instead of using a separate action. For domain-based policies, URL-based policies, and rule based policies that use classic expressions, an action is not available. So, for these types of policies, you specify the name of the target load balancing virtual server when binding the policy to a content switching virtual server.
配置an action that specifies the name of the target load balancing virtual server
如果你选择指定目标lo的名称ad balancing virtual server in a content switching action, you need as many content switching policies as you have target load balancing virtual servers. Content switching decisions, in this case, are based on the rule in the content switching policy, and the action merely specifies the target load balancing virtual server. When a request matches the policy, the request is forwarded to the specified load balancing virtual server.
To create and verify a content switching action that specifies the name of the target load balancing virtual server, by using the CLI
At the command prompt, type:
add cs action -targetLBVserver [-comment ] show cs action Example:
> add cs action mycsaction -targetLBVserver mylbvserver -comment "Forwards requests to mylbvserver." Done > show cs action mycsaction Name: mycsaction Target LB Vserver: mylbvserver Hits: 0 Undef Hits: 0 Action Reference Count: 0 Comment: "Forwards requests to mylbvserver." Done > To configure a content switching action that specifies the name of the target load balancing virtual server, by using the GUI
- Navigate toTraffic Management > Content Switching > Actions.
- Configure a content switching action, and specify the name of the target load balancing virtual server.
配置an action that specifies an expression for selecting the target at run time
If you choose to configure a request-based expression that can dynamically compute the name of the target load balancing virtual server, you need to configure only one content switching policy to select the appropriate virtual server. The rule for the policy can be a simple TRUE (the policy matches all requests) because, in this case, content switching decisions are based on the expression in the action. By configuring an expression in an action, you can drastically reduce the size of your content switching configuration.
If you choose to configure a request-based expression for computing the name of the target load balancing virtual server at run time, you must carefully consider how to name the load balancing virtual servers in the configuration. You must be able to derive their names by using the request-based policy expression in the action.
For example, if you are switching requests based on the URL suffix (extension of the requested resource), when naming the load balancing virtual servers, you can follow the convention of appending the URL suffix to a predetermined string, such asmylb_.For example, load balancing virtual servers for HTML pages and PDF files can be namedmylb_htmlandmylb_pdf, respectively. In that case, the rule that you can use in the content switching action, to select the appropriate load balancing virtual server, is"mylb_"+HTTP.REQ.URL.SUFFIX.If the content switching virtual server receives a request for an HTML page, the expression returnsmylb_html, and the request is switched to the virtual servermylb_html.
To create a content switching action that specifies an expression, by using the CLI
At the command line, type the following commands to create a content switching action that specifies an expression and verify the configuration:
add cs action -targetVserverExpr ) [-comment ] show cs action Example:
> add cs action mycsaction1 -targetvserverExpr '"mylb_" + HTTP.REQ.URL.SUFFIX' Done > show cs action mycsaction1 Name: mycsaction1 Target Vserver Expression: "mylb_" + HTTP.REQ.URL.SUFFIX Target LB Vserver: No_Target … Done > To configure a content switching action that specifies an expression by using the GUI
- Navigate toTraffic Management > Content Switching > Actions.
- Configure a content switching action, and specify an expression that will dynamically compute the name of the target load balancing virtual server.
配置content switching policies
A content switching policy defines a type of request that is to be directed to a load balancing virtual server. These policies are applied in the order of the priorities assigned to them or (if you are using Citrix ADC classic policies and do not assign priorities when binding them) in the order in which the policies were created.
The policies can be:
Domain-based policies.The Citrix ADC appliance compares the domain of an incoming URL with the domains specified in the policies. The appliance then returns the most appropriate content. Domain-based policies must be classic policies. Default syntax policies are not supported for this type of content switching policy.
URL-based policies.The appliance compares an incoming URL with the URLs specified in the policies. The appliance then returns the most appropriate URL-based content, which is usually the longest matching configured URL. URL-based policies must be classic policies. Default syntax policies are not supported for this type of content switching policy.
Rule-based policies.The appliance compares incoming data to expressions specified in the policies. You create rule-based policies by using either a classic expression or a default syntax expression. Both classic and default syntax policies are supported for rule-based content switching policies.
Note
A rule based policy can be configured with an optional action. A policy with an action can be bound to multiple virtual servers or policy labels.
If you set a priority when binding your policies to the content switching virtual server, the policies are evaluated in order of priority. If you do not set specific priorities when binding your policies, the policies are evaluated in the order in which they were created.
For information about Citrix ADC classic policies and expressions, see配置Classic Policies and Expressions.For information about Default Syntax policies, see配置Default Syntax Expressions.
To create a content switching policy by using the CLI
At the command prompt, type one of the following commands:
add cs policy -domain add cs policy -url add cs policy -rule add cs policy -rule -action Example:
add cs policy Policy-CS-1 -url "http://example.com" add cs policy Policy-CS-1 -domain "example.com" add cs policy Policy-CS-1 -rule "CLIENT.IP.SRC.SUBNET(24).EQ(10.217.84.0)" add cs policy Policy-CS-2 -rule "SYS.TIME.BETWEEN(GMT 2009 Nov,GMT 2009 Dec)" add cs policy Policy-CS-3 -rule "http.req.method.eq(GET)" -action act1 To rename a content switching policy by using the CLI
At the command prompt, type:
rename cs policy Example:
rename cs policy myCSPolicy myCSPolicy1 To rename a content switching policy by using the GUI
Navigate toTraffic Management > Content Switching > Policies, select a policy and, in the Action list, select Rename.
To create a content switching policy by using the GUI
- Navigate toTraffic Management > Content Switching > Policies, and clickAdd.
- Populate the relevant fields and clickCreate.
配置content switching policy labels
A policy label is a user-defined bind point to which policies are bound. When a policy label is invoked, all the policies bound to it are evaluated in the order of the priority that you assigned to them. A policy label can include one or more policies, each of which can be assigned its own result. A match on one policy in the policy label can result in proceeding to the next policy, invoking a different policy label or appropriate resource, or an immediate end to policy evaluation and return of control to the policy that invoked the policy label. You can create policy labels for default syntax policies only.
A content switching policy label consists of a name, a label type, and a list of policies bound to the policy label. The policy label type specifies the protocol that was assigned to the policies bound to the label. It must match the service type of the content switching virtual server to which the policy that invokes the policy label is bound. For example, you can bind TCP Payload policies to a policy label of type TCP only. Binding TCP Payload policies to a policy label of type HTTP is not supported.
Each policy in a content switching policy label is associated with either a target (which is equivalent to the action that is associated with other types of policies, such as rewrite and responder policies) or a gotoPriorityExpression option and an invoke option. That is, for a given policy in a content switching policy label, you can specify a target, or you can set the gotoPriorityExpression option and the invoke option. Also, if multiple policies evaluate to true, only the target of the last policy that evaluates to true is considered.
You can use either the Citrix ADC CLI or the GUI to configure content switching policy labels. In the Citrix ADC CLI, you first create a policy label by using the add cs policy label command. Then, you bind policies to the policy label, one policy at a time, by using the bind cs policy label command. In the Citrix ADC GUI, you perform both tasks in a single dialog box.
To create a content switching policy label by using the CLI
At the command prompt, type:
add cs policylabel ` Example:
add cs policylabel testpollab http To rename a content switching policy label by using the CLI
At the command prompt, type:
rename cs policylabel ` Example:
rename cs policylabel oldPolicyLabelName newPolicyLabelName To rename a content switching policy label by using the GUI
Navigate toTraffic Management > Content Switching > Policy Labels, select a policy label and, in the Action list, select Rename.
To bind a policy to a content switching policy label by using the CLI
在命令提示符下,键入以下命令to bind a policy to a policy label and verify the configuration:
bind cs policylabel [-targetVserver ] | [-gotoPriorityExpression ] | [-invoke ] ] show cs policylabel Example:
bind cs policylabel testpollab test_Pol 100 -targetVserver LBVIP show cs policylabel testpollab Label Name: testpollab Label Type: HTTP Number of bound policies: 1 Number of times invoked: 0 Policy Name: test_Pol Priority: 100 Target Virtual Server: LBVIP Note
If a policy is configured with an action, the target virtual server (targetVserver), go to priority expression (gotoPriorityExpression), and invoke (invoke) parameters are not required. If a policy is not configure with an action, you need to configure at least one of the following parameters: targetVserver, gotoPriorityExpression, and invoke.
To unbind a policy from a policy label by using the CLI
在命令提示符下,键入以下命令to unbind a policy from a policy label and verify the configuration:
unbind cs policylabel show cs policylabel Example:
unbind cs policylabel testpollab test_Pol show cs policylabel testpollab Label Name: testpollab Label Type: HTTP Number of bound policies: 0 Number of times invoked: 0 删除一个标签使用CLI的政策
At the command prompt, type:
rm cs policylabel 管理内容交换政策通过标签使用g the GUI
Navigate toTraffic Management > Content Switching > Policy Labels, configure a policy label, bind policies to the label, and optionally specify a priority, gotoPriority expression, and an invoke option.
Binding Policies to a Content Switching Virtual Server
After you create your content switching virtual server and policies, you bind each policy to the content switching virtual server. When binding the policy to the content switching virtual server, you specify the target load balancing virtual server.
Note
If your content switching policy uses a default syntax rule, you can configure a content switching action for the policy. If you configure an action, you must specify the target load balancing virtual server when you are configuring the action, not when you are binding the policy to the content switching virtual server. For more information about configuring a content switching action, see Configuring a Content Switching Action section.
To bind a policy to a content switching virtual server and select a target load balancing virtual server by using the CLI
At the command prompt, type:
bind cs vserver [-lbvserver -targetLBVServer -policyname -priority ] [-gotoPriorityExpression ] [-type ( REQUEST | RESPONSE )] [-invoke ( )] Example:
bind cs vserver csw-vip2 -policyname csw-ape-policy2 -priority 14 -gotoPriorityExpression NEXT bind cs vserver csw-vip3 -policyname rewrite-policy1 -priority 17 -gotoPriorityExpression 'q.header("a").count' -flowtype REQUEST -invoke policylabel label1 bind cs vserver Vserver-CS-1 Vserver-LB-1 -policyname Policy-CS-1 -priority 20 Note
The parameters, target load balancing virtual server (targetVserver), go to priority expression (gotoPriorityExpression), and invoke method (invoke) cannot be used if a policy has an action.
To bind a policy to a content switching virtual server and select a target load balancing virtual server by using the GUI
Navigate toTraffic Management > Content Switching > Virtual Servers, open a virtual server and, in the Content Switching Policy Binding section, bind a policy to the virtual server, and specify a target load balancing virtual server.
配置policy based logging for content switching
You can configure policy based logging for a content switching policy. Policy based logging enables you to specify a format for log messages. The contents of the log message are defined by using a default syntax expression in the content switching policy. When the content switching action specified in the policy is performed, the Citrix ADC appliance constructs the log message from the expression and writes the message to the log file. Policy based logging is particularly useful if you want to test and troubleshoot a configuration in which content switching actions identify the target load balancing virtual server at run time.
Note
If multiple policies bound to a given virtual server evaluate to TRUE and are configured with an audit message action, the Citrix ADC appliance does not perform all the audit message actions. It performs only the audit message action that is configured for the policy whose content switching action is performed.
To configure policy based logging for a content switching policy, you must first configure an audit message action. For more information about configuring an audit message action, see配置the Citrix ADC appliance for audit logging.After you configure the audit message action, you specify the action in a content switching policy.
To configure policy based logging for a content switching policy by using the CLI
At the command line, type the following commands to configure policy based logging for a content switching policy and verify the configuration:
set cs policy -logAction show cs policy Example:
> set cs policy cspol1 -logAction csLogAction Done > show cs policy cspol1 Policy: cspol1 Rule: TRUE Action: csact1 LogAction: csLogAction Hits: 0 1) CS Vserver: csvs1 Priority: 10 Done > To configure policy based logging for a content switching policy by using the GUI
Navigate toTraffic Management > Content Switching > Policies, open a policy and, in the Log Action list, select a log action for the policy.
Verifying the configuration
To verify that your content switching configuration is correct, you need to view the content switching entities. To verify proper operation after your content switching configuration has been deployed, you can view the statistics that are generated as the servers are accessed.
Viewing the properties of content switching virtual servers
You can view the properties of content switching virtual servers that you have configured on the Citrix ADC appliance. You can use the information to verify whether the virtual server is correctly configured and, if necessary, to troubleshoot. In addition to details such as name, IP address, and port, you can view the various policies bound to a virtual server, and its traffic-management settings.
The content switching policies are displayed in the order of their priority. If more than one policy has the same priority, they are shown in the order in which they are bound to the virtual server.
Note
If you have configured the content switching virtual server to forward traffic to a load balancing virtual server, you can also view the content switching policies by viewing the properties of the load balancing virtual server.
To view the properties of content switching virtual servers by using the CLI
To list basic properties of all content switching virtual servers in your configuration, or detailed properties of a specific content switching virtual server, at the command prompt, type one of the following commands:
show cs vserver show cs vserver Example
1. show cs vserver Vserver-CS-1 Vserver-CS-1 (10.102.29.161:80) - HTTP Type: CONTENT State: UP Last state change was at Thu Jun 30 10:48:59 2011 Time since last state change: 6 days, 20:03:00.760 Client Idle Timeout: 180 sec Down state flush: ENABLED Disable Primary Vserver On Down : DISABLED Appflow logging: DISABLED Port Rewrite : DISABLED State Update: DISABLED Default: Content Precedence: RULE Vserver IP and Port insertion: OFF Case Sensitivity: ON Push: DISABLED Push VServer: Push Label Rule: none ... 1) Policy : __ESNS_PREBODY_POLICY Priority:0 2) Policy : __ESNS_POSTBODY_POLICY Priority:0 1) Compression Policy Name: __ESNS_CMP_POLICY Priority: 2147483647 GotoPriority Expression: END Flowtype: REQUEST 2) Rewrite Policy Name: __ESNS_REWRITE_POLICY Priority: 2147483647 GotoPriority Expression: END Flowtype: REQUEST 3) Cache Policy Name: dfbx Priority: 10 GotoPriority Expression: END Flowtype: REQUEST 4) Responder Policy Name: __ESNS_RESPONDER_POLICY Priority: 2147483647 GotoPriority Expression: END 1) Policy: wiki Target: LBVIP2 Priority: 25 Hits: 0 2) Policy: plain Target: LBVIP1 Priority: 90 Hits: 0 3) Policy: DispOrderTest2 Target: KerbAuthLBVS Priority: 91 Hits: 0 4) Policy: test_Pol Target: LBVIP1 Priority: 92 Hits: 0 5) Policy: PolicyNameTesting Target: LBVIP1 Priority: 100 Hits: 0 Done > show cs vserver 1) Vserver-CS-1 (10.102.29.161:80) - HTTP Type: CONTENT State: UP … Appflow logging: DISABLED Port Rewrite : DISABLED State Update: DISABLED 2) apubendpt (10.111.111.1:80) - HTTP Type: CONTENT State: UP … Client Idle Timeout: 180 sec Down state flush: DISABLED … 3) apubendpt1 (10.111.111.2:80) - HTTP Type: CONTENT State: UP … Disable Primary Vserver On Down : DISABLED Appflow logging: DISABLED Port Rewrite : DISABLED State Update: DISABLED … Viewing content switching policies
You can view the properties of the content switching policies that you defined, such as the name, domain, and URL or expression, and use the information to find any mistakes in the configuration, or to troubleshoot if something is not working as it must.
To view the properties of content switching policies by using the CLI
To list either the basic properties of all content switching policies in your configuration or the detailed properties of a specific content switching policy, at the command prompt, type one of the following commands:
show cs policy show cs policy Example:
show cs policy show cs policy Policy-CS-1 To view the properties of content switching policies by using the GUI
Navigate toTraffic Management>Content Switching>Policies, select a policy and, in the Action list, selectShow Bindings.
Viewing a content switching virtual server configuration by using the visualizer
The Content Switching Visualizer is a tool that you can use to view a content switching configuration in graphical format. You can use the visualizer to view the following configuration items:
- A summary of the load balancing virtual servers to which the content switching virtual server is bound.
- All services and service groups that are bound to the load balancing virtual server and all monitors that are bound to the services.
- The configuration details of any displayed element.
- Any policies bound to the content switching virtual server. These policies need not be content switching policies. Many types of policies, such as Rewrite policies, can be bound to a content switching virtual server.
After you configure the various elements in a content switching and load balancing setup, you can export the entire configuration to an application template file.
Note
The Visualizer requires a graphical interface, so it is available only through the GUI.
To view a content switching configuration by using the Visualizer in the GUI
- Navigate toTraffic Management > Content Switching > Virtual Servers.
- In the details pane, select the virtual server that you want to view, and then clickVisualizer.
- In theContent Switching Visualizerwindow, you can adjust the viewable area as follows:
- Click theZoom InandZoom Outicons to increase or decrease the viewable area.
- Click theSave Imageicon to save the graph as an image file.
- In the Search in text field, begin typing the name of the item you are looking for. When you have typed enough characters to identify the item, its location is highlighted. To restrict the search, click the drop-down menu and select the type of element that you want to search for.
- To view configuration details for entities that are bound to this virtual server, you can do the following:
- To view policies that are bound to the virtual server, in the tool bar at the top of the dialog box select one or more feature-specific policy icons. If policy labels are configured, they appear in the main view area.
- To view the configuration details for a bound service or service group, click the icon for the service, click the Related Tasks tab, and then click Show Member Services.
- To view the configuration details for a monitor, click the icon for the monitor, click theRelated Taskstab, and then clickView Monitor.
- To view detailed statistics for any virtual server in the content switching configuration, click the virtual server for which you want to view statistics, then click the Related Tasks tab, and then clickStatistics.
- To view a comparative list of the parameters whose values either differ or are not defined across service containers for a load balancing virtual server, click the icon for a container, click theRelated Taskstab, and then clickService Attributes Diff.
- To view monitor binding details for the services in a container, in the Service Attributes Diff dialog box, in the Group column for the container, clickDetails.这个比较列表可以帮助你确定哪些service container has the configuration you want to apply to all the service containers.
- To view the number of requests received per second at a given point in time by the virtual servers in the configuration, and the number of select per second at a given point in time for rewrite, responder, and cache policies, click Show Stats. The statistical information is displayed on the respective nodes in the Visualizer. This information is not updated in real time. It is refreshed manually. To refresh the information, click Refresh Stats.
Note
This option is available only on Citrix ADC nCore builds.
- To copy configuration details for an element to a document or spreadsheet, click the icon for that element, click Related Tasks, click Copy Properties, and then paste the information into a document.
- 出口的整个配置显示ed in the Visualizer to an application template file, click the icon for the content switching virtual server, click Related Tasks, and then click Create Template. When creating the application template, you can configure variables in some policy expressions and actions. For more information about creating the application template file and configuring variables for a template, seeAppExpert.
In this article
- Enabling content switching
- 使内容切换使用CLI
- To enable content switching by using the GUI
- Creating content switching virtual servers
- To add a content switching virtual server by using the GUI
- Content switching virtual server statistics
- 配置负载均衡为瑞士内容设置tching
- 配置a content switching action
- 配置an action that specifies an expression for selecting the target at run time
- 配置content switching policies
- To create a content switching policy by using the CLI
- To rename a content switching policy by using the CLI
- To rename a content switching policy by using the GUI
- To create a content switching policy by using the GUI
- 配置content switching policy labels
- To create a content switching policy label by using the CLI
- To rename a content switching policy label by using the CLI
- To rename a content switching policy label by using the GUI
- To bind a policy to a content switching policy label by using the CLI
- To unbind a policy from a policy label by using the CLI
- 删除一个标签使用CLI的政策
- 管理内容交换政策通过标签使用g the GUI
- Binding Policies to a Content Switching Virtual Server
- To bind a policy to a content switching virtual server and select a target load balancing virtual server by using the CLI
- To bind a policy to a content switching virtual server and select a target load balancing virtual server by using the GUI
- 配置policy based logging for content switching
- To configure policy based logging for a content switching policy by using the CLI
- To configure policy based logging for a content switching policy by using the GUI
- Verifying the configuration
- Viewing content switching policies
- Viewing a content switching virtual server configuration by using the visualizer