
HTTP/3 configuration and Stat summary
To configure a HTTP/3 protocol for sending multiple streams of HTTP/3 data using QUIC, you must complete the following steps:
- Enable SSL and load balancing features.
- 增加开关负载平衡和内容ing (optional) virtual servers of type HTTP_QUIC.
- Associate QUIC protocol parameters with the HTTP_QUIC virtual server.
- Enable HTTP/3 on the HTTP_QUIC virtual server.
- Bind SSL certificate-key pair with HTTP_QUIC virtual server.
- Associate SSL/TLS protocol parameters with the HTTP_QUIC virtual server.
Enable SSL and load balancing
Before you begin, make sure that the SSL and Load Balancing features are enabled on the appliance. At the command prompt type:
enable ns feature ssl lb 增加开关负载平衡和内容ing (optional) virtual servers of type HTTP_QUIC for HTTP/3 service
You add a load balancing virtual server to accept HTTP/3 traffic over QUIC. Note: The load balancing virtual server of type HTTP_QUIC has built-in QUIC, SSL, and HTTP3 profiles. If you prefer to create user-define profiles, you can add new profiles and bind it with the load balancing virtual server.
add lb vserver HTTP_QUIC add cs vserver HTTP_QUIC Example:
add lb vserver lb-http3 HTTP_QUIC 1.1.1.1 443add cs vserver cs-http3 HTTP_QUIC 10.10.10.10 443
Associate QUIC protocol parameters with HTTP_QUIC virtual server
You can create a QUIC profile and specify QUIC parameters for the QUIC service and associate it to the load balancing virtual server. You must either create a user-defined profile or use the in-built QUIC profile and bind the profile to the load balancing virtual server.
Step 1: configure a user-defined QUIC profile At the command prompt, type:
set quic profile -transport_param Example:
set quic profile quic_http3 -ackDelayExponent 10 -activeConnectionIDlimit 4
The different QUIC transport parameters are as follows:
-ackDelayExponent. An integer value advertised by the Citrix ADC to the remote QUIC endpoint, indicating an exponent that the remote QUIC endpoint should use, to decode the ACK Delay field in QUIC ACK frames sent by the Citrix ADC.
-activeConnectionIDlimit. An integer value advertised by the Citrix ADC to the remote QUIC endpoint. It specifies the maximum number of QUIC connection IDs from the remote QUIC endpoint, that the Citrix ADC is willing to store.
-activeConnectionMigration. Specify whether the Citrix ADC must allow the remote QUIC endpoint to perform active QUIC connection migration.
-congestionCtrlAlgorithm. Specify the congestion control algorithm to be used for QUIC connections.
-initialMaxData. An integer value advertised by the Citrix ADC to the remote QUIC endpoint, specifying the initial value, in bytes, for the maximum amount of data that can be sent on a QUIC connection.
-initialMaxStreamDataBidiLocal. An integer value advertised by the Citrix ADC to the remote QUIC endpoint, specifying the initial flow control limit, in bytes, for bi-directional QUIC streams initiated by the Citrix ADC.
-initialMaxStreamDataBidiRemote. An integer value advertised by the Citrix ADC to the remote QUIC endpoint, specifying the initial flow control limit, in bytes, for bi-directional QUIC streams initiated by the remote QUIC endpoint.
-initialMaxStreamDataUni. An integer value advertised by the Citrix ADC to the remote QUIC endpoint, specifying the initial flow control limit, in bytes, for uni-directional streams initiated by the remote QUIC endpoint.
-initialMaxStreamsBidi. An integer value advertised by the Citrix ADC to the remote QUIC endpoint, specifying the initial maximum number of bi-directional streams the remote QUIC endpoint must initiate.
-initialMaxStreamsUni. An integer value advertised by the Citrix ADC to the remote QUIC endpoint, specifying the initial maximum number of uni-directional streams the remote QUIC endpoint must initiate.
-maxAckDelay. An integer value advertised by the Citrix ADC to the remote QUIC endpoint, specifying the maximum amount of time, in milliseconds, by which the Citrix ADC delays sending acknowledgments.
-maxIdleTimeout. An integer value advertised by the Citrix ADC to the remote QUIC endpoint, specifying the maximum idle timeout, in seconds, for a QUIC connection. A QUIC connection that remains idle, for longer than the minimum of the idle timeout values advertised by the Citrix ADC and the remote QUIC endpoint, and three times the current Probe Timeout (PTO), will be silently discarded by the Citrix ADC.
-maxUDPPayloadSize. An integer value advertised by the Citrix ADC to the remote QUIC endpoint, specifying the size of the largest UDP datagram payload, in bytes, that the Citrix ADC is willing to receive on a QUIC connection.
-newTokenValidityPeriod. An integer value, specifying the validity period, in seconds, of address validation tokens issued through QUIC NEW_TOKEN frames sent by the Citrix ADC.
-retryTokenValidityPeriod. An integer value, specifying the validity period, in seconds, of address validation tokens issued through QUIC Retry packets sent by the Citrix ADC.
-statelessAddressValidation. Specify whether the Citrix ADC must perform stateless address validation for QUIC clients, by sending tokens in QUIC Retry packets during QUIC connection establishment, and by sending tokens in QUIC NEW_TOKEN frames after QUIC connection establishment.
Step 2: Associate the user-defined QUIC profile to a load balancing virtual server of type http_quic
At the command prompt, type:
set lb vserver @ [-IPAddress @] @] [-persistenceType ] [-quicProfileName ] Example:
set lb vserver lb-http3 -quicProfileName quic_http3
Enable and bind HTTP/3 on a HTTP_QUIC virtual server
To enable HTTP/3 on an HTTP_QUIC virtual server, a set of configuration parameters is added to the HTTP profile configuration. To facilitate ease of configuration, when you add an HTTP_QUIC virtual server, a new default/built-in HTTP profile is available on the appliance. The profile has the HTTP/3 protocol support parameters set to ENABLED, and also bounded to the HTTP_QUIC virtual servers (applicable if you choose not to associate the HTTP_QUIC virtual server with a user-added HTTP profile). The value of the HTTP/3 parameters in the HTTP profile decides whether to select the HTTP/3 protocol and advertise when processing the TLS ALPN (Application Layer Protocol Negotiation) extension, during the QUIC protocol handshake.
You can create a HTTP/3 profile and specify HTTP parameters for the HTTP/3 service and load balancing virtual server. You must either create a user-defined profile or use the in-built HTTP/3 profile and bind the profile to the load balancing virtual server.
Step 1: configure a user-defined HTTP/3 profile At the command prompt, type:
Add ns httpProfile -http3 ENABLED Example:
add ns httpProfile http3_quic –http3 ENABLED
Step 2: Bind the user-defined HTTP/3 profile to a load balancing virtual server of type http_quic At the command prompt, type:
set lb vserver @ [-IPAddress @] @] [-persistenceType ] [-httpProfileName ] Example:
set lb vserver lb-http3 –httpProfileName http3_quic
Bind SSL certificate-key pair with HTTP_QUIC virtual server
For processing encrypted traffic, you must add an SSL certificate-key pair and bind it to the HTTP_QUIC virtual server.
At the command prompt, type:
bind ssl vserver -certkeyName Example:
bind ssl vserver lb-http3 -certkeyName rsa_certkeypair
For more information, seeBind SSL certificatetopic.
Bind SSL/TLS protocol parameters with a HTTP_QUIC virtual server
虚拟服务器类型的HTTP_QUIC内置TLS1.3 server functionality because the QUIC protocol uses TLS 1.3 as a mandatory security component. To facilitate the configuration when adding a HTTP_QUIC virtual server, a new default or built-in SSL profile of type - QUIC-FrontEnd is added. The SSL profile has TLS 1.3 version enabled with TLS 1.3 cipher suites (and elliptic curves) configured. The SSL profile must then be bound to the newly added HTTP_QUIC virtual servers. You can create an SSL profile and specify SSL encryption parameters for the TLP 1.1 service and load balancing virtual server. You must either create a user-defined profile or use the in-built SSL profile and bind the profile to the load balancing virtual server.
Step 1: configure a user-defined SSL profile At the command prompt, type:
add ssl profile -sslprofileType QUIC-FrontEnd Example:
add ssl profile ssl_profile1 -sslprofileType QUIC-FrontEnd -tls13 ENABLED -tls12 DISABLED -tls11 DISABLED -tls1 DISABLED
Step 2: Bind the user-defined SSL profile to a load balancing virtual server of type HTTP_QUIC At the command prompt, type:
set ssl vserver @ [-sslProfile ] Example:
set ssl vserver lb-http3 -sslprofile ssl_profile1
Enable SSL and load balancing features by using the GUI
Complete the following steps to enable SSL and load balancing features:
- On the navigation pane, expandSystemand then clickSettings.
- On theConfigure Basic Featurespage, select theSSLandLoad Balancing.
- ClickOK, and then clickClose.

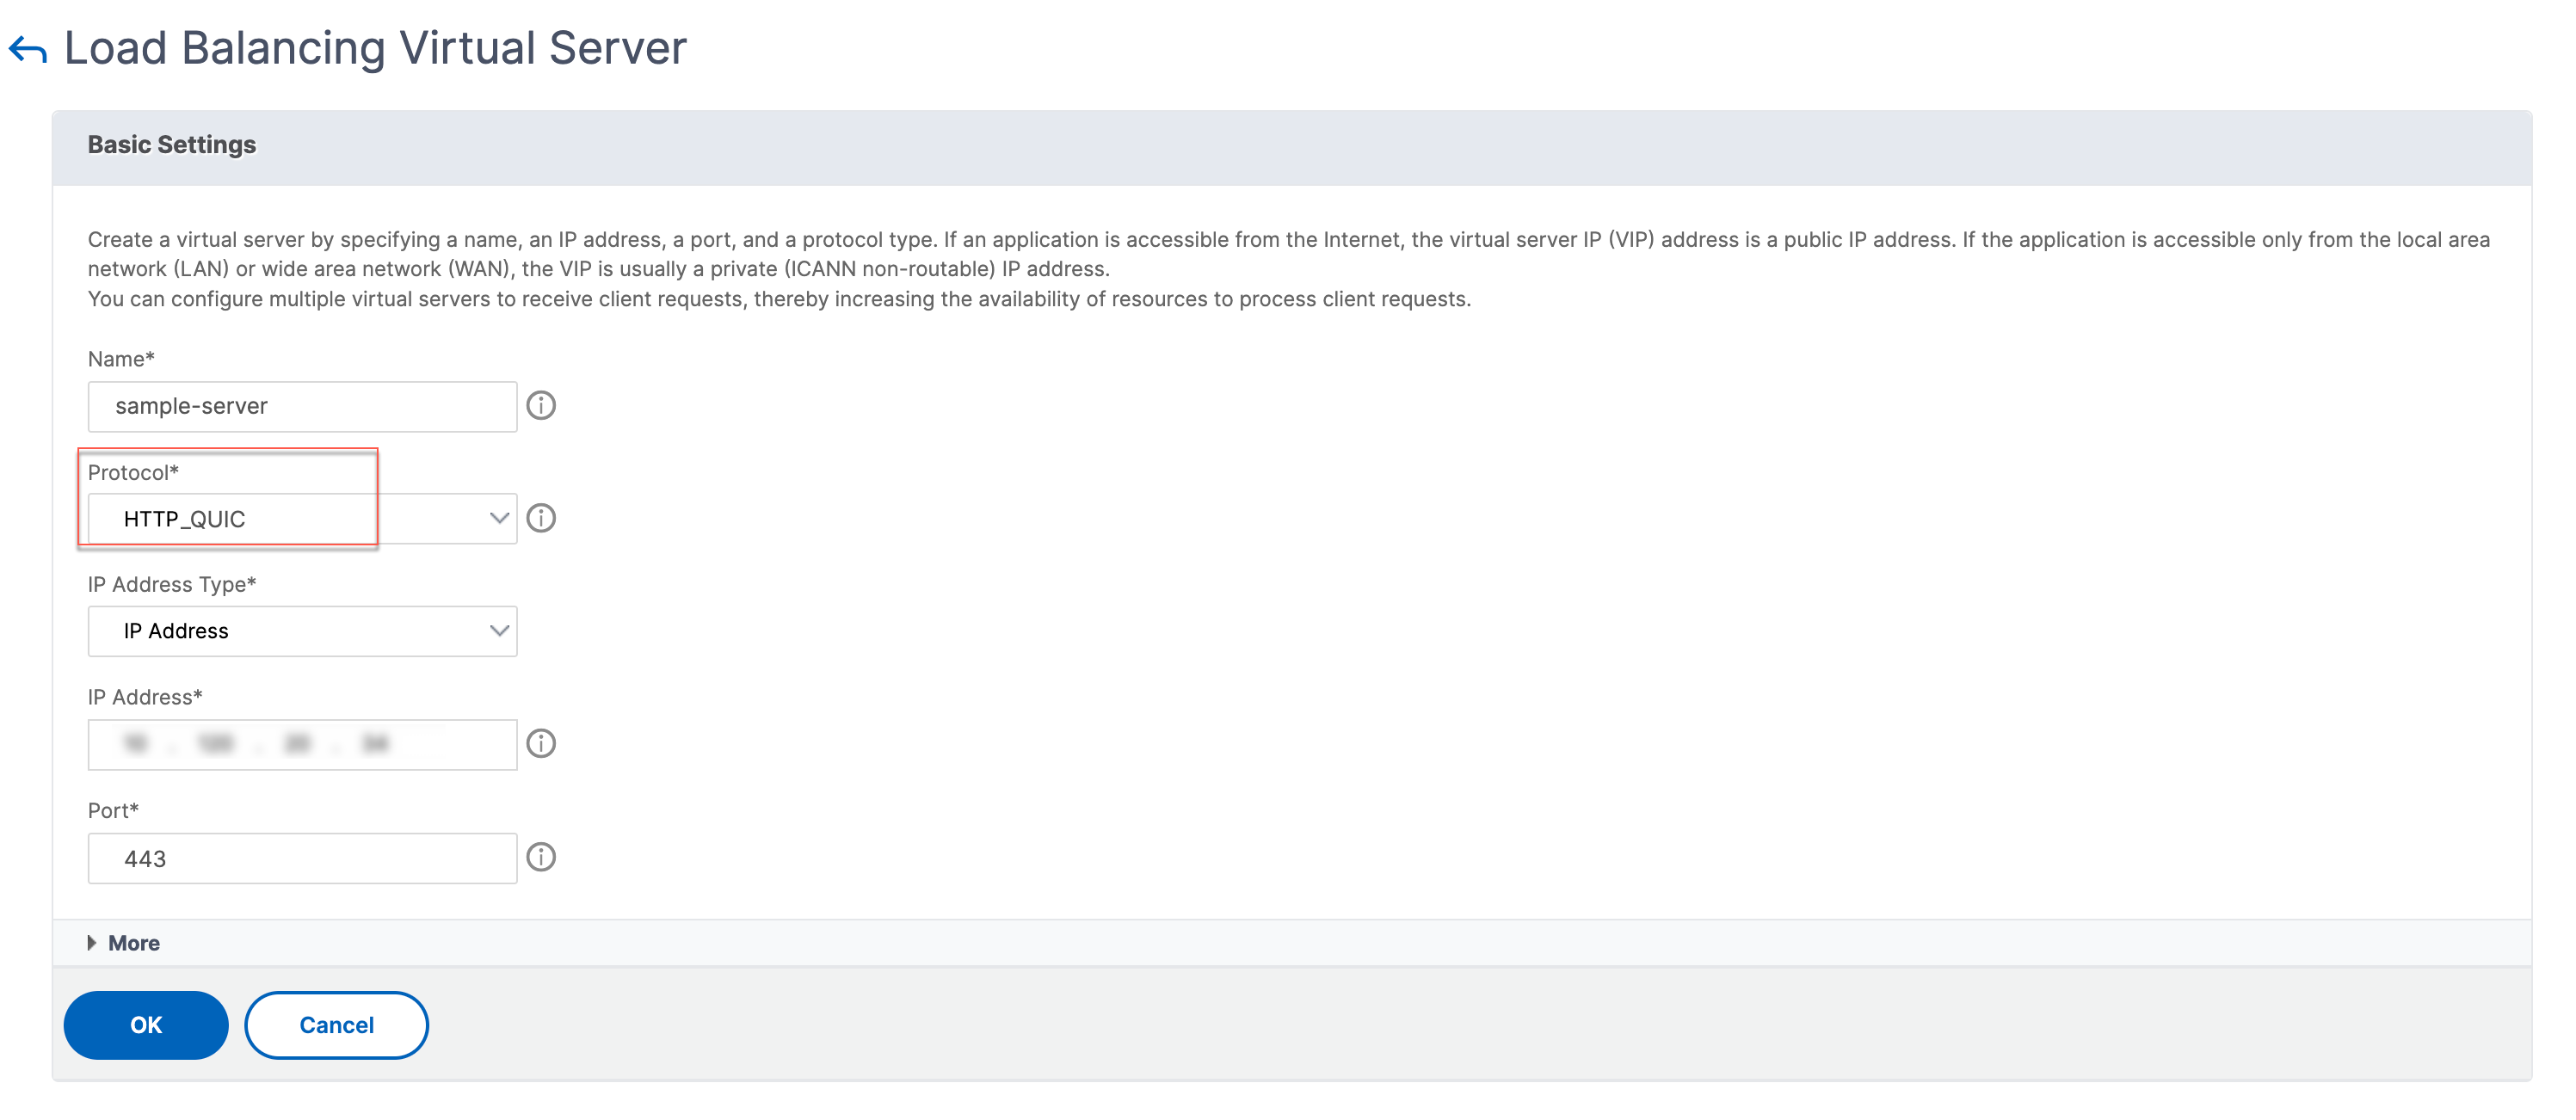
增加开关负载平衡和内容ing (optional) virtual servers of type HTTP_QUIC by using the GUI
- Navigate toTraffic Management > Load Balancing > Virtual Servers.
- ClickAddto create a load balancing virtual server of type HTTP_QUIC.
- InLoad Balancing Virtual Serverpage, clickProfiles.
- In theProfilessection, select the profile type as QUIC. Note: QUIC, HTTP/3 and SSL profiles are built-in ones.
- ClickOKand thenDone.
Associate QUIC protocol parameters with the HTTP_QUIC virtual server by using the GUI
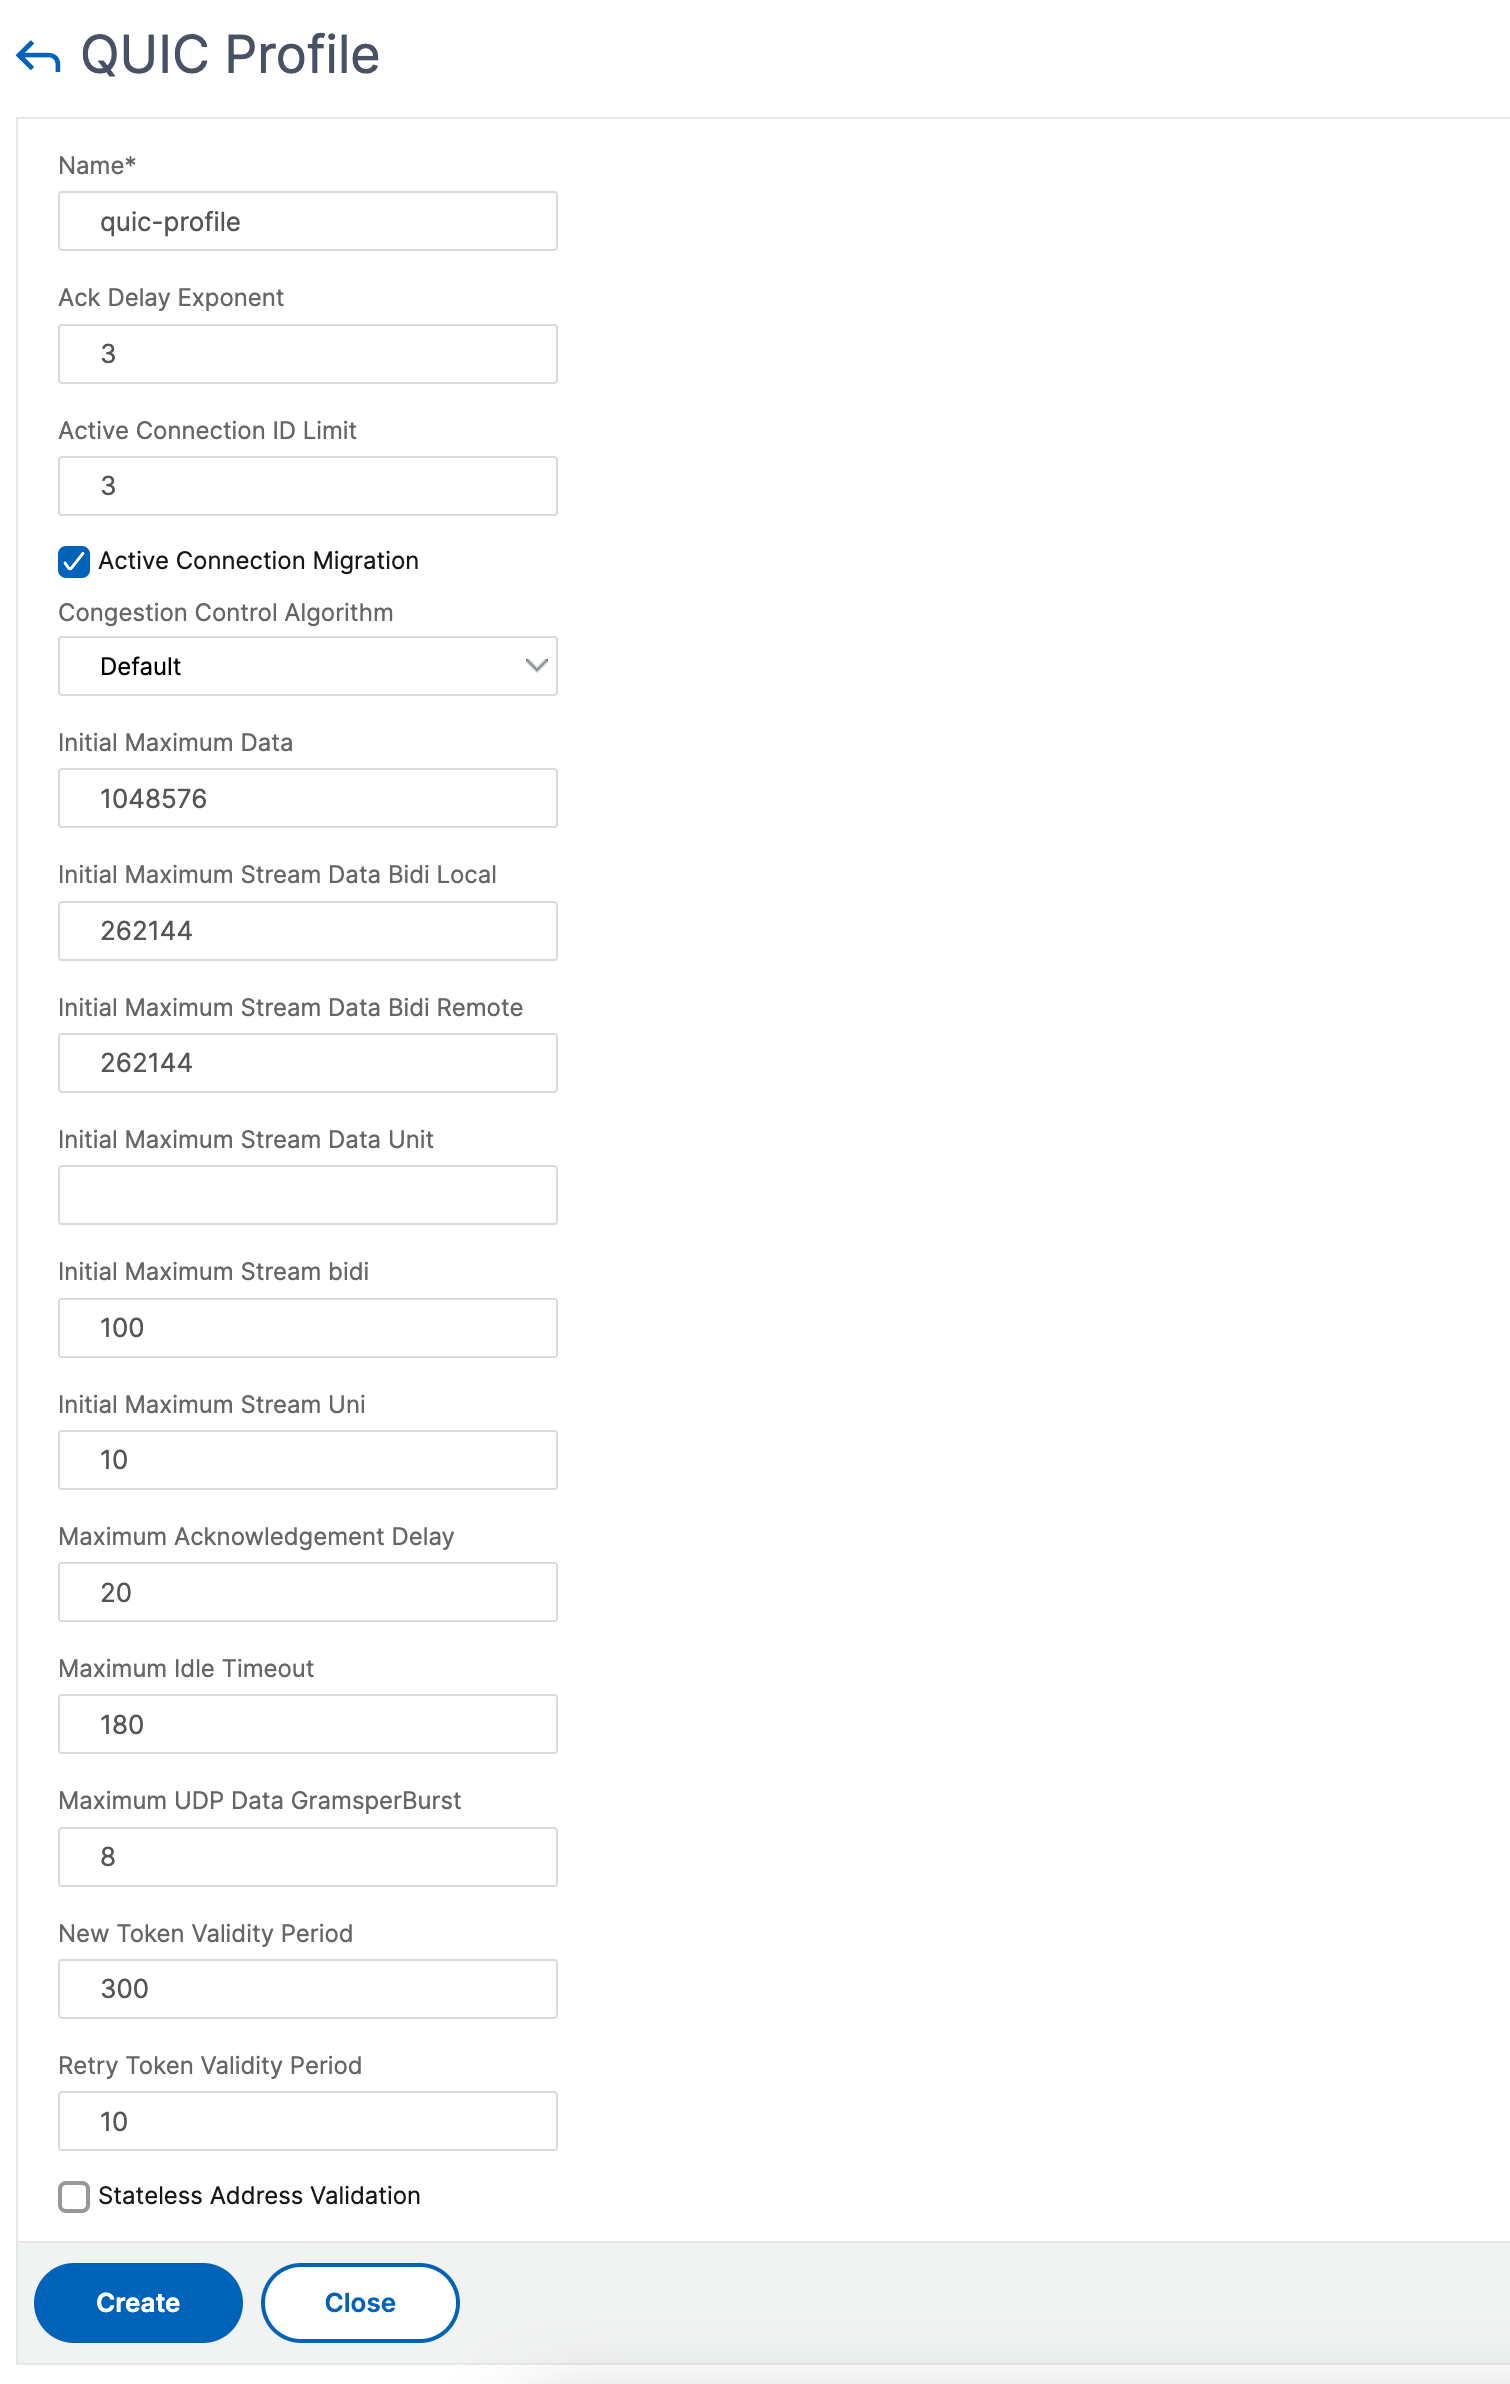
Step 1: Add QUIC profile
- Navigate toSystem > Profiles > QUIC Profile.
- ClickAdd.
In the QUIC Profile page, set the following parameters. For detailed description of each parameter, see the Associate QUIC protocol CLI section.
Ack DelayExponent- Active Connection ID Limit
- Active Connection Migration
- Congestion Control Algorithm
- Initial Maximum Data
- Initial Maximum Stream Data Bidi Local
- Initial Maximum Stream Data Bidi Remote
- Initial Maximum Stream Data Unit
- Initial Maximum Stream bidi
- Initial Maximum Stream Uni
- Maximum Acknowledgment Delay
- Maximum Idle Timeout
- Maximum UDP Data GramsperBurst
- New Token Validity Period
- Retry Token Validity Period
- Stateless Address Validation
Step 2: Associate QUIC profile with load balancing virtual server of type HTTP_QUIC
- In theProfilessection, select the QUIC profile. Note: QUIC, HTTP/3 and SSL profiles are built-in ones.
- ClickOKand thenDone.

Associate SSL/TLS protocol parameters with the virtual server of type SSL by using the GUI
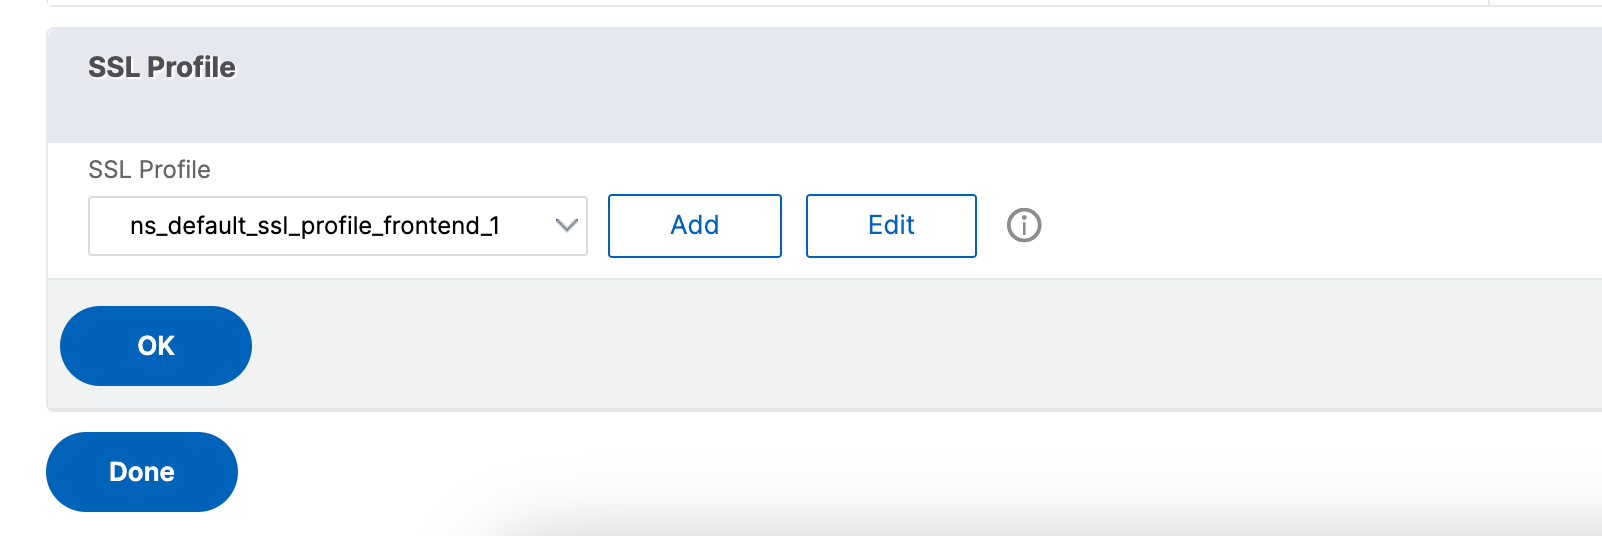
Step 1: Add SSL profile
- Navigate toSystem > Profiles > SSL Profile.
- ClickAdd.
- In theQUIC Profilepage, set the SSL parameters. For detailed description see, SSL Profile configuration topic.
- ClickOKandClose.

Step 2: Associate SSL profile with load balancing virtual server of type SSL.
- In theProfilessection, select the SSL profile.
- ClickOKand thenDone.
View QUIC, and HTTP/3 statistics
以下命令显示一个详细的总结of QUIC, and HTTP3 statistics. At the command prompt, type the following:
> stat quic > stat quic –detail To clear the statistics display, type one of the following:
> stat quic -clearstats basic > stat quic -clearstats full To display a detailed summary of HTTP/3 statistics:
> stat http3 > stat http3 –detail To clear the statistics display, type one of the following:
> stat http3 -clearstats basic > stat http3 -clearstats full In this article
- Enable SSL and load balancing
- 增加开关负载平衡和内容ing (optional) virtual servers of type HTTP_QUIC for HTTP/3 service
- Associate QUIC protocol parameters with HTTP_QUIC virtual server
- Enable and bind HTTP/3 on a HTTP_QUIC virtual server
- Bind SSL certificate-key pair with HTTP_QUIC virtual server
- Bind SSL/TLS protocol parameters with a HTTP_QUIC virtual server
- Enable SSL and load balancing features by using the GUI
- 增加开关负载平衡和内容ing (optional) virtual servers of type HTTP_QUIC by using the GUI
- Associate QUIC protocol parameters with the HTTP_QUIC virtual server by using the GUI
- Associate SSL/TLS protocol parameters with the virtual server of type SSL by using the GUI
- View QUIC, and HTTP/3 statistics