
Automated actions
You create automated actions in XenMobile to program a reaction to events, user or device properties, or the existence of apps on user devices. When you create an automated action, the triggers defined for the action determine what happens on the user device when it is connected to XenMobile. When an event is triggered, you can send a notification to the user to correct an issue before more serious action is taken.
The effects that you set to happen automatically range from the following:
- Fully or selectively wiping the device.
- Setting the device to out of compliance.
- Revoking the device.
- Sending a notification to the user to correct an issue before more severe action is taken.
You can configure app lock and app wipe actions for MAM-only mode.
Note:
Before you can notify users, you must configure notification servers in the XenMobile settings for SMTP and SMS so that XenMobile can send the messages. For information, seeNotifications.Also, set up any notification templates you plan to use before proceeding. For details, seeCreate and update notification templates.
Example actions
Here are some examples of using automated actions:
Example one
- You want to detect an app that you previously blocked (for example, “Words with Friends”). You can specify a trigger that sets the user device out of compliance after detecting the “Words with Friends” app . The action then notifies users that they must remove the app to bring their device back into compliance. You can also set a time limit for how long to wait for users to comply. After that time limit, a defined action occurs, such as selectively wiping the device.
Example two
- You want to verify if customers are using the latest firmware and block access to resources if users need to update their devices. You can specify a trigger that sets the user device out of compliance when a user device doesn’t have the latest version. You use automated actions to block resources and to notify customers.
Example three
- A user device is put into an out-of-compliance state and the user then fixes the device. You can configure a policy to deploy a package that resets the device into a compliant state.
Example four
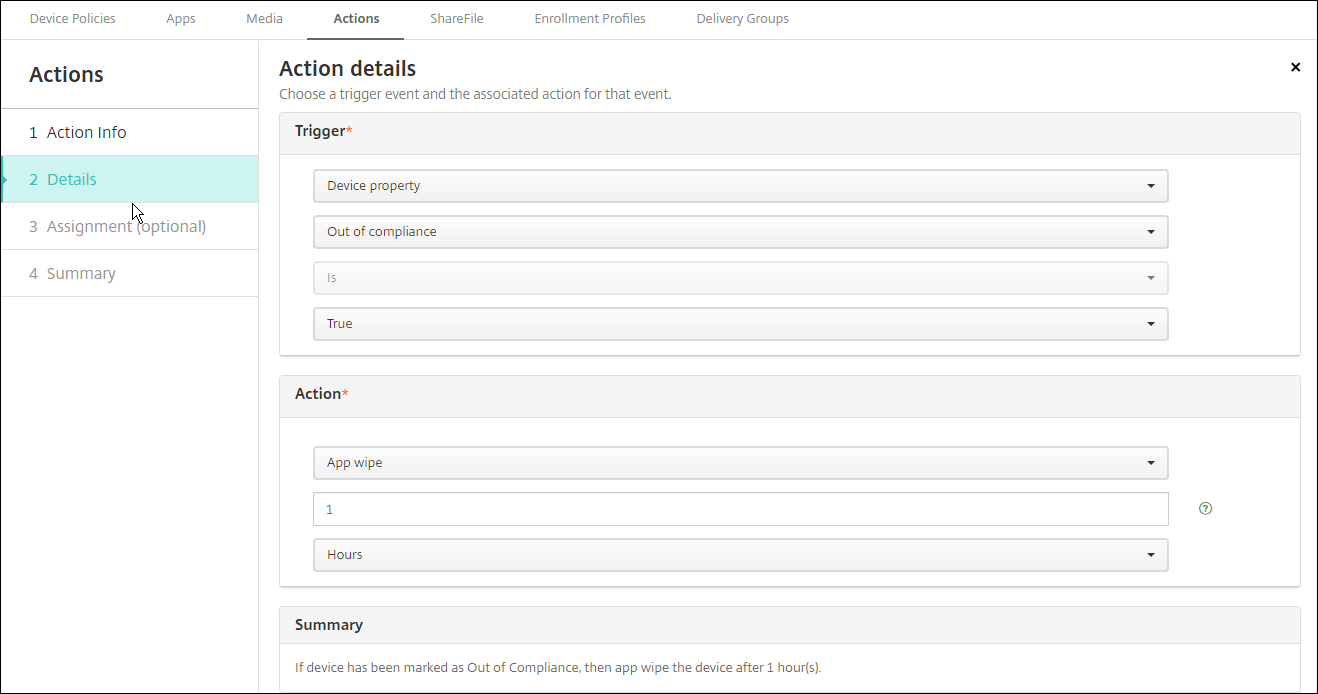
You want to mark user devices that have been inactive for a certain time period as out of compliance. You can create an automated action for inactive devices as follows:
- In the XenMobile console, go toSettings > Network Access Controland then selectInactive Devices.For more information about theInactive Devicessetting, seeNetwork Access Control.
- Follow the steps to add an action, as outlined inAdd and manage actions.The only difference is that you configure settings as follows on theAction detailspage:
- Trigger.SelectDevice property,Out of compliance, andTrue.
- Action.SelectSend notificationand select a template that you created by usingNotification TemplateinSettings.Then set the delay in days, hours, or minutes before performing the action. Set the interval at which the action repeats until the user addresses the triggering issue.
Tip:
To delete inactive devices in bulk, use thePublic API for REST Services.你第一次手动获得在设备idctive devices you want to delete and then run the delete API to delete them in bulk.
Add and manage actions
To add, edit, and filter automated actions:
From the XenMobile console, clickConfigure > Actions.TheActionspage appears.
On theActionspage, do one of the following:
- ClickAddto add an action.
- Select an existing action to edit or delete. Click the option you want to use.
TheAction Informationpage appears.
On theAction Informationpage, enter or modify the following information:
- Name:Type a name to identify the action. This field is required.
- Description:Describe what the action is meant to do.
ClickNext.TheAction detailspage appears.
The following example shows how to set up anEventtrigger. If you select a different trigger, the resulting options differ from those shown here.
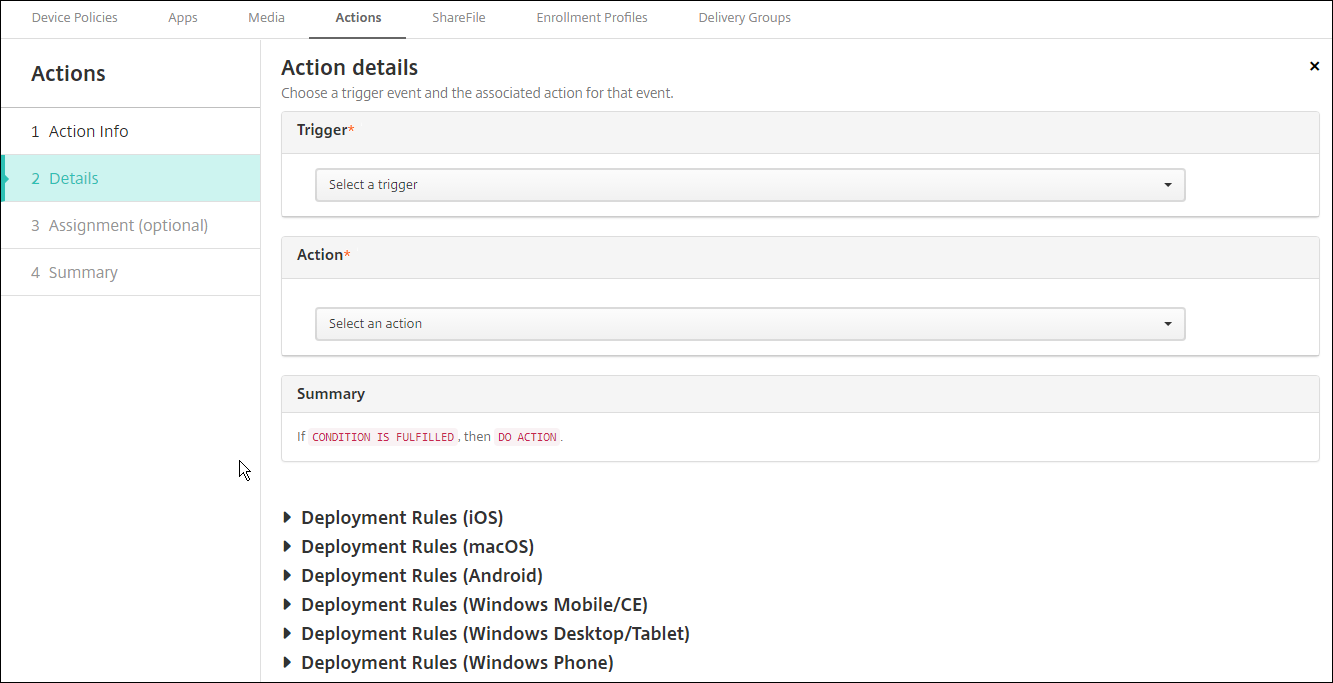
On theAction detailspage, enter or modify the following information:
In theTriggerlist, click the event trigger type for this action. The meaning of each trigger is as follows:
- Event:Reacts to a predefined event.
- Device property:Checks for a device attribute on a device that is MDM-managed, then reacts to it. For more information, seeDevice property names and values.
- User property:Reacts to a user attribute, usually from Active Directory.
- Installed app name:Reacts to an app being installed. Doesn’t apply to MAM-only mode. Requires the app inventory policy to be enabled on the device. The app inventory policy is enabled on all platforms by default. For details, seeApp inventory device policy.
In the next list, click the response to the trigger.
In theActionlist, click the action to be performed when the trigger criterion is met. Except forSend notification, you choose a time frame in which users can resolve the issue that caused the trigger. If the issue isn’t resolved within that time frame, the selected action is taken. For a definition of the actions, seeSecurity actions.
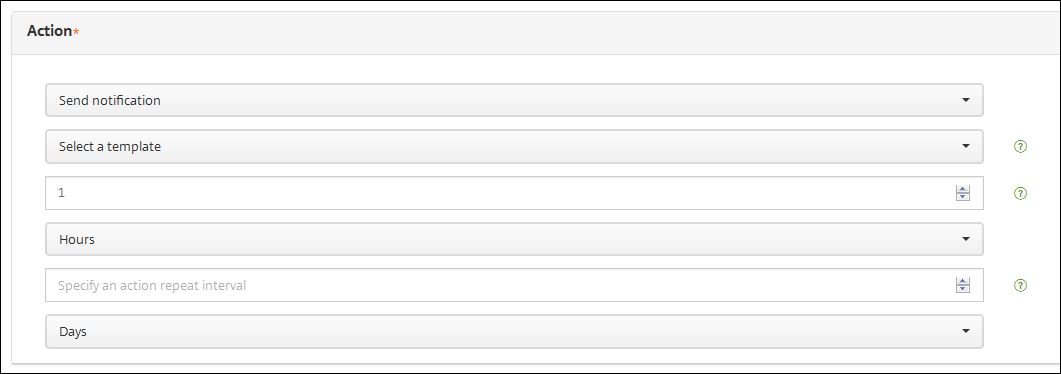
If you pickSend notification, use the following steps to send a notification action.
In the next list, select the template to use for the notification. Notification templates relevant to the selected event appear, unless a template doesn’t yet exist for the notification type. In that case, you are prompted to configure a template with the message: No template for this event type. Create template usingNotification TemplateinSettings.
Before you can notify users, you must have configured notification servers in Settings for SMTP and SMS so that XenMobile can send the messages, seeNotifications.Also, set up any notification templates you plan to use before proceeding. For details on setting up notification templates, seeCreate and update notification templates.
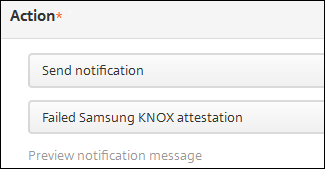
After you select the template, you can preview the notification by clickingPreview notification message.
In the following fields, set the delay in days, hours, or minutes before performing the action. Set the interval at which the action repeats until the user addresses the triggering issue.

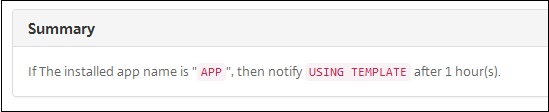
InSummary, verify that you created the automated action as you intended.
After you configure the action details, you can configure deployment rules for each platform individually. To do so, complete step 13 for each platform you choose.
Configure deployment rules. For general information about configuring deployment rules, seeDeploy resources.
对于这个示例:
- Device ownership must beBYOD.
- Device local encryption must beTrue.
- Device must be passcode compliant.
- Device mobile country code cannot be only Andorra.
When you are done configuring the platform deployment rules for the action, clickNext.TheActions assignmentpage appears, where you assign the action to a delivery group or groups. This step is optional.
Next toChoose delivery groups, type to find a delivery group or select groups in the list. The groups you select appearDelivery groups to receive app assignmentlist.
Expand Deployment Schedule and then configure the following settings:
Next toDeploy, clickONto schedule deployment or clickOFFto prevent deployment. The default option isON.If you chooseOFF, no other options are required.
Next toDeployment schedule, clickNoworLater.The default option isNow.
If you clickLater, click the calendar icon and then select the date and time for deployment.
Next toDeployment condition, clickOn every connectionor clickOnly when previous deployment has failed.The default option isOn every connection.
Next toDeploy for always-on connection, clickONorOFF.The default option isOFF.
This option applies when you have configured the scheduling background deployment key inSettings > Server Properties.iOS德的不间断选项不可用vices.
The deployment schedule you configure is the same for all platforms. Any changes you make apply to all platforms, except forDeploy for always on connection, which does not apply to iOS.
ClickNext.TheSummarypage appears, where you can verify the action configuration.
ClickSaveto save the action.


App lock and App wipe actions for MAM-only mode
You can wipe or lock apps on a device in response to all four categories of triggers listed in the XenMobile console: event, device property, user property, and installed app name.
To configure automatic app wipe or app lock
In the XenMobile console, clickConfigure > Actions.
On theActionspage, clickAdd.
On theAction Informationpage, enter a name for the action and an optional description.
On theAction Detailspage, select the trigger you want.
InAction, select an action.
For this step, keep the following conditions in mind:
When the trigger type isEventand the value is not活跃的可怕的ctory disabled user,App wipeandApp lockactions don’t appear.
When the trigger type isDevice propertyand the value isMDM lost mode enabled,following actions don’t appear:
- Selectively wipe the device
- Completely wipe the device
- Revoke the device
For each option, a 1 hour delay is automatically set, but you can select the delay period in minutes, hours or days. The intent of the delay is to give users time to fix an issue before the action occurs. For more information about the App wipe and App lock actions, seeSecurity actions.
Note:
If you set the trigger toevent,repeat interval is automatically a minimum of 1 hour. The device must carry out a refresh of the policies to synchronize with the server for the notification to come in. Typically, a device synchronizes with the server when users sign on or manually refresh their policies through Secure Hub.
An extra delay of approximately 1 hour may occur before any action is carried out, to allow the Active Directory database to synchronize with XenMobile.
Configure deployment rules and then clickNext.
Configure delivery group assignments and a deployment schedule and then clickNext.
ClickSave.

To check app lock or app wipe status
Go toManage > Devices, click a device, and then clickShow more.
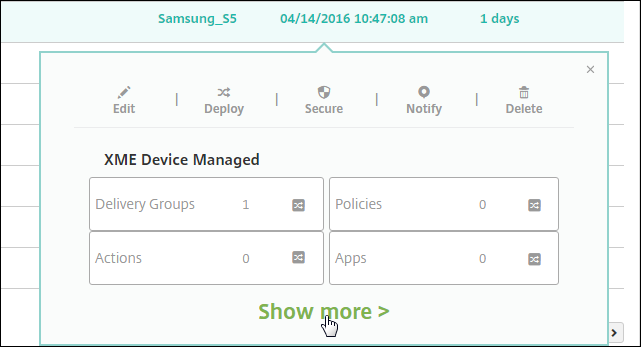
Scroll toDevice App WipeandDevice App Lock.
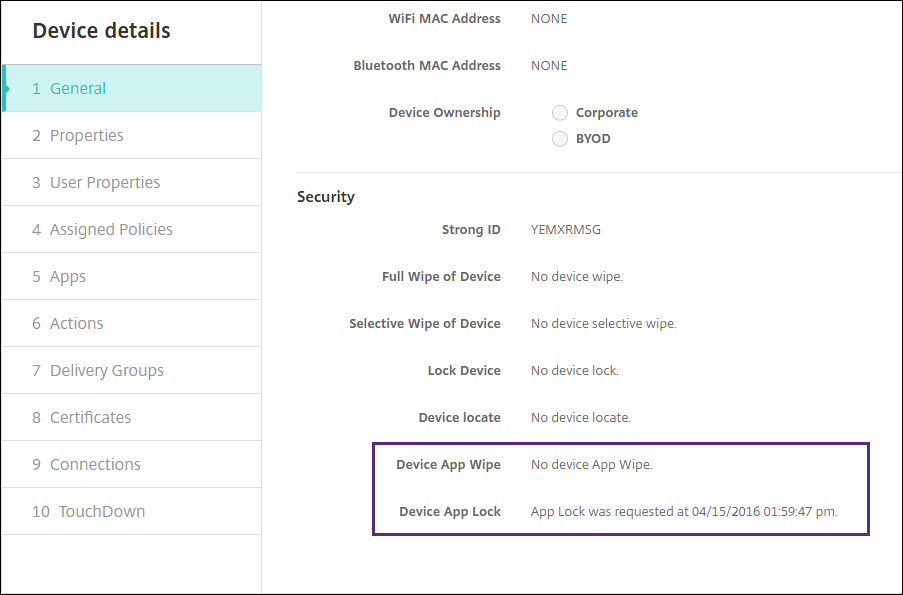
After a device gets wiped, the user is prompted to enter a PIN code. If the user forgets the code, you can look it up in the Device Details.


