
SAML for single sign-on with Citrix Files
You can configure XenMobile and Citrix Content Collaboration to use the Security Assertion Markup Language (SAML) to provide single sign-on (SSO) access to Citrix Files mobile apps. This functionality includes:
- Citrix Files apps that are MAM SDK enabled or wrapped by using the MDX Toolkit
Non-wrapped Citrix Files clients, such as the website, Outlook plug-in, or sync clients
- For wrapped Citrix Files apps. Users who log on to Citrix Files through the Citrix Files mobile app are redirected to Secure Hub for user authentication and to acquire a SAML token. After successful authentication, the Citrix Files mobile app sends the SAML token to Content Collaboration. After the initial logon, users can access the Citrix Files mobile app through SSO. They can also attach documents from Content Collaboration to Secure Mail mails without logging on each time.
- For non-wrapped Citrix Files clients. Users who log on to Citrix Files using a web browser or other Citrix Files client are redirected to XenMobile. XenMobile authenticates the users, who then acquire a SAML token which is sent to Content Collaboration. After the initial logon, users can access Citrix Files clients through SSO without logging on each time.
使用XenMobile SAML身份提供商(IdP)to Content Collaboration, you must configure XenMobile to use with Enterprise accounts, as described in this article. Alternatively, you can configure XenMobile to work only with storage zone connectors. For more information, seeUse Citrix Content Collaboration with XenMobile.
For a detailed reference architecture diagram, seeArchitecture.
Prerequisites
Complete the following prerequisites before you can configure SSO with XenMobile and Citrix Files apps:
The MAM SDK or a compatible version of the MDX Toolkit (for Citrix Files mobile apps).
For more information, seeXenMobile compatibility.
- A compatible version of Citrix Files mobile apps and Secure Hub.
- Content Collaboration administrator account.
- Connectivity verified between XenMobile and Content Collaboration.
Configure Content Collaboration access
Before setting up SAML for Content Collaboration, provide Content Collaboration access information as follows:
In the XenMobile web console, clickConfigure > ShareFile. TheShareFileconfiguration page appears. Your console might show the term Content Collaboration instead of ShareFile.
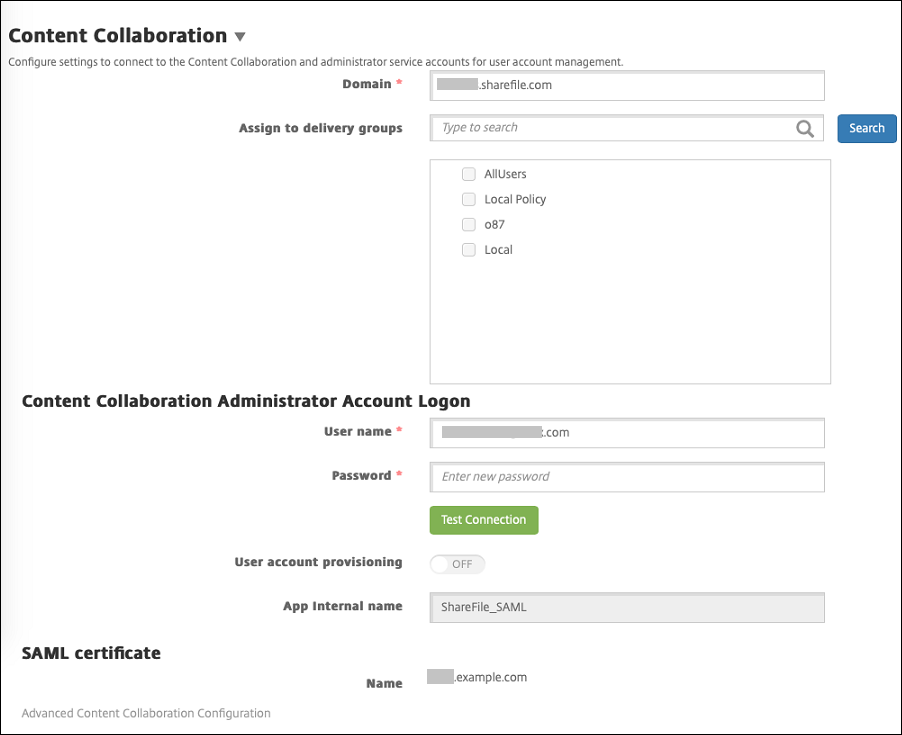
Configure these settings:
- 域:Type your Content Collaboration subdomain name. For example:
example.sharefile.com. - Assign to delivery groups:Select or search for the delivery groups that you want to be able to use SSO with Content Collaboration.
- ShareFile Administrator Account Logon
- User name:Type the Content Collaboration administrator user name. This user must have administrator privileges.
- Password:Type the Content Collaboration administrator password.
- User account provisioning:Leave this setting disabled. Use the Content Collaboration User Management Tool for user provisioning. SeeProvision user accounts and distribution groups.
- 域:Type your Content Collaboration subdomain name. For example:
ClickTest Connectionto verify that the user name and password for the Content Collaboration administrator account authenticate to the specified Content Collaboration account.
ClickSave.
XenMobile syncs with Content Collaboration and updates the Content Collaboration settingsShareFile Issuer/Entity IDandLogin URL.
TheConfigure > ShareFilepage shows theApp internal name. You need that name to complete the steps described later inModify the Citrix Files.com SSO settings.

Set up SAML for Wrapped Citrix Files MDX Apps
You don’t need to use Citrix Gateway for single sign-on configuration with wrapped Citrix Files MDX apps. To configure access for non-wrapped Citrix Files clients, such as the website, Outlook plug-in, or the sync clients, seeConfigure the Citrix Gateway for Other Citrix Files Clients.
以下步骤适用于iOS和Android应用程序and devices. To configure SAML for wrapped Citrix Files MDX apps:
With the MDX Toolkit, wrap the Citrix Files mobile app. For more information about wrapping apps with the MDX Toolkit, seeWrapping Apps with the MDX Toolkit.
In the XenMobile console, upload the wrapped Citrix Files mobile app. For information about uploading MDX apps, seeTo add an MDX app to XenMobile.
Verify the SAML settings: Log on to Content Collaboration with the administrator user name and password you configured earlier.
Verify that Content Collaboration and XenMobile are configured for the same time zone. Ensure that XenMobile shows the correct time for the configured time zone. If not, SSO might fail.
Validate the Citrix Files mobile app
On the user device, install and configure Secure Hub.
From the XenMobile Store, download and install the Citrix Files mobile app.
启动CitrixFiles mobile app. Citrix Files starts without prompting for user name or password.
Validate with Secure Mail
On the user device, if it has not already been done, install and configure Secure Hub.
From the XenMobile Store, download, install, and set up Secure Mail.
Open a new email form and then tapAttach from Citrix Files. Files available to attach to the email are shown without asking for user name or password.
Configure the Citrix Gateway for Other Citrix Files Clients
To configure access for non-wrapped Citrix Files clients, such as the website, Outlook plug-in, or the sync clients: Configure Citrix Gateway to support the use of XenMobile as a SAML identity provider as follows.
- Disable home page redirection.
- Create a Citrix Files session policy and profile.
- Configure policies on the Citrix Gateway virtual server.
Disable home page redirection
Disable the default behavior for requests that come through the /cginfra path. That action enables users to see the original requested internal URL instead of the configured home page.
Edit the settings for the Citrix Gateway virtual server that is used for XenMobile logons. In Citrix ADC, go toOther Settingsand then clear the check box labeledRedirect to Home Page.
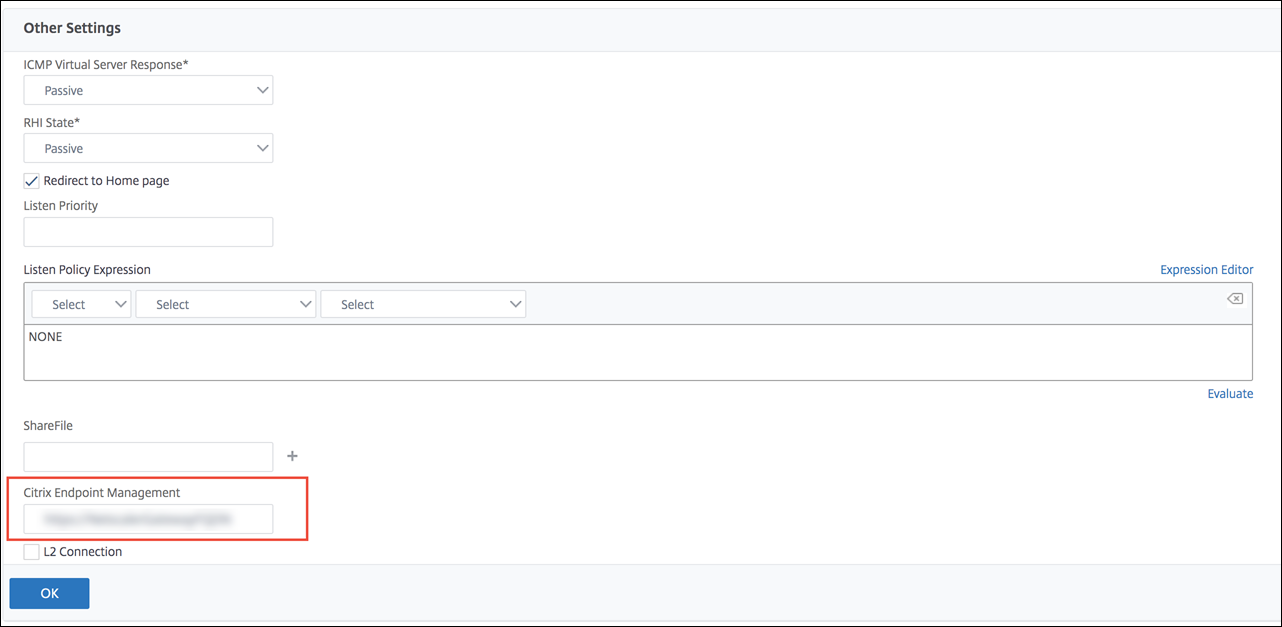
UnderShareFile(now called Content Collaboration), type your XenMobile internal server name and port number.
UnderCitrix Endpoint Management, type your XenMobile URL. Your version of Citrix Gateway may refer to the older product nameAppController.
This configuration authorizes requests to the URL you entered through the /cginfra path.

Create a Citrix Files session policy and request profile
Configure these settings to create a Citrix Files session policy and request profile:
In the Citrix Gateway configuration utility, in the left-hand navigation pane, clickCitrix Gateway > Policies > Session.
Create a session policy. On thePoliciestab, clickAdd.
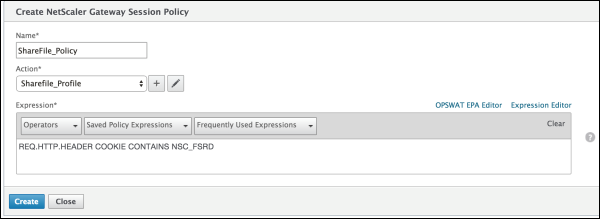
In theNamefield, typeShareFile_Policy.
Create an action by clicking the+button. TheCreate Session Profilepage appears.
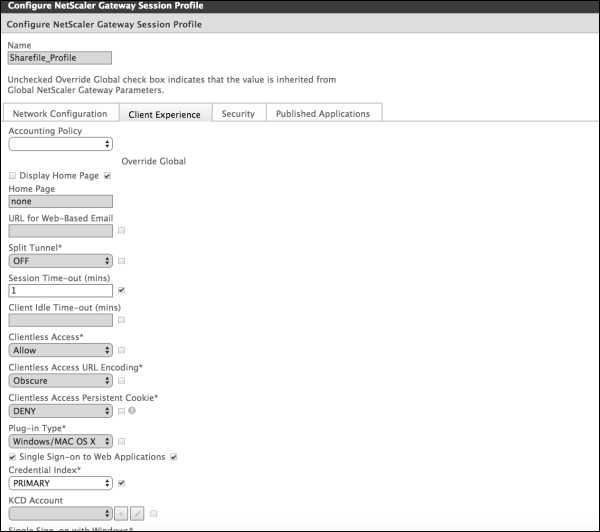
Configure these settings:
- Name:TypeShareFile_Profile.
- Click theClient Experiencetab and then configure these settings:
- Home Page:Typenone.
- Session Time-out (mins):Type1.
- Single Sign-on to Web Applications:Select this setting.
- Credential Index:ClickPRIMARY.
- Click thePublished Applicationstab.
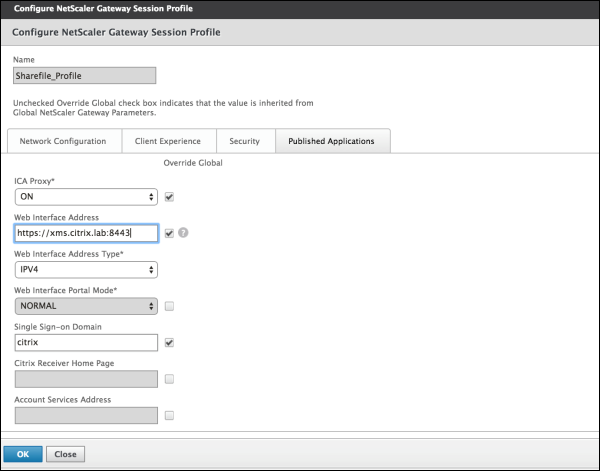
Configure these settings:
- ICA Proxy:ClickON.
- Web Interface Address:Type your XenMobile Server URL.
Single Sign-on Domain:Type your Active Directory domain name.
When configuring the Citrix Gateway Session Profile, the domain suffix forSingle Sign-on Domainmust match the XenMobile domain alias defined in LDAP.
ClickCreateto define the session profile.
ClickExpression Editor.
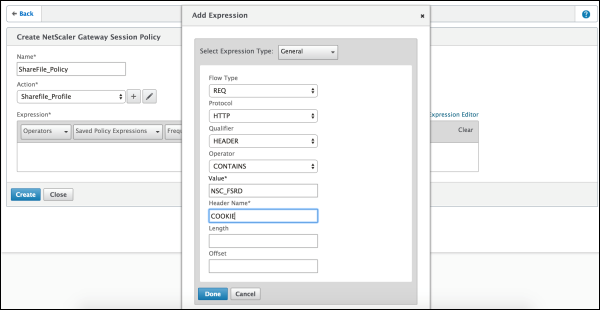
Configure these settings:
- Value:TypeNSC_FSRD.
- Header Name:TypeCOOKIE.
ClickCreateand then clickClose.


Configure policies on the Citrix Gateway virtual server
Configure these settings on the Citrix Gateway virtual server.
In the Citrix Gateway configuration utility, in the left navigation pane, clickCitrix Gateway > Virtual Servers.
In theDetailspane, click your Citrix Gateway virtual server.
ClickEdit.
ClickConfigured policies > Session policiesand then clickAdd binding.
SelectShareFile_Policy.
Edit the auto-generatedPrioritynumber for the selected policy so that it has the highest priority (the smallest number) in relation to any other policies listed. For example:
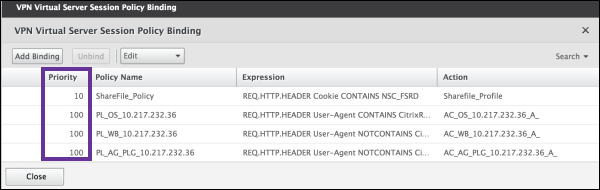
ClickDoneand then save the running Citrix ADC configuration.

Modify the Citrix Files.com SSO settings
Make the following changes for both MDX and non-MDX Citrix Files apps.
Important:
A new number is appended the internal application name:
- Each time you edit or recreate the Citrix Files app
- Each time you change the Content Collaboration settings in XenMobile
As a result, you must also update the Login URL in the Citrix Files website to reflect the updated app name.
Log on to your Content Collaboration account (
https://) as a Content Collaboration administrator..sharefile.com In the Content Collaboration web interface, clickAdminand then selectConfigure Single Sign-on.
Edit theLogin URLas follows:
Here’s a sampleLogin URLbefore the edits:
https://xms.citrix.lab/samlsp/websso.do?action=authenticateUser&app=ShareFile_SAML_SP&reqtype=1.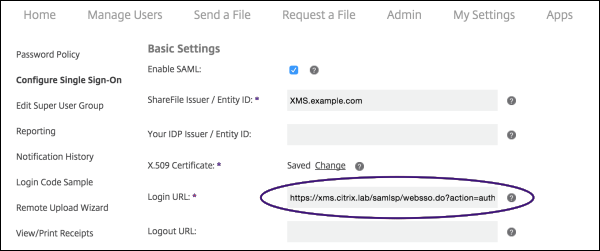
Insert the Citrix Gateway virtual server external FQDN plus
/cginfra/https/in front of the XenMobile Server FQDN and then add8443after the XenMobile FQDN.Here’s a sample of an edited URL:
https://nsgateway.acme.com/cginfra/https/xms.citrix.lab:8443/samlsp/websso.do?action=authenticateUser&app=SHareFile_SAML_SP&reqtype=1Change the parameter
&app=ShareFile_SAML_SPto the internal Citrix Files application name. The internal name isShareFile_SAMLby default. However, every time you change your configuration, a number is appended to the internal name (ShareFile_SAML_2,ShareFile_SAML_3, and so on). You can look up theApp internal nameon theConfigure > ShareFilepage.Here’s a sample of an edited URL:
https://nsgateway.acme.com/cginfra/https/xms.citrix.lab:8443/samlsp/websso.do?action=authenticateUser&app=ShareFile_SAML&reqtype=1Add
&nssso=trueto the end of the URL.Here’s a sample of the final URL:
https://nsgateway.acme.com/cginfra/https/xms.citrix.lab:8443/samlsp/websso.do?action=authenticateUser&app=ShareFile_SAML&reqtype=1&nssso=true.
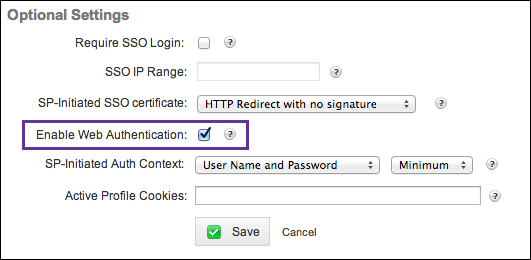
UnderOptional Settings, select theEnable Web Authenticationcheck box.


Validate the configuration
Do the following to validate the configuration.
Point your browser to
https://.sharefile.com/saml/login You are redirected to the Citrix Gateway logon form. If you are not redirected, verify the preceding configuration settings.
Enter the user name and password for the Citrix Gateway and XenMobile environment you configured.
Your Citrix Files folders at
.sharefile.com