
Google Cloud environments
Citrix DaaS (formerly Citrix Virtual Apps and Desktops service) lets you provision and manage machines on Google Cloud.
Requirements
- Citrix Cloud account. The feature described in this article is available only in Citrix Cloud.
- Citrix DaaS subscription. For details, seeGet started.
- A Google Cloud project. The project stores all compute resources associated with the machine catalog. It can be an existing project or a new one.
- Enable four APIs in your Google Cloud project. For details, seeEnable Google Cloud APIs.
- Google Cloud service account. The service account authenticates to Google Cloud to enable access to the project. For details, seeConfigure and update service accounts.
- Enable Google private access. For details, seeEnable-private-google-access.
Enable Google Cloud APIs
To use the Google Cloud functionality through the Citrix Virtual Apps and Desktops Full Configuration interface, enable these APIs in your Google Cloud project:
- Compute Engine API
- Cloud Resource Manager API
- Identity and Access Management (IAM) API
- Cloud Build API
From the Google Cloud console, complete these steps:
在高层中位数t menu, selectAPIs and Services > Dashboard.
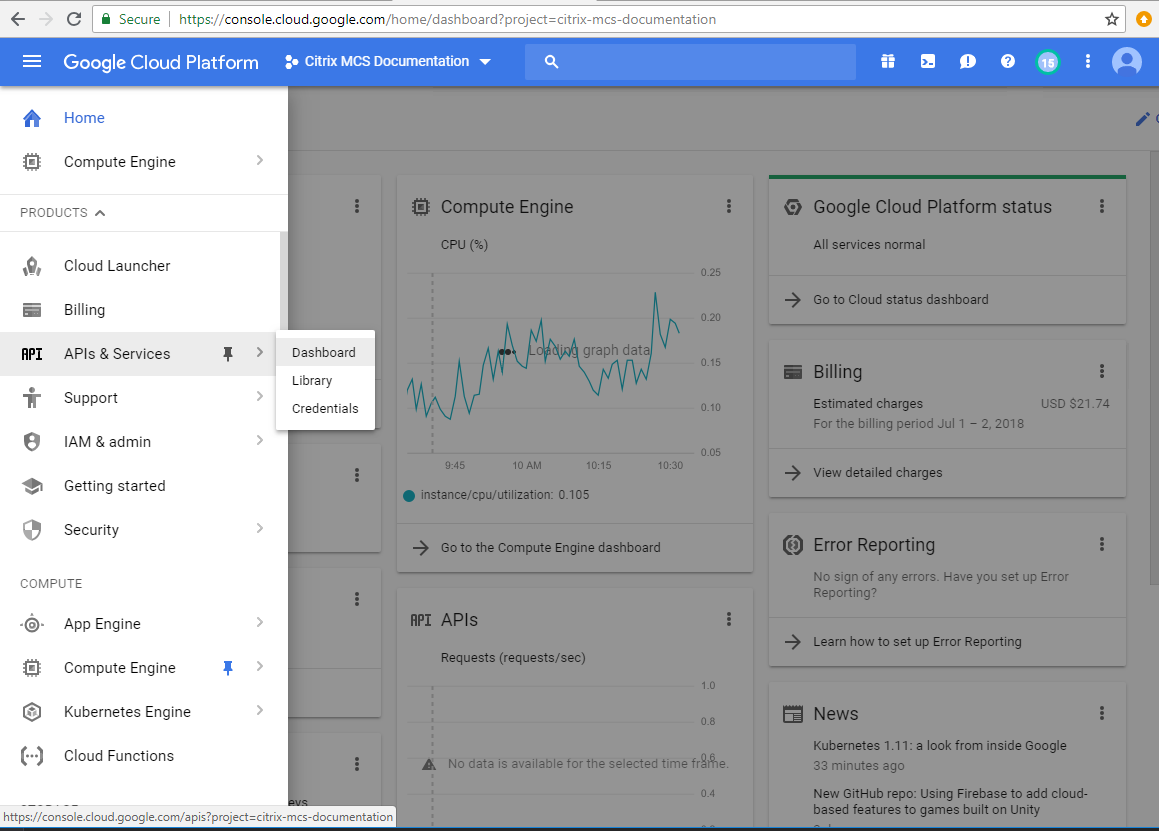
On theDashboardscreen, ensure that Compute Engine API is enabled. If not, follow these steps:
Navigate toAPIs and Services > Library.

In the search box, typeCompute Engine.
From the search results, selectCompute Engine API.
On theCompute Engine APIpage, selectEnable.
Enable Cloud Resource Manager API.
Navigate toAPIs and Services > Library.
In the search box, typeCloud Resource Manager.
From the search results, selectCloud Resource Manager API.
On theCloud Resource Manager APIpage, selectEnable. The status of the API appears.
Similarly, enableIdentity and Access Management (IAM) APIandCloud Build API.


You can also use Google Cloud Shell to enable the APIs. To do this:
- Open the Google Console and load the Cloud Shell.
Run the following four commands in the Cloud Shell:
- gcloud services enable compute.googleapis.com
- gcloud services enable cloudresourcemanager.googleapis.com
- gcloud services enable iam.googleapis.com
- gcloud services enable cloudbuild.googleapis.com
- ClickAuthorizeif the Cloud Shell prompts.
Configure and update service accounts
Citrix Cloud uses three separate service accounts within the Google Cloud project:
Citrix Cloud Service Account: This service account enables Citrix Cloud to access the Google project, provision, and manage machines. The Google Cloud account authenticates to Citrix Cloud using akeygenerated by Google Cloud.
You must create this service account manually.
You can identify this service account with an email address. For example,
@ .iam.gserviceaccount.com Each account (personal or service) has various roles defining the management of the project. Grant the following roles to this service account:
- Compute Admin
- Storage Admin
- Cloud Build Editor
- Service Account User
- Cloud Datastore User
Cloud Build Service Account: This service account is provisioned automatically after you enable all the APIs mentioned inEnable Google Cloud APIs.
You can identify this service account by an email address that begins with theProject IDand the wordcloudbuild. For example,
@cloudbuild.gserviceaccount.com Grant the following roles to this service account:
- Cloud Build Service Account
- Compute Instance Admin
- Service Account User
Cloud Compute Service Account: This service account is added by Google Cloud to instances created in Google Cloud once Compute API is activated. This account has the IAM basic editor role to do the operations. However, if you delete the default permission to have more granular control, you must addStorage Adminrole that requires the following permissions:
- resourcemanager.projects.get
- storage.objects.create
- storage.objects.get
- storage.objects.list
You can identify this service account by an email address that begins with theProject IDand the wordcompute. For example,
Create a Citrix Cloud Service Account
To create a Citrix Cloud Service Account, follow these steps:
- In the Google Cloud console, navigate toIAM & Admin > Service accounts.
- On theService accountspage, selectCREATE SERVICE ACCOUNT.
- On theCreate service accountpage, enter the required information and then selectCREATE AND CONTINUE.
On theGrant this service account access to projectpage, clickSelect a roledrop-down menu and select the required roles. Click+ADD ANOTHER ROLEif you want to add more roles.
Note:
启用的所有api ro的完整列表les available while creating a new service account.
- ClickCONTINUE
- On theGrant users access to this service accountpage, add users or groups to grant them access to perform actions in this service account.
- ClickDONE.
- Navigate to IAM main console.
- Identify the service account created.
- Validate the roles are assigned successfully.
Considerations:
When creating the service account, consider the following:
The stepsGrant this service account access to projectandGrant users access to this service accountare optional. If you choose to skip these optional configuration steps, the newly created service account does not display in theIAM & Admin > IAMpage.
To display roles associated with a service account, add the roles without skipping the optional steps. This process ensures that roles appear for the configured service account.
Citrix Cloud Service Account key
When creating a service account, there is an option to create a key for the account. You need this key when creating a connection in Citrix DaaS. The key is contained in a credential file (.json). The file is automatically downloaded and saved to theDownloadsfolder after you create the key. When you create the key, be sure to set the key type to JSON. Otherwise, the Citrix Full Configuration interface cannot parse it.
Tip:
Create keys using theService accountspage in the Google Cloud console. We recommend that you change keys regularly for security purposes. You can provide new keys to the Citrix Virtual Apps and Desktops application by editing an existing Google Cloud connection.
Add roles to the Citrix Cloud Service Account
To add roles to the Citrix Cloud Service Account:
- In the Google Cloud console, navigate toIAM & Admin > IAM.
On theIAM > PERMISSIONSpage, locate the service account you created, identifiable with an email address.
For example,
@ .iam.gserviceaccount.com - Select the pencil icon to edit the access to the principal of the service account.
- On theEdit access to “project-id”page for the selected principal option, selectADD ANOTHER ROLEto add the required roles to your service account one by one and then selectSAVE.
Add roles to the Cloud Build Service Account
To add roles to the Cloud Build Service Account:
- In the Google Cloud console, navigate toIAM & Admin > IAM.
On theIAMpage, locate the Cloud Build service account, identifiable with an email address that begins with theProject IDand the wordcloudbuild.
For example,
@cloudbuild.gserviceaccount.com - Select the pencil icon to edit the Cloud Build account roles.
On theEdit access to “project-id” pagefor the selected principal option, selectADD ANOTHER ROLEto add the required roles to your Cloud Build service account one by one and then selectSAVE.
Note:
启用的所有api ro的完整列表les.
Storage permissions and bucket management
Citrix DaaS improves the process of reporting cloud build failures for theGoogle Cloud service. This service runs builds on the Google Cloud. Citrix DaaS creates a storage bucket namedcitrix-mcs-cloud-build-logs-{region}-{5 random characters}where the Google Cloud services captures build log information. An option is set on this bucket that deletes the contents after a period of 30 days. This process requires that the service account used for the connection has Google Cloud permissions set tostorage.buckets.update. If the service account does not have this permission, Citrix DaaS ignores errors and proceeds with the catalog creation process. Without this permission, the size of the build logs increases and requires manual cleanup.
Enable private Google access
When a VM lacks an external IP address assigned to its network interface, packets are only sent to other internal IP addresses destinations. When you enable private access, the VM connects to the set of external IP addresses used by the Google API and associated services.
Note:
Whether private Google access is enabled, all VMs that are with and without public IP addresses, must be able to access Google Public APIs, especially if third-party networking appliances have been installed in the environment.
To ensure that a VM in your subnet can access the Google APIs without a public IP address for MCS provisioning:
- In Google Cloud, access theVPC network configuration.
- In the Subnet details screen, turn onPrivate Google access.

For more information, seeConfiguring Private Google Access.
Important:
If your network is configured to prevent VM access to the Internet, ensure that your organization assumes the risks associated with enabling Private Google access for the subnet to which the VM is connected.
Where to go next
- For a simple proof-of-concept deployment,install a VDAon a machine that will deliver apps or a desktop to your users.
- For creating and managing a connection, seeConnection to Google cloud environments.
- Review all the steps in the installation and configuration process.