
Connection to Microsoft Azure
Create and manage connectionsdescribes the wizards that create a connection. The following information covers details specific to Azure Resource Manager cloud environments.
Note:
Before creating a connection to Microsoft Azure, you must finish setting up your Azure account as a resource location. SeeMicrosoft Azure Resource Manager cloud environments.
Create service principals and connections
Before creating connections, you must set up service principals that connections use to access Azure resources. You can create a connection in two ways:
- Create a service principal and a connection together using Full Configuration
- Create a connection using a previously created service principal
This section shows you how to complete these tasks:
- 创建一个服务主体和连接使用ll Configuration
- Create a service principal using PowerShell
- 秘密在Azure中的应用
- Create a connection using an existing service principal
Considerations
Before you start, be aware of these considerations:
- Citrix recommends using service principals withContributorrole. However, seeMinimum permissionssection to get the list of minimum permissions.
- When creating the first connection, Azure prompts you to grant it the necessary permissions. For future connections you must still authenticate, but Azure remembers your previous consent and does not display the prompt again.
- Accounts used for authentication must be a co-administrator of the subscription.
- The account used for authentication must be a member of the subscription’s directory. There are two types of accounts to be aware of: ‘Work or School’ and ‘personal Microsoft account.’ SeeCTX219211for details.
While you can use an existing Microsoft account by adding it as a member of the subscription’s directory, there can be complications if the user was previously granted guest access to one of the directory’s resources. In this case, they might have a placeholder entry in the directory that does not grant them the necessary permissions, and an error is returned.
Rectify this by removing the resources from the directory and adding them back explicitly. However, exercise this option carefully, because it has unintended effects on other resources that this account can access.
- There is a known issue where certain accounts are detected as directory guests when they are actually members. Configurations like this typically occur with older established directory accounts. Workaround: add an account to the directory, which takes the proper membership value.
- Resource groups are simply containers for resources, and they can contain resources from regions other than their own region. This can potentially be confusing if you expect resources displayed in a resource group’s region to be available.
- Ensure that your network and subnet are large enough to host the number of machines you require. This requires some foresight, but Microsoft helps you specify the right values, with guidance about the address space capacity.
创建一个服务主体和连接使用ll Configuration
Important:
This feature is not yet available for Azure China subscriptions.
With Full Configuration, you can create both a service principal and a connection in a single workflow. Service principals give connections access to Azure resources. When you authenticate to Azure to create a service principal, an application is registered in Azure. A secret key (calledclient secretorapplication secret) is created for the registered application. The registered application (aconnectionin this case) uses the client secret to authenticate to Azure AD.
Before you start, make sure that you’ve met these prerequisites:
- 你有在你的订阅Azu用户帐户re Active Directory tenant.
- The Azure AD user account is also a co-administrator for the Azure subscription that you want to use for provisioning resources.
- You have global administrator, application administrator, or application developer permissions for authentication. The permissions can be revoked after you create host connection. For more information about roles, seeAzure AD built-in roles.
Use theAdd Connection and Resourceswizard to create a service principal and a connection together:
On theConnectionpage, selectCreate a new connection, theMicrosoft Azureconnection type, and your Azure environment.
Select which tools to use to create the virtual machines and then selectNext.
On theConnection Detailspage, create a service principal and set the connection name as follows:
To grant the connection permission to automatically clean stale Azure AD joined devices, selectEnable Azure AD joined device management. We recommend that you select this option if you want to create Azure AD joined machines through this connection. For more information, seeEnable Azure AD joined device management.
Enter your Azure subscription ID and a name for the connection. After you enter the subscription ID, theCreate newbutton is enabled.
Note:
The connection name can contain 1–64 characters, and cannot contain only blank spaces or the characters
\/;:#.*?=<>|[]{}"'()'.SelectCreate newand then enter the Azure Active Directory account user name and password.
SelectSign in.
SelectAcceptto give Citrix DaaS the listed permissions. Azure creates a service principal that allows Citrix DaaS to manage Azure resources on behalf of the specified user.
After you selectAccept, you’re taken back to theConnection Detailspage.
Note:
After you successfully authenticate to Azure, theCreate newand使用现有的buttons disappear. TheConnection successfultext appears, with a green check mark, indicating the successful connection to your Azure subscription.
To route API requests to Azure through Citrix Cloud Connectors, select theRoute traffic through Citrix Cloud Connectorscheck box.
Alternatively, you can enable this feature using PowerShell. For more information, seeCreate a secure environment for Azure-managed traffic.
Note:
- This feature is being rolled out in phases. It might not be activated for your account.
- This option is available only when there are active Citrix Cloud Connectors in your deployment. Currently, this feature is not supported for Connector Appliances.
SelectNext.
Note:
You cannot proceed to the next page until you successfully authenticate to Azure and consent to giving the required permissions.
Configure resources for the connection as follows:
- On theRegionpage, select a region.
- On theNetworkpage, do the following:
- Type a 1–64 character resource name to help identify the region and network combination. A resource name cannot contain only blank spaces or the characters
\/;:#.*?=<>|[]{}"'()'. - Select a virtual network/resource group pair. (If you have more than one virtual network with the same name, pairing the network name with the resource group provides unique combinations.) If the region you selected on the previous page does not have any virtual networks, return to that page and select a region that has virtual networks.
- Type a 1–64 character resource name to help identify the region and network combination. A resource name cannot contain only blank spaces or the characters
On theSummarypage, view a summary of settings and selectFinishto complete your setup.
View the application ID
After you create a connection, you can view the application ID that the connection uses to access Azure resources.
In theAdd Connection and Resourceslist, select the connection to view the details. TheDetailstab shows the Application ID.

Create a service principal using PowerShell
To create a service principal using PowerShell, connect to your Azure Resource Manager subscription and use the PowerShell cmdlets provided in the following sections.
Make sure that you have these items ready:
- SubscriptionId:Azure Resource Manager
SubscriptionIDfor the subscription where you want to provision VDAs. - ActiveDirectoryID: Tenant ID of the application that you registered with Azure AD.
- ApplicationName:Name for the application to be created in Azure AD.
Detailed steps are as follows:
Connect to your Azure Resource Manager subscription.
Connect-AzAccountSelect the Azure Resource Manager subscription where you want to create the service principal.
Get-AzSubscription -SubscriptionId $subscriptionId | Select-AzSubscriptionCreate the application in your AD tenant.
$AzureADApplication = New-AzADApplication -DisplayName $ApplicationNameCreate a service principal.
New-AzADServicePrincipal -ApplicationId $AzureADApplication.AppIdAssign a role to the service principal.
New-AzRoleAssignment -RoleDefinitionName Contributor -ServicePrincipalName $AzureADApplication.AppId –scope /subscriptions/$SubscriptionIdFrom the output window of the PowerShell console, note the ApplicationId. You provide that ID when creating the host connection.
秘密在Azure中的应用
Tocreate a connection using an existing service principal, you must first get the application ID and secret of the service principal in the Azure portal.
Detailed steps are as follows:
- Get theApplication IDfrom the Full Configuration interface or using PowerShell.
- Sign in to the Azure portal.
- In Azure, selectAzure Active Directory.
- FromApp registrationsin Azure AD, select your application.
- Go toCertificates & secrets.
- ClickClient secrets.

Create a connection using an existing service principal
If you already have a service principal, you can use it to create a connection using Full Configuration.
Make sure you have these items ready:
- SubscriptionId
- ActiveDirectoryID (tenant ID)
- Application ID
应用程序的秘密
For more information, seeGet the application secret.
- Secret expiration date
Detailed steps are as follows:
In theAdd Connection and Resourceswizard:
On theConnectionpage, selectCreate a new connection, theMicrosoft Azureconnection type, and your Azure environment.
Select which tools to use to create the virtual machines and then selectNext.
On theConnection Detailspage, enter your Azure subscription ID and a name for the connection.
Note:
The connection name can contain 1–64 characters, and cannot contain only blank spaces or the characters
\/;:#.*?=<>|[]{}"'()'.Select使用现有的. In theExisting Service Principal Detailswindow, enter the following settings for the existing service principal. After you enter the details, theSavebutton is enabled. SelectSave. You cannot progress beyond this page until you provide valid details.
- Subscription ID. Enter your Azure subscription ID. To obtain your subscription ID, sign in to the Azure portal and navigate toSubscriptions > Overview.
- Active Directory ID(tenant ID). Enter the Directory (tenant) ID of the application that you registered with Azure AD.
- Application ID. Enter the Application (client) ID of the application that you registered with Azure AD.
- 应用程序的秘密. Enter a secret key (client secret). The registered application uses the key to authenticate to Azure AD. We recommend that you change keys regularly for security purposes. Be sure to save the key because you cannot retrieve the key later.
Secret expiration date. Enter the date after which the application secret expires. You receive an alert on the console before the secret key expires. However, if the secret key expires, you receive errors.
Note:
For security purposes, the expiration period cannot be more than two years from now.
- Authentication URL. This field is automatically populated and isn’t editable.
- Management URL. This field is automatically populated and isn’t editable.
Storage suffix. This field is automatically populated and isn’t editable.
访问以下需要的端点creating an MCS catalog in Azure. Access to these endpoints optimizes connectivity between your network and the Azure portal and its services.
- Authentication URL:https://login.microsoftonline.com/
- Management URL:https://management.azure.com/. This is a request URL for Azure Resource Manager provider APIs. The endpoint for management depends on the environment. For example, for Azure Global, it ishttps://management.azure.com/, and for Azure US Government, it ishttps://management.usgovcloudapi.net/.
- Storage suffix:https://*.core.windows.net./. This (*) is a wildcard character for storage suffix. For example,https://demo.table.core.windows.net/.
After selectingSave, you’re taken back to theConnection Detailspage. SelectNextto proceed to the next page.
Configure resources for the connection as follows:
- On theRegionpage, select a region.
- On theNetworkpage, do the following:
- Type a 1–64 character resource name to help identify the region and network combination. A resource name cannot contain only blank spaces or the characters
\/;:#.*?=<>|[]{}"'()'. - Select a virtual network/resource group pair. (If you have more than one virtual network with the same name, pairing the network name with the resource group provides unique combinations.) If the region you selected on the previous page does not have any virtual networks, return to that page and select a region that has virtual networks.
- Type a 1–64 character resource name to help identify the region and network combination. A resource name cannot contain only blank spaces or the characters
On theSummarypage, view a summary of settings and selectFinishto complete your setup.
Manage service principals and connections
This section details how you can manage service principals and connections:
- Configure Azure throttling settings
- Enable Azure AD joined device management
- Enable image sharing in Azure
- Add shared tenants to a connection using Full Configuration
- Implement image sharing using PowerShell
- Create a secure environment for Azure-managed traffic
- Manage the application secret and secret expiration date
Configure Azure throttling settings
Azure Resource Manager throttles requests for subscriptions and tenants, routing traffic based on defined limits, tailored to the specific needs of the provider. SeeThrottling Resource Manager requestson the Microsoft site for more information. Limits exist for subscriptions and tenants, where managing many machines can become problematic. For example, a subscription containing many machines might experience performance problems related to power operations.
Tip:
For more information, seeImproving Azure performance with Machine Creation Services.
To help mitigate these issues, Citrix DaaS allows you to remove MCS internal throttling to use more of the available request quota from Azure.
We recommend the following optimal settings when powering VMs on or off in large subscriptions, for example, those containing 1,000 VMs:
- Absolute simultaneous operations: 500
- Maximum new operations per minute: 2000
- Max concurrency of operations: 500
Use the Full Configuration interface to configure Azure operations for a given host connection:
- FromManage > Full Configuration, selectHostingin the left pane.
- Select an Azure-related connection to edit it.
- In theEdit Connectionwizard, selectAdvanced.
- On theAdvancedpage, use the configuration options to specify the number of simultaneous actions and maximum new actions per minute, and any additional connection options.

MCS supports 500 maximum concurrent operations by default. Alternatively, you can use the Remote PowerShell SDK to set the maximum number of concurrent operations.
Use thePowerShellproperty,MaximumConcurrentProvisioningOperations, to specify the maximum number of concurrent Azure provisioning operations. When using this property, consider:
- Default value of
MaximumConcurrentProvisioningOperationsis 500. - Configure the
MaximumConcurrentProvisioningOperationsparameter using the PowerShell commandSet-item.
Enable Azure AD joined device management
在Azure可能preve加入设备陈旧Azure广告nt new machines from joining Azure AD, causing them to work improperly. To avoid potential issues, you can grant connections permission to manage Azure AD joined devices. With this permission, connections can automatically clean stale Azure AD joined devices.
Note:
Azure AD joined devices can’t be deleted from Azure AD when you delete machines or machine catalogs.
- FromManage > Full Configuration, select Hosting in the left pane.
- Select the connection and then selectEdit Connectionin the action bar.
- SelectConnection Propertiesfrom the left pane.
On theConnection Propertiespage that appears, follow these steps:
- SelectEnable Azure AD joined device management.
- ClickSave.
In the Azure sign-in window that appears, enter your subscription password, and then clickSign in.
After the sign-in completes, you’re taken back to the list of hosting connections and resources. Click the connection in the list and then click theDetailstab in the bottom pane. You can see that theAzure AD joined device managementfield showsEnabled.
When you enable Azure AD joined device management with Full Configuration, you must authenticate with Azure AD regardless of the host connection creation method you choose (create new or use existing). The Azure AD built-inCloud Device Administratorrole is assigned to the service principal. To adopt theminimal permissions for Azure AD joined devicemanagement, you can manually remove the assignment ofCloud Device Administratorrole from the service principal and create an Azure AD custom role which only includes the minimal permissions and assign it to the service principal.
Note:
- The minimal permissions for Azure AD joined devices management areAzure AD permissionsand not theAzure Resource Manager permissions. They cannot be explicitly assigned to a service principal. You must create a custom role in Azure AD which includes those permissions and assign it to the service principal. SeeCreate and assign a custom role in Azure Active Directoryfor details.
- To create a custom role in Azure AD, you need Azure AD Premium P1 or P2 license.
Enable image sharing in Azure
When creating or updating machine catalogs, you can select shared images from different Azure tenants and subscriptions (shared through the Azure Compute Gallery). To enable image sharing within or across tenants, you must make the necessary settings in Azure:
Share images within a tenant (across subscriptions)
To select an image in Azure Compute Gallery that belongs to a different subscription, the image must be shared with the service principal (SPN) of that subscription.
For example, if there is a service principal (SPN 1), which is configured in Studio as:
Service principal: SPN 1
Subscription: subscription 1
Tenant: tenant 1
The image is in a different subscription, which is configured in Studio as:
Subscription: subscription 2
Tenant: tenant 1
If you want to share the image in subscription 2 with subscription 1 (SPN 1), go to subscription 2, and share the resource group with SPN1.
The image must be shared with another SPN using Azure role-based access control (RBAC). Azure RBAC is the authorization system used to manage access to Azure resources. For more information on Azure RBAC, see the Microsoft documentWhat is Azure role-based access control (Azure RBAC). To grant access, you assign roles to service principals at resource group scope with the Contributor role. To assign Azure roles, you must haveMicrosoft.Authorization/roleAssignments/writepermission, such as User Access Administrator or Owner. For more information on sharing images with another SPN, see the Microsoft documentAssign Azure roles using the Azure portal.
Share images across tenants
To share images across tenants with Azure Compute Gallery, create an application registration.
For example, if there are two tenants (Tenant 1 and Tenant 2) and you want to share your image gallery with Tenant 1, then:
Create an application registration for Tenant 1. For more information, seeCreate the app registration.
Give Tenant 2 access to the application by requesting a sign-in using a browser. Replace
Tenant2 IDwith the tenant ID of Tenant 1. ReplaceApplication (client) IDwith the application ID of the application registration that you created. When done making the replacements, paste the URL into a browser and follow the sign-in prompts to sign into Tenant 2. For example:https://login.microsoftonline.com//oauth2/authorize?client_id= &response_type=code&redirect_uri=https%3A%2F%2Fwww.microsoft.com%2F For more information, seeGive Tenant 2 access.
Give the application access to the Tenant 2 resource group. Sign in as Tenant 2 and give the application registration access to the resource group which has the gallery image. For more information, seeAuthenticate requests across tenants.
Add shared tenants to a connection using Full Configuration
When creating or updating machine catalogs in the Full Configuration interface, you can select shared images from different Azure tenants and subscriptions (shared through the Azure Compute Gallery). The feature requires that you provide shared tenant and subscription information for associated host connections.
Note:
Make sure you’ve configured the necessary settings in Azure to enable image sharing across tenants. For more information, seeShare images across tenants.
Complete the following steps for a connection:
- FromManage > Full Configuration, selectHostingin the left pane.
Select the connection and then selectEdit Connectionin the action bar.
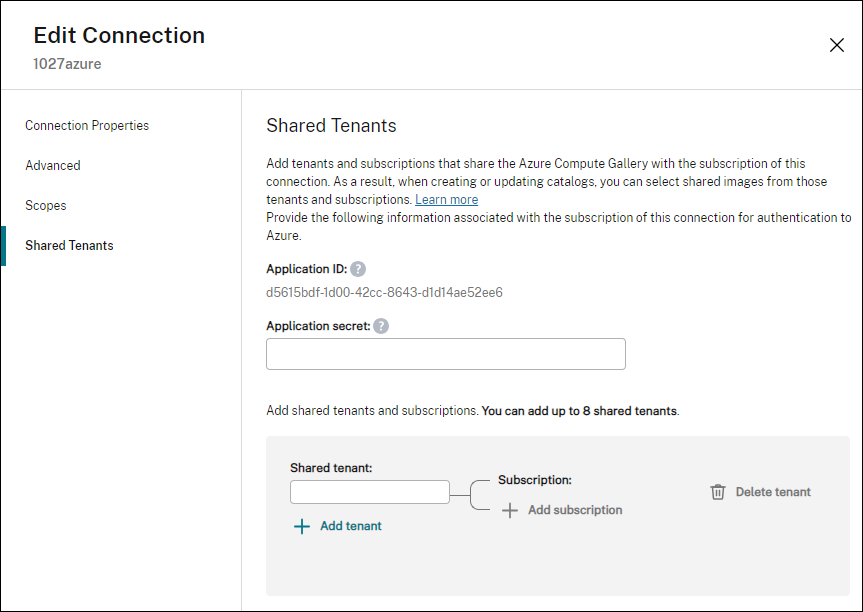
- InShared Tenants, do the following:
- Provide the application ID and application secret associated with the subscription of the connection. DaaS uses this information to authenticate to Azure AD.
- 添加共享Azure的租户和订阅Compute Gallery with the subscription of the connection. You can add up to eight shared tenants and eight subscriptions for each tenant.
- When you are finished, selectApplyto apply the changes you made and keep the window open, or selectOKto apply the changes and close the window.

Implement image sharing using PowerShell
This section guides you through the processes of sharing images using PowerShell:
- Select an image from a different subscription
- Update hosting connection custom properties with shared tenant IDs
- Select an image from a different tenant
Select an image from a different subscription
You can select an image in Azure Compute Gallery that belongs to a different shared subscription in the same Azure tenant to create and update MCS catalogs using PowerShell commands.
- In the hosting unit root folder, Citrix creates a new shared subscription folder called
sharedsubscription. List all shared subscriptions in a tenant.
Get-ChildItem -Path "XDhyp:\HostingUnits\azres\sharedsubscription.folder"Select one shared subscription, and then list all shared resource groups of that shared subscription.
Get-ChildItem -Path "XDhyp:\HostingUnits\azres\image.folder\abc123.sharedsubscription"Select a resource group, and then list all galleries of that resource group.
Get-ChildItem -Path "XDhyp:\HostingUnits\azres\image.folder\abc123.sharedsubscription\ xyz.resourcegroup"Select a gallery, and then list all image definitions of that gallery.
Get-ChildItem -Path "XDhyp:\HostingUnits\azres\image.folder\abc123.sharedsubscription\xyz.resourcegroup\testgallery.gallery"Select one image definition, and then list all image versions of that image definition.
Get-ChildItem -Path "XDhyp:\HostingUnits\azres\image.folder\abc123.sharedsubscription\xyz.resourcegroup\sigtestdef.imagedefinition"Create and update an MCS catalog using the following elements:
- Resource group
- Gallery
- Gallery image definition
- Gallery image version
For information on how to create a catalog using the Remote PowerShell SDK, seehttps://developer-docs.citrix.com/projects/citrix-virtual-apps-desktops-sdk/en/latest/creating-a-catalog/.
Update hosting connection custom properties with shared tenant IDs
UseSet-Itemto update the hosting connection custom properties with shared tenant IDs and subscription IDs. Add a propertySharedTenantsinCustomProperties. The format ofShared Tenantsis:
[{"Tenant":"94367291-119e-457c-bc10-25337231f7bd","Subscriptions":["7bb42f40-8d7f-4230-a920-be2781f6d5d9"]},{"Tenant":"50e83564-c4e5-4209-b43d-815c45659564","Subscriptions":["06ab8944-6a88-47ee-a975-43dd491a37d0"]}] For example:
Set-Item -CustomProperties " " -LiteralPath @("XDHyp:\Connections\aazure") -PassThru -UserName "advc345" -SecurePassword $psd Note:
You can add more than one tenant. Each tenant can have more than one subscription.
Select an image from a different tenant
You can select an image in the Azure Compute Gallery that belongs to a different Azure tenant to create and update MCS catalogs using PowerShell commands.
- In the hosting unit root folder, Citrix creates a new shared subscription folder called
sharedsubscription. List all shared subscriptions.
Get-ChildItem XDHyp:\HostingUnits\azres\sharedsubscription.folderSelect one shared subscription, and then list all shared resource groups of that shared subscription.
Get-ChildItem XDHyp:\HostingUnits\azres\image.folder\abc123.sharedsubscriptionSelect a resource group, and then list all galleries of that resource group.
Get-ChildItem XDHyp:\HostingUnits\azres\image.folder\abc123.sharedsubscription\ xyz.resourcegroupSelect a gallery, and then list all image definitions of that gallery.
Get-ChildItem XDHyp:\HostingUnits\azres\image.folder\abc123.sharedsubscription\xyz.resourcegroup\efg.gallerySelect one image definition, and then list all image versions of that image definition.
Get-ChildItem XDHyp:\HostingUnits\azres\image.folder\abc123.sharedsubscription\xyz.resourcegroup\efg.gallery\hij.imagedefinitionCreate and update an MCS catalog using the following elements:
- Resource group
- Gallery
- Gallery image definition
- Gallery image version
For information on how to create a catalog using the Remote PowerShell SDK, seehttps://developer-docs.citrix.com/projects/citrix-virtual-apps-desktops-sdk/en/latest/creating-a-catalog/.
Create a secure environment for Azure-managed traffic
MCS enables network traffic (API calls from Citrix Cloud to Azure hypervisor) to be routed through Cloud Connectors in your environment. This implementation helps you lock down your Azure subscription to allow network traffic from specific IP addresses. To do this, addProxyHypervisorTrafficThroughConnectorinCustomProperties. After you set the custom properties, you can configure Azure policies to have private disk access to Azure managed disks.
If you configure Azure policy to create Disk Accesses automatically for each new disk to use private endpoints, you cannot upload or download more than five disks or snapshots at the same time with the same disk access object as enforced by Azure. This limit is for each machine catalog if you configure Azure policy at resource group level, and for all machine catalogs if you configure Azure policy at subscription level. If you do not configure Azure policy to create Disk Accesses automatically for each new disk to use private endpoints, the limit of five concurrent operations is not enforced.
Note:
Currently, this feature is not supported for Connector Appliance.
Limitations
Due to Azure limitation, this feature is currently not supported when managed disks have server-side encryption with customer-managed keys. For other related limitations, seeRestrict import/export access for managed disks using Azure Private Link.
For more information on server-side encryption, seeAzure server side encryption.
Enable the proxy
To enable the proxy, set the custom properties as follows on the host connection:
- Open a PowerShell window using the Remote PowerShell SDK. For more information, seehttps://docs.citrix.com/en-us/citrix-daas/sdk-api.html#citrix-virtual-apps-and-desktops-remote-powershell-sdk/.
Run the following commands:
Add-PSSnapin citrix*.cd XDHyp:\Connections\dir
Copy the
CustomPropertiesfrom the connection to a notepad and append property settingCustomPropertiesto enable the proxy. For example:In the PowerShell window, assign a variable to the modified custom properties. For example:
$customProperty = '- Run
$cred = Get-Credential. If prompted, provide the connection credentials. The credentials are Azure Application ID and secret. Run
Set-Item -PSPath XDHyp:\Connections\.-CustomProperties $customProperty -username $cred.username -Securepassword $cred.password Important:
If you get a message stating
SubscriptionIdis missing, then replace all double quotes (“) with backtick followed by double quotes (`”) in the custom property. For example:- Run
dirto verify the updatedCustomPropertiessettings.
Manage the application secret and secret expiration date
Be sure to change the application secret for a connection before the secret expires. You receive an alert on the Full Configuration interface before the secret key expires.
Create an application secret in Azure
You can create an application secret for a connection through the Azure portal.
- SelectAzure Active Directory.
- FromApp registrationsin Azure AD, select your application.
- Go toCertificates & secrets.
ClickClient secrets > New client secret.

Provide a description of the secret and specify a duration. When you’re done, selectAdd.
Note:
Be sure to save the client secret because you cannot retrieve it later.
- Copy the client secret value and the expiration date.
- In the Full Configuration interface, edit the corresponding connection and replace the content in the应用程序的秘密andSecret expiration datefield with the values you copied.

Change the secret expiration date
You can use the Full Configuration interface to add or modify the expiration date for the application secret in use.
- In theAdd Connection and Resourceswizard, right-click a connection, and clickEdit Connection.
- On theConnection Propertiespage, clickSecret expiration dateto add or modify the expiration date for the application secret in use.

Required Azure permissions
This section details theminimum permissionsandgeneral permissionsrequired for Azure.
Minimum permissions
Minimum permissions give better security control. However, new features that require additional permissions fail if only minimum permissions are given. This section lists minimum permissions by action.
Creating a host connection
Add a host connection using the information obtained from Azure.
“微软。Network/virtualNetworks/read", "Microsoft.Compute/virtualMachines/read", "Microsoft.Compute/disks/read", Power management of VMs
Power on or off the machine instances.
“微软。Compute/virtualMachines/read", "Microsoft.Resources/subscriptions/resourceGroups/read", "Microsoft.Compute/virtualMachines/deallocate/action", "Microsoft.Compute/virtualMachines/start/action", "Microsoft.Compute/virtualMachines/restart/action", Creating, updating, or deleting VMs
Create a machine catalog, then add, delete, update machines, and delete the machine catalog.
Following is the list of minimum permissions required when the master images are managed disks or snapshots that are located in the same region as the hosting connection.
“微软。Resources/subscriptions/resourceGroups/read", "Microsoft.Resources/deployments/validate/action", "Microsoft.Compute/virtualMachines/read", "Microsoft.Compute/virtualMachines/write", "Microsoft.Compute/virtualMachines/delete", "Microsoft.Compute/virtualMachines/deallocate/action", "Microsoft.Compute/snapshots/read", "Microsoft.Compute/snapshots/write", "Microsoft.Compute/snapshots/delete", "Microsoft.Compute/snapshots/beginGetAccess/action", "Microsoft.Compute/snapshots/endGetAccess/action", "Microsoft.Compute/disks/read", "Microsoft.Compute/disks/write", "Microsoft.Compute/disks/delete", "Microsoft.Compute/disks/beginGetAccess/action", "Microsoft.Compute/disks/endGetAccess/action", "Microsoft.Network/virtualNetworks/read", "Microsoft.Network/virtualNetworks/subnets/join/action", "Microsoft.Network/virtualNetworks/subnets/read", "Microsoft.Network/networkSecurityGroups/read", "Microsoft.Network/networkSecurityGroups/write", "Microsoft.Network/networkSecurityGroups/delete", "Microsoft.Network/networkSecurityGroups/join/action", "Microsoft.Network/networkInterfaces/read", "Microsoft.Network/networkInterfaces/write", "Microsoft.Network/networkInterfaces/delete", "Microsoft.Network/networkInterfaces/join/action", You need the following extra permissions based on minimal permissions for the following features:
如果主image is a VHD in a storage account located in the same region as the hosting connection:
“微软。存储/ storageAccounts /阅读”、“Microsoft.Storage/storageAccounts/listKeys/action",如果主image is an ImageVersion from the Azure Compute Gallery (formerly Shared Image Gallery):
“微软。Compute/galleries/read", "Microsoft.Compute/galleries/images/read", "Microsoft.Compute/galleries/images/versions/read",如果主image is a managed disk, snapshot, or VHD is in a region different from the region of the hosting connection:
“微软。存储/ storageAccounts /阅读”、“Microsoft.Storage/storageAccounts/listKeys/action", "Microsoft.Storage/storageAccounts/write", "Microsoft.Storage/storageAccounts/delete",If you use Citrix-managed resource group:
“微软。Resources/subscriptions/resourceGroups/write", "Microsoft.Resources/subscriptions/resourceGroups/delete",If you put the master image in Azure Compute Gallery (formerly Shared Image Gallery):
“微软。Compute/galleries/write", "Microsoft.Compute/galleries/images/write", "Microsoft.Compute/galleries/images/versions/write", "Microsoft.Compute/galleries/read", "Microsoft.Compute/galleries/images/read", "Microsoft.Compute/galleries/images/versions/read", "Microsoft.Compute/galleries/delete", "Microsoft.Compute/galleries/images/delete", "Microsoft.Compute/galleries/images/versions/delete",If you use Azure dedicated host support:
“微软。Compute/hostGroups/read", "Microsoft.Compute/hostGroups/write", "Microsoft.Compute/hostGroups/hosts/read",If you use Server Side Encryption (SSE) with Customer Managed Keys (CMK):
“微软。计算/ diskEncryptionSets /读”,< !——NeedCopy-->If you deploy VMs using ARM templates (machine profile):
“微软。Resources/deployments/write", "Microsoft.Resources/deployments/operationstatuses/read", "Microsoft.Resources/deployments/read", "Microsoft.Resources/deployments/delete",If you use Azure template spec as a machine profile:
“微软。Resources/templateSpecs/read", "Microsoft.Resources/templateSpecs/versions/read",
Creating, updating, and deleting machines with unmanaged disk
Following is the list of minimum permissions required when the master image is VHD and use resource group as provided by admin:
“微软。Resources/subscriptions/resourceGroups/read", "Microsoft.Storage/storageAccounts/delete", "Microsoft.Storage/storageAccounts/listKeys/action", "Microsoft.Storage/storageAccounts/read", "Microsoft.Storage/storageAccounts/write", "Microsoft.Compute/virtualMachines/deallocate/action", "Microsoft.Compute/virtualMachines/delete", "Microsoft.Compute/virtualMachines/read", "Microsoft.Compute/virtualMachines/write", "Microsoft.Resources/deployments/validate/action", "Microsoft.Network/networkInterfaces/delete", "Microsoft.Network/networkInterfaces/join/action", "Microsoft.Network/networkInterfaces/read", "Microsoft.Network/networkInterfaces/write", "Microsoft.Network/networkSecurityGroups/delete", "Microsoft.Network/networkSecurityGroups/join/action", "Microsoft.Network/networkSecurityGroups/read", "Microsoft.Network/networkSecurityGroups/write", "Microsoft.Network/virtualNetworks/subnets/read", "Microsoft.Network/virtualNetworks/read", "Microsoft.Network/virtualNetworks/subnets/join/action" Managing Azure AD joined devices
Following is the list of minimal permissions required for managing the Azure AD joined devices:
microsoft.directory/devices/standard/read microsoft.directory/devices/delete General permissions
Contributor role has full access to manage all resources. This set of permissions does not block you from getting new features.
The following set of permissions provides the best compatibility going forward although it does include more permissions than needed with the current feature set:
“微软。计算/ diskEncryptionSets /阅读”、“小osoft.Compute/disks/beginGetAccess/action", "Microsoft.Compute/disks/delete", "Microsoft.Compute/disks/endGetAccess/action", "Microsoft.Compute/disks/read", "Microsoft.Compute/disks/write", "Microsoft.Compute/galleries/delete", "Microsoft.Compute/galleries/images/delete", "Microsoft.Compute/galleries/images/read", "Microsoft.Compute/galleries/images/versions/delete", "Microsoft.Compute/galleries/images/versions/read", "Microsoft.Compute/galleries/images/versions/write", "Microsoft.Compute/galleries/images/write", "Microsoft.Compute/galleries/read", "Microsoft.Compute/galleries/write", "Microsoft.Compute/hostGroups/hosts/read", "Microsoft.Compute/hostGroups/read", "Microsoft.Compute/hostGroups/write", "Microsoft.Compute/snapshots/beginGetAccess/action", "Microsoft.Compute/snapshots/delete", "Microsoft.Compute/snapshots/endGetAccess/action", "Microsoft.Compute/snapshots/read", "Microsoft.Compute/snapshots/write", "Microsoft.Compute/virtualMachines/deallocate/action", "Microsoft.Compute/virtualMachines/delete", "Microsoft.Compute/virtualMachines/read", "Microsoft.Compute/virtualMachines/restart/action", "Microsoft.Compute/virtualMachines/start/action", "Microsoft.Compute/virtualMachines/write", "Microsoft.Network/networkInterfaces/delete", "Microsoft.Network/networkInterfaces/join/action", "Microsoft.Network/networkInterfaces/read", "Microsoft.Network/networkInterfaces/write", "Microsoft.Network/networkSecurityGroups/delete", "Microsoft.Network/networkSecurityGroups/join/action", "Microsoft.Network/networkSecurityGroups/read", "Microsoft.Network/networkSecurityGroups/write", "Microsoft.Network/virtualNetworks/subnets/read", "Microsoft.Network/virtualNetworks/read", "Microsoft.Network/virtualNetworks/subnets/join/action", "Microsoft.Resources/deployments/operationstatuses/read", "Microsoft.Resources/deployments/read", "Microsoft.Resources/deployments/validate/action", "Microsoft.Resources/deployments/write", "Microsoft.Resources/deployments/delete", "Microsoft.Resources/subscriptions/resourceGroups/read", "Microsoft.Resources/subscriptions/resourceGroups/write", "Microsoft.Resources/subscriptions/resourceGroups/delete", "Microsoft.Storage/storageAccounts/delete", "Microsoft.Storage/storageAccounts/listKeys/action", "Microsoft.Storage/storageAccounts/read", "Microsoft.Storage/storageAccounts/write", "Microsoft.Resources/templateSpecs/read", "Microsoft.Resources/templateSpecs/versions/read", Azure AD permission
If you create Azure AD joined machine catalogs, then MCS is responsible for managing the Azure AD devices when you enable Azure AD joined device management. The Azure AD built-inCloud Device Administratorrole provides the best compatibility going forward although it does include more permissions than needed with the current feature set.
Where to go next
- If you’re in the initial deployment process, seeCreate machine catalogs.
- For Azure-specific information, seeCreate a Microsoft Azure catalog.