
Manage delivery groups
Introduction
This article describes procedures for managing delivery groups from the management console. In addition to changing the settings specified when creating the group, you can configure other settings that are not available when you create a delivery group.
The procedures are organized by categories: general, users, machines, and sessions. Some tasks span more than one category. For example, “Prevent users from connecting to machines” is described in the machines category, but it also affects users. So, if you can’t find a task in one category, check a related category.
Other articles also contain related information:
- Applicationscontains information about managing applications in delivery groups.
- Managing delivery groups requires the Delivery Group Administrator built-in role permissions. For details, seeDelegated administration.
General
- Change the delivery type
- Change StoreFront addresses
- Change the functional level
- Manage Remote PC Access delivery groups
- Change the license for a delivery group
- Organize delivery groups using folders
- Manage app protection
Change the delivery type of a delivery group
The delivery type indicates what the group can deliver: applications, desktops, or both.
Before changing anapplicationstype to theDesktopstype, delete all applications from the group.
- FromManage > Full Configuration, select交付组in the left pane.
- 年代elect a group and then selectEditin the action bar.
- On the交付类型page, select the delivery type you want.
- 年代electApplyto apply any changes you made and keep the window open. Or, selectOKto apply changes and close the window.
Change StoreFront addresses
- FromManage > Full Configuration, select交付组in the left pane.
- 年代elect a group and then selectEditin the action bar.
- On the年代toreFrontpage, indicate whether you will specify a StoreFront server address later (Manually) or selectAdd newto specify the StoreFront servers you want to be used (Automatically).
- 年代electApplyto apply any changes you made and keep the window open. Or, selectOKto apply changes and close the window.
You can also specify StoreFront server addresses by selecting年代toreFrontin the left pane of the console.
Change the functional level
Change the functional level for the delivery group after you upgrade the VDAs on its machines and the machine catalogs containing the machines used in the delivery group.
Before you start:
- If you use Citrix Provisioning (formerly Provisioning Services), upgrade the VDA version in the Citrix Provisioning console.
- 年代tart the machines containing the upgraded VDA so that they can register with Citrix DaaS. This process tells the console about what must change in the delivery group.
- If you must continue to use earlier VDA versions, newer product features might not be available. For more information, see the upgrade documentation.
To change the functional level for a delivery group:
- FromManage > Full Configuration, select交付组in the left pane.
- 年代elect a group and then selectChange Functional Levelin the action bar. TheChange Functional Levelaction appears only if upgraded VDAs are detected.
The display indicates you which, if any, machines cannot be changed to the functional level and why. You can then cancel the change action, resolve the machine issues, and then perform the change action again.
After the change completes, you can revert the machines to their previous states. Select the delivery group and then selectUndo Functional Level Changein the action bar.
Manage Remote PC Access delivery groups
If a machine in a Remote PC Access machine catalog is not assigned to a user, the machine is temporarily assigned to a delivery group associated with that catalog. This temporary assignment enables the machine to be assigned to a user later.
The delivery group-to-machine catalog association has a priority value. Priority determines which delivery group that machine is assigned to when it registers with the system or when a user needs a machine assignment: the lower the value, the higher the priority. If a Remote PC Access machine catalog has multiple delivery group assignments, the software selects the match with the highest priority. Use the PowerShell SDK to set this priority value.
When first created, Remote PC Access machine catalogs are associated with a delivery group. This association means that machine accounts or Organizational Units added to the catalog later can be added to the delivery group. This association can be switched off or on.
To add or remove a Remote PC Access machine catalog association with a delivery group:
- FromManage > Full Configuration, select交付组in the left pane.
- 年代elect a Remote PC Access group.
- In theDetailssection, select theMachine Catalogstab and then select a Remote PC Access catalog.
- To add or restore an association, selectAdd Desktops.To remove an association, selectRemove Association.
Change the license for a delivery group
To change the license entitlement for a delivery group, follow these steps:
年代elect交付组in the navigation pane.
年代elect a group and then clickEditin the action bar.
On theLicense Assignmentpage, select the license you want the group to use.
ClickApplyto apply any changes you made and to keep the window open. Or, click年代aveto apply changes and to close the window.
For more information about delivery group level entitlements, seeMulti-type licensing.
Organize delivery groups using folders
You can create folders to organize delivery groups for easy access.
Required roles
By default, you need to have the following built-in role to create and manage delivery group folders: Cloud Administrator, Full Administrator, or Delivery Group Administrator. If necessary, you can customize roles for creating and managing delivery group folders. For more information, seeRequired permissions.
Create a delivery group folder
Before you start, plan how to organize your delivery groups. Consider the following:
- You can nest folders up to five levels (excluding the default root folder).
- A folder can contain delivery groups and subfolders.
- All nodes inFull Configuration(such as theMachine Catalogs,Applications, andDelivery groupsnodes) share a folder tree in the back-end. To avoid name conflicts with other nodes when renaming or moving folders, we recommend you give different names to first-level folders in different nodes.
To create a delivery group folder, follow these steps:
- FromManage > Full Configuration, select交付组in the left pane.
- In the folder hierarchy, select a folder and then selectCreate Folderin theActionbar.
- Enter a name for the new folder, and then clickDone.
Tip:
If you create a folder in an unintended location, you can drag it to the correct location.
Move a delivery group
You can move a delivery group between folders. Detailed steps are as follows:
FromManage > Full Configuration, select交付组in the left pane.
View groups by folder. You can also turn onView allabove the folder hierarchy to view all groups at a time.
Right-click a group and then selectMove Delivery Group.
年代elect the folder to which you want to move the group, and then clickDone.
Tip:
You can drag a group to a folder.
Manage delivery group folders
You can delete, rename, and move delivery group folders.
Be aware of that you can delete a folder only if it and its subfolders don’t contain delivery groups.
To manage a folder, follow these steps:
FromManage > Full Configuration, select交付组in the left pane.
In the folder hierarchy, select a folder, and then select an action in theActionbar as needed:
- To rename the folder, selectRename Folder.
- To delete the folder, select删除Folder.
- To move the folder, selectMove Folder.
Follow onscreen instructions to complete the remaining steps.
Required permissions
The following table lists the permissions required to perform actions on delivery group folders.
| Action | Required permissions |
|---|---|
| Create delivery group folders | Create Delivery Group Folder |
| Delete delivery group folders | Remove Delivery Group Folder |
| Move delivery group folders | Move Delivery Group Folder |
| Rename delivery group folders | Edit Delivery Group Folder |
| Move delivery groups to folders | Edit Delivery Group Folder and Edit Delivery Group Properties |
Manage app protection
以下是补充信息App protectionarticle in the Citrix Virtual Apps and Desktops documentation. To use app protection in a Citrix DaaS deployment, follow the general guidance in that article, minding the following details.
FromManage > Full Configuration, select交付组in the left pane.
年代elect a group and then selectEditin the action bar.
On theApp Protectionpage, you can enableAnti-keyloggingandAnti-screen-capturing.
You must have a valid Citrix Cloud subscription and valid app protection entitlements. To purchase the app protection feature, you can contact your Citrix sales representative.
App protection requires XML trust. To enable XML trust, go to年代ettings > Enable XML trust.
Regarding anti-screen-capturing:
- On Windows and macOS, only the window of the protected content is blank. App protection is active when a protected window is not minimized.
- On Linux, the entire capture is blank. App protection is active whether a protected window is minimized or not.
Users
Change user settings in a delivery group
The name of this page appears as eitherUser SettingsorBasic Settings.
- FromManage > Full Configuration, select交付组in the left pane.
- 年代elect a group and then selectEditin the action bar.
- On theUser Settingspage, change any of the settings in the following table.
- 年代electApplyto apply any changes you made and keep the window open. Or, selectOKto apply changes and close the window.
| 年代etting | Description |
|---|---|
| Description | The text that Citrix Workspace (or StoreFront) uses and that users see. |
| Enable Delivery Group | Whether the delivery group is enabled. |
| Time zone | The time zone in which the machines of this delivery group must reside. The option lists the time zones supported by the site. |
| Enable Secure ICA | 年代ecures communications to and from machines in the delivery group using SecureICA, which encrypts the ICA protocol. The default level is 128-bit. The level can be changed using the SDK. Citrix recommends using more encryption methods such as TLS encryption when traversing public networks. Also, SecureICA does not check data integrity. |
| Maximum desktops per user | How many desktops a user can have. |
Add or remove users in a delivery group
用户的详细信息,请参阅Users.
- FromManage > Full Configuration, select交付组in the left pane.
- 年代elect a group and then selectEdit Delivery Groupin the action bar.
On theUserspage:
- To add users, selectAdd, and then specify the users you want to add.
- To remove users, select one or more users and then selectRemove.
- 年代elect or clear the check box to allow access by unauthenticated users.
- 年代electApplyto apply any changes you made and keep the window open. Or, selectOKto apply changes and close the window.
Manage user assignments
To manage user assignments:
- InManage > Full Configuration, select交付组.
- 年代elect a group and then selectEdit Delivery Groupin the action bar.
- On theMachine Allocationpage, add or remove users. To add users, browse to them or enter a semicolon-separated list of user names.
When entering user names, consider the following:
- If the users are in Active Directory, enter the names directly. If not, enter the names in this format:
: AzureAD:username.
Machines
- Change assignments of machines to users
- Update a machine
- Add, change, or remove a tag restriction for a desktop
- Remove a machine
- Restrict access to machines
- Prevent users from connecting to a machine (maintenance mode)
- 年代hut down and restart machines
- Create and manage restart schedules for machines
- Load manage machines
- Manage Autoscale
In addition to the features described in this article, seeAutoscalefor information about proactively power managing machines.
Change assignments of machines to users in a delivery group
You can change the assignments of single-session OS machines provisioned with MCS. You cannot change assignments for multi-session OS machines or machines provisioned with Citrix Provisioning.
- FromManage > Full Configuration, select交付组in the left pane.
- 年代elect a group and then selectEditin the action bar.
- On theMachine Allocationpage, specify the new users.
- 年代electApplyto apply any changes you made and keep the window open. Or, selectOKto apply changes and close the window.
Update a machine in a delivery group
- FromManage > Full Configuration, select交付组in the left pane.
- 年代elect a group and then selectView Machinesin the action bar.
- 年代elect a machine and then selectUpdate Machinesin the action bar.
To choose a different image, selectMaster imageand then select a snapshot.
To apply changes and notify machine users, selectRollout notification to end-users.Then specify:
- When to update the image: now or on the next restart
- The restart distribution time (the total time to begin updating all machines in the group)
- Whether users are notified of the restart
- The message users will receive
Add, change, or remove a tag restriction for a desktop
Adding, changing, and removing tag restrictions can have unanticipated effects on which desktops are considered for launch. Review the considerations and cautions inTags.
- FromManage > Full Configuration, select交付组in the left pane.
- 年代elect a group and then selectEditin the Actions bar.
- On theDesktopspage, select the desktop and selectEdit.
- To add a tag restriction, selectRestrict launches to machines with the tagand then select the tag.
To change or remove a tag restriction, either:
- 年代elect a different tag.
- Remove the tag restriction by clearingRestrict launches to machines with this tag.
- 年代electApplyto apply any changes you made and keep the window open. Or, selectOKto apply changes and close the window.
Remove a machine from a delivery group
Removing a machine deletes it from a delivery group. It does not delete it from the machine catalog that the delivery group uses. Therefore, that machine is available for assignment to another delivery group.
Machines must be shut down before they can be removed. To temporarily stop users from connecting to a machine while you are removing it, put the machine into maintenance mode before shutting it down.
Machines might contain personal data, so use caution before allocating the machine to another user. Consider reimaging the machine.
- FromManage > Full Configuration, select交付组in the left pane.
- 年代elect a group and then selectView Machinesin the action bar.
- Ensure that the machine is shut down.
- 年代elect the machine and then selectRemove from Delivery Groupin the action bar.
You can also remove a machine from a delivery group through theconnectionthe machine uses.
Restrict access to machines in a delivery group
Any changes you make to restrict access to machines in a delivery group supersede previous settings, regardless of the method you use. You can:
Restrict access for administrators using delegated administration scopes:You can create and assign a scope that permits administrators to access all applications, and another scope that provides access to only certain applications. For details, seeDelegated administration.
Restrict access for users through SmartAccess policy expressions:Use policy expressions to filter user connections made through Citrix Gateway.
- FromManage > Full Configuration, select交付组in the left pane.
- 年代elect a group and then clickEditin the action bar.
- On theAccess Policypage, selectConnections through Citrix Gateway.
- To choose a subset of those connections, selectConnections meeting any of the following filters.Then define the Citrix Gateway site, and add, edit, or remove the SmartAccess policy expressions for the allowed user access scenarios. For details, see the Citrix Gateway documentation.
- 年代electApplyto apply any changes you made and to keep the window open. Or, select年代aveto apply changes and to close the window.
Restrict access for users through exclusion filters:Use exclusion filters on access policies that you set in the SDK. Access policies are applied to delivery groups to refine connections. For example, you can restrict machine access to a subset of users, and you can specify allowed user devices. Exclusion filters further refine access policies. For example, for security, you can deny access to a subset of users or devices. By default, exclusion filters are disabled.
For example, to prevent access from a teaching lab on a corporate network subnet to a particular delivery group, regardless of who is using the machines in the lab, use the command:
年代et-BrokerAccessPolicy -Name VPDesktops_Direct -ExcludedClientIPFilterEnabled $True -.You can use the asterisk (*) wildcard to match all tags that start with the same policy expression. For example, if you add the tag
VPDesktops_Directto one machine andVPDesktops_Testto another, setting the tag in the年代et-BrokerAccessPolicyscript toVPDesktops_*applies the filter to both machines.If you are connected using a web browser or with the Citrix Workspace app user experience feature enabled in the store, you cannot use a client name exclusion filter.
Prevent users from connecting to a machine (maintenance mode) in a delivery group
When you need to temporarily stop new connections to machines, you can turn on maintenance mode for one or all machines in a delivery group. You might do this before applying patches or using management tools.
- When a multi-session OS machine is in maintenance mode, users can connect to existing sessions, but cannot start new sessions.
- When a single-session OS machine (or a PC using Remote PC Access) is in maintenance mode, users cannot connect or reconnect. Current connections remain connected until they disconnect or log off.
To turn maintenance mode on or off:
- FromManage > Full Configuration, select交付组in the left pane.
- 年代elect a group.
To turn on maintenance mode for all machines in the delivery group, selectTurn On Maintenance Modein the action bar.
To turn on maintenance mode for one machine, selectView Machinesin the action bar. Select a machine, and then selectTurn On Maintenance Modein the action bar.
- To turn maintenance mode off for one or all machines in a delivery group, follow the previous instructions, but selectTurn Off Maintenance Modein the action bar.
Windows Remote Desktop Connection (RDC) settings also affect whether a multi-session OS machine is in maintenance mode. Maintenance mode is on when any of the following occur:
- Maintenance mode is set to on, as described earlier.
- RDC is set toDon’t allow connections to this computer.
- RDC is not set toDon’t allow connections to this computerand the Remote Host Configuration User Logon Mode setting is eitherAllow reconnections, but prevent new logonsorAllow reconnections, but prevent new logons until the server is restarted.
You can also turn maintenance mode on or off for:
- A connection, which affects the machines using that connection.
- A machine catalog, which affects the machines in that catalog.
年代hut down and restart machines in a delivery group
This procedure is not supported for Remote PC Access machines.
- FromManage > Full Configuration, select交付组in the left pane.
- 年代elect a group and then selectView Machinesin the action bar.
年代elect the machine and then select one of the following actions in the action bar:
Note:
- The following actions apply only to machines that are power managed.
- 年代ome options might not be available, depending on the machine state.
- Force shut down:Forcibly powers off the machine and refreshes the list of machines.
- Restart:Requests the operating system to shut down and then start the machine again. If the operating system cannot comply, the machine remains in its current state.
- Force restart:Forcibly shuts down the operating system and then restarts the machine.
- 年代uspend:Pauses the machine without shutting it down, and refreshes the list of machines.
- 年代hut down:Requests the operating system to shut down.
For non-force actions, if the machine does not shut down within 10 minutes, it is powered off. If Windows attempts to install updates during the shutdown, there is a risk that the machine will be powered off before the updates finish.
Create and manage restart schedules for machines in a delivery group
Note:
- When a restart schedule is applied to a delivery group with Autoscale enabled, its machines are just powered off and left for Autoscale to power them on.
- When restart schedules are applied to random single-session machines, those machines are powered off rather than restarted, to save costs. We recommend that you use Autoscale to power on machines.
重启计划指定当机器在德livery group are periodically restarted. You can create one or more schedules for a delivery group. A schedule can affect either:
- All the machines in the group.
- One or more (but not all) machines in the group. The machines are identified by a tag that you apply to the machine. This is called a tag restriction, because the tag restricts an action to only items (in this case, machines) that have the tag.
For example, let’s say all of your machines are in one delivery group. You want every machine restarted once every week, and you want the machines used by the accounting team restarted daily. To accomplish this, set up one schedule for all machines, and another schedule for only the machines in accounting.
A schedule includes the day and time the restart begins, and the duration. The duration is either “start all affected machines at the same time” or an interval it will likely take to restart all affected machines.
You can enable or disable a schedule. Disabling a schedule can be helpful when testing, during special intervals, or when preparing schedules before you need them.
你不能使用自动开机或时间表shutdown from the management console, only to restart.
年代chedule overlap
Multiple schedules can overlap. In the example above, both schedules affect the accounting machines. Those machines might be restarted twice on Sunday. The scheduling code is designed to avoid restarting the same machine more often than intended, but it cannot be guaranteed.
- If the schedules coincide precisely in start and duration times, it is more likely that the machines will be restarted only once.
- The more the schedules differ in start and duration times, it’s more likely that multiple restarts will occur.
- The number of machines affected by a schedule also affects the chance of an overlap. In the example, the weekly schedule that affects all machines might initiate restarts faster than the daily schedule for accounting machines, depending on the duration specified for each.
For an in-depth look at restart schedules, seeReboot schedule internals.
View restart schedules
- FromManage > Full Configuration, select交付组in the left pane.
- 年代elect a group and then selectEditin the action bar.
- 年代elect theRestart Schedulepage.
TheRestart Schedulepage contains the following information for each configured schedule:
- 年代chedule name.
- Tag restriction used, if any.
- How often the machine restarts occur.
- Whether machine users receive a notification.
- Whether the schedule is enabled. Disabling a schedule can be helpful when testing, during special intervals, or when preparing schedules before you need them.
Add (apply) tags
When you configure a restart schedule that uses a tag restriction, ensure that the tag has been added (applied) to the machines that the schedule affects. In the example above, each of the machines used by the accounting team has a tag applied. For details, seeTags.
Although you can apply more than one tag to a machine, a restart schedule can specify only one tag.
- FromManage > Full Configuration, select交付组in the left pane.
- 年代elect the group containing the machines to be controlled by the schedule.
- 年代electView Machinesand then select the machines you want to add a tag to.
- 年代electManage Tagsin the action bar.
- If the tag exists, enable the check box next to the tag name. If the tag does not exist, selectCreateand then specify the name for the tag. After the tag is created, enable the check box next to the newly created tag name.
- 年代elect年代avein theManage Tagsdialog.
Create a restart schedule
- FromManage > Full Configuration, select交付组in the left pane.
- 年代elect a group and then selectEditin the action bar.
- On theRestart Schedulepage, selectAdd.
On theAdd Restart Schedulepage:
- To enable the schedule, selectYes.To disable the schedule, selectNo.
- Type a schedule name and description.
- ForRestrict to tag, apply a tag restriction.
- ForInclude machines in maintenance mode, choose whether to include machines that are in maintenance mode in this schedule. To use PowerShell instead, see年代cheduled restarts for machines in maintenance mode.
- ForRestart frequency, select how often the restart occurs: daily, weekly, monthly, or once. If you selectWeeklyorMonthly, you can specify one or more specific days.
- ForRepeats every, specify how often you want the schedule to run.
- For年代tart date, specify a start date for the first occurrence of the schedule.
- ForBegin restart at, specify, in 24-hour clock format, the time of day to begin the restart.
- ForRestart duration:
- If you do not want to use natural restart, selectRestart all machines at the same timeorRestart all machines within a time period.
If you want to use natural restart, selectRestart all machines after draining all sessions.
Upon starting a restart schedule that is configured to use natural restart:
- All idle machines belonging to the delivery group are restarted immediately
- Each machine belonging to the delivery with one or more active sessions are restarted when all sessions are logged off.
Note:
- Currently, you cannot apply a tag restriction if you useRestart all machines after draining all sessionsoption.
- You can use this option for machines that are power managed and also for machines that are not power managed.
- In年代end notification to users, choose whether to display a notification message on the applicable machines before a restart begins. By default, no message appears.
- 如果你选择显示一条消息15分钟更加积极re the restart begins, you can choose (inNotification frequency) to repeat the message every five minutes after the initial message. By default, the message does not repeat.
Enter the notification title and text. There is no default text.
If you want the message to include a countdown to restart, include the variable%m%.Unless you chose to restart all machines at the same time, the message appears on each machine at the appropriate time before the restart.
- ClickDoneto apply the changes and to close theAdd Restart Schedulewindow.
- ClickApplyto apply the changes you made and keep theEdit Delivery Groupwindow open. Or, click年代aveto apply changes and to close the window.
Immediately run a restart schedule
重启计划指定当机器在德livery group restart regularly. You can also run a restart schedule immediately to restart the machines in that schedule.
To run a restart schedule immediately, follow these steps:
- FromManage > Full Configuration, select交付组in the left pane.
- 年代elect the applicable delivery group and then selectEditin the action bar
- On theRestart Schedulepage, select a schedule that you want to run and then selectRun schedule now.
Note:
- You cannot run a schedule immediately if it is configured with theRestart all machines after draining sessionssetting.
- You can applyRun schedule nowonly to one schedule at a time.
- After you edit a schedule,Run schedule nowbecomes unavailable. SelectApplyto make it available.
Edit, remove, enable, or disable a restart schedule
- FromManage > Full Configuration, select交付组in the left pane.
- 年代elect a group and then selectEditin the action bar.
- On theRestart Schedulepage, select the check box for a schedule.
- To edit a schedule, selectEdit.Update the schedule configuration, using the guidance inCreate a restart schedule.
- To enable or disable a schedule, selectEdit.年代elect or clear theEnable restart schedulecheck box.
- To remove a schedule, selectRemove.确认删除。删除没有时间表t affect any tags applied to machines in the affected machines.
年代cheduled restarts delayed due to database outage
Note:
This feature is available only in PowerShell.
If a site database outage occurs before a scheduled restart begins for machines (VDAs) in a delivery group, the restarts begin when the outage ends. This action can have unintended results.
For example, let’s say you’ve scheduled a delivery group’s restarts to occur during off-production hours (beginning at 3 am). A site database outage occurs one hour before a scheduled restart begins (2 am). The outage lasts six hours (until 8 am). The restart schedule begins when the connection between the Delivery Controller and the site database is restored. The VDA restarts now begin five hours after their original schedule. This action might result in VDAs restarting during production hours.
To help avoid this situation, you can use theMaxOvertimeStartMinsparameter for theNew-BrokerRebootScheduleV2and年代et-BrokerRebootScheduleV2cmdlets. The value specifies the maximum number of minutes beyond the scheduled start time that a restart schedule can begin.
If the database connection is restored within that time (scheduled time +
MaxOvertimeStartMins), the VDA restarts begin.If the database connection is not restored within that time, the VDA restarts do not begin.
If this parameter is omitted or has a zero value, the scheduled restart begins when the connection to the database is restored, regardless of the outage duration.
For more information, see the cmdlet help. This feature is available only in PowerShell.
年代cheduled restarts for machines in maintenance mode
To indicate whether a restart schedule affects machines that are in maintenance mode, use theIgnoreMaintenanceModeoption with theBrokerRebootScheduleV2cmdlets.
For example, the following cmdlet creates a schedule that restarts both machines that are and machines that are not in maintenance mode.
New-BrokerRebootSchedulev2 rebootSchedule1 -DesktopGroupName
The following cmdlet modifies an existing restart schedule.
年代et-BrokerRebootSchedulev2 rebootSchedule1 -IgnoreMaintenanceMode $true
For more information, see the cmdlet help.
Load manage machines in delivery groups
You can load manage multi-session OS machines only.
Load management measures the server load and determines which server to select under the current environment conditions. This selection is based on:
年代erver maintenance mode status:A multi-session OS machine is considered for load balancing only when maintenance mode is off.
年代erver load index:Determines how likely a server delivering multi-session OS machines is to receive connections. The index is a combination of load evaluators: the number of sessions and the settings for performance metrics such as CPU, disk, and memory use. Load evaluators are specified in load management policy settings.
A server load index of 10000 indicates that the server is fully loaded. If no other servers are available, users might receive a message that the desktop or application is currently unavailable when they launch a session.
You can monitor the load index in Director (Monitor), a Full Configuration management interface search, and the SDK.
In console displays, to display the年代erver Load Indexcolumn (which is hidden by default), select a machine, right-click a column header, and then select年代elect Column.In theMachine category, selectLoad Index.
In the SDK, use the
Get-BrokerMachinecmdlet. For details, seeCTX202150.Concurrent logon tolerance policy setting:The maximum number of concurrent requests to log on to the server. (This setting is equivalent to load throttling in XenApp 6.x versions.)
When all servers are at or higher than the concurrent logon tolerance setting, the next logon request is assigned to the server with the lowest pending logons. If more than one server meets these criteria, the server with the lowest load index is selected.
Manage Autoscale
By default, Autoscale is disabled for delivery groups. To manage Autoscale for a delivery group (if applicable), follow these steps:
- FromManage > Full Configuration, select交付组in the left pane.
- 年代elect a group and then selectManage Autoscalein the action bar. TheManage Autoscalewindow appears.
- Configure settings as needed. For information about Autoscale settings, seeAutoscale.
- 年代electApplyto apply any changes you made and to keep the window open. Or, select年代aveto apply changes and to close the window.
年代essions
- Log off or disconnect a session, or send a message to users
- Configure session prelaunch and session linger
- Configure session roaming
- Control session reconnection when disconnected from machine in maintenance mode
Log off or disconnect a session, or send a message to delivery group users
- FromManage > Full Configuration, select交付组in the left pane.
- 年代elect a group and then selectView Machinesin the action bar.
- 记录一个用户了session, select the session or desktop and then selectLog offin the action bar. The session closes and the machine becomes available to other users, unless it is allocated to a specific user.
- To disconnect a session, select the session or desktop and then selectDisconnectin the action bar. Applications continue to run and the machine remains allocated to that user. The user can reconnect to the same machine.
- To send a message to users, select the session, machine, or user and then select年代end messagein the action bar. Enter the message.
Configure session prelaunch and session linger in a delivery group
These features are supported only on multi-session OS machines.
The session prelaunch and session linger features help specified users access applications quickly, by:
- 年代tarting sessions before they are requested (session prelaunch)
- Keeping application sessions active after a user closes all applications (session linger)
默认情况下,会话下水前的和会话徘徊re not used. A session starts (launches) when a user starts an application, and remains active until the last open application in the session closes.
Considerations:
- The delivery group must support applications, and the machines must be running a VDA for multi-session OS, minimum version 7.6.
- These features are supported only when using Citrix Workspace app for Windows, and also require more Citrix Workspace app configuration. For instructions, search for session prelaunch in the product documentation for your Citrix Workspace app for Windows version.
- Citrix Workspace app for HTML5 is not supported.
- When using session prelaunch, if a user’s machine is put into suspend or hibernate mode, prelaunch does not work (regardless of session prelaunch settings). Users can lock their machines/sessions. However, if a user logs off from Citrix Workspace app, the session is ended and prelaunch no longer applies.
- When using session prelaunch, physical client machines cannot use the suspend or hibernate power management functions. Client machine users can lock their sessions but should not log off.
- 下水前的消费concu和挥之不去的会话rrent license, but only when connected. If using a user/device license, the license lasts 90 days. Unused prelaunched and lingering sessions disconnect after 15 minutes by default. This value can be configured in PowerShell (
New/Set-BrokerSessionPreLaunchcmdlet). - Careful planning and monitoring of your users’ activity patterns are essential to tailoring these features to complement each other. Optimal configuration balances the benefits of earlier application availability for users against the cost of keeping licenses in use and resources allocated.
- You can also configure session prelaunch for a scheduled time of day in Citrix Workspace app.
How long unused prelaunched and lingering sessions remain active
There are several ways to specify how long an unused session remains active if the user does not start an application: a configured timeout and server load thresholds. You can configure all of them. The event that occurs first causes the unused session to end.
Timeout:A configured timeout specifies the number of minutes, hours, or days an unused prelaunched or lingering session remains active. If you configure too short a timeout, prelaunched sessions end before they provide the user benefit of quicker application access. If you configure too long a timeout, incoming user connections might be denied because the server doesn’t have enough resources.
You can enable this timeout from the SDK only (
New/Set-BrokerSessionPreLaunchcmdlet), not from the management console. If you disable the timeout, it does not appear in the console display for that delivery group or in theEdit Delivery Grouppages.Thresholds:Automatically ending prelaunched and lingering sessions based on server load ensures that sessions remain open as long as possible, assuming that server resources are available. Unused prelaunched and lingering sessions do not cause denied connections because they are ended automatically when resources are needed for new user sessions.
You can configure two thresholds: the average percentage load of all servers in the delivery group, and the maximum percentage load of a single server in the group. When a threshold is exceeded, the sessions that have been in the prelaunch or lingering state for the longest time are ended. Sessions are ended one-by-one at minute intervals until the load falls below the threshold. While the threshold is exceeded, no new prelaunch sessions are started.
年代ervers with VDAs that have not registered with a Controller and servers in maintenance mode are considered fully loaded. An unplanned outage causes prelaunch and lingering sessions to end automatically to free capacity.
To enable session prelaunch
- FromManage > Full Configuration, select交付组in the left pane.
- 年代elect a group and then selectEditin the action bar.
On theApplication Prelaunchpage, enable session prelaunch by choosing when sessions launch:
- When a user starts an application. This is the default setting. Session prelaunch is disabled.
- When any user in the delivery group logs on to Citrix Workspace app for Windows.
- When anyone in a list of users and user groups logs on to Citrix Workspace app for Windows. Be sure to also specify users or user groups if you choose this option.
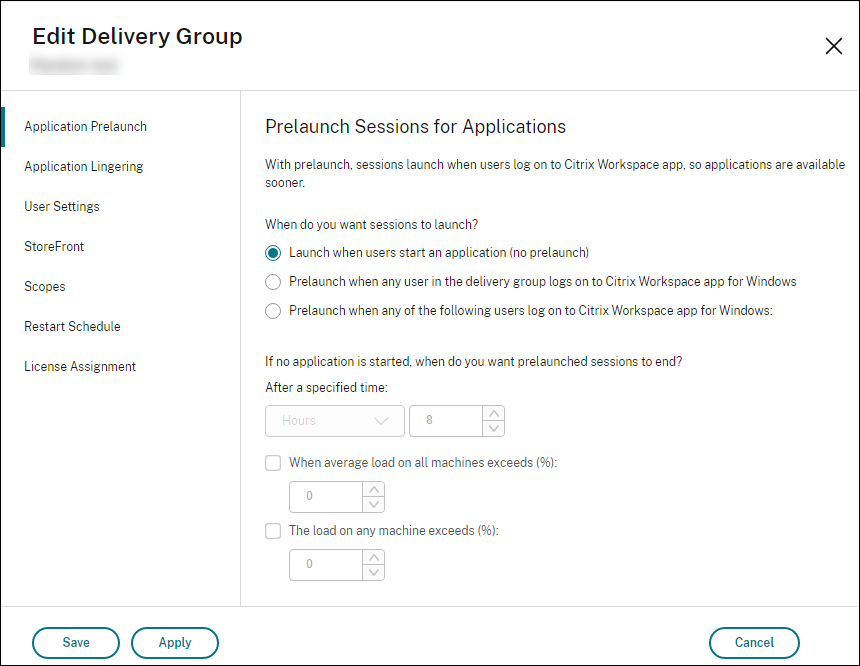
A prelaunched session is replaced with a regular session when the user starts an application. If the user does not start an application (the prelaunched session is unused), the following settings affect how long that session remains active.
- When a specified time interval elapses. You can change the time interval (1–99 days, 1–2376 hours, or 1–142,560 minutes).
- When the average load on all machines in the delivery group exceeds a specified percentage (1–99%).
- When the load on any machine in the delivery group exceeds a specified percentage (1–99%).
Recap: A prelaunched session remains active until one of the following events occurs: a user starts an application, the specified time elapses, or a specified load threshold is exceeded.

To enable session linger
- FromManage > Full Configuration, select交付组in the left pane.
- 年代elect a group and then selectEditin the action bar.
On theApplication Lingeringpage, enable session linger by selectingKeep sessions active until.

年代everal settings affect how long a lingering session remains active if the user does not start another application.
- When a specified time interval elapses. You can change the time interval: 1–99 days, 1–2376 hours, or 1–142,560 minutes.
- When the average load on all machines in the delivery group exceeds a specified percentage: 1–99%.
- When the load on any machine in the delivery group exceeds a specified percentage: 1–99%.
Recap: A lingering session remains active until one of the following events occurs: a user starts an application, the specified time elapses, or a specified load threshold is exceeded.

Configure session roaming
默认情况下,启用会话漫游交付y groups. Sessions roam between client devices with the user. When the user launches a session and then moves to another device, the same session is used and applications are simultaneously available on both devices. You can view the applications on multiple devices. The applications follow, regardless of the device or whether current sessions exist. Often, printers and other resources assigned to the application also follow. Alternatively, you can also use PowerShell. For more information, see年代ession roaming.
Configure session roaming for applications
To configure session roaming for applications, follow these steps:
FromManage > Full Configuration, select交付组in the left pane.
年代elect a group and then selectEdit Delivery Groupin the action bar.
On theUserspage, enable session roaming by selecting the年代essions roam with users as they move between devicescheck box.
- When enabled, if a user launches an application session and then moves to another device, the same session is used and available on both devices. When disabled, the session no longer roams between devices.
年代electOKto apply changes and close the window.
Configure session roaming for desktops
To configure session roaming for a desktop, follow these steps:
FromManage > Full Configuration, select交付组in the left pane.
年代elect a group and then selectEdit Delivery Groupin the action bar.
On theDesktopspage, select the desktop and selectEdit.
Enable session roaming by selecting the年代ession roamingcheck box.
- When enabled, if the user launches the desktop and then moves to another device, the same session is used, and applications are available on both devices. When disabled, the session no longer roams between devices.
年代electOKto apply changes and close the window.
Control session reconnection when disconnected from machine in maintenance mode
Note:
This feature is available only in PowerShell.
You can control whether sessions that are disconnected on machines in maintenance mode are allowed to reconnect to machines in the delivery group.
Before late May 2021, reconnection was not allowed for single-session pooled desktop sessions that had disconnected from machines in maintenance mode. Now, you can configure a delivery group to allow or prohibit reconnections (regardless of session type) after disconnection from a machine in maintenance mode.
When creating or editing a delivery group (New-BrokerDesktopGroup,年代et-BrokerDesktopGroup), use the-AllowReconnectInMaintenanceMode parameter to allow or prohibit reconnections for machines that were disconnected from a machine in maintenance mode.
- When set to true, sessions can reconnect to machines in the group.
- When set to false, sessions cannot reconnect to machines in the group.
Default values:
- 年代ingle-session: Disabled
- Multi-session: Enabled
Troubleshoot
VDAs that are not registered with a Delivery Controller are not considered when launching brokered sessions. This results in underutilization of otherwise available resources. There are various reasons a VDA might not be registered, many of which an administrator can troubleshoot. The details display provides troubleshooting information in the catalog creation wizard, and after you add a catalog to a delivery group.
After you create a delivery group, the details pane for a delivery group indicates the number of machines that are expected to be registered but are not. For example, one or more machines are powered on and not in maintenance mode, but are not currently registered with a Controller. When viewing a “not registered, but should be” machine, review theTroubleshoottab in the details pane for possible causes and recommended corrective actions.
For messages about functional level, seeVDA versions and functional levels.
For information about VDA registration troubleshooting, seeCTX136668.
- In the display for a delivery group, theInstalled VDA versionin the details pane might differ from the actual version installed on the machines. The machine’s Windows Programs and Features display shows the actual VDA version.
- For machines withPower State Unknownstatus, seeCTX131267for guidance.