
Integrate with Apple Education features
You can use XenMobile as your mobile device management (MDM) solution in an environment that uses Apple Education. XenMobile support includes Apple School Manager (ASM) and Classroom app for iPad. The XenMobile Education Configuration device policy configures instructor and student devices for use with Apple Education.
You provide preconfigured and supervised iPads to instructors and students. That configuration includes ASM enrollment in XenMobile, a Managed Apple ID account configured with a new password, and required volume purchase apps and iBooks.
Here are highlights of XenMobile support for Apple Education features.
Apple School Manager
ASM is a service that lets you set up, deploy, and manage iOS (iPadOS) devices and macOS laptops used in educational institutions. ASM includes a web-based portal that lets IT administrators:
Assign Apple Deployment Program devices to different MDM servers.
Purchase volume purchase licenses for apps and iBooks
CreateManaged Apple IDsin bulk. These customized Apple IDs provide access to Apple services such as storing documents in iCloud Drive and enrolling in Apple App Store courses.
You can add multiple ASM accounts to XenMobile. For example, this feature enables you to use different enrollment settings and Setup Assistant options by Education unit or department. You then associate ASM accounts with different device policies.
After you add an ASM account to the XenMobile console, XenMobile retrieves class and roster information. During device setup, XenMobile:
- Enrolls the devices.
- Installs the resources you configured for deployment, such as device policies (Education Configuration, Home screen layout, and so on).
- Also installs both apps and iBooks purchased through volume purchase.
You then provide the preconfigured devices to instructors and students. If a device is lost or stolen, you can use MDM Lost Mode feature to lock and locate devices.
Classroom app for iPad
iPad能使教师的课堂应用connect to and manage student devices. You can view device screens, open apps on iPads, and share and open web links.
教室在App Store是免费的。你上传app to the XenMobile console. You then use the Education Configuration device policy to configure the Classroom app, which you deploy to instructor devices.
For more information about Apple Education features, see the AppleEducationsite and the Apple Education Deployment Guide from the same site.
Prerequisites
Citrix Gateway
Enrollment profile configured for MDM+MAM.
Apple iPad 3rd generation (minimum version) or iPad Mini, with iOS 9.3 (minimum version)
Note:
XenMobile doesn’t validate ASM user accounts against LDAP or Active Directory. However, you can connect XenMobile to LDAP or Active Directory for management of users and devices not related to ASM instructors or students. For example, you can use Active Directory to provide Secure Mail and Secure Web to other ASM members, such as IT administrators and managers.
Because ASM instructors and students are local users, there is no need to deploy Citrix Secure Hub to their devices.
MAM enrollment that includes Citrix Gateway authentication doesn’t support local users (only Active Directory users). Therefore, XenMobile deploys only required volume purchase apps and iBooks to instructor and student devices.
Prerequisites for Shared iPads
- Any iPad Pro, iPad 5th generation, iPad Air 2 or later, and iPad mini 4 or later
- At least 32 GB of storage
- Supervised
Configure Apple School Manager and XenMobile
After you purchase iPads from Apple or from Apple Authorized Resellers or carriers: Follow the workflow in this section to set up your ASM account and devices. This workflow includes steps that you perform in the ASM portal and in the XenMobile console.
Follow these instructions to configure your integration for any iPads that you use in a one-to-one model (one iPad per student) or for instructor iPads (unshared). To configure Shared iPads, seeConfigure Shared iPads。
Step 1: Create your Apple School Manager account and complete the Setup Assistant
If you plan to upgrade from Apple Deployment Program, see the Apple Support article,Upgrade your institution to ASM。To create your ASM account, go tohttps://school.apple.com/and follow the instructions to enroll. The first time that you log in to ASM, the Setup Assistant opens.
For information about ASM prerequisites, the Setup Assistant, and management tasks, see theApple School Manager User Guide。
When setting up an ASM, use a domain name that differs from the domain name for Active Directory. For example, prefix the domain name for ASM with something like
appleid。When you connect ASM to your roster data, ASM creates Managed Apple IDs for instructors and students. Your roster data includes instructors, students, and classes. For information about adding roster data to ASM, see the ASM User Guide, referenced earlier.
You can customize the Managed Apple ID format for your institution, as described in the ASM User Guide, referenced earlier.
Important:
Don’t change Managed Apple IDs after you import ASM information into XenMobile.
If you purchased devices through resellers or carriers, link those devices to ASM. For information, see the ASM User Guide, referenced earlier.
Step 2: Configure XenMobile as the MDM Server for Apple School Manager and configure device assignments
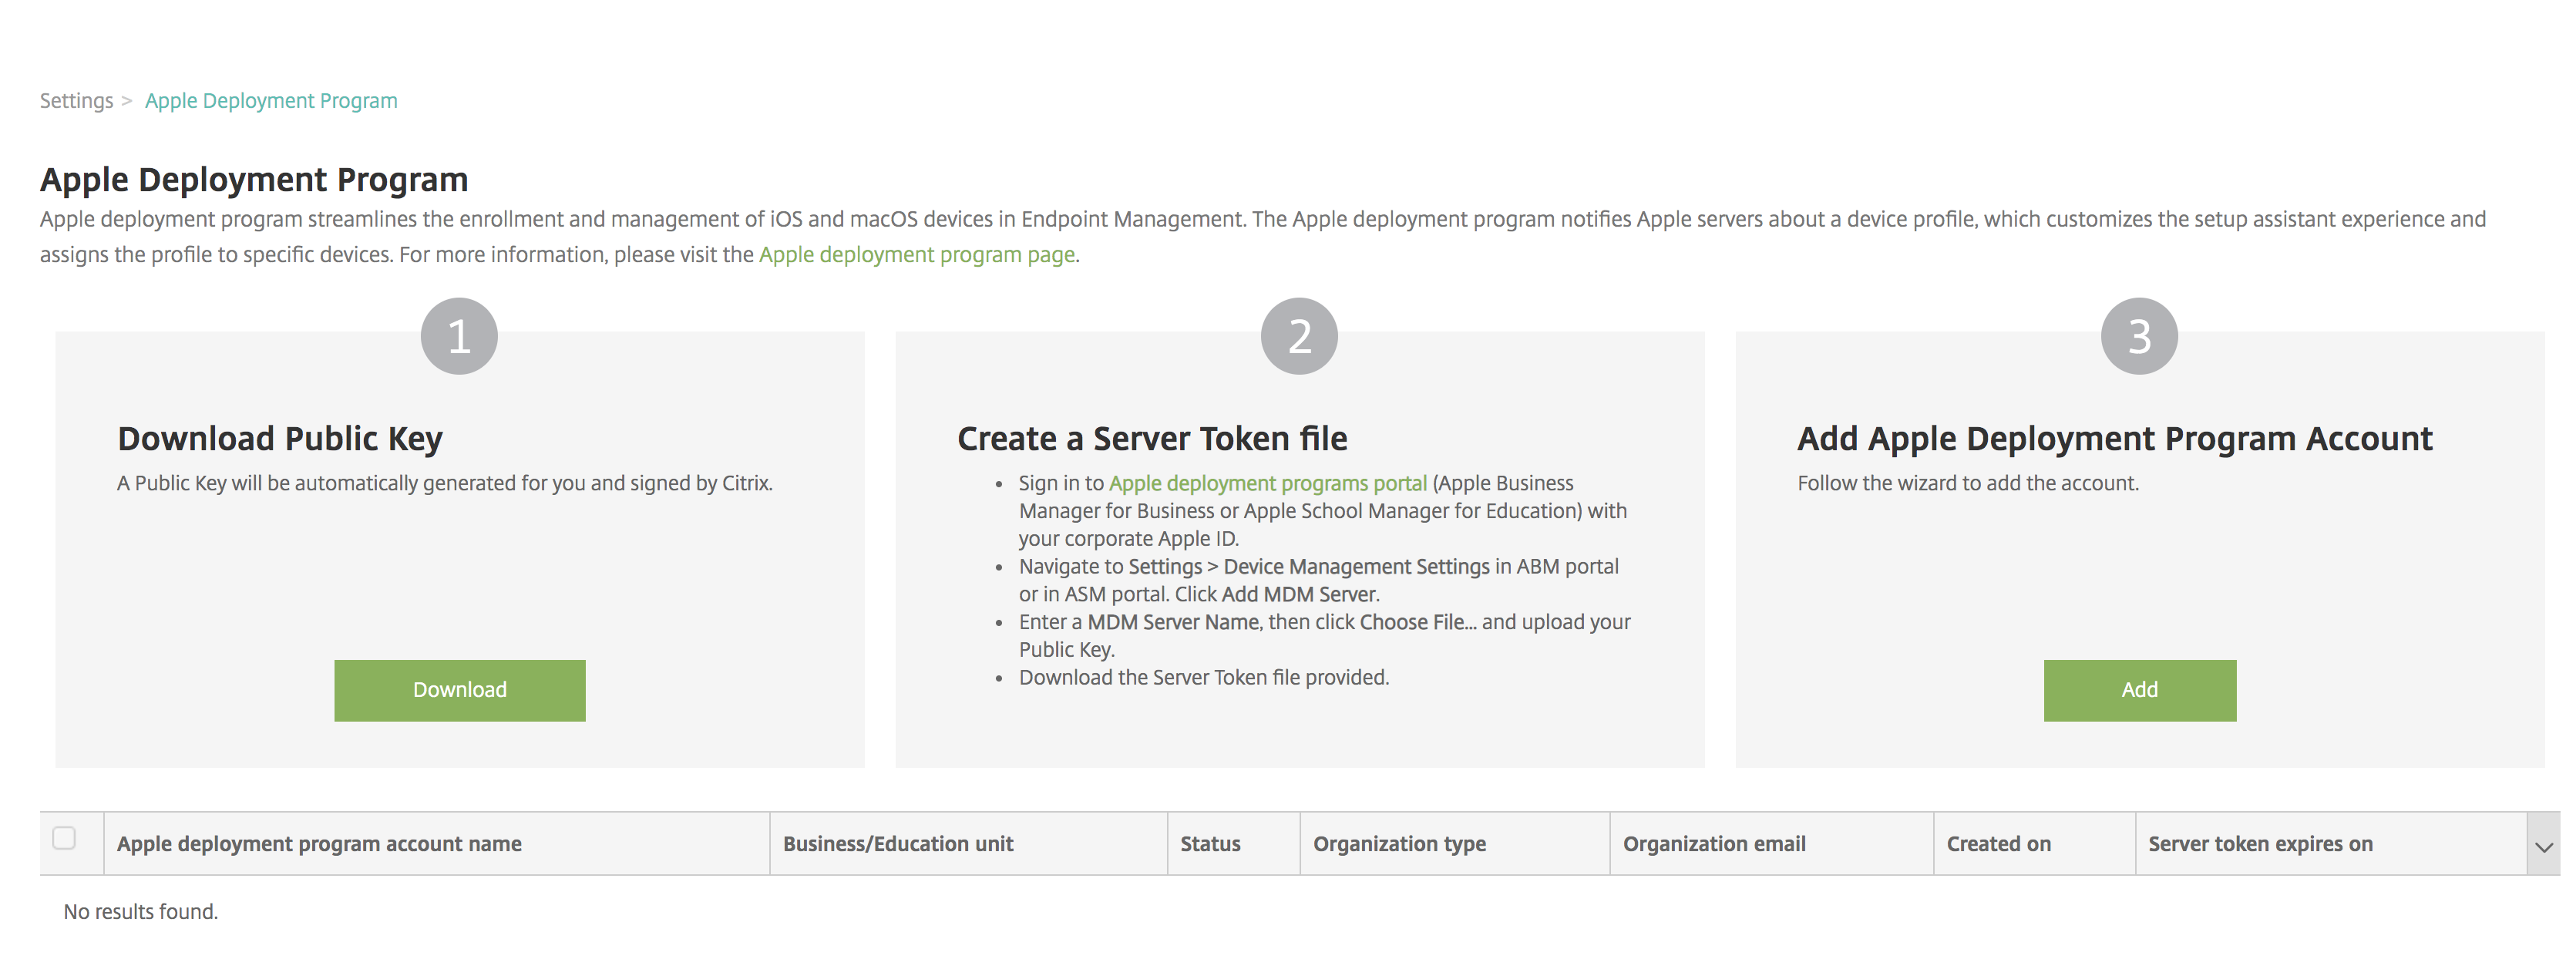
The ASM portal includes anMDM Serverstab. You need the public key file from XenMobile to complete that setup.
Download the public key for your XenMobile to your local computer: In the XenMobile console, go toSettings > Apple Deployment Program。
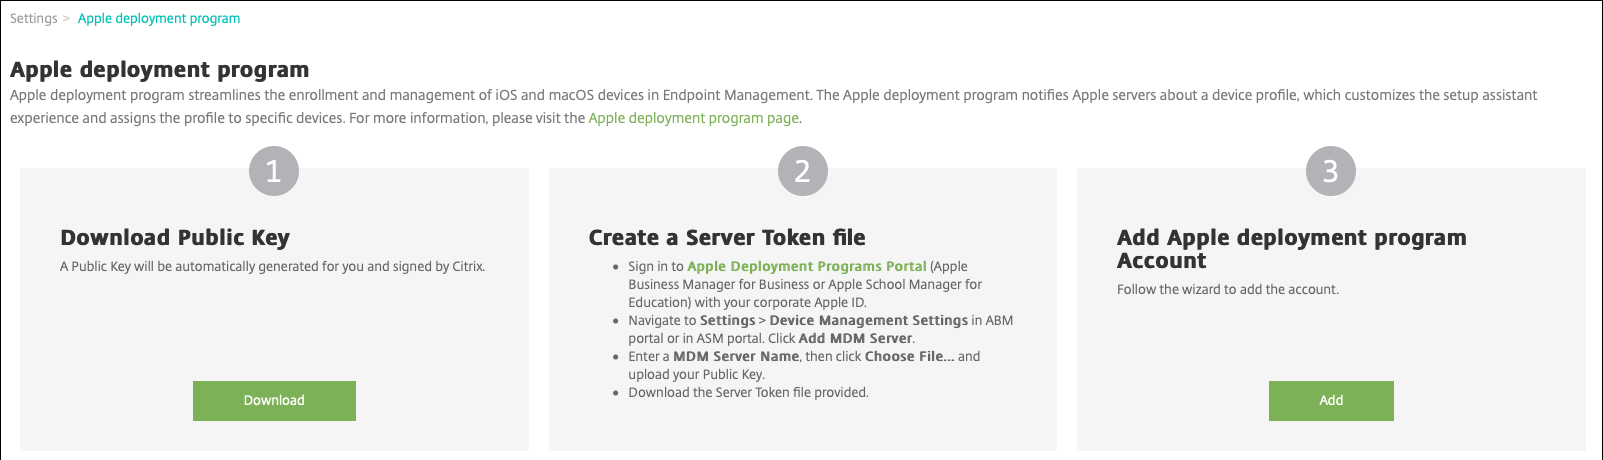
UnderDownload Public Key, clickDownloadand then save the PEM file.
In theApple School Managerportal, clickSettings, thenDevice Management Settings。ClickAdd MDM Server。
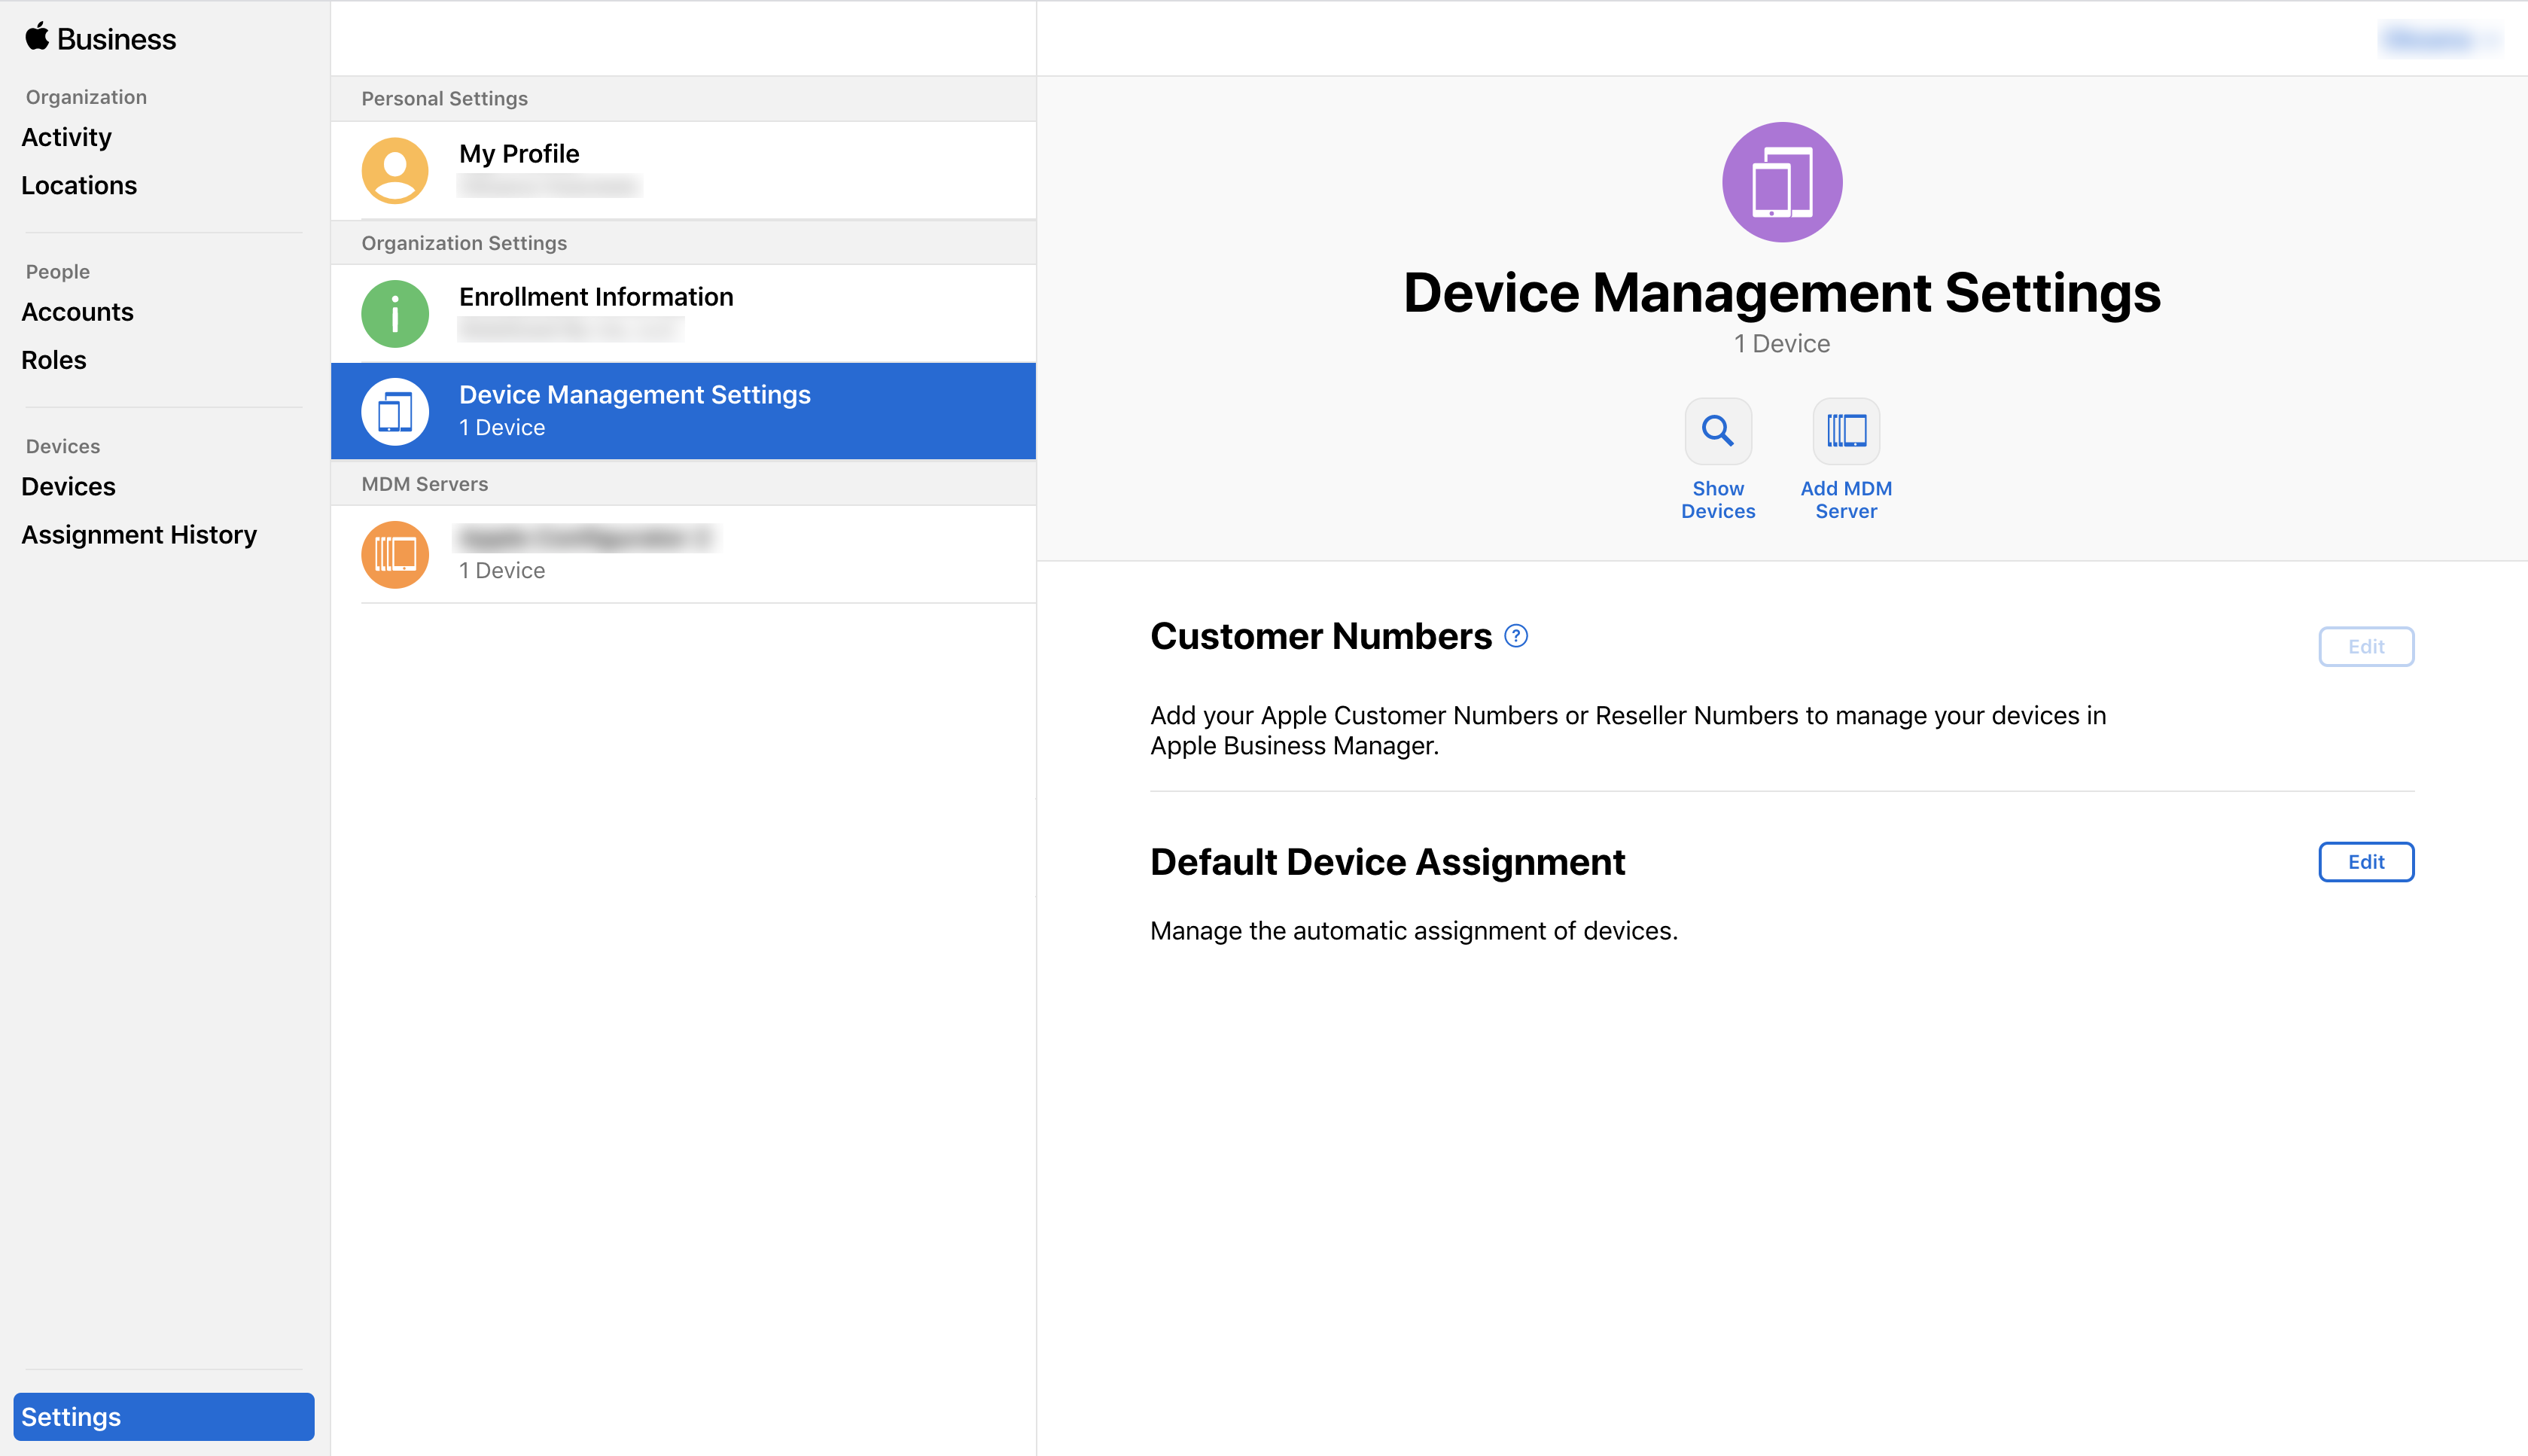
Type a name for XenMobile. The server name that you type is for your reference and is not the server URL or name. UnderUpload Public Key, clickChoose File。

Upload the public key that you downloaded from XenMobile and then clickSave。
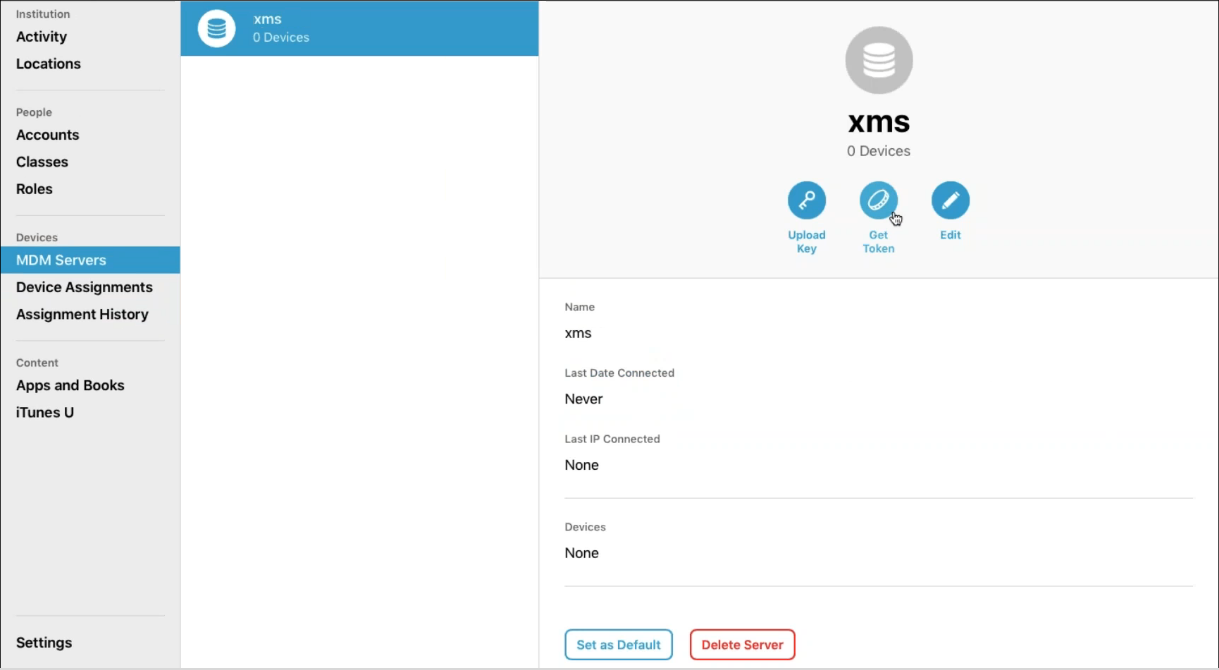
Generate a server token: ClickDownload Tokento download the server token file to your computer.
UnderDefault Device Assignment, clickChange。Choose how you want to assign devices and then provide the information requested. For information, see theASM User Guide。


Step 3: Add the Apple School Manager account to XenMobile
In XenMobile console, go toSettings > Apple Deployment Programand underAdd Apple Deployment Program Account, clickAdd。
In theServer Tokenspage, clickUploadand choose the server token (a P7M file) file that you downloaded from the ASM portal. The token information appears.
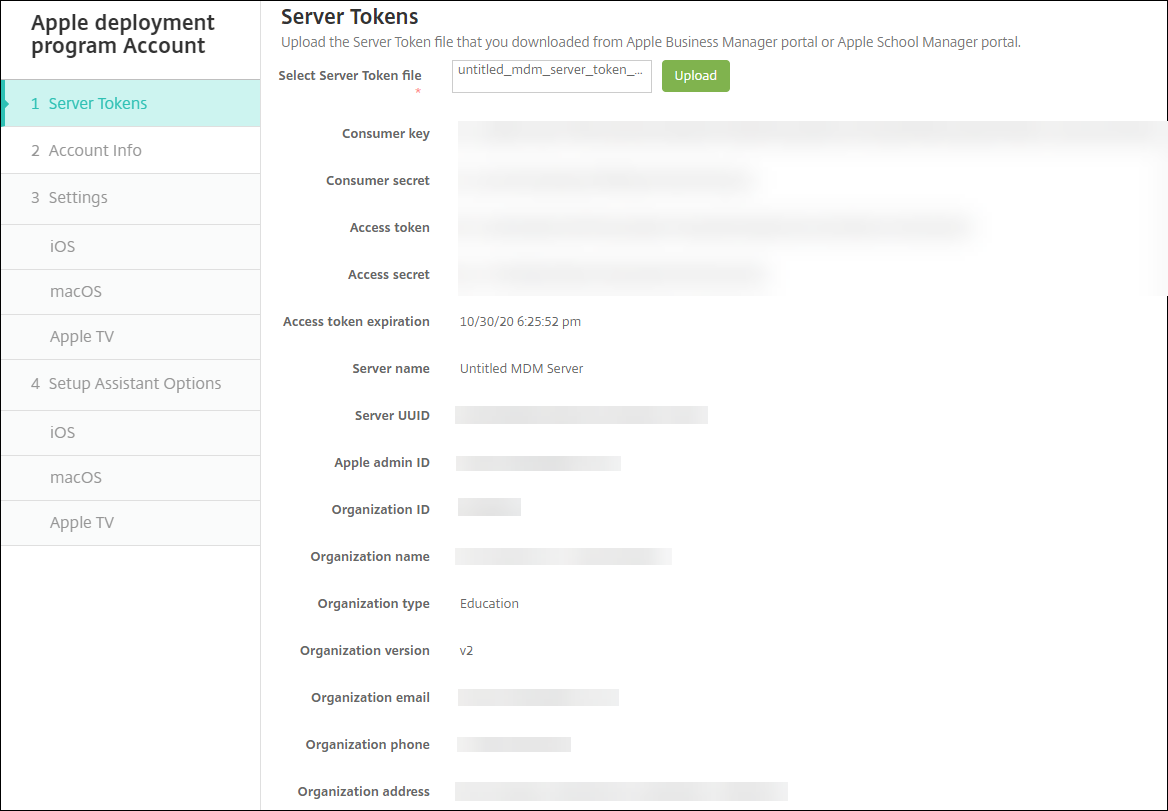
Notes:
Organization IDis your customer ID for Apple Deployment Program.
ASM accounts have anOrganization typeofEducationand anOrganization versionofv2。
In theAccount Infopage, specify the following settings.
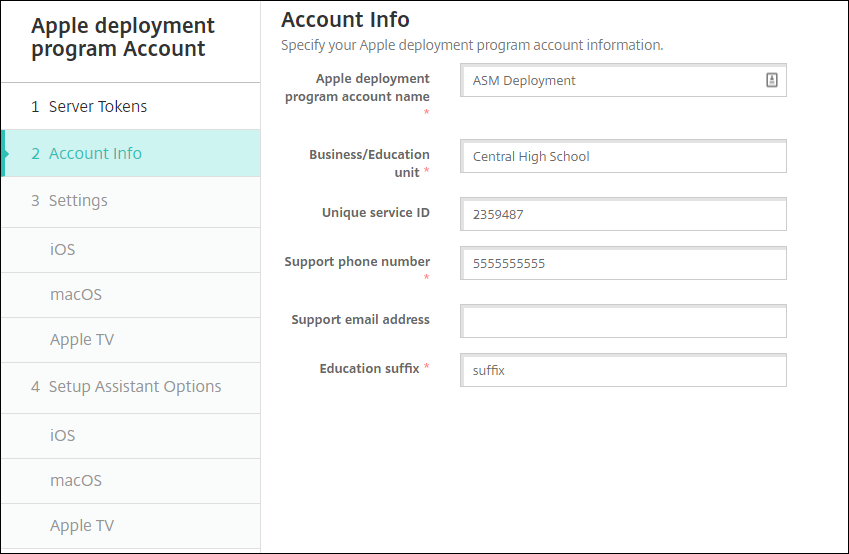
- Apple Deployment Program account name:A unique name for this Apple Deployment Program account. Use names that reflect how you organize Apple Deployment Program accounts, such as by country or organizational hierarchy.
- Business/Education unit:The Education unit or department for device assignment. This field is required.
- Unique service ID:An optional unique ID to help you further identify the account.
- Support phone number:A support phone number that users can call for help during setup. This field is required.
- Support email address:An optional support email address available to end users.
- Education suffix:Flags the classes for a given ASM Deployment Program account. (The volume purchase suffix flags apps and iBooks for a given volume purchase account.) The recommendation is to use the same suffix for both accounts, ASM Deployment Program and ASM volume purchase.
ClickNext。IniOS Settings, specify the following settings.
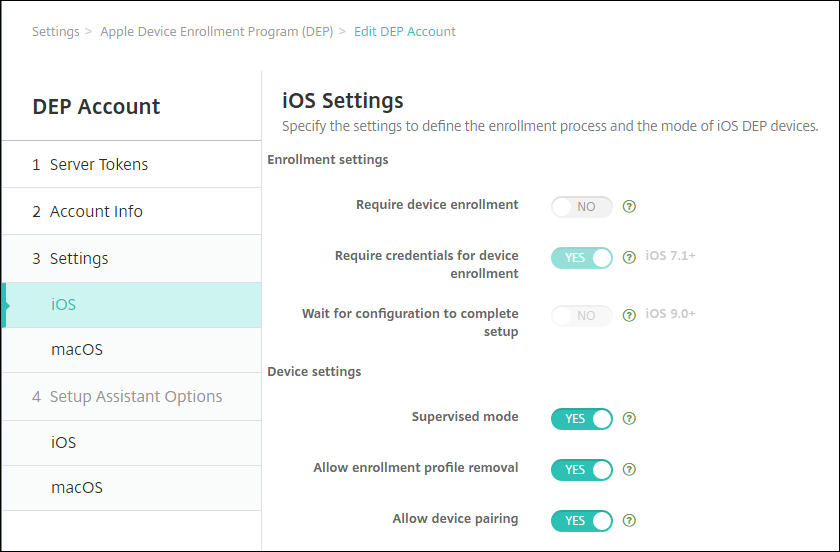
Enrollment settings
- Require device enrollment:Require users to enroll their devices. Change this setting toNo。
- Require credentials for device enrollment:Require users to enter their credentials during Apple Deployment Program setup. For ASM integration with XenMobile, this setting isYesby default and can’t be changed. Apple Deployment Program requires credentials for device enrollment.
Wait for configuration to complete setup:是否需要用户设备继续安装Assistant mode until all MDM resources deploy to the device. For ASM integration with XenMobile, this setting isNoby default. According to Apple documentation, the following commands might not work while a device is in Setup Assistant mode:
- InviteToProgram
- InstallApplication
- InstallMedia
- ApplyRedemptionCode
设备的设置
Supervised mode:Place iOS devices in supervised mode. Don’t change the default,Yes。For details on placing an iOS device in supervised mode, seeTo place an iOS device in Supervised mode by using the Apple Configurator。
- Shared mode:Enable shared mode on iPads. Devices that don’t meet the minimum requirements can’t share.
- Allow enrollment profile removal:For ASM integration, allow user to remove the enrollment profile from the device. Change this setting toYes。
- Allow device pairing:For ASM integration, allow device pairing so you can manage them through Apple App Store and the Apple Configurator. Change this setting toYes。
IniOS Setup Assistant Options, select the iOS Setup Assistant steps to skip when users start their devices the first time. By default, the Setup Assistant includes all steps. Consider that removing steps from the Setup Assistant simplifies the user experience.
Important:
Citrix strongly recommends that you include theApple IDandTerms & Conditionssteps. Those steps enable instructors and students to provide their new Managed Apple ID passwords and accept the required terms and conditions.

- Location services:Set up the location service on the device.
- Touch ID:Set up Touch ID on iOS devices.
- Passcode lock:Create a passcode for the device.
- Set up as New or Restore:Set up the device as new or from an iCloud or Apple App Store backup.
- Move from Android:Enable transferring data from an Android device to an iOS device. This option is available only whenSet up as New or Restoreis selected (that is, the step is skipped).
- Apple ID:Set up an Apple ID account for the device. Citrix recommends that you select the check box to include this step.
- Terms and conditions:Require users to accept terms and conditions for use of the device. Citrix recommends that you select the check box to include this step.
- Apple Pay:Set up Apple Pay on iOS devices.
- Siri:Use or not use Siri on the device.
- App analytics:Set up whether to share crash data and usage statistics with Apple.
- Display zoom:Set up the display resolution (either standard or zoomed) on iOS devices.
- True Tone:Set up the True Tone Display on iOS devices.
- Home Button:Set up the Home Button screen sensitivity.
- New feature highlights:Set up the onboarding informational screens, Access the Dock from Anywhere and Switch Between Recent Apps on iOS 11.0 devices (minimum version).
- Privacy:Prevent users from seeing the data and privacy pane during setup of Apple Deployment Program devices. For iOS 11.3 and later.
- SoftwareUpdate:Prevents the user from seeing the mandatory software update screen during setup of the Apple Deployment Program devices. For iOS 12.0 and later.
- ScreenTime:防止用户看到屏幕时间screen during setup of the Apple Deployment Program devices. For iOS 12.0 and later.
- SIM Setup:Prevents the user from seeing the Add Cellular Plan screen during setup of the Apple Deployment Program devices. For iOS 12.0 and later.
- iMessage & FaceTime:Prevents the user from seeing the iMessage and FaceTime screen during setup of the Apple Deployment Program devices. For iOS 12.0 and later.
The account appears onSettings > Apple Deployment Program。To test connectivity between XenMobile and your ASM account, select the account and clickTest Connectivity。
A status message appears.
After a few minutes, the user accounts from ASM appear onManage > Userspage. XenMobile creates local user accounts based on the imported Managed Apple ID for each user. In the following example, the domain name prefix of customized Apple IDs for user accounts is
appleid。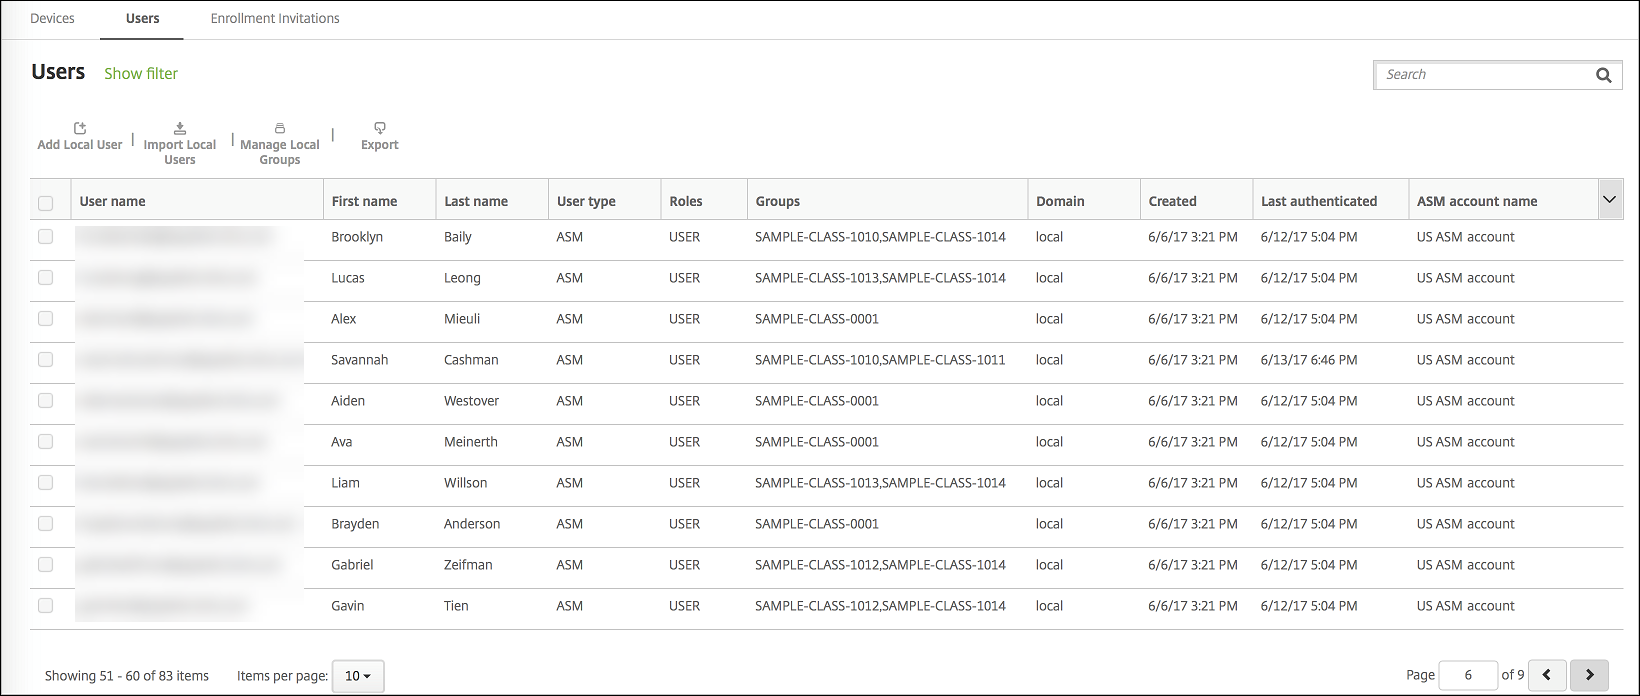


找到所有用户对于一个给定的ASM帐户,th类型e account name in the user search filter.
Step 4: Configure an Education volume purchase account for Apple School Manager
In this section, you point XenMobile to the volume purchase account that you use to purchase volume purchase licenses for apps and iBooks.
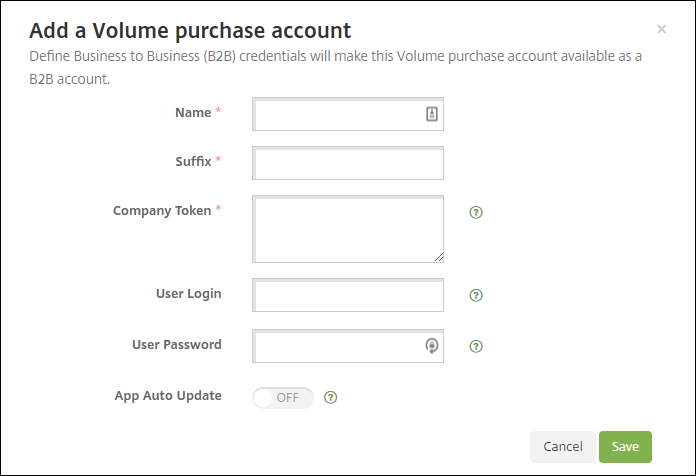
To configure an Education volume purchase account for ASM, follow the instructions inApple Volume Purchase。The Add a volume purchase account screen requires that you supply a Company Token. Download your token directly from your Education volume purchase account and paste it into theAdd a Volume purchase accountscreen.
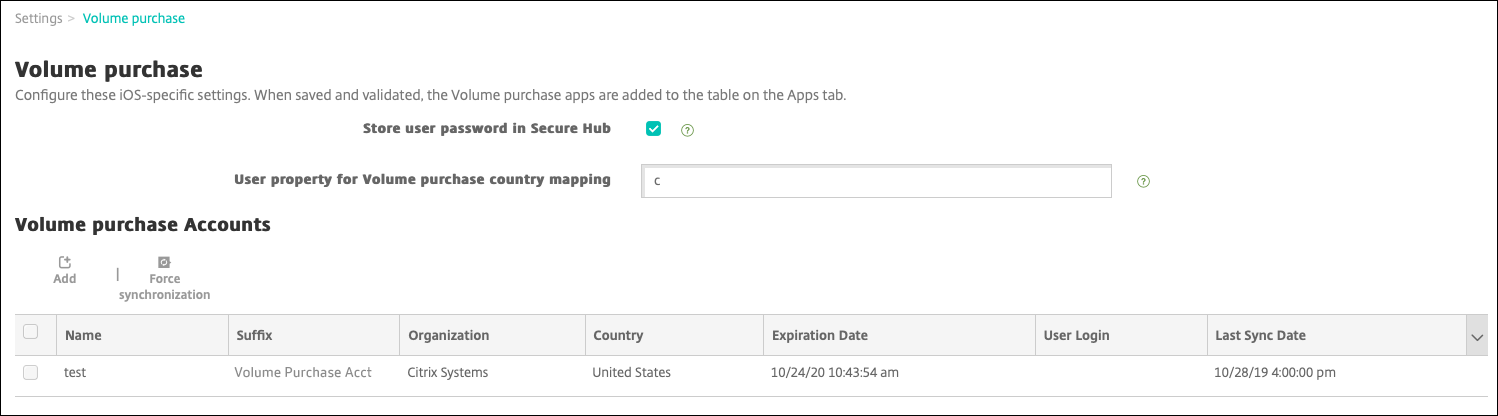
Wait a few minutes for the volume purchase licenses to import into XenMobile.


Step 5: Add passwords for Apple School Manager users
添加一个ASM帐户后,XenMobile进口classes and users from ASM. XenMobile treats classes as local groups and uses the term “group” in the console. If a class has a group name in ASM, XenMobile assigns the group name to the class. Otherwise, XenMobile uses the source system ID for the group name. XenMobile doesn’t use the course name for the class name because course names in ASM aren’t unique.
XenMobile uses the Managed Apple IDs to create local users with the user typeASM。当地因为ASM创建用户信誉entials independently of all external data sources. As a result, XenMobile doesn’t use a directory server to authenticate these new users.
ASM doesn’t send temporary user passwords to XenMobile. You can import them from a CSV file or add them manually. To import temporary user passwords:
Obtain the CSV file generated by ASM when creating the Managed Apple ID temporary passwords.
Edit the CSV file, replacing the temporary passwords with new passwords that users provide to enroll to XenMobile. There is no constraint on the password type for this purpose.
The format of an entry in the CSV file is as follows:
user@appleid.citrix.com,Firstname,Middle,Lastname,Password123!Where:
User:
user@appleid.citrix.comFirst name:
FirstnameMiddle name:
MiddleLast name:
LastnamePassword:
Password123!In the XenMobile console, clickManage > Users。TheUserspage appears.
The followingManage > Usersscreen sample shows a list of users imported from ASM. In theUserslist:
User nameshows the managed Apple ID.
User type isASM, to indicate the account originated from ASM.
Groupsshow the classes.
ClickImport Local Users。TheImport Provisioning Filedialog box appears.
For Format, chooseASM user, navigate to the CSV file you prepared in step 2, and then clickImport。

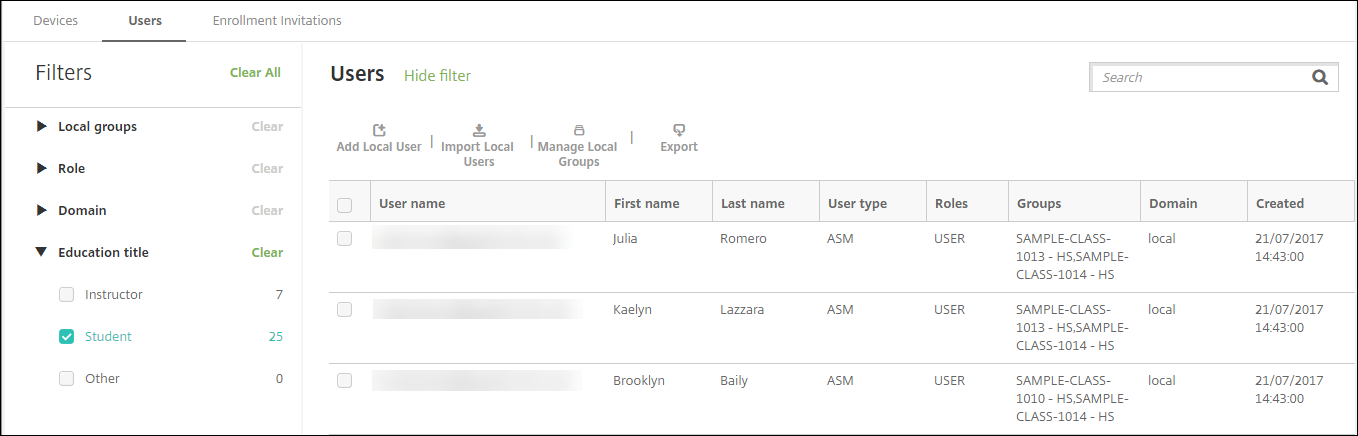
To view the properties for a local user, select the user and then clickEdit。
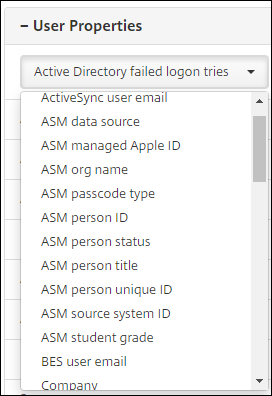
In addition to the name properties, these ASM properties are available:
- ASM data source:The data source of the class, such asCSVorSFTP。
- ASM managed Apple ID:A Managed Apple ID might include your institution name and
appleid。For example, the ID might resemble johnappleseed@appleid.myschool.edu. XenMobile requires a Managed Apple ID for authentication. - ASM org name:The name you gave the account in XenMobile.
- ASM passcode type:Password policy of the person:complex(a non-student password of eight or more numbers and letters),four(digits), orsix(digits).
- ASM person unique ID:Identifier for the user.
- ASM person status:Specifies whether the Managed Apple ID isActiveorInactive。This status becomes active after the user provides their new password for the Managed Apple ID account.
- ASM person title:Either Instructor, Student or Other.
- ASM person unique ID:Unique identifier for the user.
- ASM source system ID:Identifier for the system source.
- ASM student grade:Student grade information (not used by instructors).


Step 6: Optionally add photos of students
You can add a photo of each student. If the instructors use the Apple Classroom app, the photos appear in this app.
Recommended for photos:
Resolution: 256 x 256 pixels (512 x 512 pixels on a 2x device)
Format: JPEG, PNG, or TIFF
To add a photo, go toManage > Users, select a user, clickEdit, and then clickChoose image。

Step 7: Plan and add resources and delivery groups to XenMobile
A delivery group specifies the resources to deploy to categories of users. For example, you might create one delivery group for instructors and students. Alternatively, you might create multiple delivery groups so you can customize the apps, media, and policies sent to various instructors or students. You might create one or more delivery groups per class. You can also create one or more delivery groups for managers (other staff in your educational institution).
Resources that you deploy to user devices include device policies, volume purchase apps, and iBooks.
Device policies:
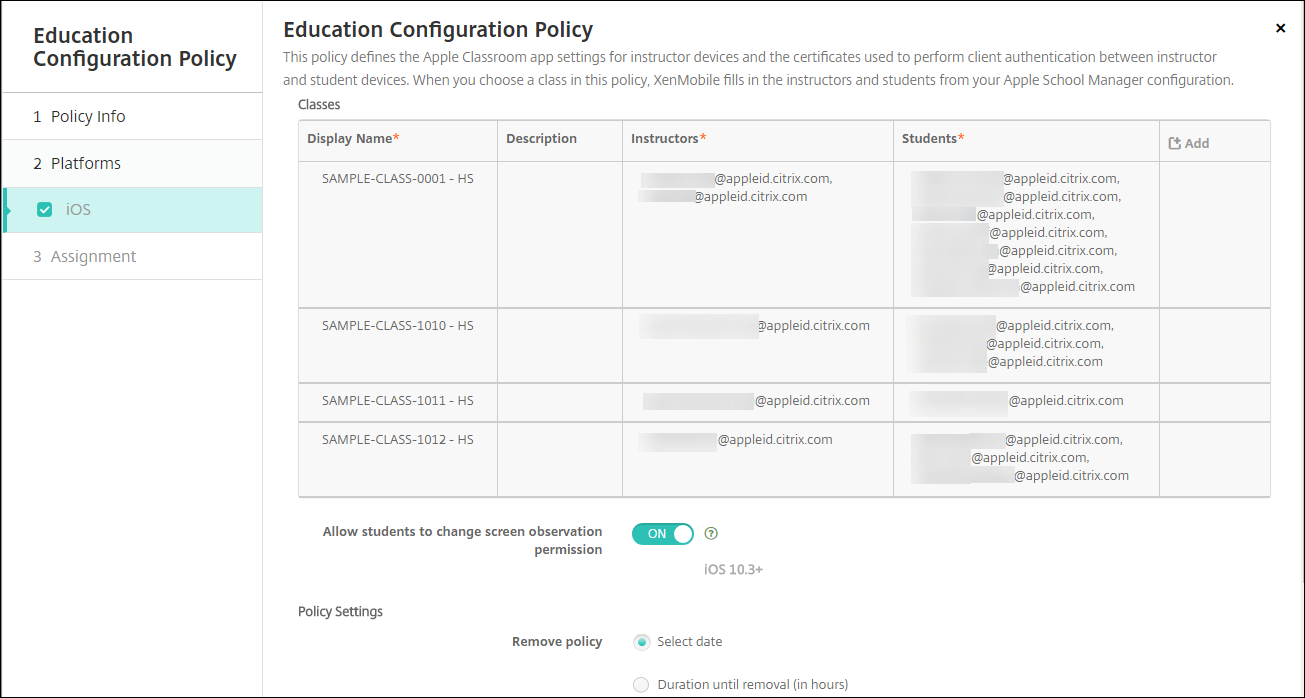
If instructors use the Classroom app, the Education Configuration device policy is required. Be sure to review other device policies to determine how you want to configure and restrict instructor and student iPads.
Volume purchase apps:
XenMobile requires that you deploy volume purchase apps as required apps for education users. XenMobile doesn’t support deploying such volume purchase apps as optional.
If you use the Apple Classroom app, deploy it only to instructor devices.
Deploy any other apps that you want to provide to instructors or students. This solution doesn’t use Citrix Secure Hub app, so there’s no need to deploy it to instructors or students.
Volume purchase iBooks:
After XenMobile connects to your ASM account, your purchased iBooks appear in the XenMobile console, inConfigure > Media。The iBooks listed on that page are available to add to delivery groups. XenMobile supports adding iBooks as required media only.
After you plan the resources and delivery groups for instructors and students, you can create those items in the XenMobile console.
Create any device policies that you want to deploy to instructor or student devices. For information about the Education Configuration device policy, seeEducation Configuration device policy。
For information about device policies, seeDevice policiesand the individual policy articles.
Configure apps (Configure > Apps) and iBooks (Configure > Media):
By default, XenMobile assigns apps and iBooks at the user level. During first-time deployment, instructors and students receive a prompt to register to ASM. After accepting the invitation, users receive their ASM apps and iBooks at the next deployment (within six hours). Citrix recommends that you force the deployment of apps and iBooks to new ASM users. To do that, select the delivery group and clickDeploy。
You can choose to assign apps (but not iBooks) at the device level. To do that, change the settingForce license association to devicetoOn。When you assign apps at the device level, users don’t receive an invitation to join Apple volume purchase.
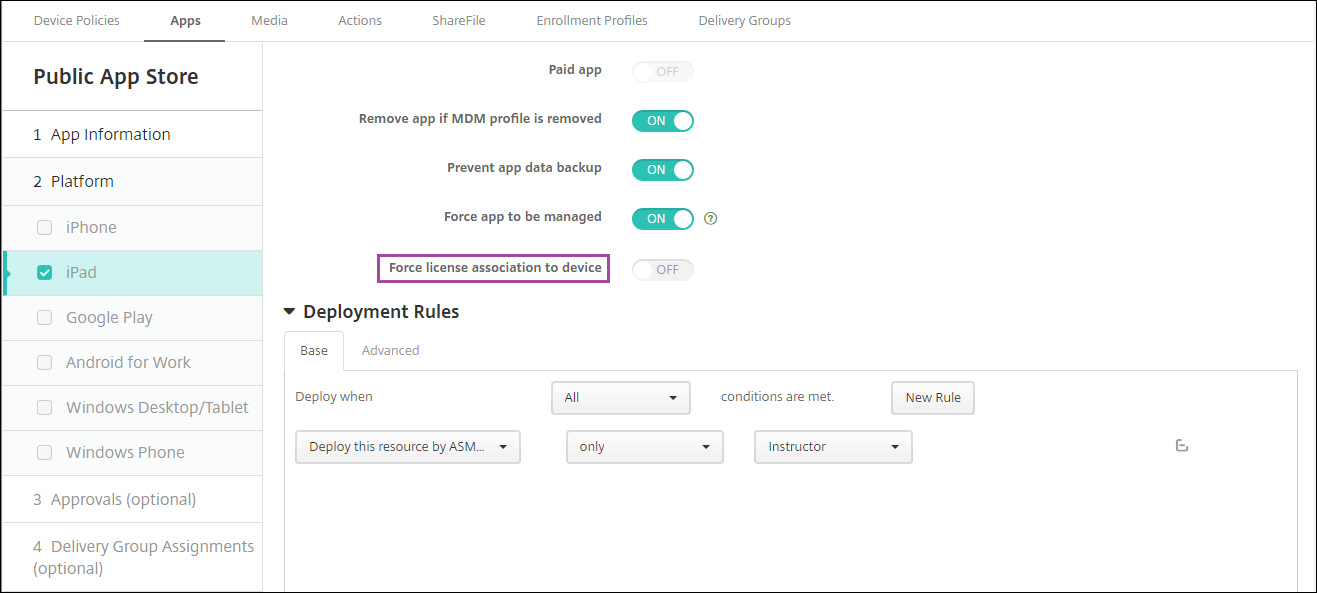
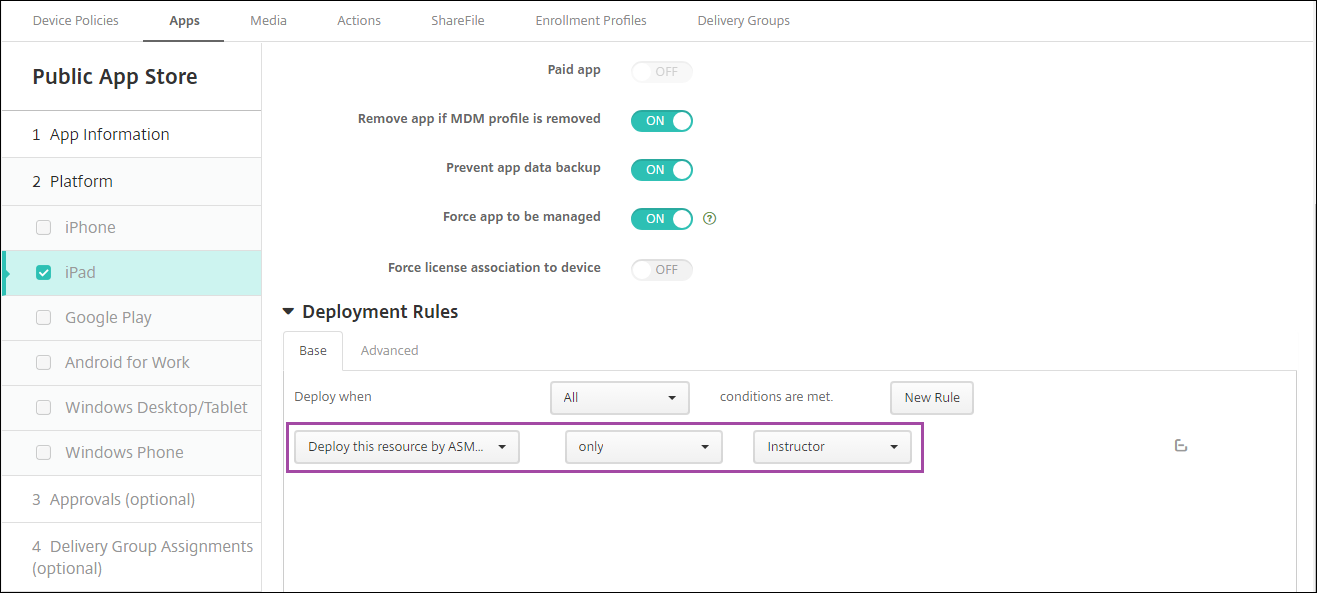
To deploy an app only to instructors, select a delivery group that includes only instructors or use the following deployment rule:
Deploy this resource by ASM device type only Instructor
- For help with adding volume purchase apps, seeAdd a Public App Store app。
Optional. Create actions based on ASM user properties. For example, you might create an action to send a notification to student devices when a new app installs. Alternatively, you can create an action that a user property triggers, as shown in the following example.
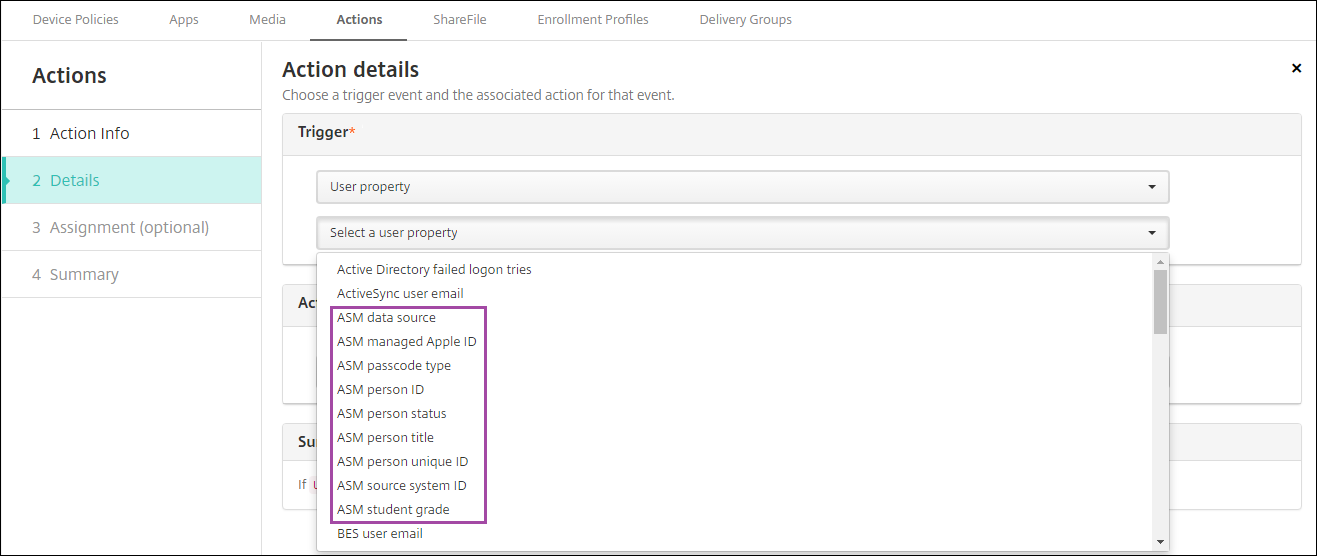
To create an action, go toConfigure > Actions。For information about configuring actions, seeAutomated actions。
InConfigure > Delivery Groups, create delivery groups for instructors and for students. Choose the classes that were imported from ASM. Also, create a deployment rule for instructors and students.
For example, the following user assignments are for instructors. The deployment rule is:
Limit by user property ASM person title is equal to Instructor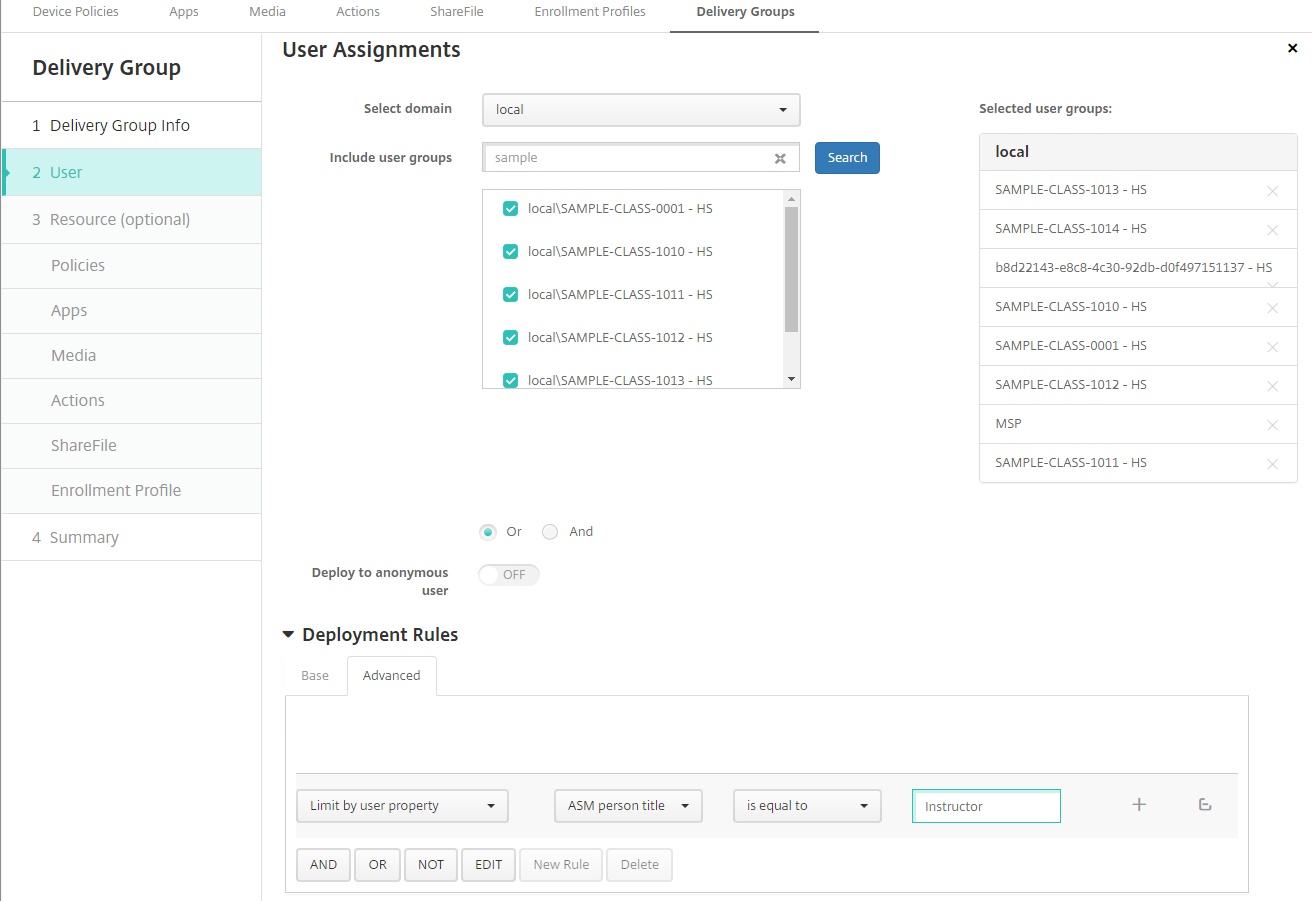
The following user assignments are for students. The deployment rule is:
Limit by user property ASM person title is equal to Student
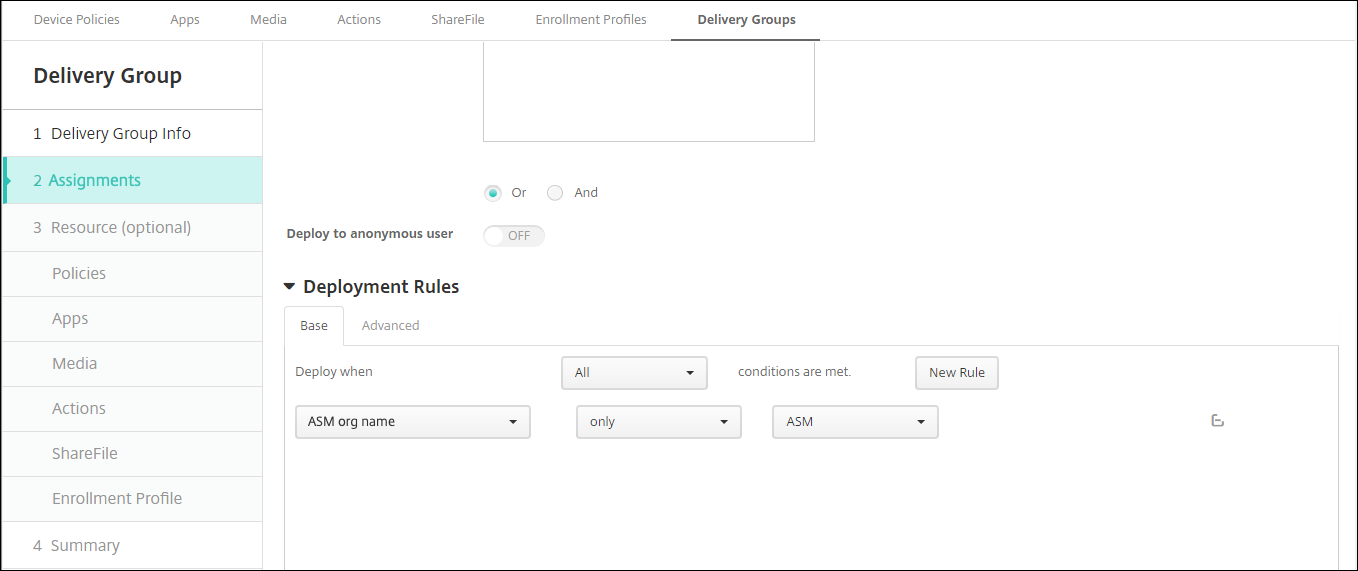
你也可以过滤交付组通过使用deployment rule based on the ASM org name.
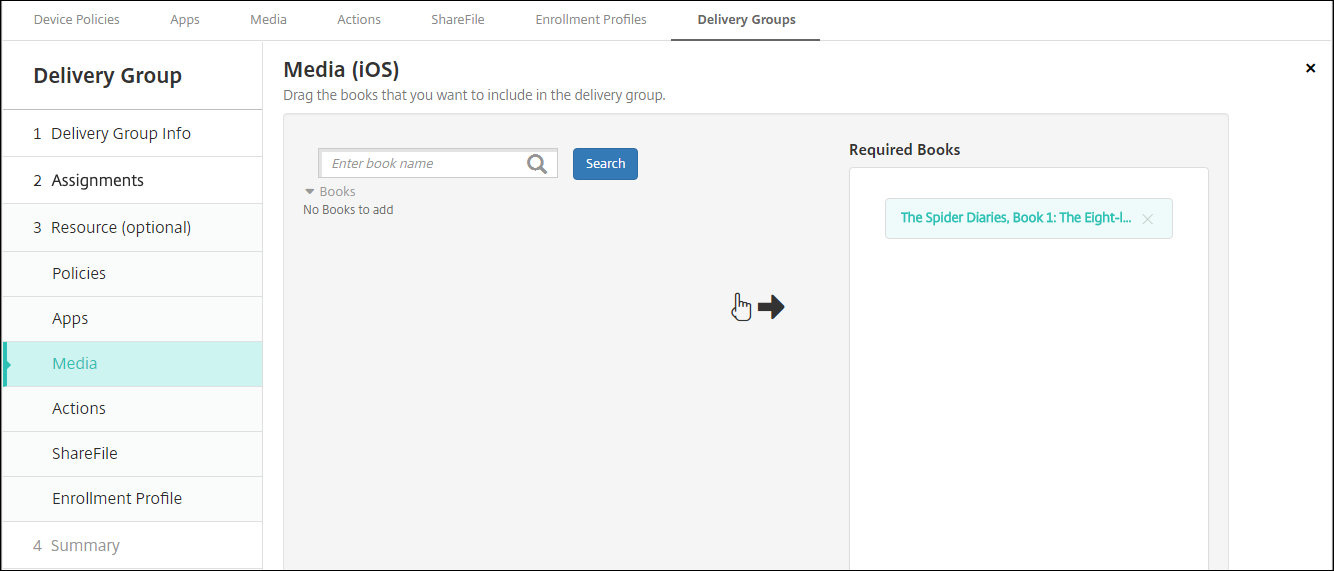
Assign the resources to delivery groups. The following example shows an iBook contained in a delivery group.
The following example shows the confirmation dialog that appears when you select a delivery group and clickDeploy。

For more information, see “To edit a delivery group” and “To deploy to delivery groups” inDeploy resources。


Step 8: Test instructor and student device enrollments
You can enroll devices through either of the following methods:
A school administrator can enroll instructor and student devices by using the user password you can set in the XenMobile console. As a result, you can provide users with devices that are already set up with apps and media.
When users receive the devices, they enroll using the user password that you provide to them. After enrollment completes, XenMobile sends device policies, apps, and media to the devices.
To test enrollment, use Apple Deployment Program devices that are linked to ASM.
If the devices aren’t linked to ASM, erase the device contents and settings by performing a hard reset.
Enroll an ASM device with an instructor. Then, enroll an ASM device with a student.
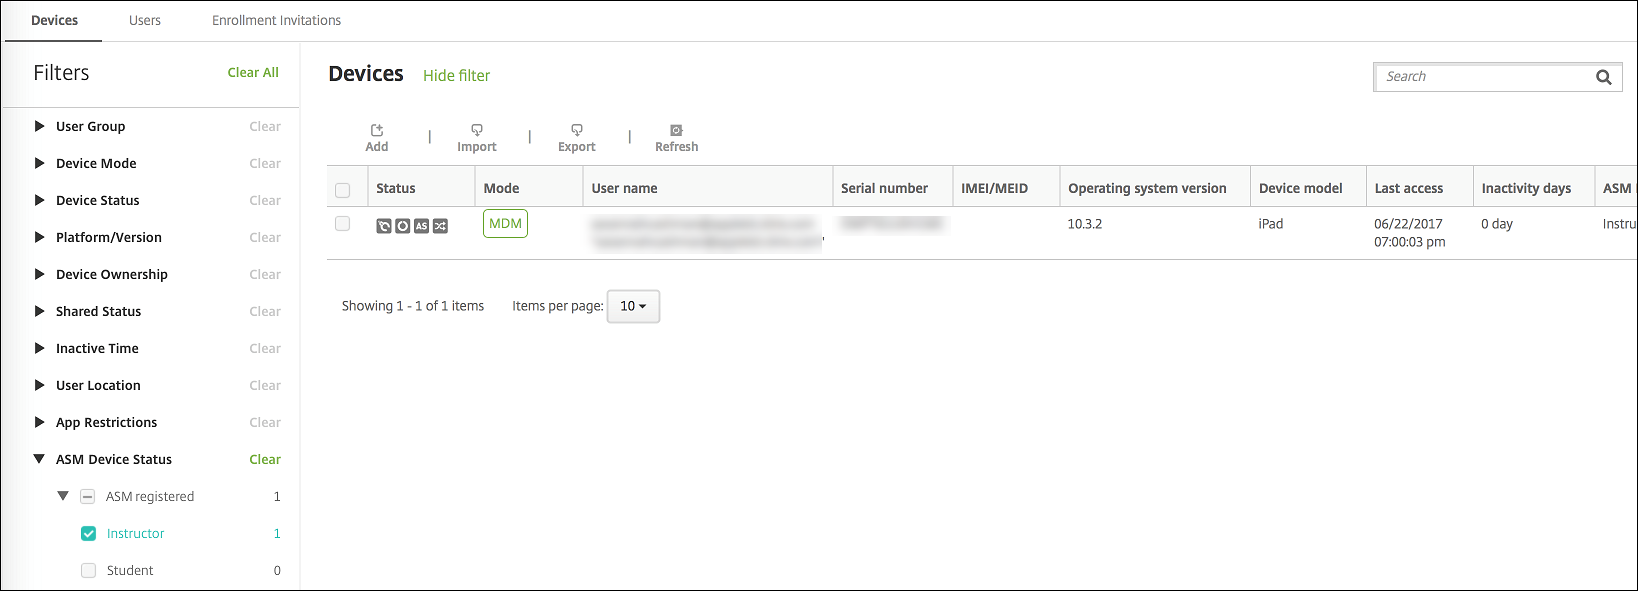
In theManage > Devicespage, check that both ASM devices are enrolled in MDM only.
You can filter theDevicespage by the ASM device status:ASM registered,ASM shared,Instructor, andStudent。
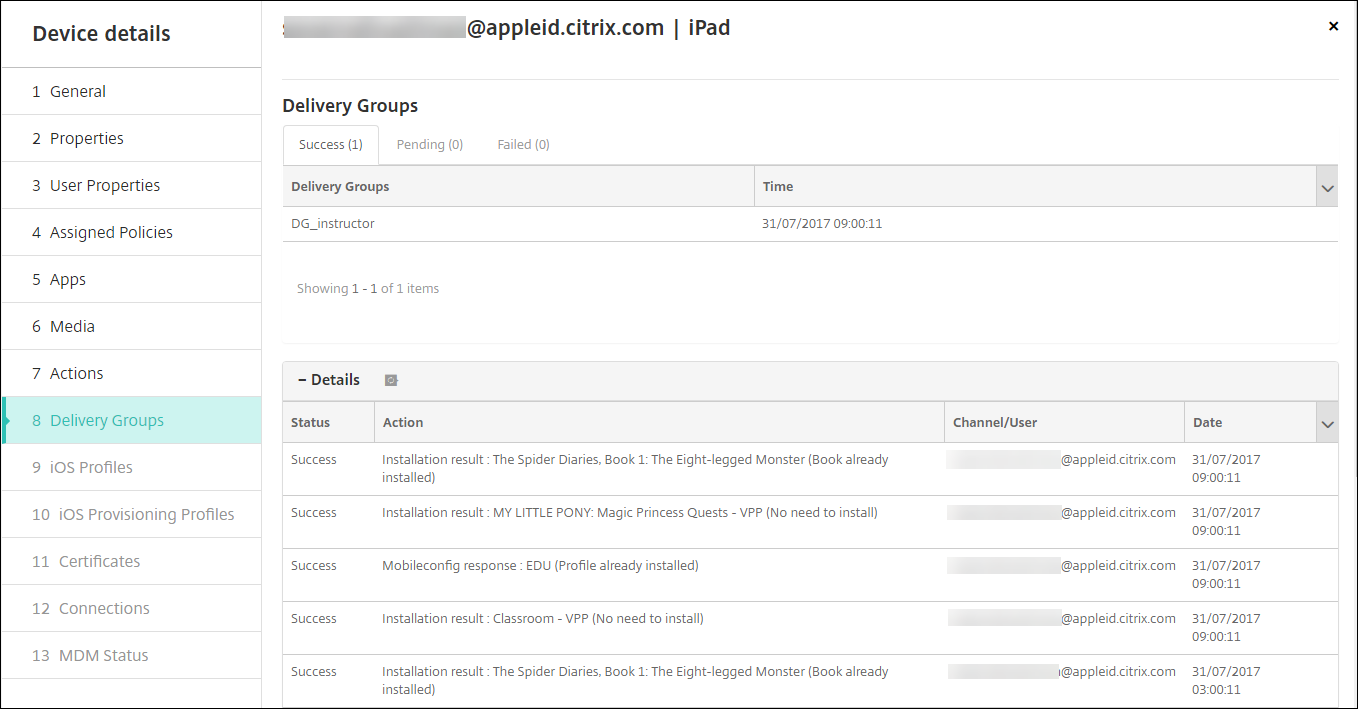
To verify that MDM resources deployed correctly for each device: Select the device, clickEdit, and check the various pages.


Step 9: Distribute devices
Apple recommends that you host an event so you can distribute devices to instructors and students.
If you don’t distribute pre-enrolled devices, also provide the following to these users:
XenMobile passwords for enrollment
ASM temporary passwords for Managed Apple IDs.
The first-time user experience is as follows.
The first time that a user starts their device after a hard-reset, XenMobile prompts them in the enrollment screen to enroll their device.
The user provides their Managed Apple ID and XenMobile password used to authenticate to XenMobile.
In the Apple ID setup step, the device prompts the user to provide their Managed Apple ID and ASM temporary password. Those items authenticate the user to Apple services.
The device prompts the user to create a password for their Managed Apple ID, used to protect their data in iCloud.
At the end of the Setup Assistant, XenMobile starts installing the policies, apps, and media to the device. For apps and iBooks assigned at the user level, the assistant prompts instructors and students to register to volume purchase. After accepting the invitation, users receive their volume purchase apps and iBooks at the next deployment (within six hours).
Configure Shared iPads
Multiple students in a classroom can share an iPad for different subjects taught by one or several instructors.
Either you or instructors enroll Shared iPads and then deploy device policies, apps, and media to the devices. After that, students provide their managed Apple ID credentials to sign in to a Shared iPad. If you previously deployed an Education Configuration policy to students, they no longer sign in as an “Other User” to share devices.
XenMobile uses two communications channels for Shared iPads: The system channel for the device owner (instructor) and the user channel for the current resident user (student). XenMobile uses those channels to send the appropriate MDM commands for the resources supported by Apple.
Resources that deploy over the system channel are:
- Device policies, such as Education Configuration, Lock Screen Message, Maximum Resident Users, and Passcode Lock Grace Period
Device-based volume purchase apps
Apple doesn’t support Enterprise apps or user-based volume purchase apps on Shared iPads. Apps installed on a Shared iPad are global to the device and not per user.
User-based volume purchase iBooks
Apple supports assignment of user-based volume purchase iBooks on Shared iPads.
Resources that deploy over the user channel are:
Device policies: Apps Notifications, Home Screen Layout, and Restrictions
XenMobile supports only those device policies over the user channel.
When configuring device policies, you specify the deployment channel in the policy settingProfile scope。

To remove device policies that you deployed over the user channel, be sure to choose aDeployment scopeofUserfor the Profile Removal policy.
General workflow
Typically, you provide preconfigured and supervised Shared iPads to instructors. The instructors then distribute the devices to students. If you don’t distribute pre-enrolled Shared iPads to instructors: Be sure to provide the instructors with their XenMobile server passwords so they can enroll their devices.
The general workflow for configuring and enrolling Shared iPads is as follows.
- Use the XenMobile server console to add ASM accounts (Settings > Apple Deployment Program) withShared modeenabled. For more information, see “Manage ASM accounts for Shared iPads” next.
- As described in this section, add the required device policies, apps, and media to XenMobile. Assign those resources to delivery groups.
- Have the instructors perform a hard reset on the Shared iPads. The Remote Management screen for enrollment appears.
- The instructors enroll the Shared iPads. XenMobile deploys configured resources to each enrolled Shared iPad. After an automatic restart, instructors can share the devices with students. A sign in page appears on the iPad.
- A student chooses the class and then enters their Managed Apple ID and temporary ASM (ASM) password. The Shared iPad authenticates to ASM and prompts the student to create an ASM password. For the next sign into the Shared iPad, the student provides the new ASM password.
- Another student who is sharing the iPad can then sign in by repeating the previous step.
Manage ASM accounts for Shared iPads
If you already use XenMobile with Apple Education: You have an existing ASM account configured in XenMobile for devices that aren’t shared, such as the devices used by instructors. You can use the same ASM and the same XenMobile server for both shared and non-shared devices.
XenMobile supports these deployment scenarios:
A group of Shared iPads per class
In this scenario, you assign the Shared iPads to a class of students. The iPads stay in the classroom. Instructors who teach different subjects in that class use the same set of iPads.
A group of Shared iPads per instructor
In this scenario, you assign the Shared iPads to an instructor, who uses those iPads for the various classes that they teach.
Organize Shared iPads into device groups
ASM lets you organize devices into groups by creating multiple MDM servers. When you assign the Shared iPads to an MDM server, create a device group for each group of Shared iPads, per class or per instructor:
- Group 1 of Shared iPads > Device Group 1 MDM Server
- Group 2 of Shared iPads > Device Group 2 MDM Server
- Group N of Shared iPads > Device Group N MDM Server
Add ASM accounts for each device group
When you create multiple ASM accounts from the XenMobile server console, you automatically import groups of Shared iPads (one for each class or instructor):
- Device Group 1 MDM Server > Device Group 1 account
- Device Group 2 MDM Server > Device Group 2 account
- Device Group N MDM Server > Device Group N account
Requirements specific to Shared iPads are as follows:
- One ASM account for each device group with these settings enabled:
- Require device enrollment
- Supervised mode
- Shared mode
- For a given educational organization, be sure to use the sameEducation suffixfor all ASM accounts.
To add an account, go toSettings > Apple Deployment Program。

Apps for Shared iPads
Shared iPads support assignment of device-based volume purchase apps. Before deploying an app on a Shared iPad, XenMobile sends a request to the Apple volume purchase server to assign volume purchase licenses to devices. To check the volume purchase assignments, go toConfigure > Apps > iPadand expandVolume Purchase。
Media for Shared iPads
Shared iPads support assignment of user-based volume purchase iBooks. Before deploying iBooks on a Shared iPad, XenMobile sends a request to the Apple volume purchase server to assign volume purchase licenses to students. To check the volume purchase assignments, go toConfigure > Media > iPadand expandVolume Purchase。

Deployment rules for Shared iPads
For Shared iPad deployment, the rules at the delivery group level don’t apply because they relate to user properties. To filter the policies, apps, and media for each group of devices: Add a deployment rule for the resources based on the account name. For example:
- For the Device Group 1 account, set this deployment rule:
Apple Deployment Program account name Only Device Group 1 account - For the Device Group 2 account, set this deployment rule:
Apple Deployment Program account name Only Device Group 2 account - For the Device Group N account, set this deployment rule:
Apple Deployment Program account name Only Device Group N account 
To deploy the Apple Classroom app only to instructors (using unshared iPads), filter the resources by ASM shared status with these deployment rules:
Deploy this resource regarding ASM shared mode only unshared Or:
Deploy this resource regarding ASM shared mode except shareable 
Delivery groups for Shared iPads
For the device group for each instructor:
- Configure one delivery group. For the instructor, assign all the classes that the Education Configuration policy defines.

- That delivery group must include these MDM resources:
- Device policies:
- Education Configuration
- Lock Screen Message
- Apps Notifications
- Home Screen Layout
- Restrictions
- Maximum Resident Users
- Passcode Lock Grace Period
- Required volume purchase apps
- Required volume purchase iBooks
- Device policies:

Security actions for Shared iPads
In addition to existing security actions, you can use these security actions for Shared iPads:
- Get Resident Users:Lists the users that have active accounts on the current device. This action forces a sync between the device and the XenMobile console.
- Logout Resident User:Forces a log out of the current user.
- Delete Resident User:Deletes the current session for a specific user. The user can sign in again.

After you clickDelete Resident User, you can specify the user name.

Results of security actions appear on theManage > Devices > GeneralandManage > Devices > Delivery Groupspages.
Get information about Shared iPads
Find information specific to Shared iPads on theManage > Devicespage:
- Look up:
- Whether a device is shared (ASM shared)
- Who is logged in to the shared device (ASM logged-in user)
- All users assigned to the shared device (ASM resident users)

- Filter the device list by itsASM Device Status:

- View details about the user logged in to a Shared iPad, on theManage > Devices > Logged-in User Propertiespage.


- See the channel used to deploy resources to instructors and users in a delivery group on theManage > Devices > Delivery Groupspage. TheChannel/Usercolumn shows the type (SystemorUser) and the recipient (instructor or student).

- Get information about resident users:
- Has data to sync:Whether the user has data to be synchronized to the cloud.
- Data quotas:The data quota set for the user in bytes. A quota might not appear if user quotas are temporarily off or aren’t enforced for the user.
- Data used:The amount of data used by the user in bytes. A value might not appear if an error occurs as the system gathers the information.
- Is logged in:Whether the user is logged on to the device.

- View the push status for both channels.

Manage instructor, student, and class data
When managing instructor, student, and class data, note the following:
Don’t change Managed Apple IDs after you import ASM information into XenMobile. XenMobile also uses ASM user identifiers to identify users.
If you add or change class data in ASM after you create one or more Education Configuration device policies: Edit the policies and then redeploy them.
If the instructor for a class changes after you deploy the Education Configuration device policy: Review the policy to ensure it updates in the XenMobile console and then redeploy the policy.
If you update user properties in the ASM portal, XenMobile also updates those properties in the console. However, XenMobile doesn’t receive the ASM person title property (Instructor, Student, or Other) in the same way it receives other properties. Thus, if you change the ASM person title in ASM, complete the following steps to reflect that change in XenMobile.
To manage the data:
In the ASM portal, update the student grade and clear the instructor grade.
If you changed a student account to an instructor account, remove the user from the list of students in the class. Then, add the user to the list of instructors in the same or another class.
If you changed an instructor account to a student account, remove the user from the class. Then, add the user to the list of students in the same or another class. Your updates appear in the XenMobile console during the next sync (every five minutes by default) or fetch (every 24 hours by default).
Edit the Education Configuration device policy to apply the change and redeploy it.
If you delete a user from the ASM portal, XenMobile also deletes that user from the XenMobile console after a fetch.
You can reduce the interval between two baselines by changing this server property value:bulk.enrollment.fetchRosterInfoDelay(default is1440minutes).
After you deploy resources: If a student joins a class, create a delivery group with just that student and deploy the resources to the student.
If a student or instructor loses their temporary password, have them contact the ASM administrator. The administrator can provide the temporary password or generate a new one.
Manage a lost or stolen device that’s enrolled in Apple School Manager Apple Deployment Program
The Apple Find My iPhone/iPad service includes an Activation Lock feature. Activation Lock prevents non-authorized users from using or reselling a lost or stolen device that’s enrolled in Apple Deployment Program.
XenMobile includes anASM Activation Locksecurity action that enables you to send a lock code to an ASM Apple Deployment Program enrolled device.
When you use theASM Activation Lock安全行动,XenMobile可以定位设备out requiring users to enable the Find My iPhone/iPad service. When an ASM device is hard-reset or fully wiped, the user provides their Managed Apple ID and password to unlock the device.
To release the lock from the console, click the security actionActivation Lock Bypass。For information about bypassing an activation lock, seeBypass an iOS activation lock。The user also can leave the login blank and type theASM activation lock bypass codeas the password. That information is available inDevice Details, on thePropertiestab.
To set the activation lock, go toManage > Devices, select the device, clickSecurity, and then clickASM Activation Lock。

The propertiesASM escrow keyandASM activation lock bypass codeappear inDevice details。

The RBAC permission for an ASM Activation Lock isDevices > Enable ASM Bypass activation lock。
