
PoC指南:Citrix互联网安全Access with Citrix SD-WAN
Overview
Citrix工作区被ent成功应用erprises of all sizes for nearly three decades. Customers have choices in how they license, deploy, integrate, and manage these technologies. This flexibility allows Citrix technologies to serve various use cases, business types, integration requirements, and deployment models. Broad enterprise adoption has led to a diverse set of deployments to meet use cases, and the evolution of networking technologies. Many different factors drive deployment selection including location of data centers (on-prem, cloud or hybrid model), users, branches, management service, and choices for networking connectivity.
Scope
In this Proof-of-Concept guide, you experience the role of a Citrix administrator who creates a connection between the organization’s edge SD-WAN device to the Citrix SIA Cloud via IPsec tunnels.
This guide showcases how to perform the following actions:
- Configuration of a new site on the Orchestrator for the Proof of concept
- Deployment of the site via Seamless automation of IPsec tunnels to Citrix SIA cloud from the Orchestrator
- Verification of the IPsec tunnel in both the Orchestrator and Citrix SIA Cloud platform
- Installation of SIA software agents (also known as Cloud Connector Agent) on the laptop with a specific Security Group and exercise security policies for Internet traffic
- Demonstration of various SIA+SD-WAN integration use-cases made available in this PoC guide.
- Configure Web security policies, CASB, Malware Protection policies to allow/deny access to certain websites or categories via the Citrix SIA Console.
- Initiate web traffic and verify the block and allow functionality
- Show Reporting and Analytics
Benefits
Networking and Deployment Use-cases/Benefits
Seamless SIA for managed devices and reliable, secure DC workloads access via SD-WAN Virtual PathOn managed devices behind SD-WAN, it is easy to use the Citrix SIA agent to have secure internet access. The SD-WAN overlay forwards the branch to data center workload traffic securely and reliably.
SD-WAN’s multi-wan link reliable IPsec tunnel for local subnets based Secure Internet access of agentless devicesBYOD or personal laptops that are not managed by the enterprise can be secured via Citrix SD-WAN + Citrix SIA’s highly reliable IPsec tunnel. The reliability is achieved via the tunnel having multiple wan links.
Simple security posture for Guest domains in a branch via DNS redirection or IPsec tunnelWith a separate tunnel/Local subnet for guest domains and related security group mapping.
Benefits of Integration/Automation/Management between Citrix SIA and SD-WAN


Citrix SD-WAN + SIA Overall Topology
Following you see a flow diagram for 3 primary use cases:
1) Branch Users 2) Remote Users WITHOUT Workspace Service 3) Remote Users WITH Workspace Service

Citrix SD-WAN + SIA Integration Use cases
Citrix SD-WAN and Citrix SIA integration offers flexibility and choice for a mixed profile of Branch users in an enterprise. An enterprise typically has a mix of managed and unmanaged devices in the Branch where a Citrix SD-WAN exists. With the integration, Citrix SIA agent allows to securely breakout managed devices traffic to the Citrix SIA cloud via the SD-WAN using Internet service (with Load Balancing). The unmanaged devices like BYOD and Guest users are secured using the IPsec tunnel between Citrix SD-WAN and Citrix SIA as the tunnel endpoints.

PoC Prerequisites
General Pre-Requisites
- Citrix SD-WAN 110/210 for an On-Premises hardware based PoC.
- Can be any appliance you choose for the PoC. All Citrix SD-WAN appliances support the Citrix SIA offering.
- Note:PoC can also be performed on an Azure VPX based SD-WAN with a windows VM behind the VM on the LAN with/without a Citrix SIA agent (also known as Citrix SIA Cloud Connector).
- A Windows or MAC Laptop.
- Agent Windows/MAC MSI download from Citrix SIA cloud platform.
Network Requirements
Port / Firewall settings to SIA – Outbound connections:
| Protocol | Port | Description |
|---|---|---|
| TCP | 53 | DNS Filtering |
| TCP | 80 | Proxy Connections and Custom Block Pages |
| TCP | 443 | PAC Script Retrieval over HTTPS and Proxy authentication over HTTPS |
| TCP | 7080 | Alternative port for PAC script retrieval over HTTP |
| TCP | 7443 | Alternative port for PAC script retrieval over HTTPS |
| TCP | 8009 | Alternative port for proxy connections |
| TCP | 8015 | Proxy Authentication over HTTP |
| TCP | 8016 | Alternative port for proxy authentication |
| TCP | 8025 | Legacy HTTP Cloud Connector (SIA Agent) |
| TCP | 8026 | Legacy HTTPS Cloud Connector (SIA Agent) |
| TCP | 8080 | Default block page |
| TCP | 8082 | Cloud Connector for iOS (Default additional proxy port) |
| TCP | 10080 | PAC script retrieval over HTTP |
Orchestrator - Custom Application
It is a recommended best practice that the SIA agent traffic from corporate managed devices be bypassed from the local IPsec tunnel of the SD-WAN in the branch edge. This allows direct proxy to the Citrix SIA where enterprise OU’s or security groups can be exercised directly via cloud connectors on the managed devices.
To allow for the Citrix SIA agent to seamlessly Call Home to the Citrix SIA gateway cluster and PoP’s, it is critical to bypass the cloud connector based traffic from the IPsec tunnel so that the registration of the cloud connector happens and the proxy is made available directly from the connector.
The custom application is based on the port list mentioned in the preceding section Ports List of PoC Prerequisites. All the specific IP/Protocols in the Orchestrator bypass custom application, is sent via the Internet Service.
Information required from the Citrix SIA platform:
- Citrix SIA CloudGateway node IP’s part of the gateway cluster
- The Citrix SIA agent connects to the gateway nodes over port 443. Our configuration of bypass custom application ensures that the agent traffic is sent via the Internet service and bypassed from the IPsec tunnel.
- Citrix SIA Reporter node IP is part of the node group management. The reporter is contacted for sending stats/reporting from the cloud connector (SIA Agent).

Node in Orange –Reporter Node with IP displayed in “Public IP” column and represented with a different icon (before node name).
Node(s) in Green –Cloud PoP nodes part of a CSIA gateway cluster with IPs displayed in “Public IP” column and represented with the globe icon. A CSIA gateway cluster is an aggregate of two or more CSIA gateway nodes.
Note:
- When doing your PoC, check the nodes as per your account and apply the Orchestrator bypass rules accordingly.
- The accounts almost usually always have a reporter node but the gateway ndoes can be one or more.
- Ensure bypass to all gateway nodes so that they are accounted during the bypass (traffic can go to any CloudGateway node).
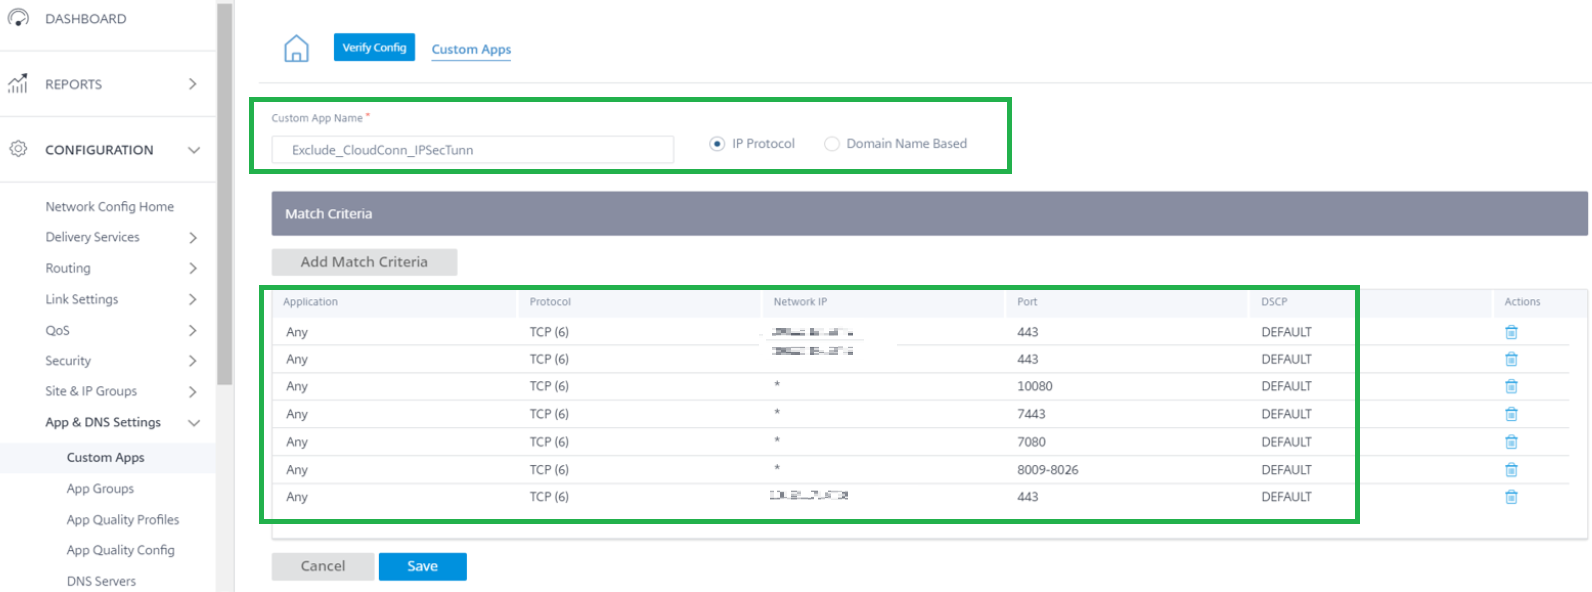
Create a Custom application in the Orchestrator - “Exclude_CloudConn_IPsecTunn”
- Create tbe below entries using IPs and Ports
- The IPs will be the Citrix SIA Reporter Cloud Node and the Gateway Cloud Node IPs with port 443
- There will be explicit port based entries which is used by the Citrix SIA agent for registration, traffic processing and reporting.

Orchestrator – Internet service cost
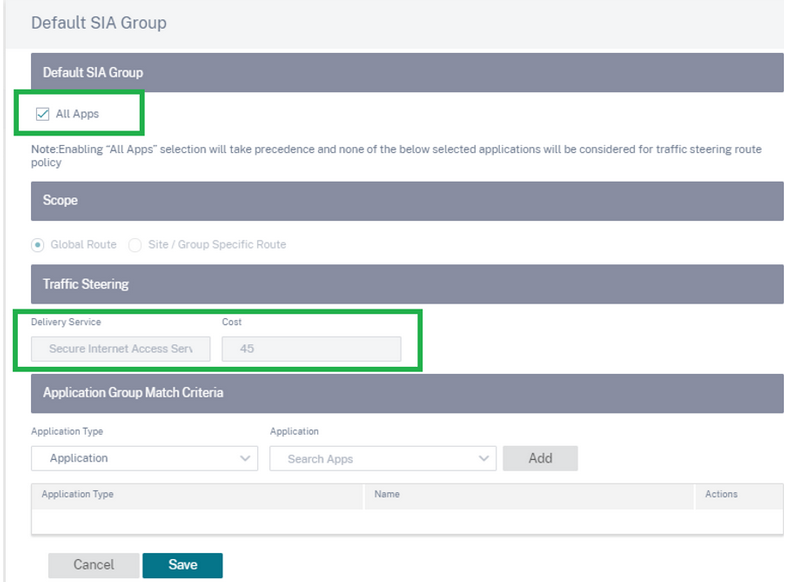
While creating the Citrix Secure Internet Access service, an administrator can use the default SIA group to select the traffic to be steered through the IPsec tunnel.
The administrator can either route “ALL APPS” or specific applications through the IPsec tunnel as part of the Citrix SIA service.
- Route ALL APPS via Citrix SIA Service in Orchestrator under SIA service Default SIA Group
- Route Specific APPS via Citrix SIA Service in Orchestrator under SIA service Default SIA Group
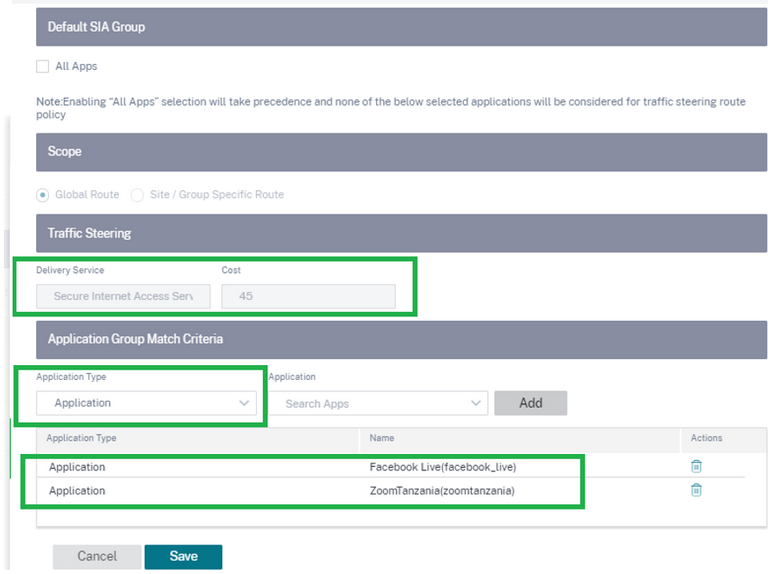
Note: If specific apps are chosen, then only specific application routes are created with the Citrix SIA as the service type to be steered through the IPsec Tunnel. The Citrix SIA service is INTRANET type service by default.
Important Recommendation when using Citrix SIA service for ALL APPS routing along with Internet ServiceIf an administrator chooses “ALL APPS” to be routed via Citrix SIA, a DEFAULT route 0.0.0.0/0 created with Citrix SIA service with a cost of 45 by default.
An Internet service exists or is created on the SD-WAN for a specific use case. For instance - Internet service to breakout CSIA agent related traffic, Internet service to breakout Orchestrator traffic or a brownfield deployment where an internet service exists already for some scenarios. Note this, when creating the SIA service with the Internet service (for proper routing).
General Recommendations:
Recommendation 1 :If the CSIA service is used for ALL apps alongside the Internet service, then create specific custom applications or use the DPI engine with specific applications to be steered via the Internet service.
Recommendation 2 :If the CSIA service is to be used for some applications and Internet service as the default service for Internet, ensure that specific applications are chosen for the Citrix SIA service breakout.
Issues you may face if “ALL APPS” is chosen for routing via both CSIA and Internet service and how to overcome that:
Since by design, the Internet Service cost is 5 and the CSIA service cost is 45, ALL traffic prefers to be routed over Internet service instead of CISA service. So it is good to be aware of routing when Internet and CSIA services co-exist in the deployment.
Use one of the preceding 2 recommendations. Or you can modify the internet service cost as “50” so that CSIA service is more preferred (with a cost of 45).

Citrix SD-WAN 110/210 Configuration
Assumption :It is assumed that the Orchestrator is already configured with an MCN.
Orchestrator site configuration
- Create a site in the Orchestrator and provide:
- Site Name
- Choose On-Premises
- Provide the site address (Location from where the PoC is done)
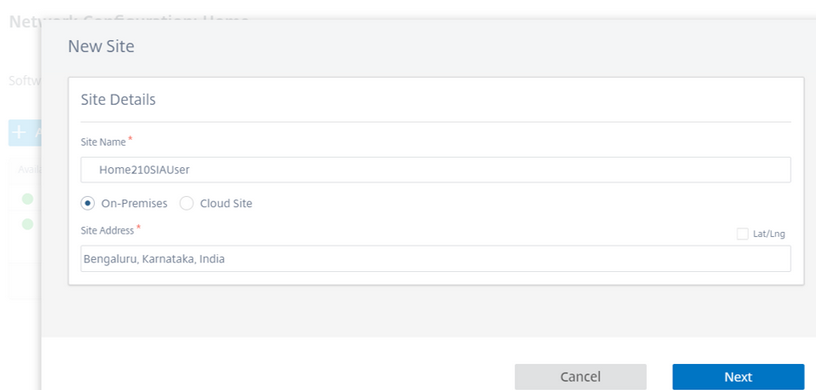
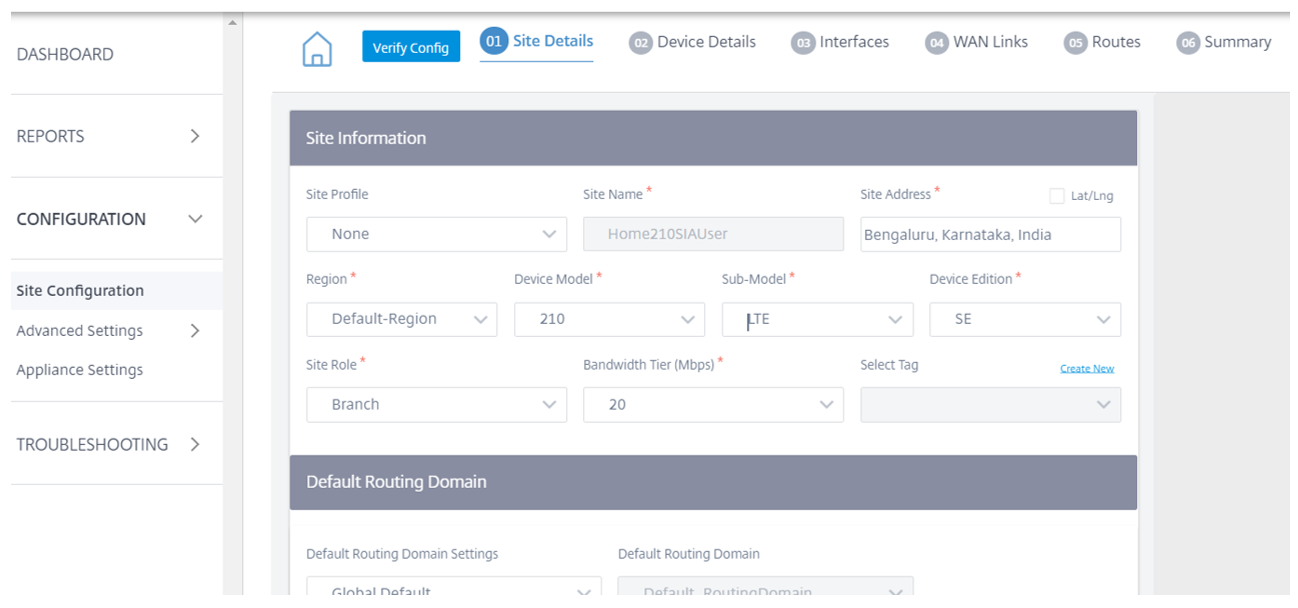
- Enter the necessary details for the new site added
- Enter the device model – 210
- In this guide the reference device is a 210. Based on your device in the PoC select appropriately
- Enter the Sub-Model: LTE
- Enter the device edition: SE
- Enter the Site Role: Branch
Enter the Interface details to define LAN/WAN interfaces.
For this PoC guide demo:
- Deployment mode type: Gateway Mode
- Interfaces – 1 LAN and 2 WAN Interfaces
- WAN Links – 2 (One static IP and 1 DHCP based)
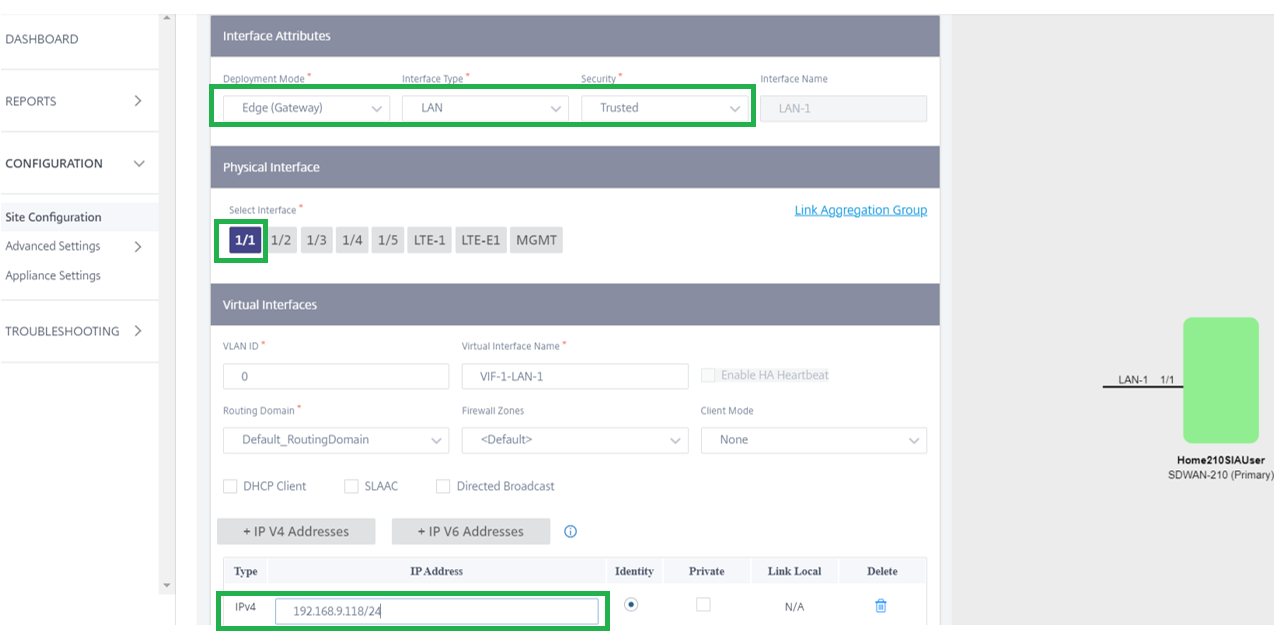
LAN Interface definition
- Select Deployment mode as Edge (Gateway)
- Choose Interface type as LAN and Security as Trusted
- Choose 1/1 as the LAN interface
- Enter the LAN IP as 192.168.9.118
- Apply Done and Save
WAN Link 1 - Interface definition
- Select Deployment mode as Edge (Gateway)
- Choose Interface type as WAN and Security as Trusted
- Choose 1/2 as a WAN interface
- Enter the WAN IP as 192.168.1.199
- Apply Done and Save

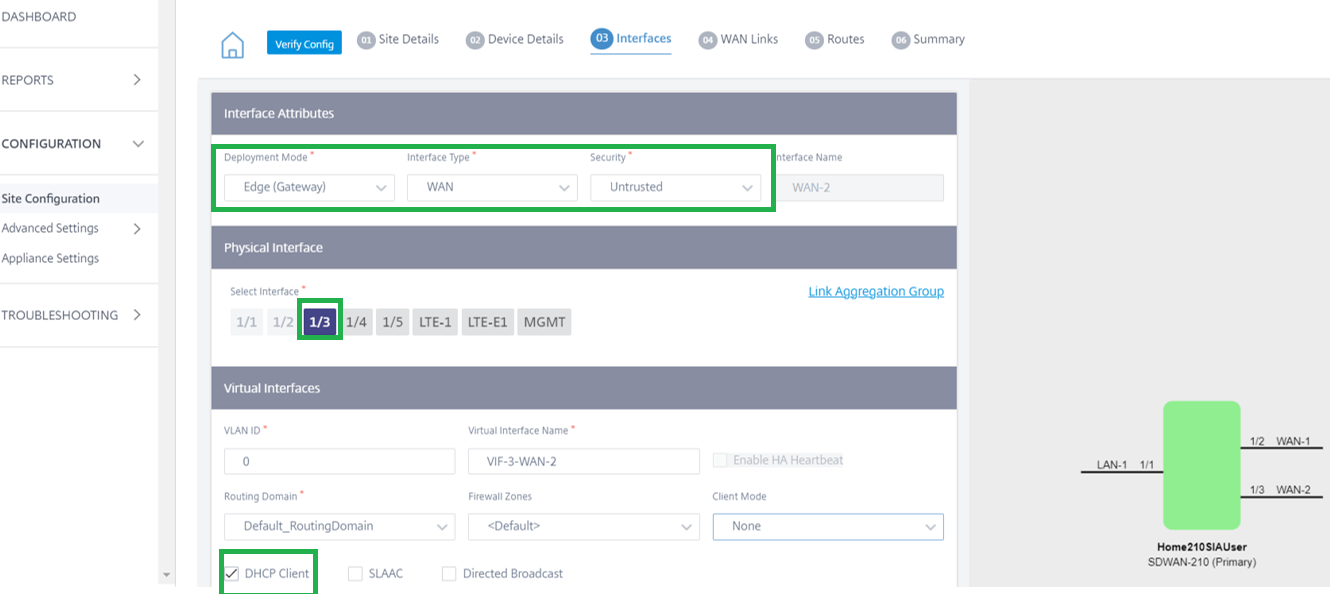
WAN Link 2 - Interface definition
- Select Deployment mode as Edge (Gateway)
- Choose Interface type as WAN and Security as Trusted
- Choose 1/3 as a WAN interface
- Select DHCP Client so the WAN link gets auto addressed
- Apply Done and Save
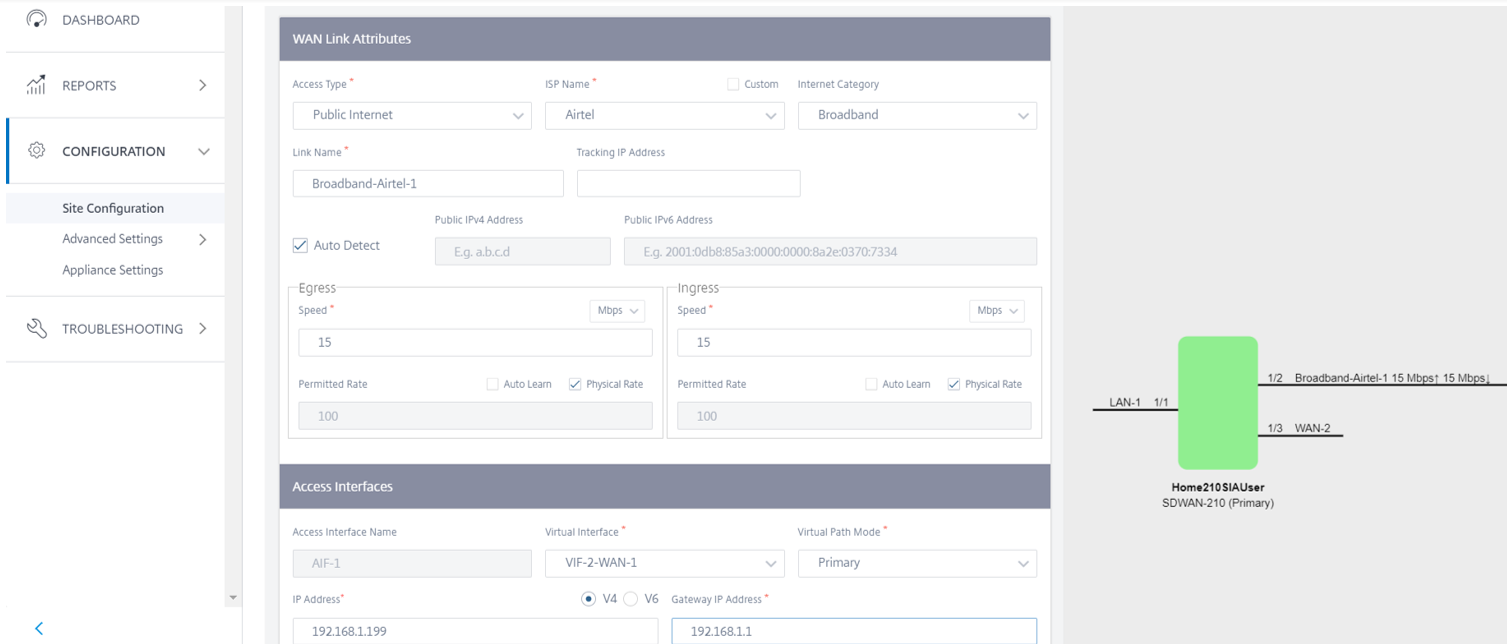
WAN Link 1 - Access Interface definition
- Select access type as Public Internet
- Select Auto Detect
- Enter the speed as appropriate (based on the PoC link made available)
- 15 Mbps Upload/Download
- Select the WAN1 interface and provide the Gateway (Access Interface IP is auto populated)
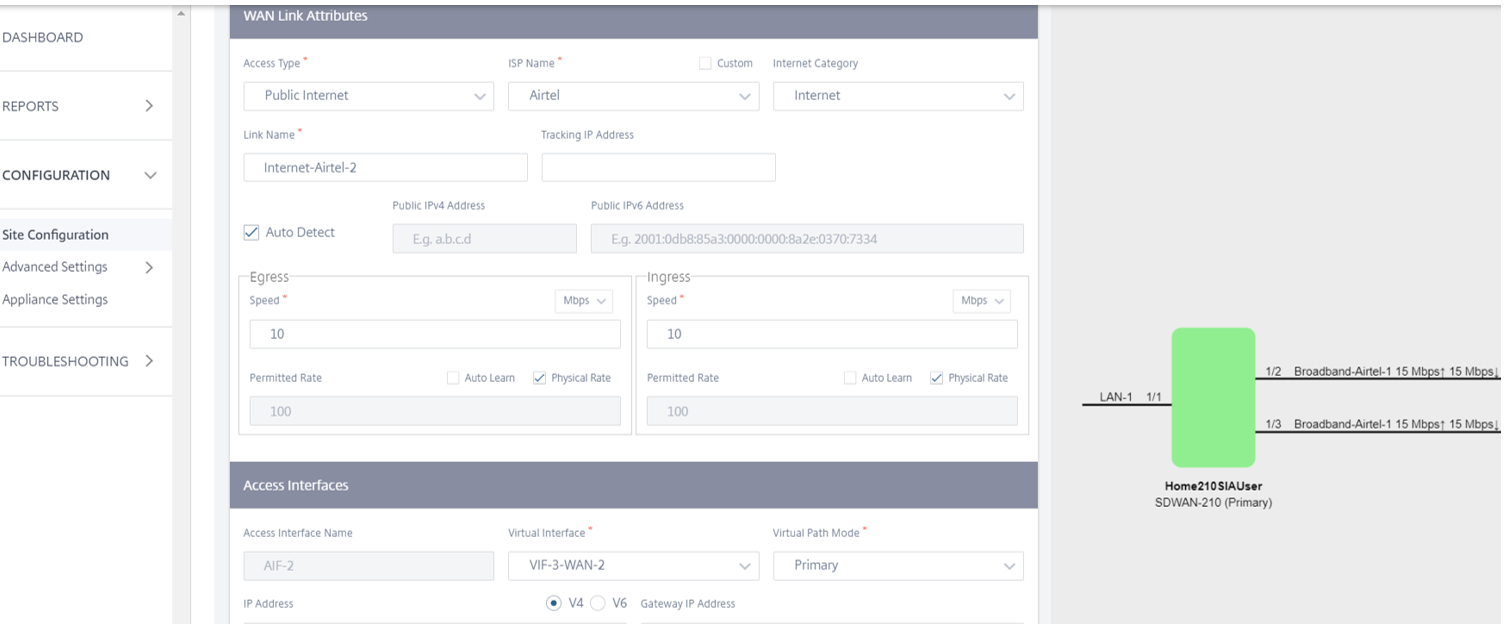
WAN Link 2 - Access Interface definition
- Select access type as Public Internet
- Select Auto Detect
- Enter the speed as appropriate (based on the PoC link made available)
- 10 Mbps Upload/Download
- Select the WAN2 interface and the Access interface is auto populated (as it is a DHCP link)
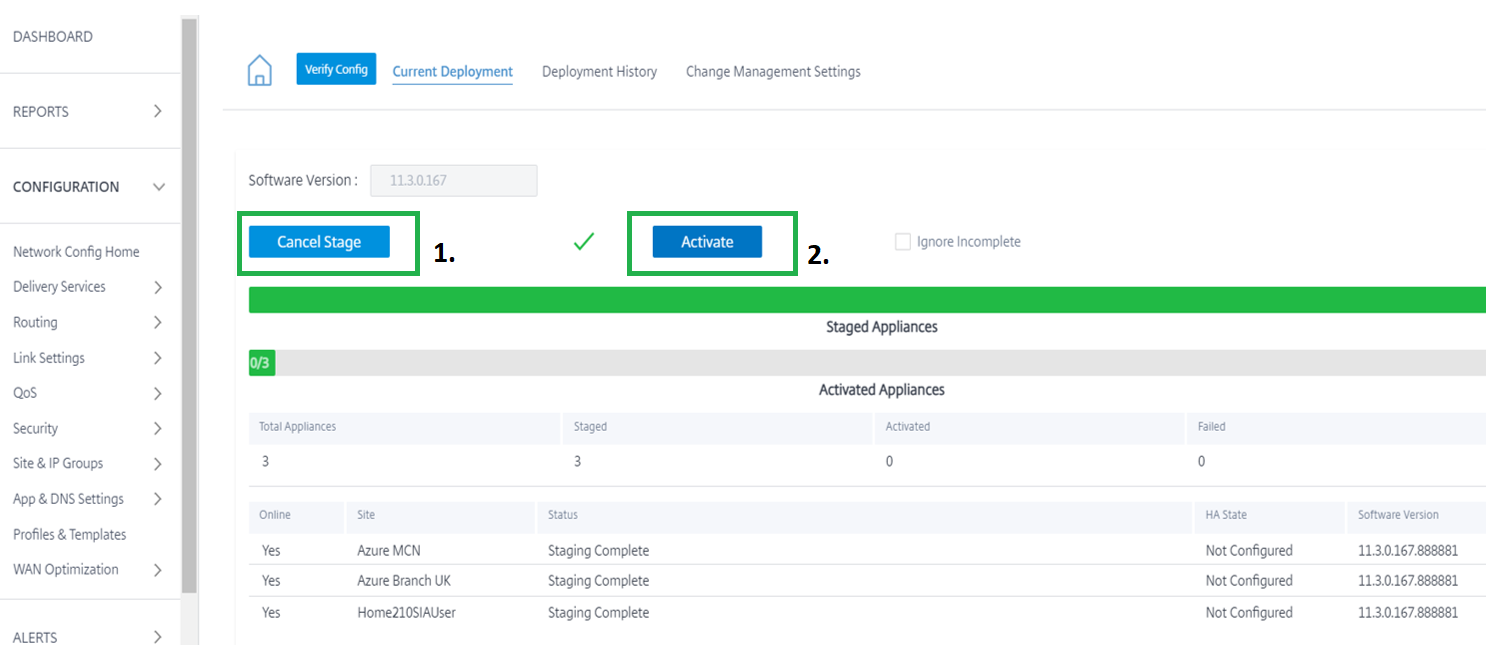
Deploy Config/Software to initiate Change management and activation
- Click Deploy Config Software
- Click Stage and allow staging to complete
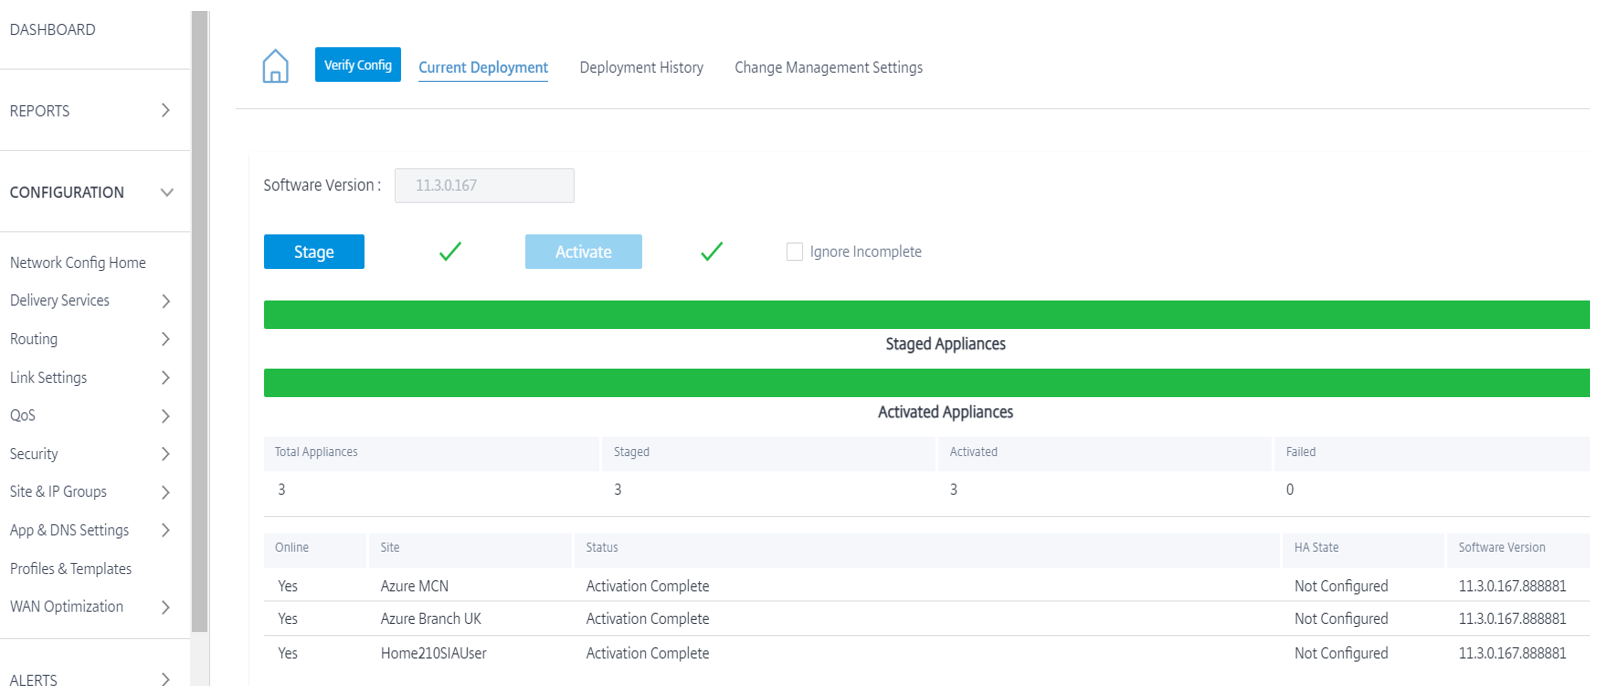
- Click Activate and allow activate to complete


Citrix SD-WAN IPsec Tunnel
Create SIA Service
Go to All Sites -> Delivery Services -> Secure Internet Access Service
Adjust the provisioning on the Secure Internet Access service at the global level and readjust the overall internet link provisioning
Note: At a global level, without the provisioning value for the SIA service, the SIA site automated IPsec provisioning fails
- Provide some provisioning percentage on the Internet link for the Secure Internet Access service: For this demo we give 30%
Best Practice Recommendation: Without this percentage provisioning, the site provisioning fails. So, it is recommended that we provide the percentage before creating the site for SIA service
- Click the gear icon to add the new site for Citrix SIA service
Note: Creating an SIA service internally creates an automatic INTRANET service with the routing domain chosen during the SIA site configuration and PRESERVE ROUTE TO INTRANET SERVICE which is the IGNORE WAN LINK status knob automatically.

Create a SIA Service
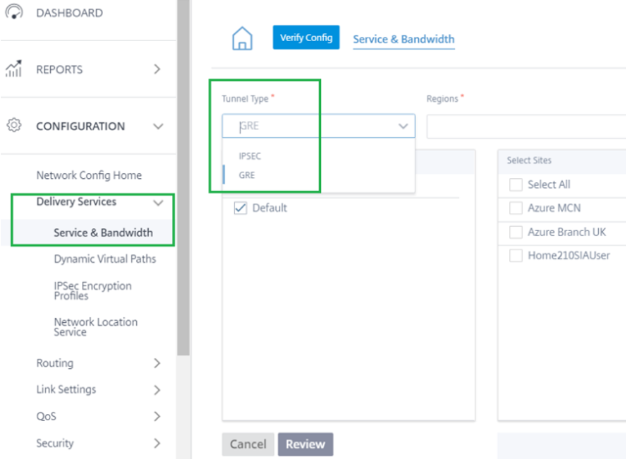
- Add a site by clicking the “+Site” button
- After you add the new site, configure the following sections.
- Select the Tunnel Type as “IPsec”
You can create an IPsec tunnel with the Citrix SIA cloud nodes. In the PoC, we use an IPsec tunnel automated configuration between Citrix SD-WAN and Citrix SIA

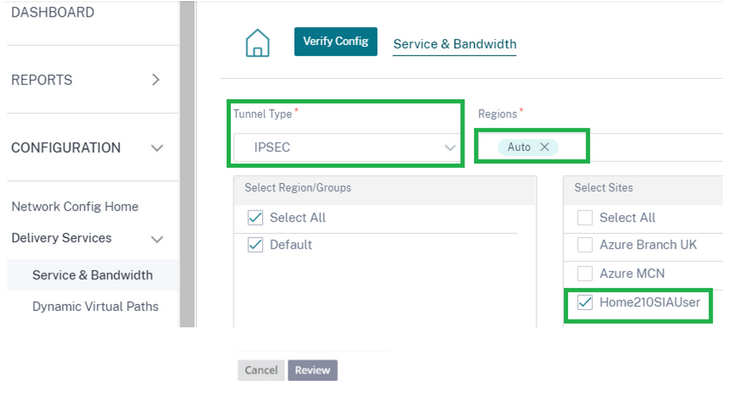
PoP Selection
- Choosing AUTO selects the closest 2 PoP’s for the IPsec tunnel (based on the geo location of the site created in the Orchestrator)
- Maximum of 2 PoPs are selected for creating a redundant ACTIVE-STANDBY tunnel to the 2 different PoPs
Note: Ensure to provide the proper location of the branch in the Orchestrator so that the closest PoP selection is done.
- Select the site that must be automatically provisioned from the SD-WAN site to the SIA Cloud PoP(s)
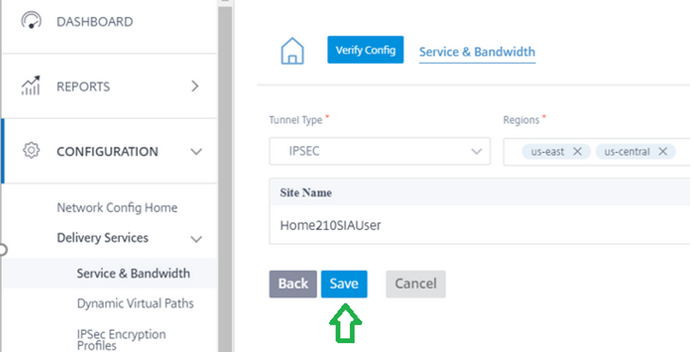
Click “Review”
Click “Save”


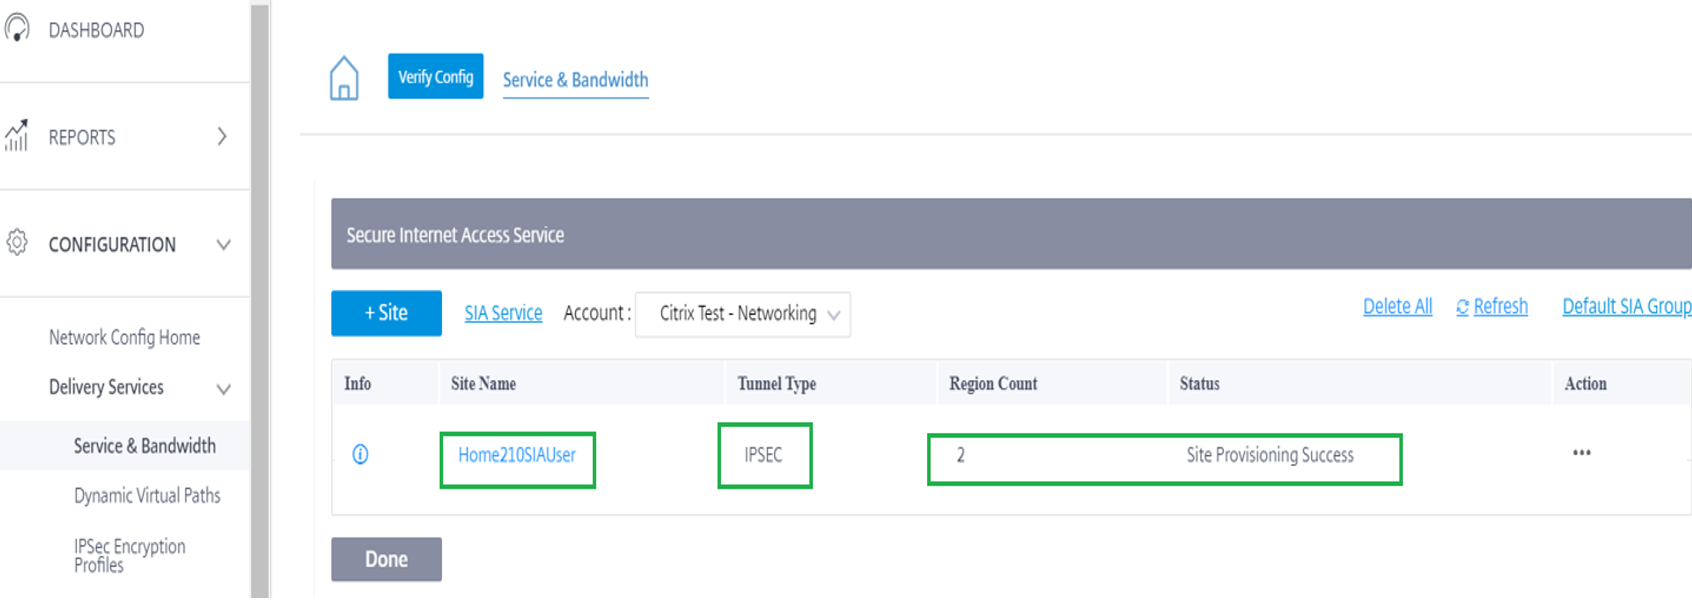
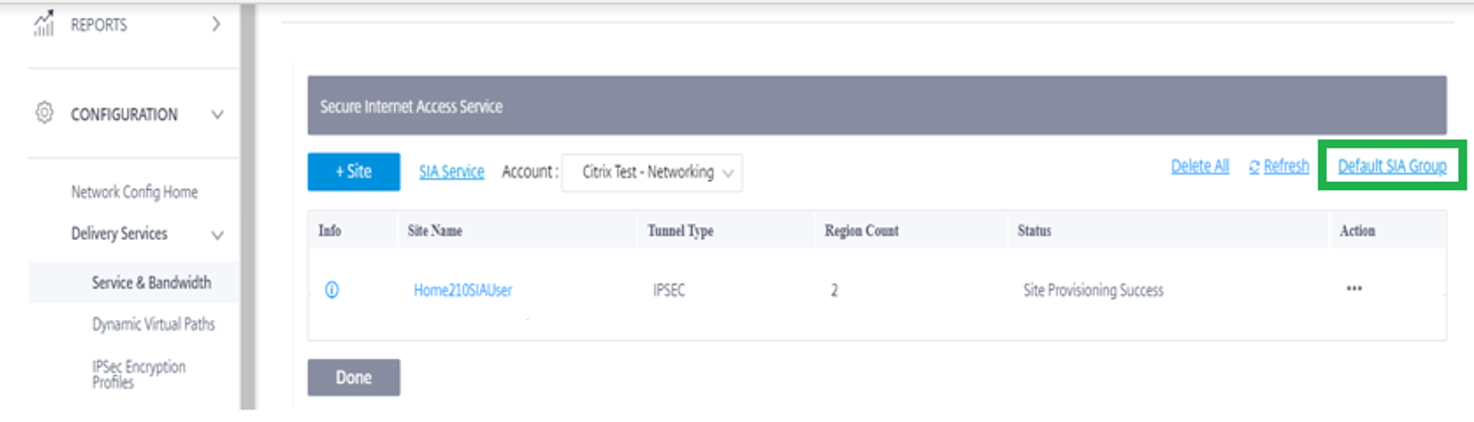
Verify service provisioning
- Once the site is added, and if the service provisioning was provided in the Delivery services section, the Site Provisioning is successful.
- Verify the Tunnel type is: IPsec
- Region Count: 2 (If you have 2 or more PoPs available in your account. If your account has ONLY 1 PoP, then you see only 1 during the Citrix SIA configuration in Orchestrator)
Status: Site Provisioning Success

Steering of traffic
Click “Default SIA Group”
Routing “ALL APPS” via Citrix SIA service –If ALL Internet traffic is to go through the Citrix SIA IPsec tunnel. A default 0.0.0.0/0 is created via the Citrix SIA service in this case

Application/Custom Application/Group Specific –If there are only specific applications that need to be routed through the SIA service. In this case app routes are created in the SD-WAN


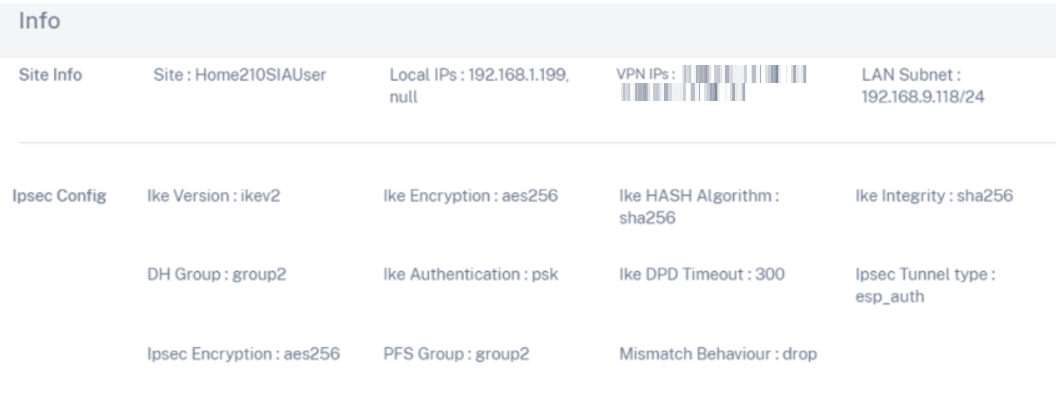
Automation verification
Click the Info icon to know what details have been automated for the IPsec tunnel from the SD-WAN side
Note: Once the Citrix SIA IPsec tunnel is provisioned and saved, the Citrix SD-WAN Orchestrator configures the Citrix SIA IPsec tunnel with tunnel endpoint addresses, IKE/IPsec authentication and encryption settings and the WAN Links on which the Citrix SIA IPsec tunnel should be enabled.
- Some of the following attributes are displayed by clicking the “i” icon on the tunnel once provisioned
- Local IPs: Static WAN IP address of the 2 WAN Links is listed
- Peer Node IPs displayed - Tunnel remote endpoints (Auto Selected during tunnel creation based on Geo Location of the site)
- Local LAN subnet displayed - which is the Local VIP subnet of the SD-WAN’s LAN interface
- Version is IKEv2
- Encryption – AES256
- MD5/Auth HASH – SHA256
- PFS/IKE Group – Modp 1024 (Group2)

Deploy
Stage and Activate the configuration to enable the IPsec tunnel establishment between the Citrix SD-WAN and the Citrix SIA cloud PoP


Tunnel verification
Once the admin adds an SIA site in the Orchestrator , an automated tunnel configuration is initiated. The API automation creates an IPsec tunnel between the Citrix SD-WAN and the Citrix SIA CloudGateway node. From the Citrix SIA side, for establishing a tunnel, we need two things. The creation of a tunnel under Connect Device to Cloud -> Tunnels -> IPsec tunnel and then a Local Subnet creation under Network -> Local Subnets
Note: The IPsec Tunnel Name, IKE/IPsec encryption and Authentication settings, IKE Version2, Local and Remote ID including the Pre-Shared Key are auto generated by the API without the need of any manual intervention.

The Local subnets are also automatically created, and the tunnel newly created in the SIA cloud is attributed to the local subnet appropriately.
Note:
The policy (Security Group) enabled is “Default” and we can change the policy in the Citrix SIA platform by editing the Local Subnets and choosing a group of administrative choice
Note:
- SSL Decryption is disabled by Default
- Default Policy is “Default”

- GotoAll Sites -> Network Config Home -> Delivery Services -> Secure Internet Access Service
- Click the Info icon
- You can verify the Tunnel state with local and remote endpoint IPs
- Status of the Tunnel with statistics of packets inbound and outbound

You can also verify the status of the IPsec tunnel by going to:
- Specific site -> Reports -> Real Time -> IPsec Tunnel -> Retrieve Latest Data

Verify Cloud IP assignments
In Citrix SIA Portal, Go toHome -> Node Collection Management -> Node Groups -> Node-Cluster with Gateway Type

Verify IPSEC tunnel traffic
隧道已经启动并运行后,验证职业xy IP usinghttps://ipchicken.comorhttps://whatsmyip.com
If you are either using a Citrix SIA Cloud Connector (SIA Agent) or an IPsec tunnel (without agent), the proxy IP is ONE of the Cloud Nodes provided by the Citrix SIA Platform for the account used

PoC use-case 1 - SIA Agent + Citrix SD-WAN in a branch
Pre-Requisites
First download and install Cloud connector (SIA Agent) with a specific Security Group (Windows Connector).
Note: You cannot create a new Security Group but only modify the default ones and change the names to create and apply the security policies to a specific group.
For instance, in this case we are modifying Group 7 (Not taken and still default) and making changes to the Group name “PoC_Demo_Group”.

Connector configuration pre-requisite for Proxy
- Go to Proxy & Caching -> Proxy Settings -> Settings
- Click Enable Proxy Settings as “YES”
- Ensure the User Authentication Method is “Local User credentials + Cloud Connectors”
- Ensure the Connector registration method is “Standard Registration + SAML”
Leave others as default

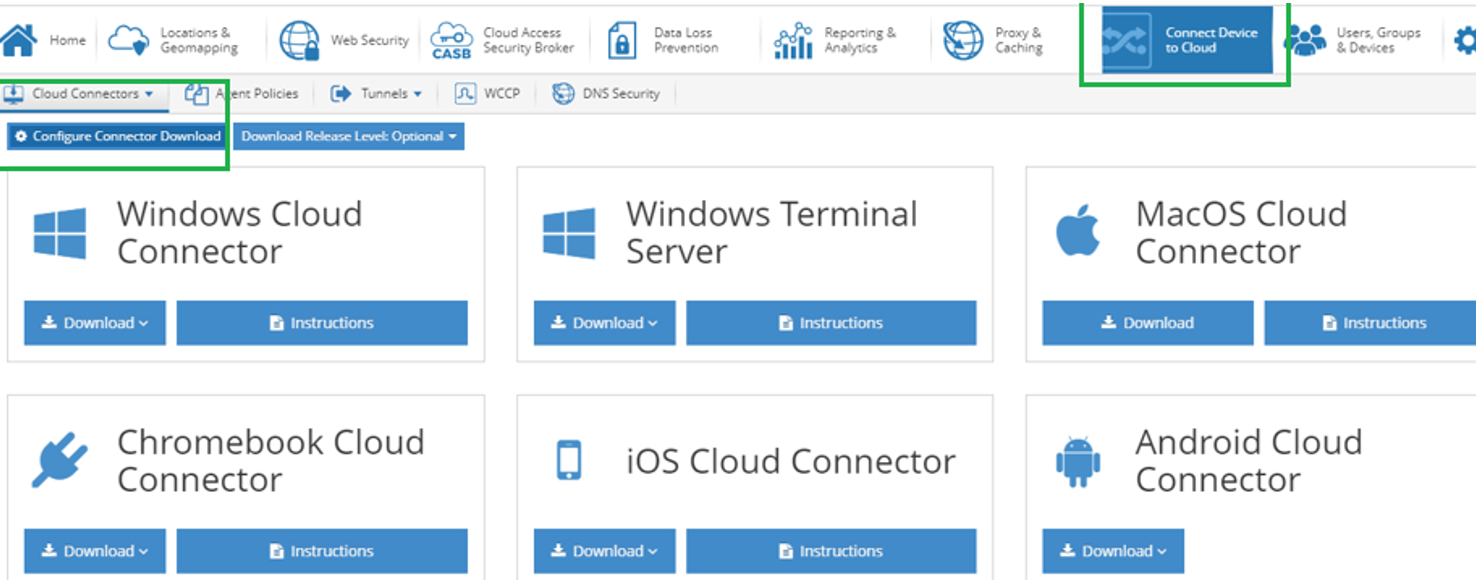
Click Connect Device to Cloud -> Cloud Connectors
Click Configure Connector Download
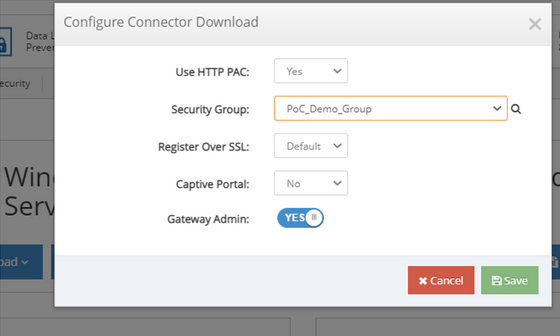
Select the following values.
- Use HTTP PAC – YES
- Security Group – PoC_Demo_Group
- Register Over SSL – Default
- Captive Portal – Yes
- Gateway Admin - Enabled
Click Windows Cloud Connector Download Button and choose Windows 8/10 64 bit


Note: Please ensure you perform the access of Citrix SIA Cloud platform via Google Chrome browser. With Firefox, the installer may not download as a .msi (in which case you need to manually change the name of the file removing .html from the file).

- Let the installer download and then double-click the installer in the download pane or from the downloads folder where it got stored

- After double-click, a PoP up is presented. Click “More Info” and then Click “Run Anyway”
- clicking on Run Anyway starts installing the msi file
- Finish the MSI file installation allowing all further administrative operations

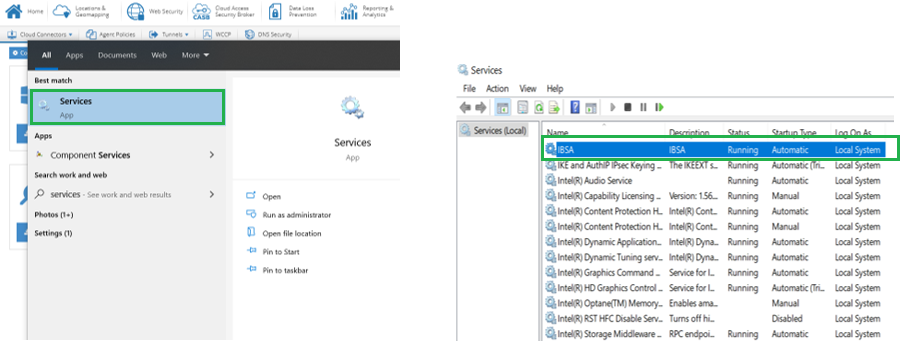
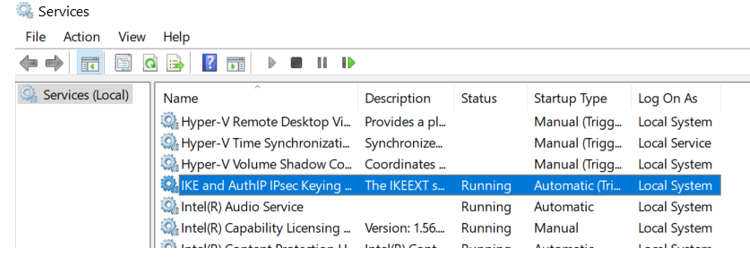
- Once the msi installation is complete, look for “services” in the Windows search and open the services window.
Look for a service by name IBSA. This confirms that the Citrix SIA Agent service running on the host machine.
Verify that with the Cloud Agent Service running, the proxy IP accessing www.ipchicken.com or www.whatsmyip.com is that of CloudGateway nodes of the Citrix SIA account

注意:在这一点上,与云代理successfully registered, the IP must change to one of the Cloud Node PoP IPs. If the IP you have got is that of the service provider NAT IP, you may debug why the SIA agent/Cloud Connector failed.
- If the Cloud registration is successful from the Cloud Connector (SIA Agent), notice the user name and all other details with a successful agent registration
Note: If you are NOT seeing your user name and other details, the User agent registration must have some issues.
- Goto Users Groups and Devices -> Cloud Connected Devices

- With successful Agent registration, notice the agent traffic on the Citrix SIA Reporter under Real-time Dashboard or Events logs
Note: If you have an Agent installed, notice the user name to explicitly show up with the Group that was set during the agent download/install including the Private Source IP.

Configuration
In this use-case, we use the Citrix SIA Cloud Connector (SIA Agent) to breakout and proxy to the Citrix SIA Cloud directly using the Internet service so that the DC workloads can be accessed reliably via the Overlay Virtual Path of Citrix SD-WAN
Without Citrix SIA, we would need to backhaul enterprise sensitive SaaS applications to the data center for providing security. But this induces latency considerably thereby deteriorating the application delivery and experience.
With Citrix SIA, the backhaul is no longer necessary. The Citrix SIA agent helps proxy the enterprise SaaS connections to Citrix SIA Cloud directly. The Citrix SIA then creates a secure service edge infrastructure at the Branch/Edge.
Recommended Best Practice: It is a recommended best practice that the Cloud connector traffic from corporate managed devices be bypassed from the local IPsec tunnel of the Citrix SD-WAN in the branch edge. This allows direct proxy to the Citrix SIA where enterprise OU’s or security groups can be exercised directly via cloud connectors on the managed devices.
To allow for the Citrix SIA cloud connector to seamlessly Call Home to the Citrix SIA gateway cluster and PoP’s, it is critical to bypass the cloud connector based traffic from the IPsec tunnel.
Create a new Custom APP with the following IP/PORT/Protocol Lists
Associate the custom App to INTERNET Breakout so that the SIA or Cloud Connector agent traffic can be bypassed from the tunnel and sent directly via Internet Service

Web Security - Category Policies
- Click网络安全- >网络安全策略- > Web / SSL Categories
Choose the Group as “PoC_Demo_Group” as the SIA Agent is installed for that group)
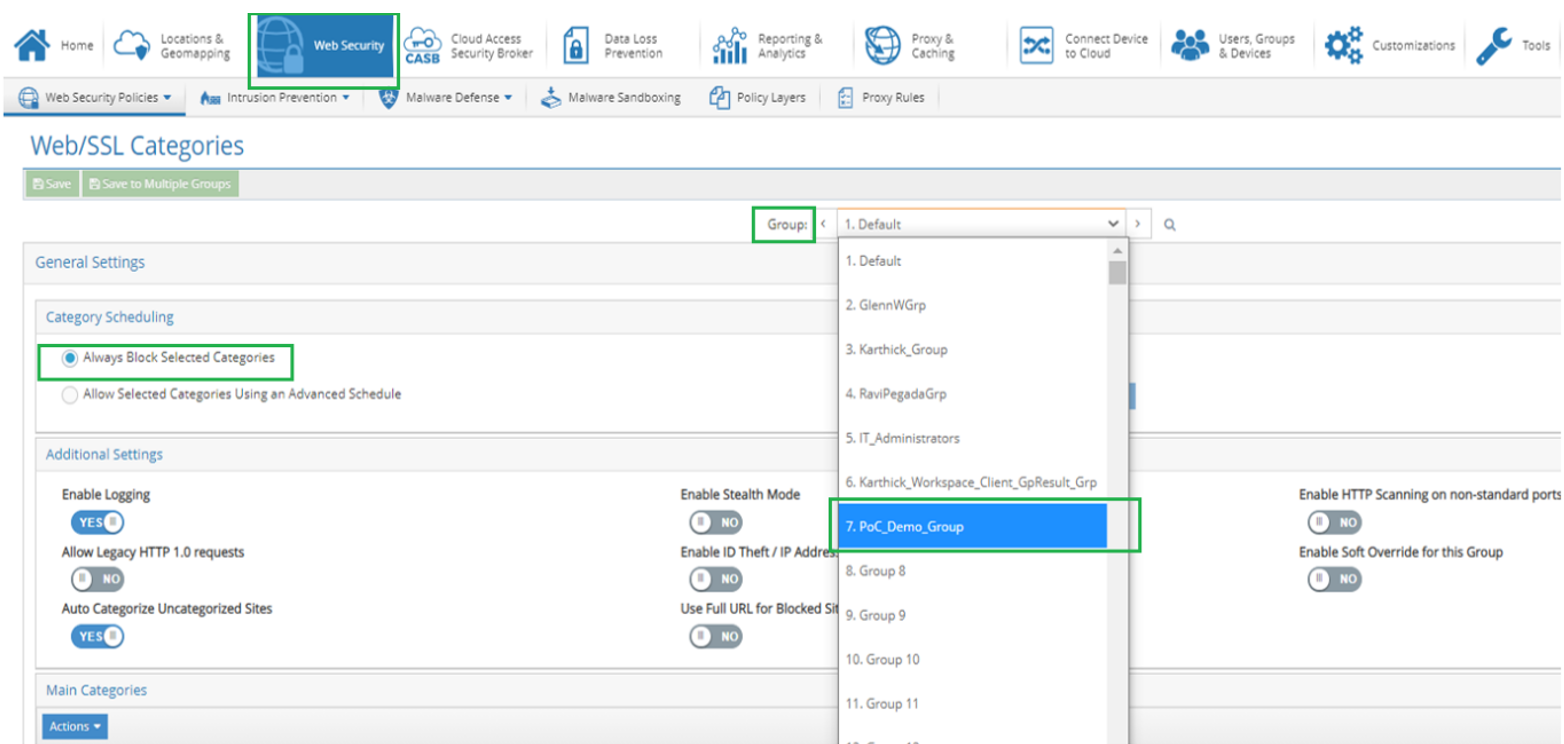
Enable Blocking of Friendship and Gambling Categories
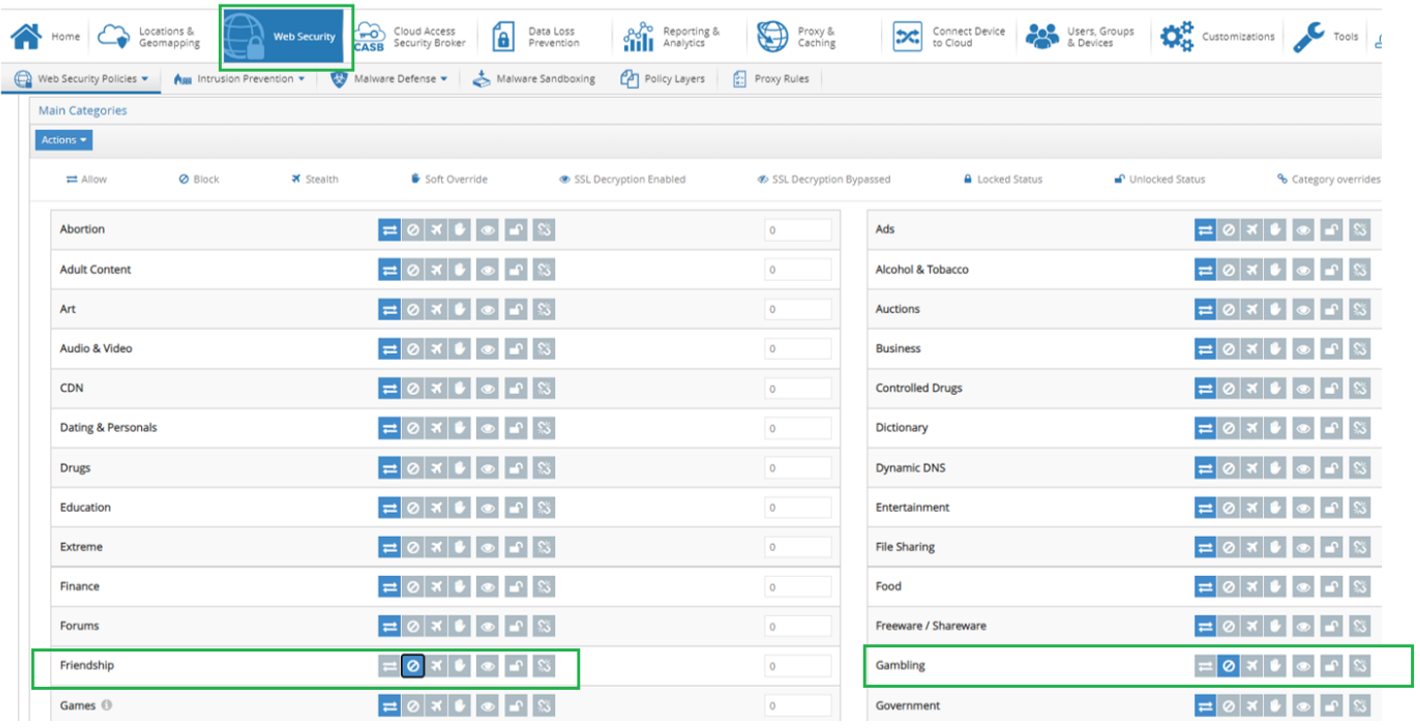
SAVE the settings to “PoC_Demo_Group” ONLY


Web Security - Category Policy Verification
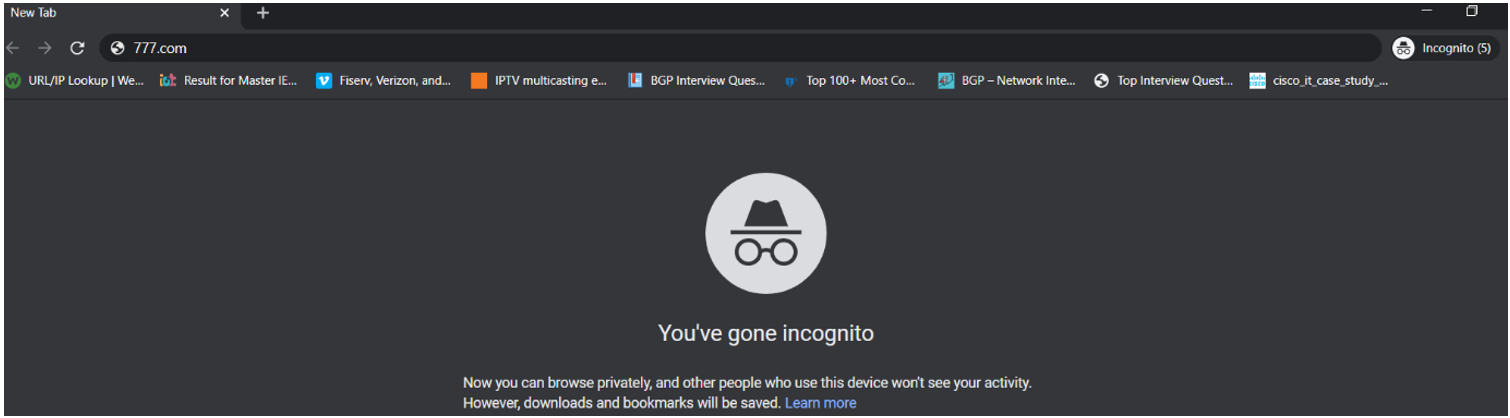
- Open an Incognito window of a browser
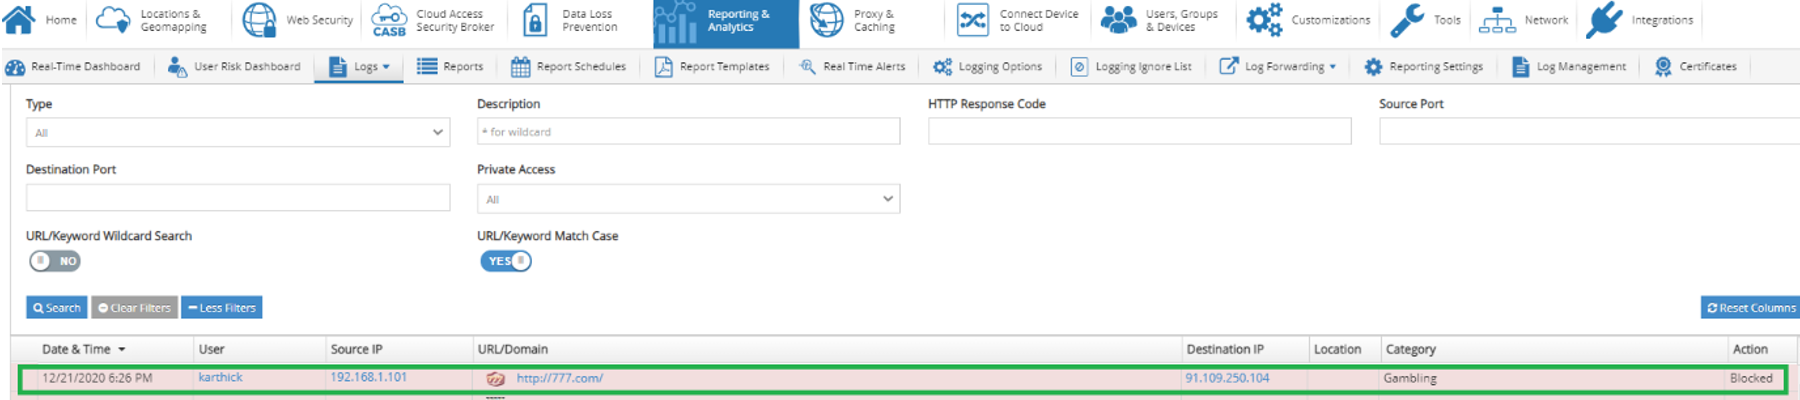
Access 777.com (A gambling site)

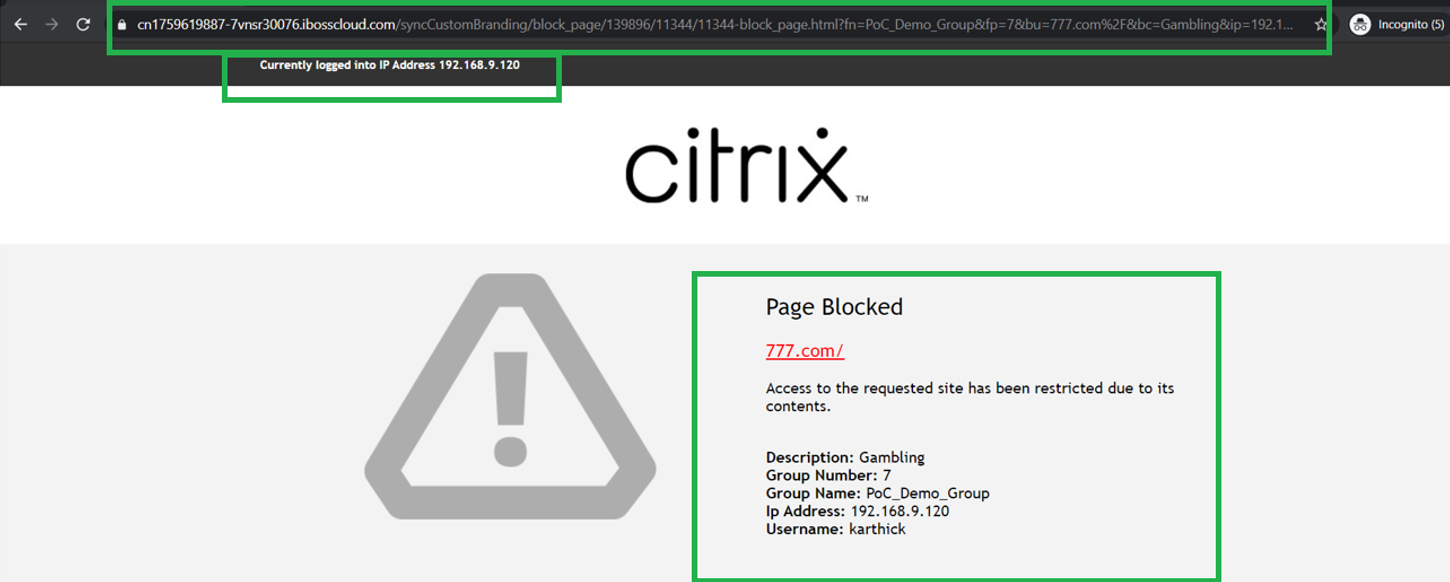
As soon as the site is accessed, the splash page comes up blocking the traffic (as enforced by the administrator on the PoC_Demo_Group policy
You can also see that the Group name is visible including the end host private local IP and the user name
The description also states the category accessed
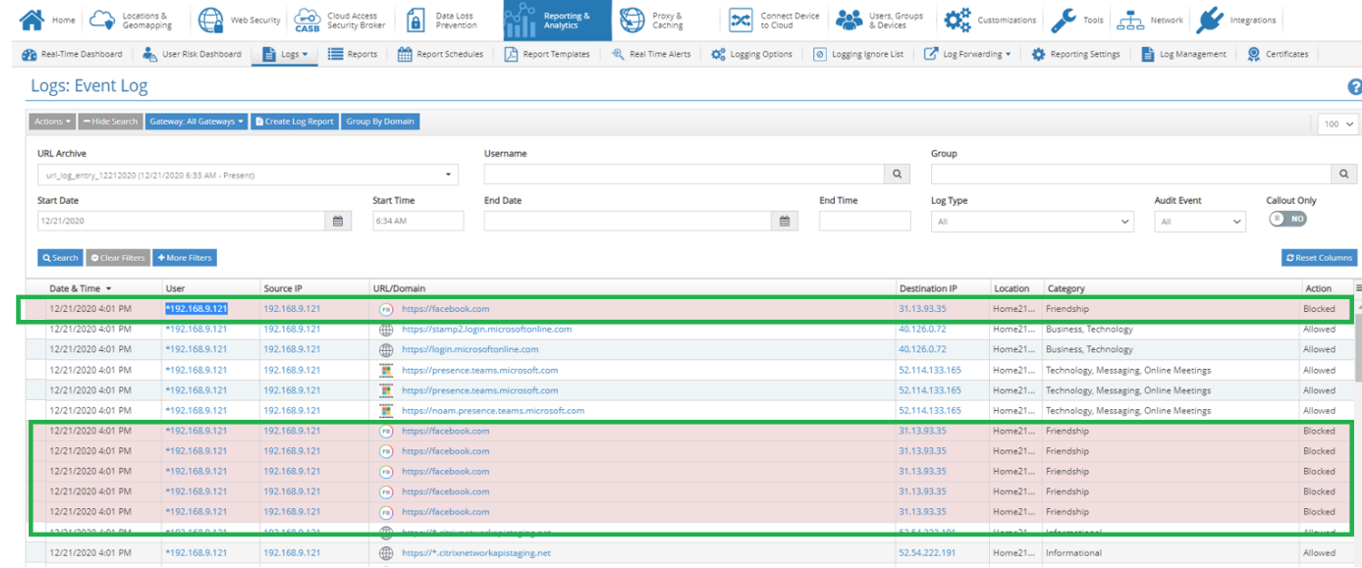
The reporting event logs indicate the block of access to the Gambling site
- Open an Incognito window of a browser
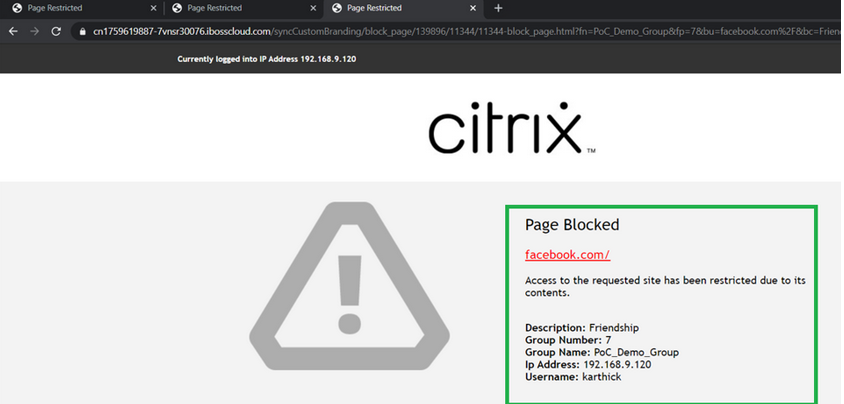
- Access facebook.com (A Friendship Category site)


As soon as the site is accessed, the splash page comes up blocking the traffic (as enforced by the administrator on the PoC_Demo_Group policy
You can also see that the Group name is visible including the end host private local IP and the user name
The description also states the category accessed
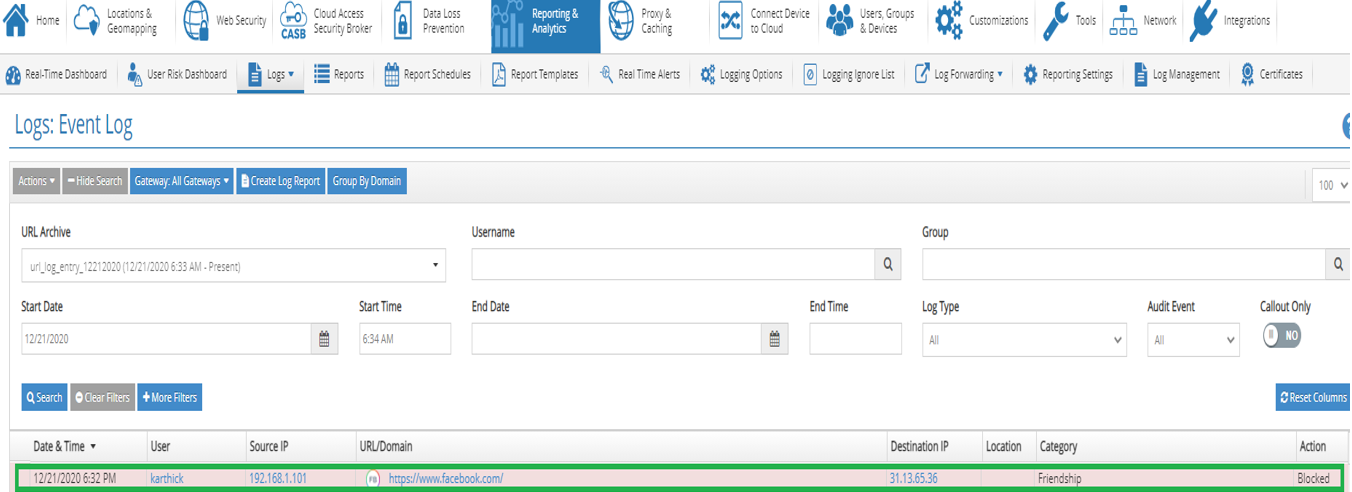
The reporter also shows that Facebook from Friendship category is blocked.


Web Security - Allow list
Create a simple allow list to allow ONLY Facebook from the entire Friendship category that is currently BLOCKED
Go toWeb Security -> Web Security Policies -> Allow List
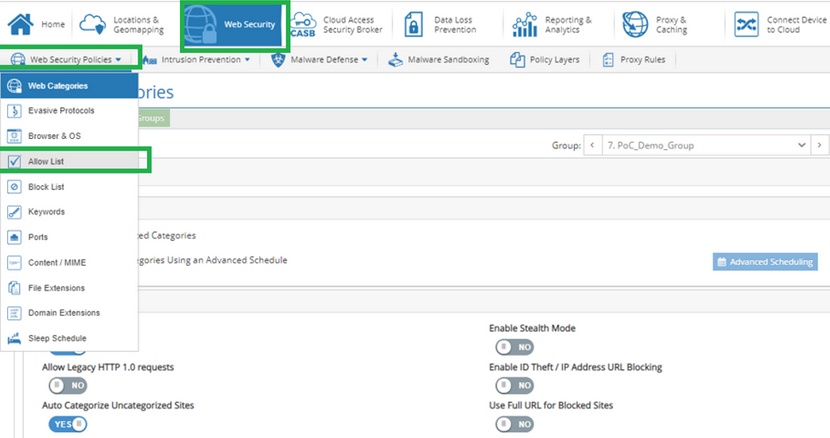
Add an allow list in the URL/IP Range stating facebook.com and click in “+Add”
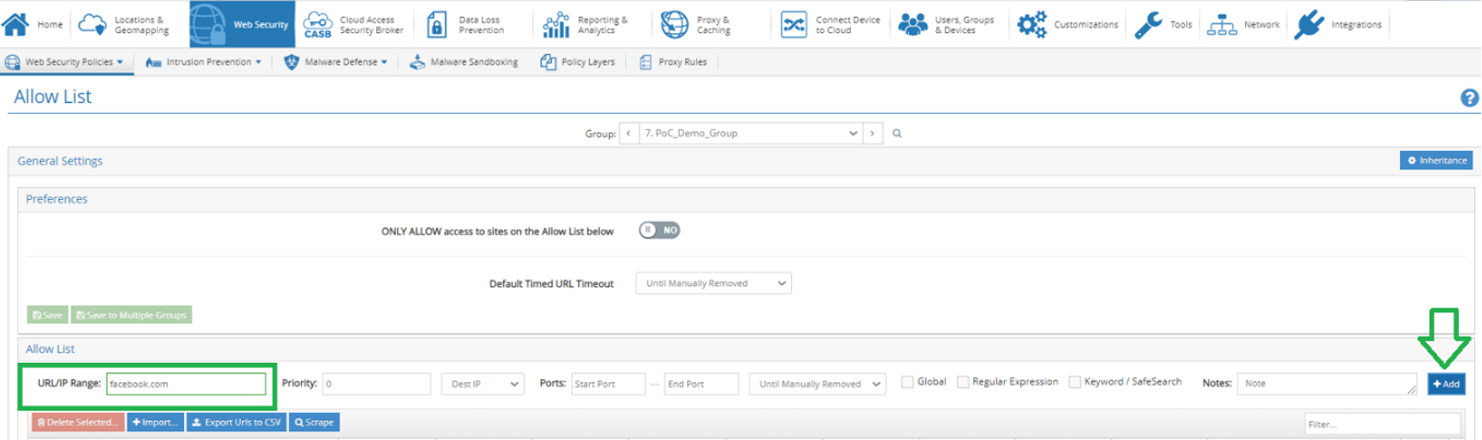
Notice the allow list showing the URL added to be allowed


Web Security - Reporting
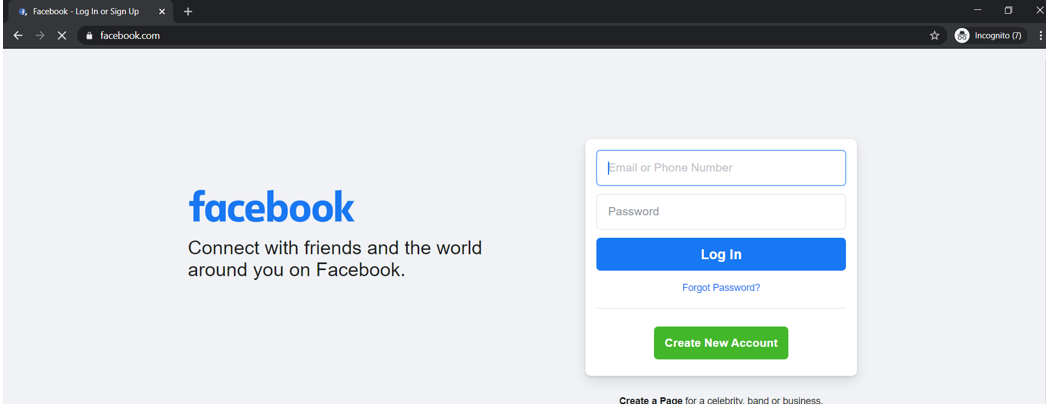
- Open an incognito browser tab and access facebook.com
- Facebook seems allowed, but you can see that it is NOT fully loaded as a page
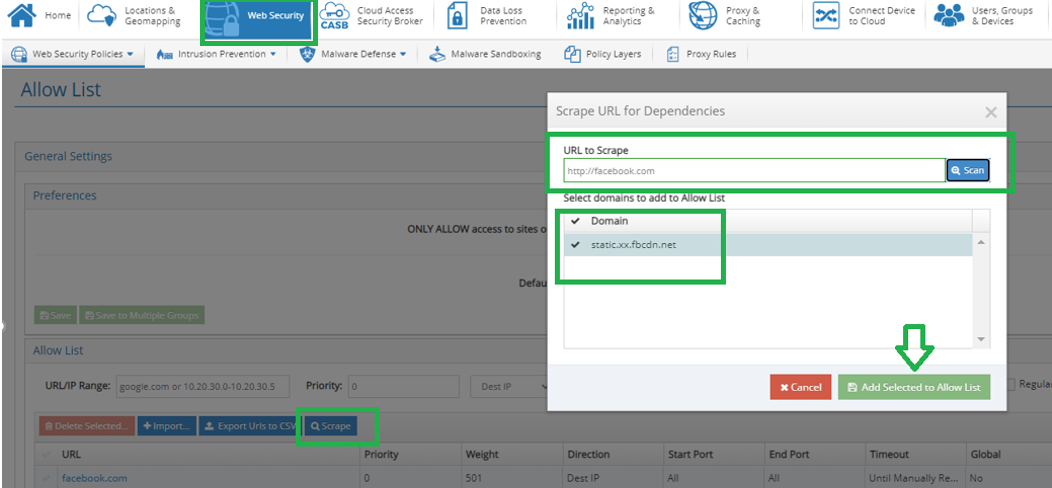
Note: This is because there are other related URLs that facebook.com is dependent upon, which also need to be in the allow list for the entire page/domain to open properly.
Recommended Best Practice: For Allow/Block List – SCRAPE and add all domains if being allowed.

- Go to the allow list under Web Security
- Web Security -> Web Security Policies -> allow list
- Click Scrape
- Type facebook.com and Click Scan
Add all domains to the allow list
Now open facebook.com in an incognito browser and it opens fully
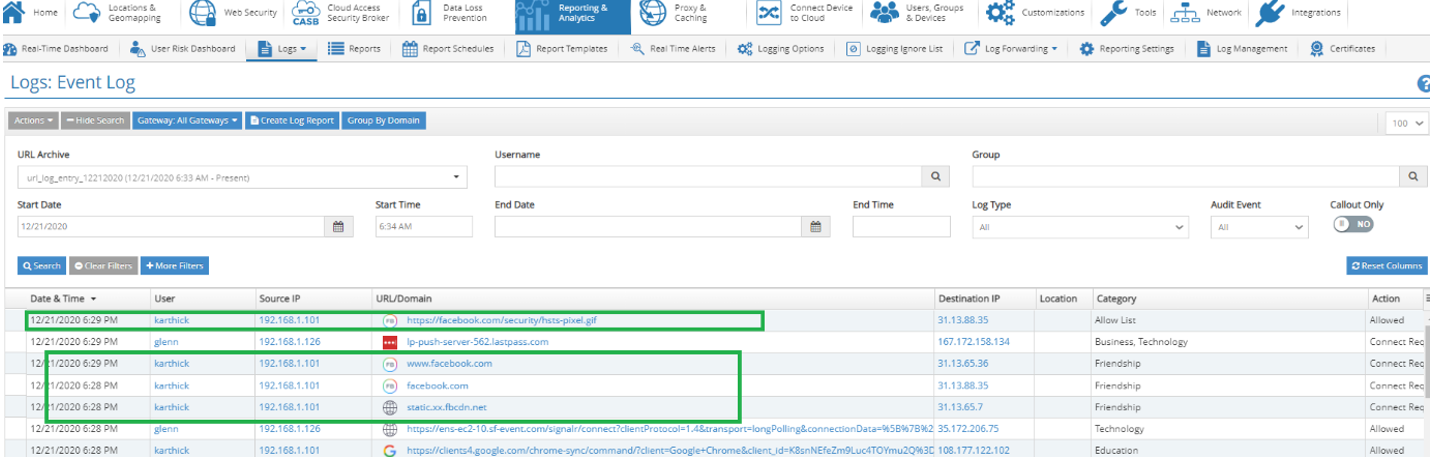
- Notice from the reporter event logs the Facebook.com is NOW allowed and no more blocked as it was added to the allow list
allow list takes more precedence than the Category blocking


CASB - Policies
Create a CASB rule to enable safe search on Google Browser and disable gmail.com access
- Go toCASB - > CASB应用控制- >云应用控制
- Select Group as “PoC_Demo_Group”
- UnderSearch Engine Controls -> Google Safe Search Enforcement
- 选择“强制安全搜索当前组”
- Under Google Controls
- Enable Block Google Drive
- Click “SAVE”

CASB Reporting
Google Drive Blocking control:
- Access drive.google.com in an incognito browser tab
Soon as we access Google Drive, a splash page pops up. This is due to the Google Drive CASB control exercised in the PoC_Demo_Group Security Group
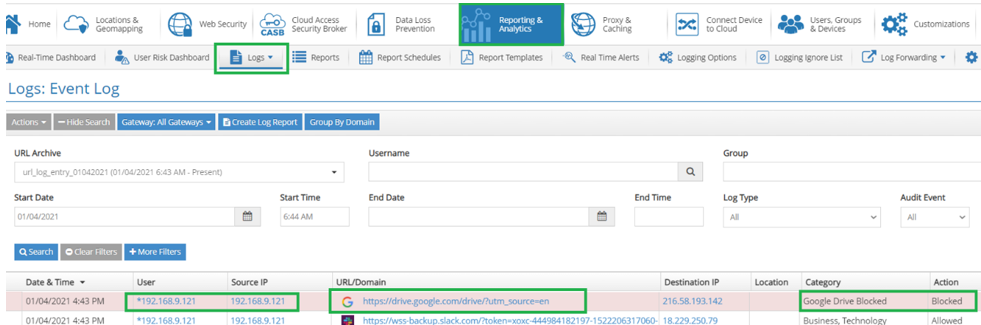
- The reporter event logs also indicate access to Google Drive blocked
Category states “Google Drive Blocked” as it comes from CASB controls


Google Browser Safe Search enablement:
- Access google.com in an incognito browser tab
- Soon as we access, google.com opens up with a search bar
- Enter Citrix or any keyword and initiate search
Notice that the search results are filtered, as the safe search is ON and is indicated as soon as the keyword is entered in the engine

Anti Malware Defense - Configuration
Note: SSL Decryption must be enabled (If Cloud connector is used and configured to auto install the root certificate as part of agent installation, this feature is enabled by default).
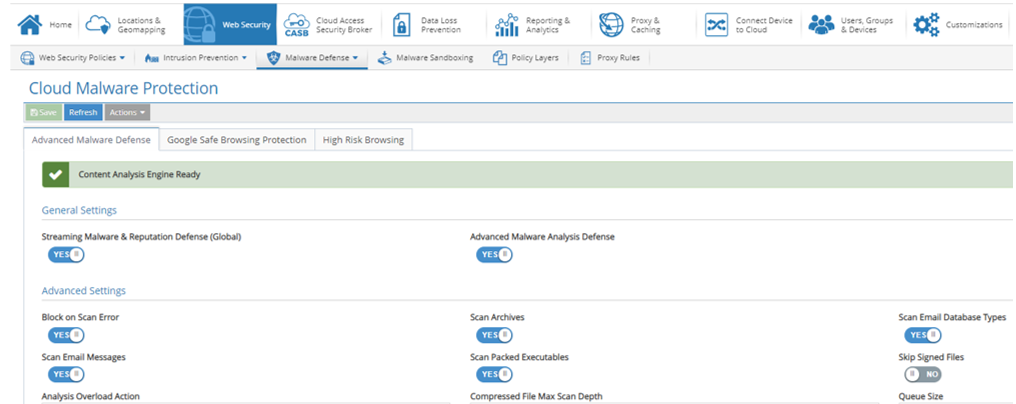
- Go toWeb Security -> Malware Defense -> Cloud Malware Protection
- The Content engine must be ready
Click Block on Scan error to be Enabled


Anti Malware - Verification
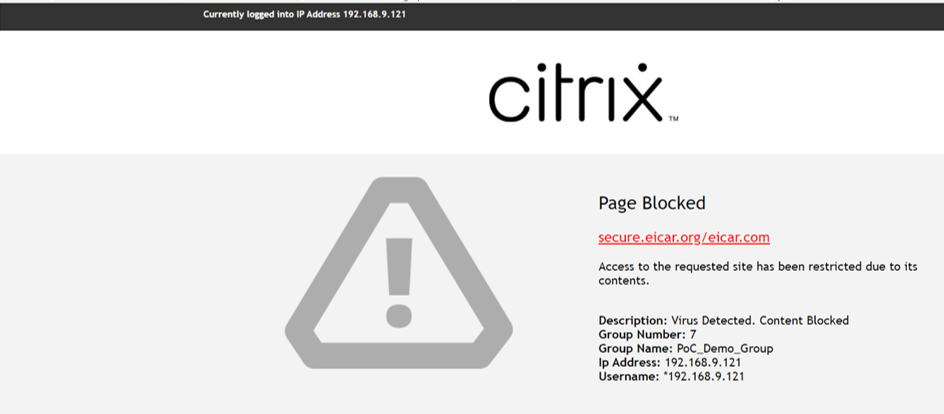
- Accesshttps://www.eicar.org/?page_id=3950
Scroll down and click download the 68-byte file
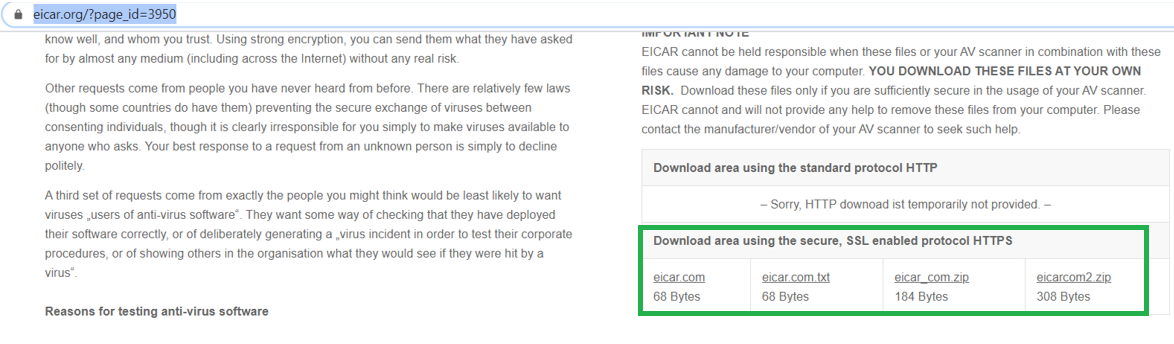
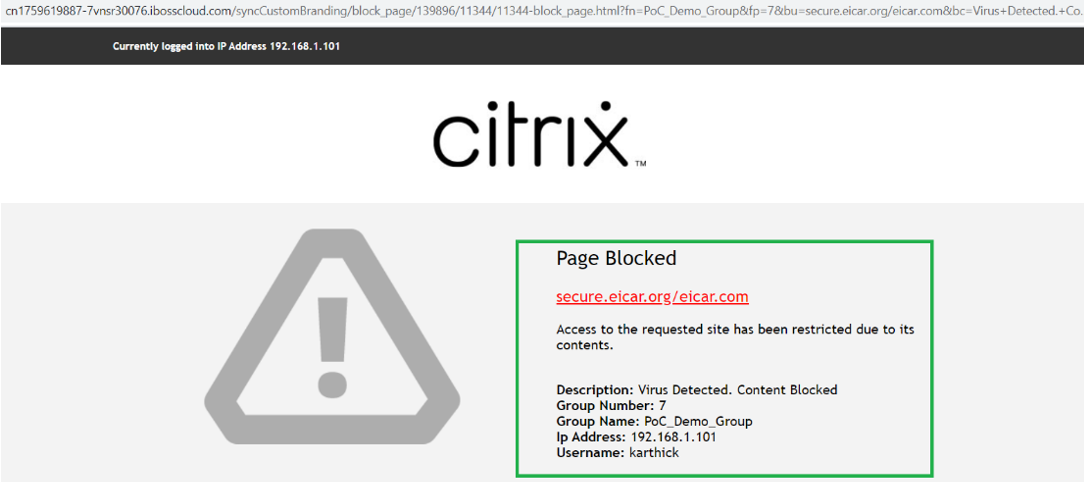
Once the file download is initiated, a splash screen pops up. The page is blocked due to a Virus or Malware detection.


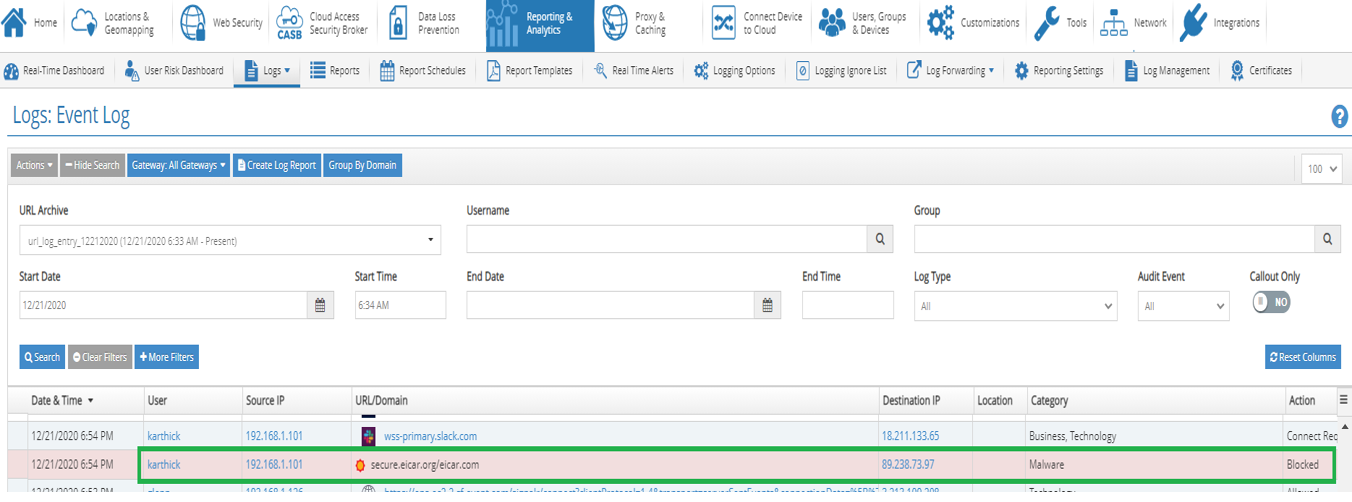
Verifying via CSIA Reporting Section
Reporter also indicates the Malware protection enforced

DLP - Configuration
- Ensure that that DLP Content and Analysis engine is ready and config is done appropriately
- Click “Yes” for content analysis and data loss prevention
- Ensure that content analysis engine is ready
- For the PoC, allow default selection for Content Engines and Analysis engines

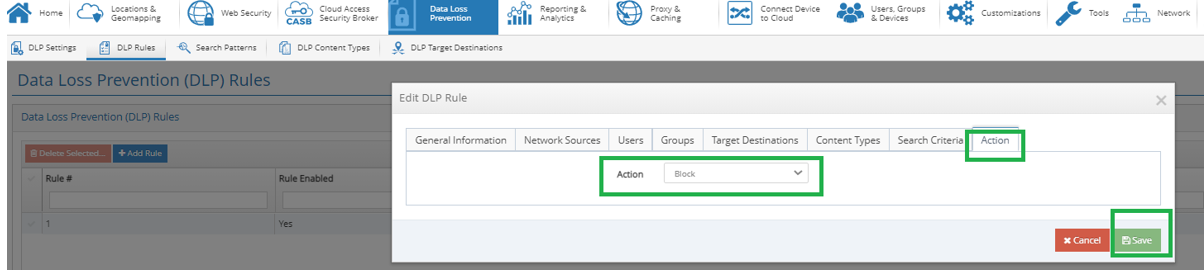
- Create a DLP rule so that Data Loss Prevention can be enforced on unauthorized content upload/download/both
- Go to Data Loss Prevention tab
- Clcik DLP Rules
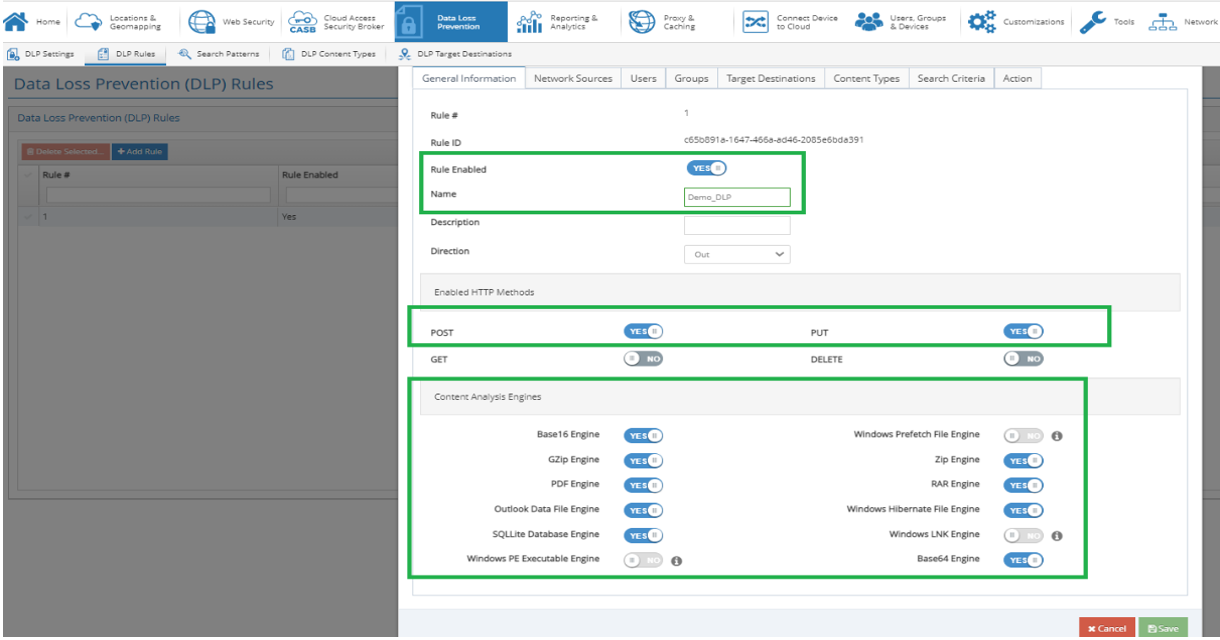
- Click “+Add Rule”
- Under General Information Tab:
- Ensure Rule Enabled is “YES”
- Provide a name for the rule
- Enable HTTP Methods of PUT a POST so we can enforce DLP on uploads
- Leave content engines default
- Under DLP tabs from Network Sources to Content Types
- Choose the policy as “Include All except selected items”
- Allow Defaults in the Search Criteria tab
- Select Action as “BLOCK”


DLP - Reporting
- Gotohttps://dlptest.com(a site to verify Data Loss Prevention tests)
- Click Sample Data and view some sample information
Click XLS File (This downloads the file)
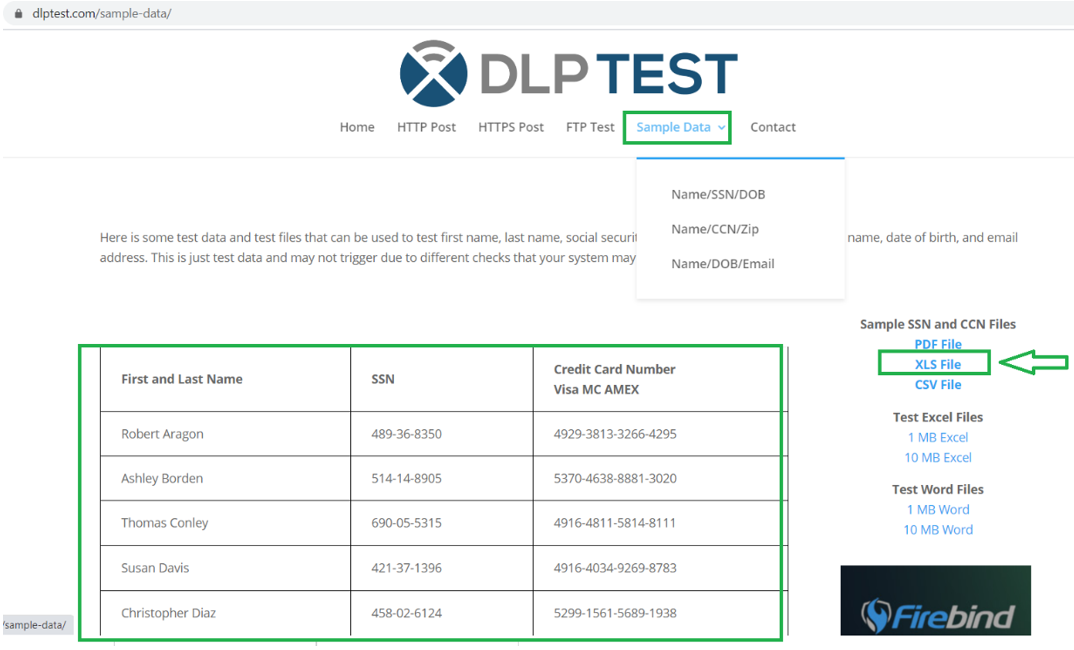
- See the file gets downloaded with the name “sample-data.xls” under Downloads folder (or folder you have selected)
Use this file to test DLP in a new site next
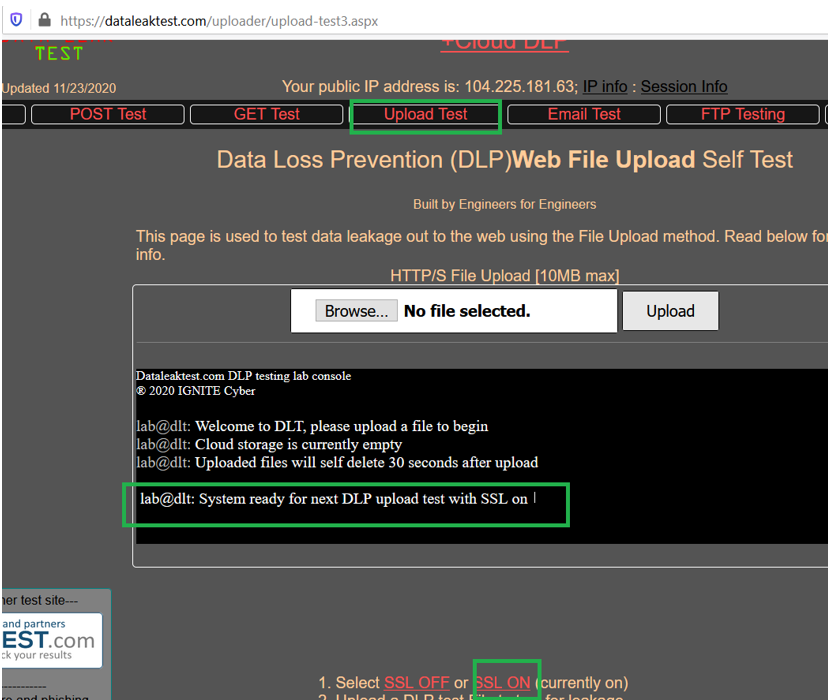
- Now open a new browser incognito tab and typehttps://dataleaktest.com
- Click Upload Test
- In the Upload test page, scroll down and Click “SSL ON”
- After clicking on SSL ON, you can see the message on the black screen “System Ready for Next DLP Test with SSL ON”
- Now Click Browse
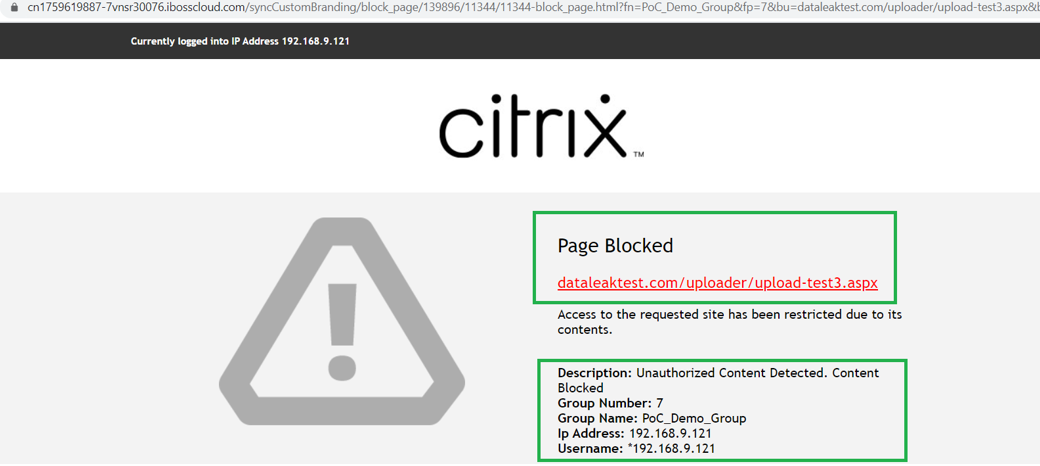
- Select the file we previously downloaded file sample-data.xls and UPLOAD
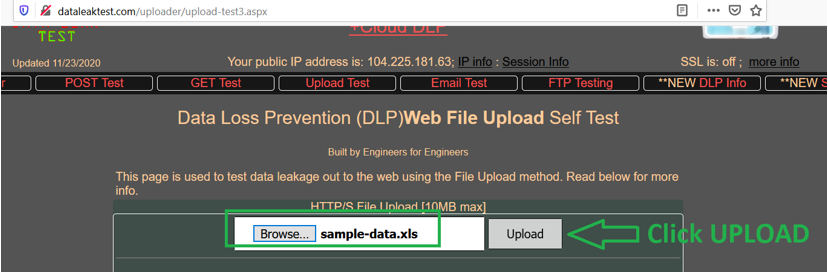
On uploading the sensitive file (containing SSN), a splash screen pops up. The page is blocked due to Unauthorized content detection (DLP)
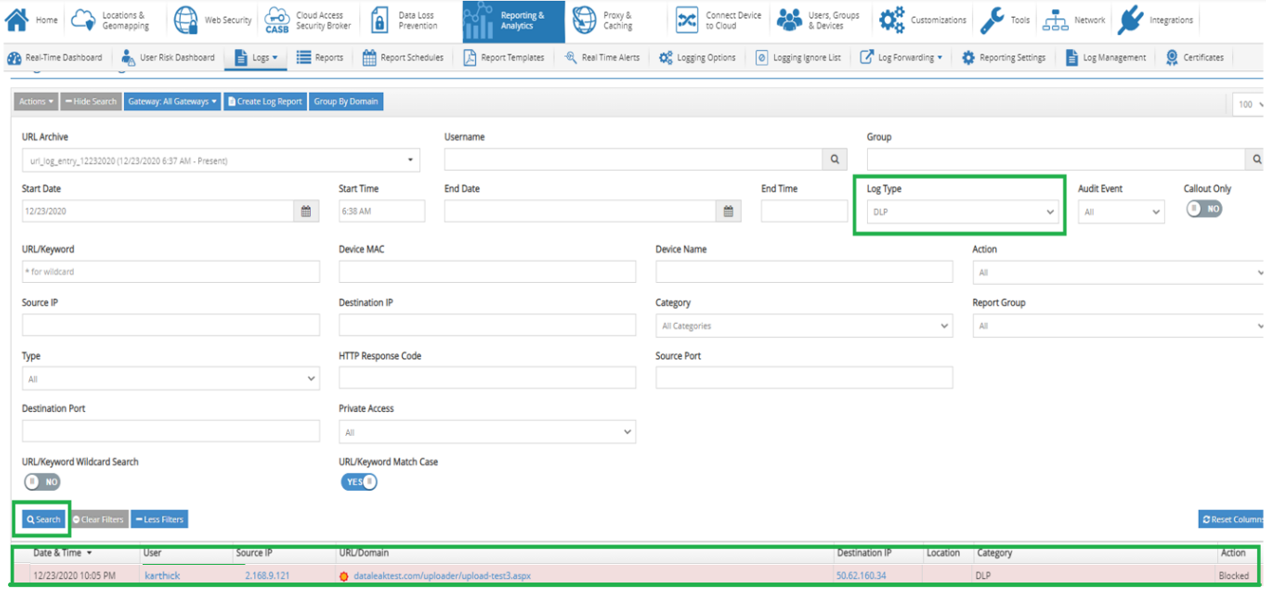
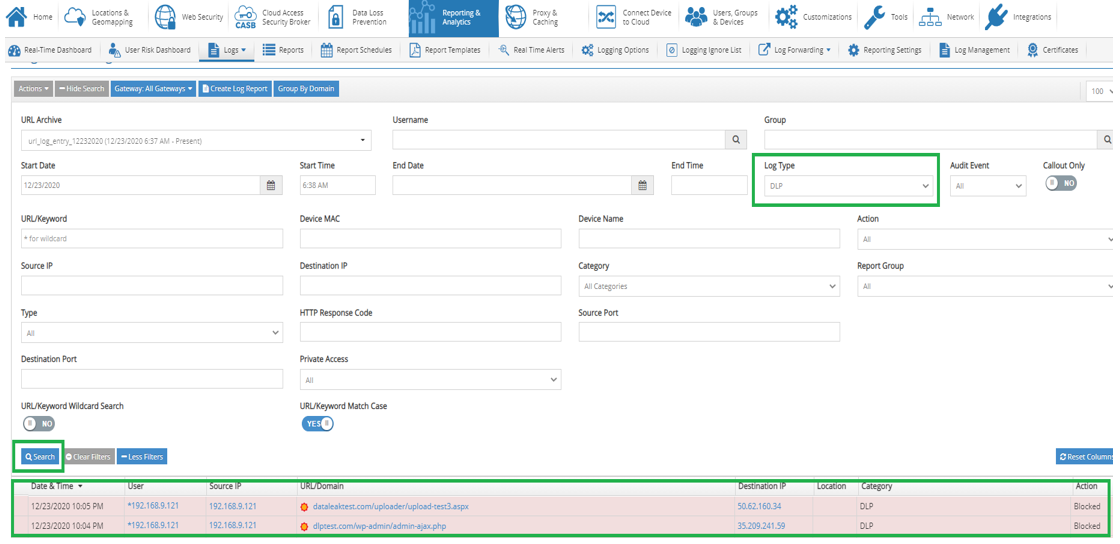
- Verify Reporter Logs for DLP events:
- Click More Filters
- Choose log Type as DLP and click “Search”
- Notice that the DLP upload gets blocked


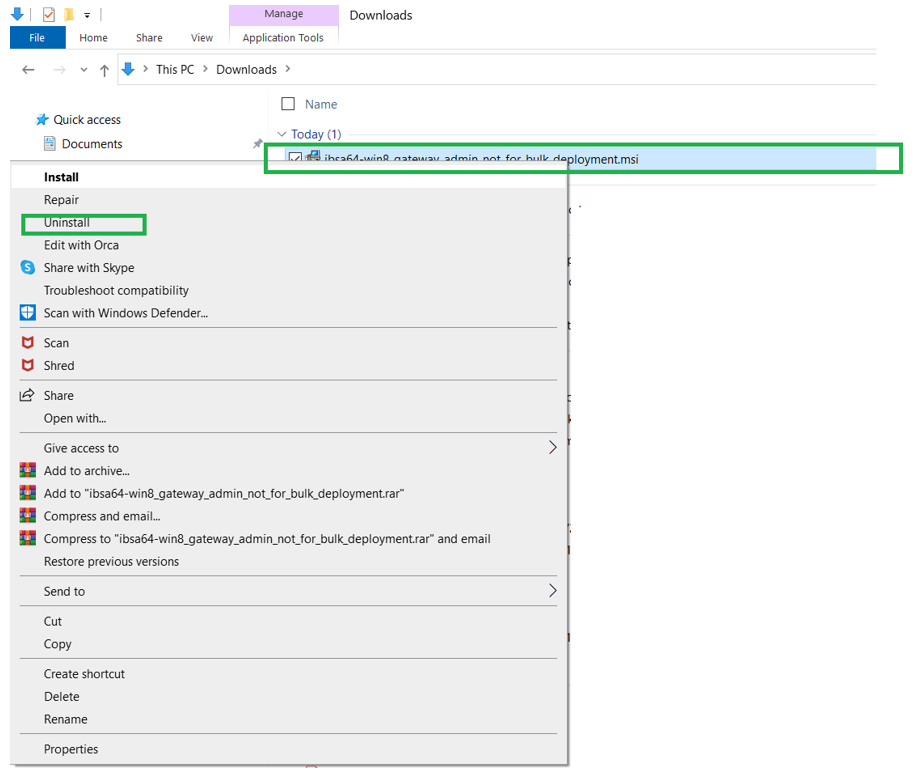
SIA Agent uninstall
- To start the Citrix SIA agent uninstallation process, right-click the previously downloaded Citrix SIA installer (from the folder it was downloaded)
- Select uninstall
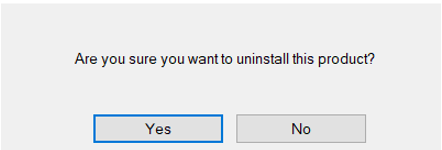
Select YES for “Are you sure you want to uninstall this product”
- Follow the uninstallation process and administratively say “Yes” for uninstalling if asked
Go to Services in windows and check the IBSA service is uninstalled properly and does not exist
- Verify the proxy IP
The Proxy IP is one of the Citrix SIA CloudGateway node IP’s. This is because, the test laptop we are using for PoC is behind the Citrix SD-WAN whose IPsec tunnel is still up and running with the Citrix SIA cloud service
Once the agent is uninstalled all the traffic goes through the IPsec tunnel


PoC use-case 2: Unmanaged Endpoints without SIA Agent + Citrix SD-WAN
In this use-case, we use the Citrix SIA IPsec tunnel to secure for unmanaged devices like BYOD, Personal and Guest devices behind a branch SD-WAN. Managed devices with the Citrix SIA in the branch agent bypass the tunnel and connect directly to the Citrix SIA platform.
Recommended Best Practice: It is a recommended best practice that the in case where there are no Cloud Connector agents in devices, a branch managed by Citrix SD-WAN uses the IPsec tunnel to manage the security policies for those devices securely with the Citrix SIA platform.
Note: The tunnels that get configured by default do not have SSL decryption enabled by default.
With just the IPsec tunnel, we only get the following features:
- Web Security (Category based)
- Allow List
- Block List
SSL decryption via tunnel is covered in the next PoC use case for exercising full security via IPsec tunnel
Web Security - Category Block
Before verification of policy enforcement via the IPsec tunnel, create the security policies in the Citrix SIA cloud portal
- Go to网络安全- >网络安全策略- > Web / SSL Categories
- Click Default Security Group as the IPsec tunnel is created in general with Default Security Group
Note: If you want to change the group, you must manually do it in Local Subnets for the entry that has the IPsec tunnel.

- Enable CATEGORY blocking via IPsec tunnel for Gambling and Friendship categories

Web Security - Allow list
- Add an allow list to Friendship category to allow Linkedin ONLY but block all other social media categories
Note: As defined best practice, scrape and resolve other URL dependencies before adding to an Allow/Block List to completely exercise the functionality of URL web filtering


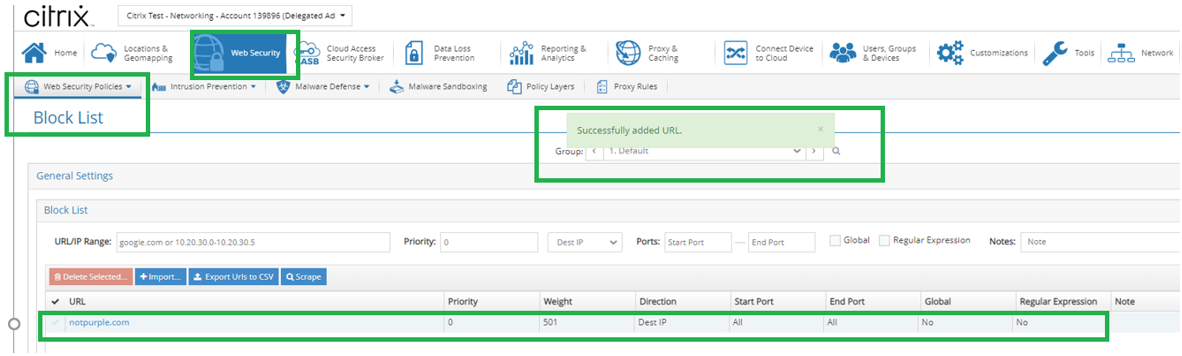
Web Security - Block List
Configure a specific block list via URL web filtering for a site like notpurple.com
- Go to网络安全- >网络安全策略- >块Lis)t
- Add a web URL “notpurple.com” to the block list

Web Security - Category Block Verification
- Open an incognito browser tab and access Gambling site 777.com from the Gambling category
A splash page is presented due to the block list policy enforcement
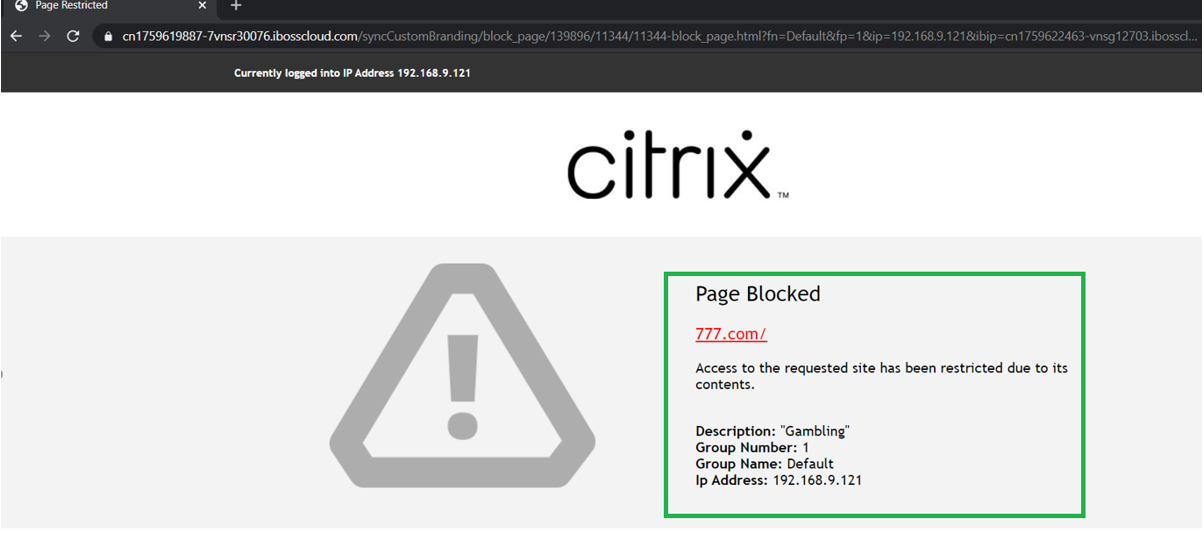
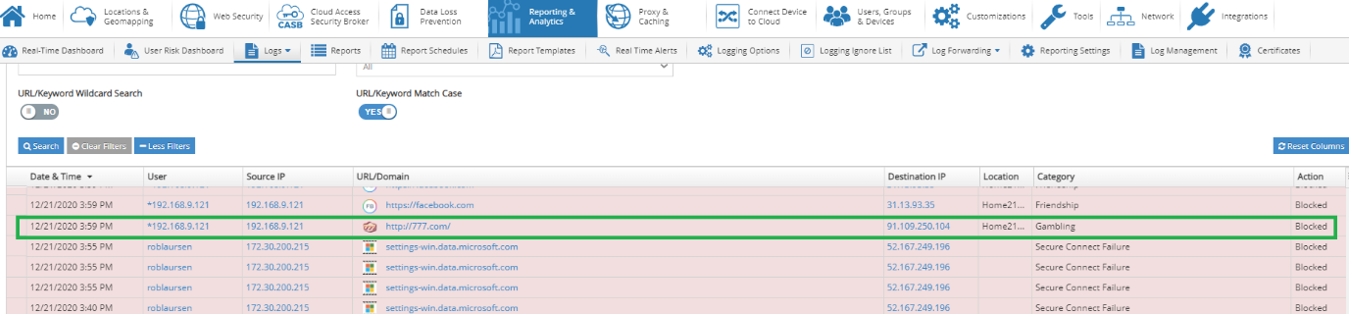
- From the reporter we can see in even logs that the access to 777.com is categorically Blocked due to GAMBLING section
- Click Reporting and Analytics -> Logs -> Event Logs
- Click Search
- If needed,Click More Filters, and selectAction -> Blockedto filter all the logged events that are blocked
- Open an incognito browser tab and access site facebook.com from the Friendship category
Notice that the site does not open (Facebook is inaccessible as it is blocked)
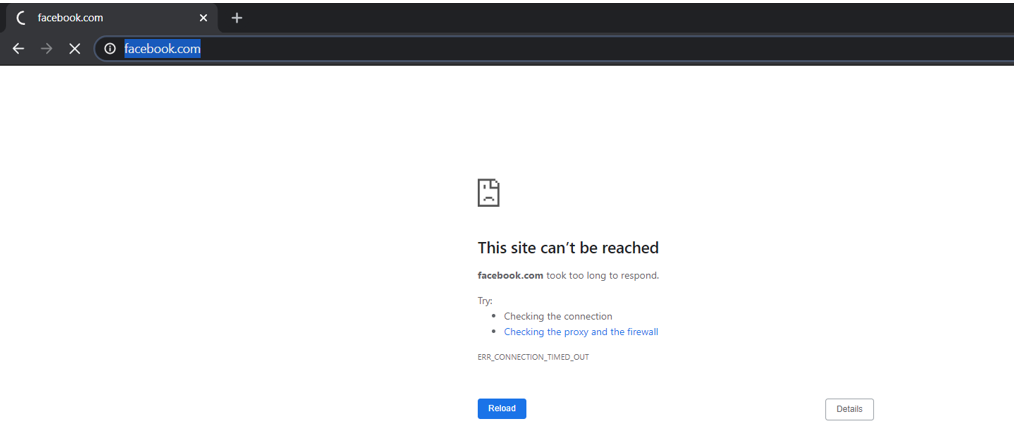
From the reporter we can see in even logs that the access to facebook.com is categorically Blocked due to FRIENDSHIP section
- Click Reporting and Analytics -> Logs -> Event Logs
- Click Search
- If needed, ClickClick More Filters, and selectAction -> Blockedto filter all the logged events that are blocked


Web Security - IPsec Tunnel Verification
- We had initially configured LinkedIn to be exempt from the Friendship category to be blocked via selective allow list configuration.
- Access linkedin.com from the Friendship category in an incognito browser tab
We can see that access is allowed and the page opens up
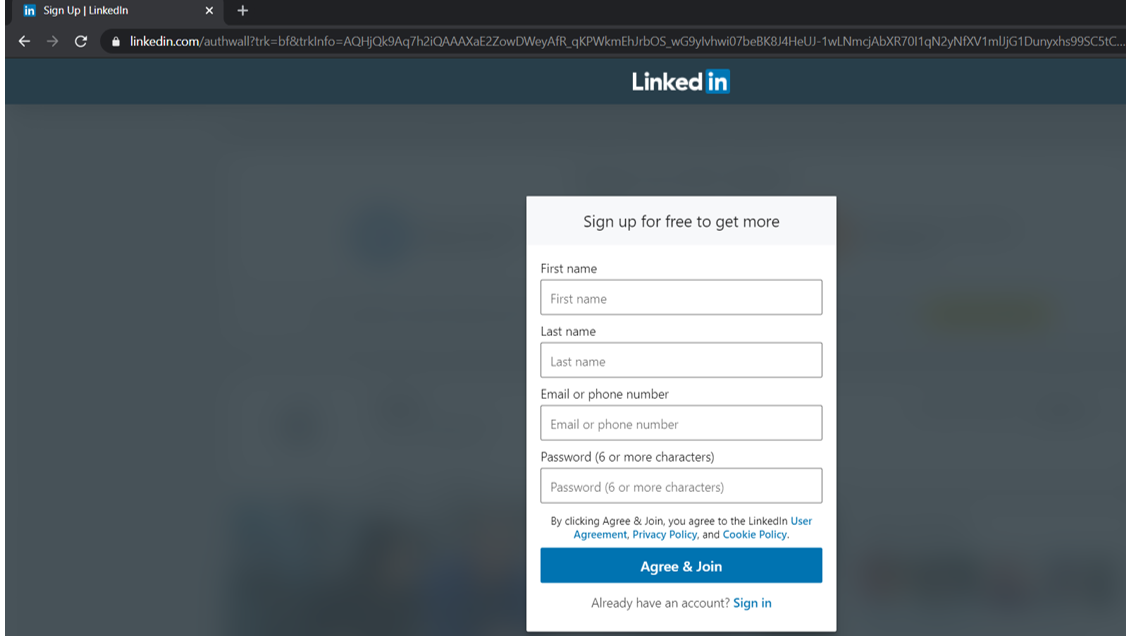
The reporter also shows the traffic to be allowed and NOT blocked due to the allow list configuration taking precedence to category blocking

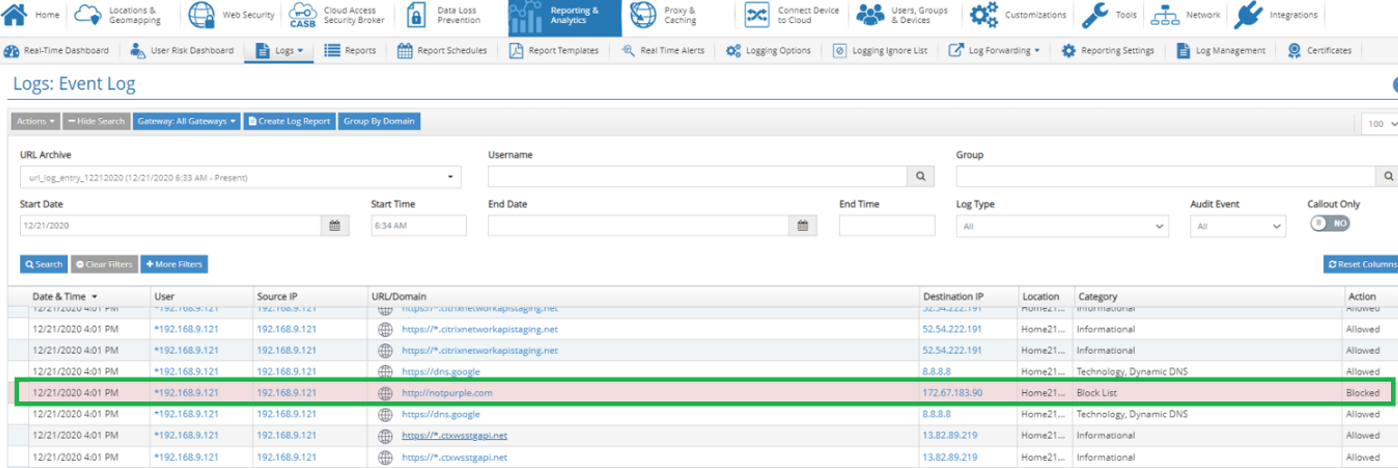
- 最后,访问特定的网站notpurple.com which is in the block list and see that when accessed over the tunnel gets blocked
- Open an incognito browser tab and access notpurple.com
We get an immediate splash page blocking access to the site
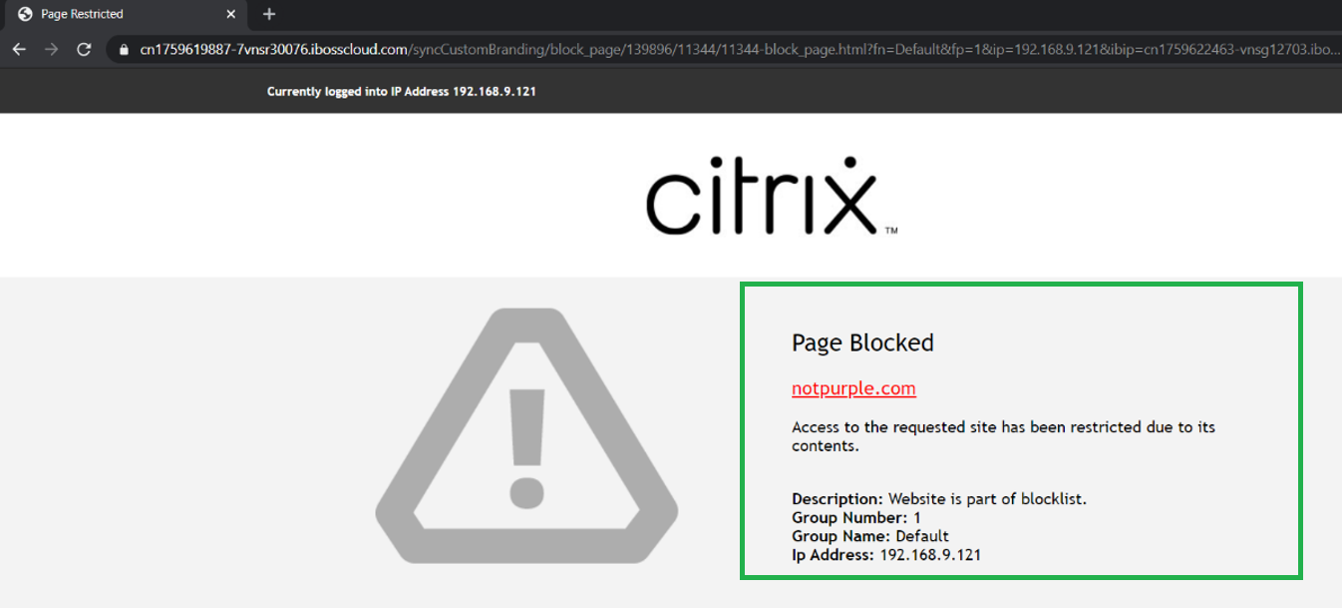
The reporter also shows the traffic to be BLOCKED as it is explicitly configured as part of the block list


IPsec tunnel SSL decryption
The tunnels that get configured generally come disabled with SSL decryption, unless explicitly set. Once the IPsec tunnel is enabled for SSL decryption, it is capable of performing ALL Advanced security features like Malware Defense, DLP, CASB and so on.
However, there are a few pre-requisites, without which Advanced security CANNOT be enabled on the IPsec tunnel with the Citrix SIA cloud
Important 3 pre-requisites:
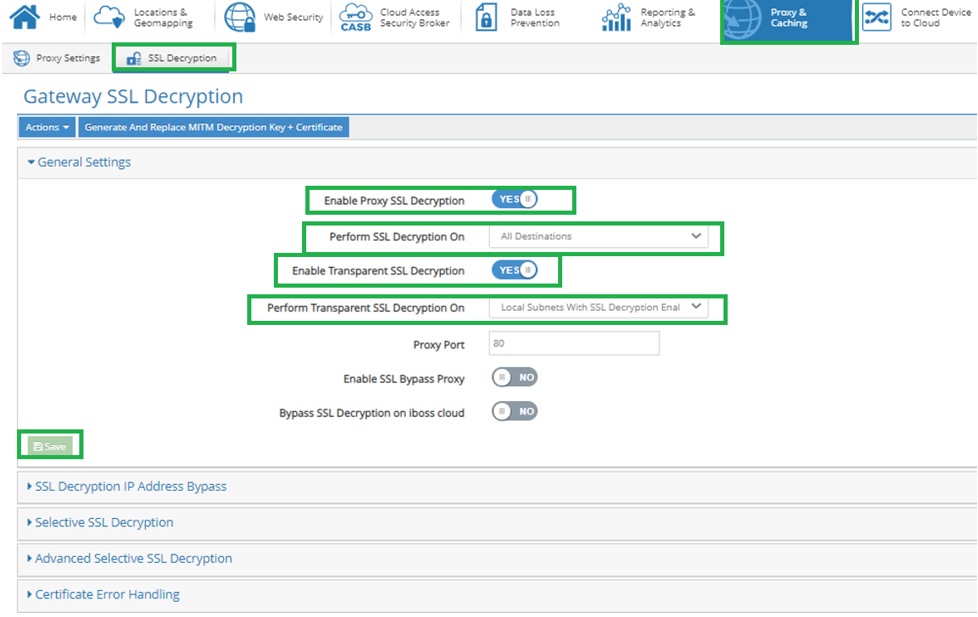
- Enable Transparent SSL Proxy under “Proxy/Caching -> SSL Decryption -> General Settings”
- Enable SSL decryption on the IPsec tunnel in the Local Subnets
- Download and Install the ROOT Certificate from the Citrix SIA Cloud and install on the end user device under trusted root authorities (To enable SSL decryption by the platform)
Transparent SSL Decryption
For enabling the IPsec tunnel to allow for SSL decryption, the transparent SSL decryption must be enabled.
Note: SSL decryption can be applied for ALL IPsec tunnels depending on how we administer it. We can either choose SSL decryption for ALL subnets or manually enable SSL decryption per Local Subnet of an IPsec tunnel.
For this demo PoC, we enable an explicit tunnel with SSL decryption and choose from General settings the value “Local subnets with SSL decryption enabled”
- Enable Proxy SSL Decryption – YES
- Perform SSL Decryption on – All Destinations
- Enable Transparent SSL Decryption – YES
- Perform Transparent SSL Decryption on – Local Subnets with SSL Decryption Enabled
Leave others to default

IPsec Tunnel decryption for Local Subnets
Note: Enable the decryption on the tunnel after it is configured in the SIA portal (From Orchestrator).
ClickNetwork -> Local Subnets -> Quick Edit Local Subnets(As displayed in the following snapshot)
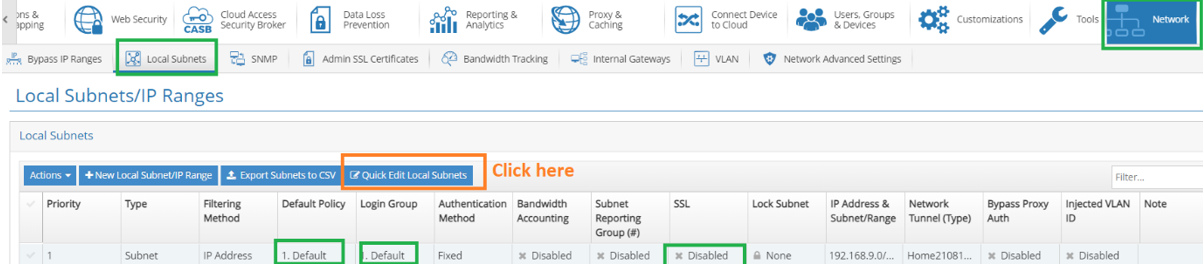
- All IPsec tunnels created, need a local subnet that defines the local LAN subnet of the end hosts protected by the IPsec tunnel.
- Choose the IPsec tunnel based on the name and the local subnet
- The local subnet is automatically created with the local LAN subnet of the Citrix SIA site
Click the check box SSL to enable SSL decryption

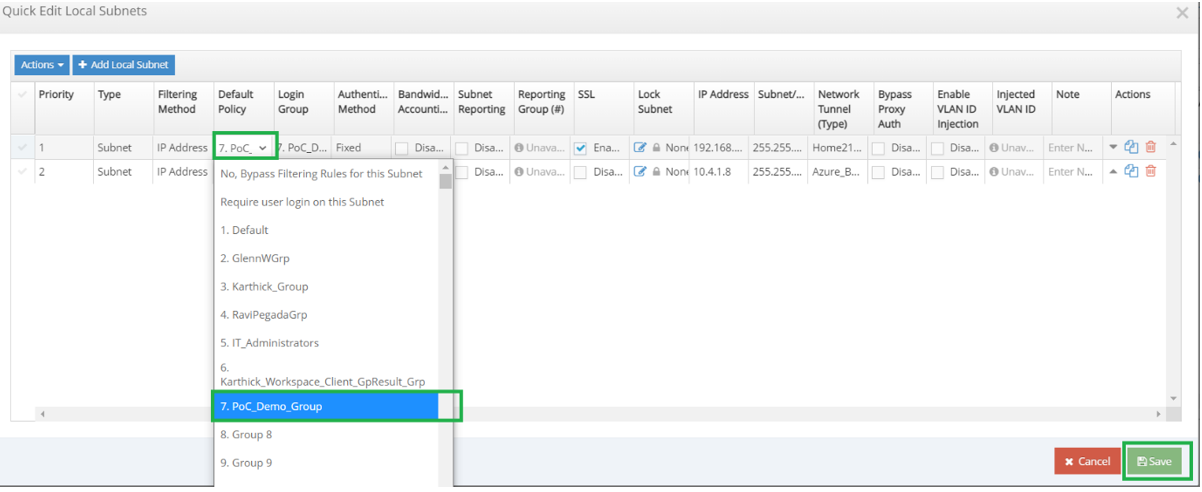
- While in the Quick edit window, double-click Default policy
- Default policy indicates the security group that is applied to ALL the traffic falling under the Local Subnet (with LAN network defined)
- Select “PoC_Demo_Group”
Also, double-click Login Group and select “PoC_Demo_Group”


Root Certificate
Installing the Citrix SIA SSL root certificate on the browser of unmanaged devices is a MUST for SSL decryption. SSL decryption is needed for applying advanced security capabilities like CASB, Malware defense, DLP and so on.
Note: Installation of the ROOT certificate is a MANUAL process or must be performed via GPO (Group policy object) or MDM or the enterprise presenting a splash page determining how to install the root certificate on the initiating devices.
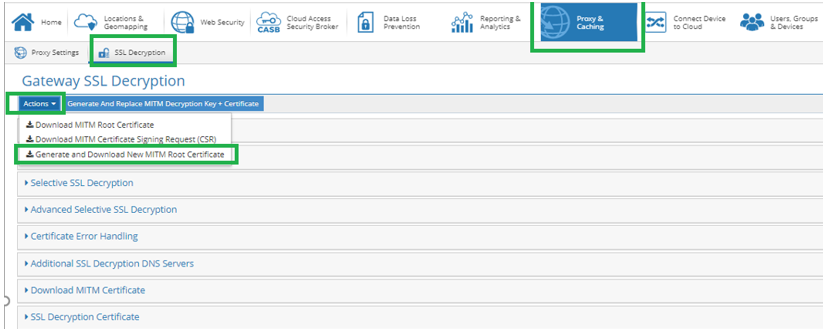
Go toProxy & Caching -> SSL Decryption -> Actions -> Generate and Download New MITM Root Certificate
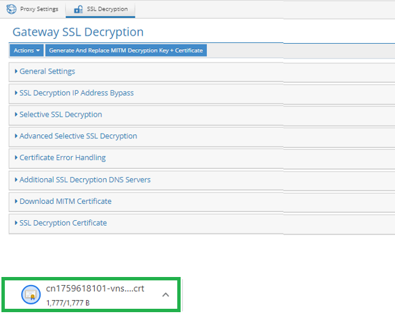
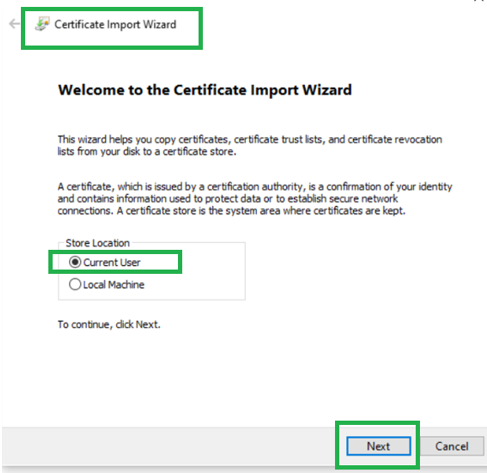
A certificate is downloaded. Click the downloaded New MITM Root Certificate
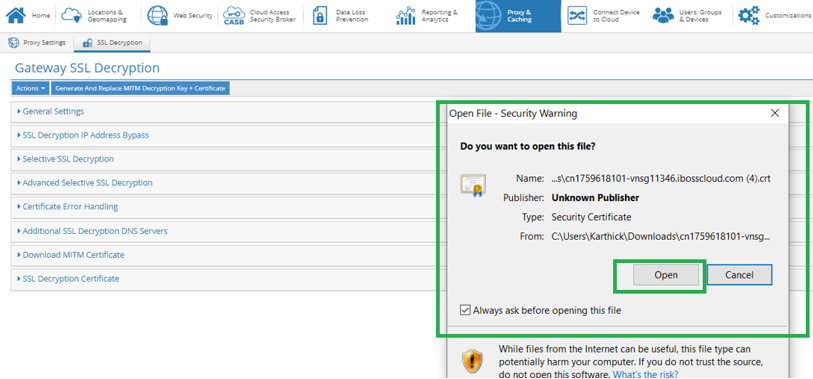
Click “Open” upon the double-click of the certificate
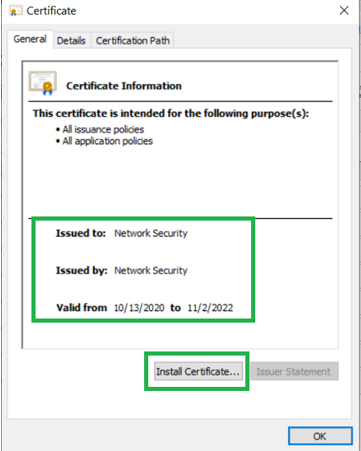
Verify the certificate is issues by “Network Security” and is valid
This takes us to the wizard. UnderStore location, select “Current User” and Click “Next”
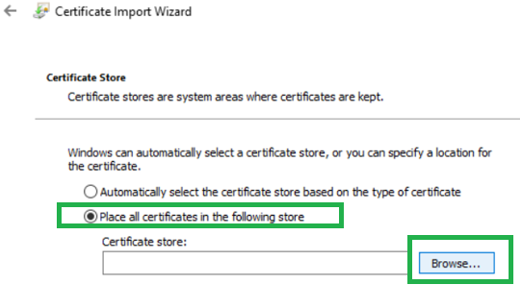
Click “Place all certificates in the following store” and Click “Browse”
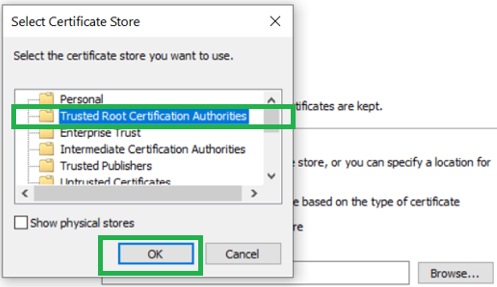
Click “Trusted Root Certification Authorities” and Click “OK”
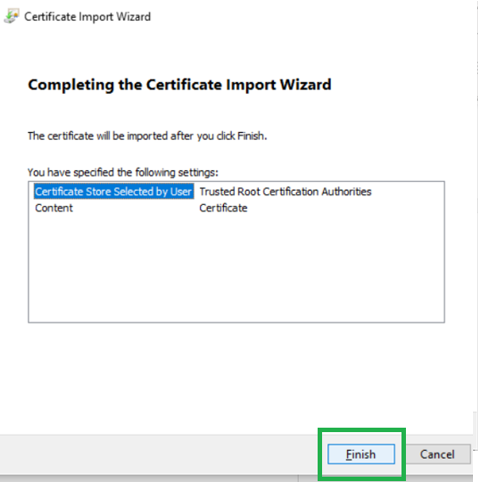
Notice after Step 6; the certificate store gets updated with “Trusted Root Certification Authorities” Click “Next”
Click “Finish”
Notice that a window pops up indicating that the import was successful. Click OK for the popped-up window and then Click “OK” in the certificate install window
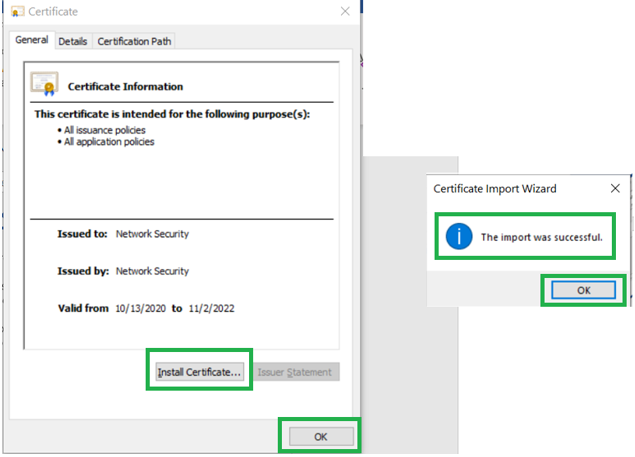
Once installed, confirm that a certificate by Issuer “Network Security” is present in Trusted Root Certification Authorities.


In Windows : Search for certmgr in the search box and you can open the certificate manager
- Navigate and Click Trusted Root Certification Authorities
- Click Certificates
- Verify a certificate by name “Network Security” (Highlighted)
If the certificate is found, then the installation is successful and the pre-requisites are complete to test SSL decryption via the IPsec tunnel

PoC use-case 3: Unmanaged Endpoints without SIA Agent + Citrix SD-WAN with SSL encryption
In this use-case, we will use the Citrix SIA IPsec tunnel with SSL decryption and exercise Advanced security features from the Citrix SIA cloud like CASB, Malware Defense, DLP and so on.
Citrix SIA IPsec tunnel allows for unmanaged devices like BYOD, Personal and Guest devices to be managed securely behind a branch SD-WAN. The devices with the agent bypass the tunnel and get enforced of policies.
Recommended Best Practice: It is a recommended best practice that the in case where there are no Cloud Connector agents in devices, a branch managed by Citrix SD-WAN uses the IPsec tunnel to manage the security policies for those devices securely with the Citrix SIA platform.
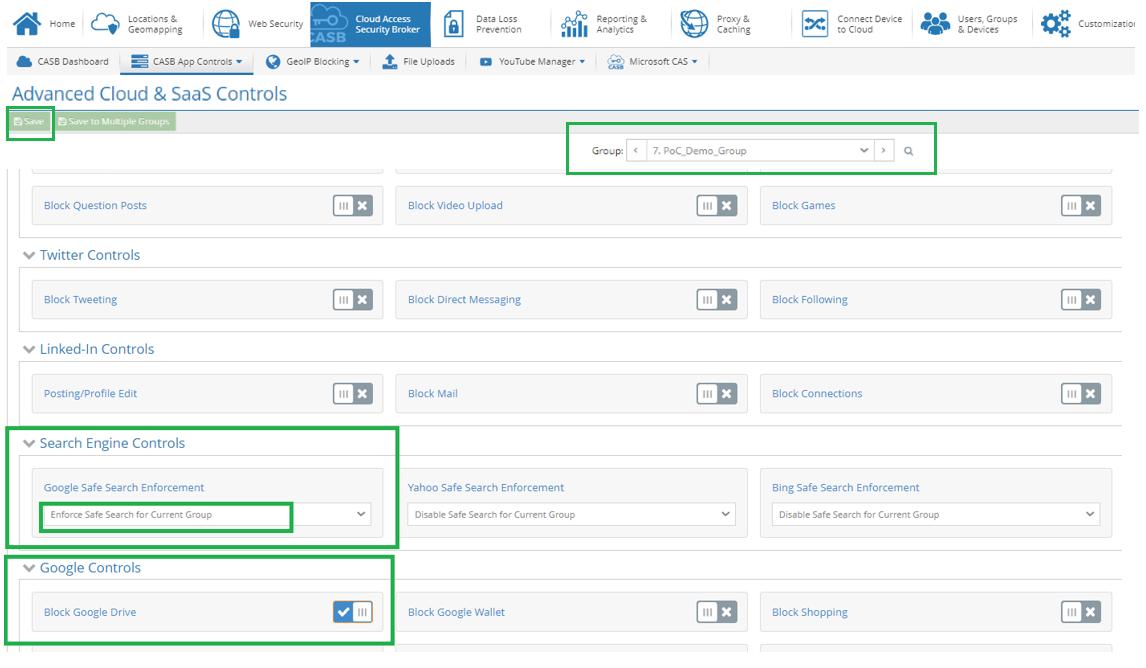
CASB – Policy Configuration
We create a CASB rule to enable safe search on the Google Browser and also disable gmail.com access
- Go toCASB - > CASB应用控制- >云应用控制
- Select Group as “PoC_Demo_Group”
- UnderSearch Engine Controls -> Google Safe Search Enforcement
- 选择“强制安全搜索当前组”
- Under Google Controls
- Enable Block Google Drive
Click “SAVE”
CASB - Verification
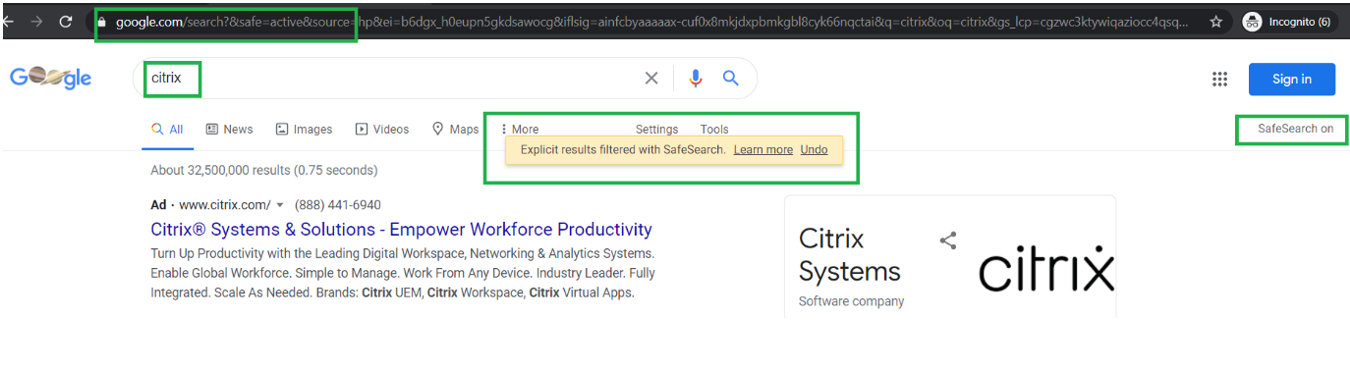
Google Browser Safe Search enablement
- Access google.com in an incognito browser tab
- Soon as we access, we get google.com with a search bar
- Enter Citrix or any keyword and initiate search
We see that the search results are filtered as the safe search is ON and is indicated as soon as the keyword is entered in the engine
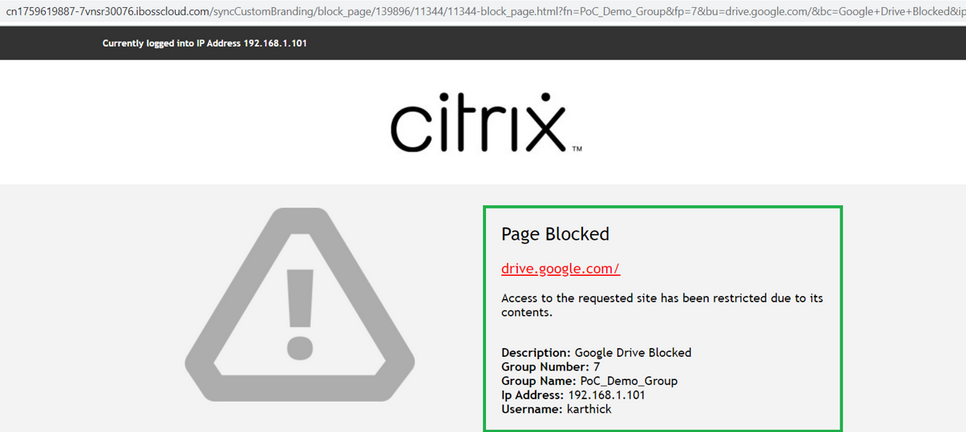
Google Drive Blocking control
- Access drive.google.com in an incognito browser tab
Soon as we access, we get a splash page indicating the access to the Google Drive is blocked due to the CASB control exercised in the PoC_Demo_Group Security Group
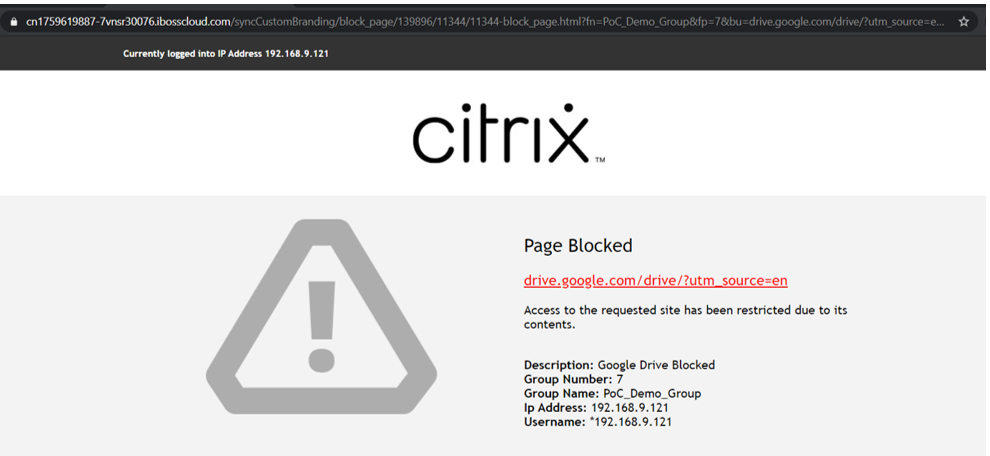
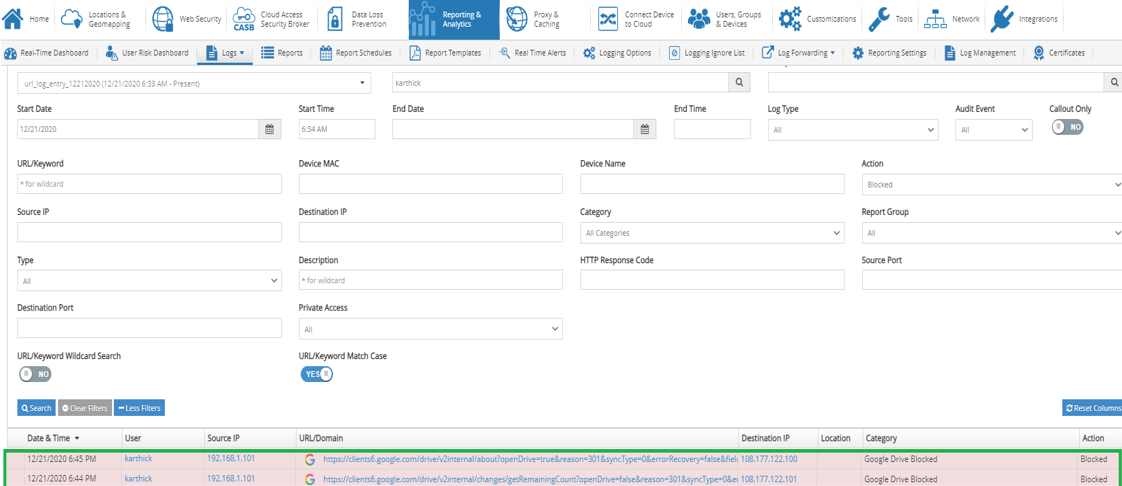
- The reporter event logs also indicate access to Google Drive blocked
Category states “Google Drive Blocked” as it comes from CASB controls


Anti Malware - Configuration
Note: SSL Decryption must be enabled (If Cloud connector is used and configured to auto install the root certificate as part of agent installation and this feature is be enabled by default)
- Goto Web Security -> Malware Defense -> Cloud Malware Protection
- The Content engine must be ready
Click Block on Scan error to be Enabled

Anti Malware - Verification
- Accesshttps://www.eicar.org/?page_id=3950
Scroll down and click download the 68 byte file
Verification
Once the file download is initiated, a splash screen pops up. The page is blocked due to Virus detection.
Reporter also indicates the Malware protection enforced


DLP - Configuration
Data Loss Prevention Configuration
- Click Data Loss Prevention Tab -> DLP Settings
- Click “Yes” for content analysis and data loss prevention
- Ensure that that DLP Content and Analysis engine is ready and config is done appropriately
For the PoC, allow default selection for Content Engines and Analysis engines
- Create a DLP rule so that Data Loss Prevention can be enforced on unauthorized content upload/download/both
- Go to Data Loss Prevention tab
- Click DLP Rules
- Click “+Add Rule”
- Under General Information Tab:
- Ensure Rule Enabled is “YES”
- Provide a name for the rule
- Enable HTTP Methods of PUT and POST so we can enforce DLP on uploads
- Leave content engines default
- Under DLP tabs from Network Sources till Content Types
- Choose the policy as “Include All except selected items”
- Allow Defaults in the Search Criteria tab
- Select Action as “BLOCK”
DLP - Verification
- Gotohttps://dlptest.com(a site to verify Data Loss Prevention tests)
- Click Sample Data and view some sample information
Click XLS File (This downloads the file)
See the file gets downloaded with the name “sample-data.xls” under Downloads folder (or folder you have selected)
- Now open a new browser incognito tab and typehttps://dataleaktest.com
- Click Upload Test
- In the Upload test page, scroll down and Click “SSL ON”
- After clicking on SSL ON, you can see the message on the black screen “System Ready for Next DLP Test with SSL ON”
- Now Click Browse
- Select the file we previously downloaded file sample-data.xls and UPLOAD
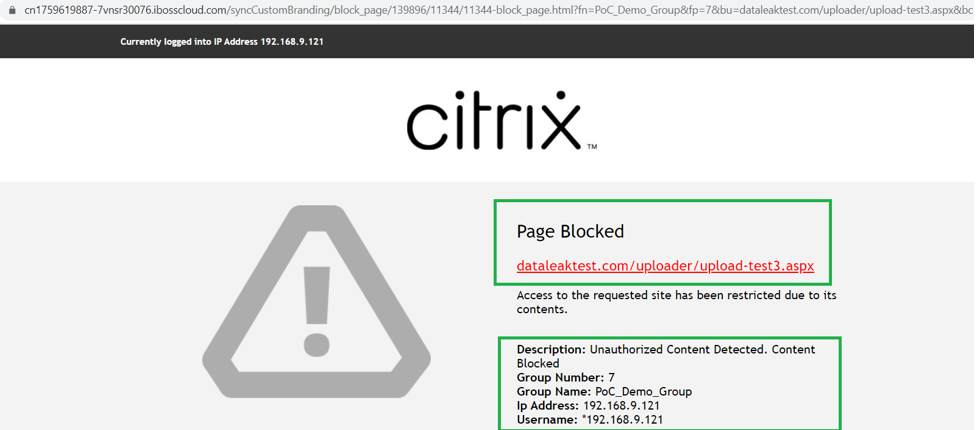
On uploading the sensitive file (containing SSN), a splash screen pops up. The page is blocked due to Unauthorized content detection.

Verify Reporter Logs for DLP events:
- Click More Filters
- Choose log Type as DLP and click “Search”
The DLP upload gets blocked and a splash page is presented to the user

Summary
In this Proof-of-Concept guide, you learned how to integrate an organization’s edge SD-WAN devices with Citrix SIA Cloud. Together Citrix SD-WAN and Citrix SIA provide Enterprises with performance improvements and security benefits along with a great user experience.
In this article
- Overview
- Scope
- Benefits
- Citrix SD-WAN + SIA Overall Topology
- Citrix SD-WAN + SIA Integration Use cases
- PoC Prerequisites
- Citrix SD-WAN 110/210 Configuration
- Citrix SD-WAN IPsec Tunnel
- Tunnel verification
- PoC use-case 1 - SIA Agent + Citrix SD-WAN in a branch
- SIA Agent uninstall
- PoC use-case 2: Unmanaged Endpoints without SIA Agent + Citrix SD-WAN
- IPsec tunnel SSL decryption
- PoC use-case 3: Unmanaged Endpoints without SIA Agent + Citrix SD-WAN with SSL encryption
- Summary