
Support for Azure Key Vault
The Citrix ADC appliance integrates with external HSMs (SafeNet and Thales) for on-premises deployments. For cloud deployments, the ADC appliance integrates with Azure Key Vault. The appliance stores its private keys in the Key Vault for ease of management and security of the private key in the public cloud domain. You no longer have to store and manage keys in different locations for ADC appliances deployed across multiple data centers and cloud providers.
Using ADC with the Azure Key Vault Premium pricing tier, which provided HSM backed keys, provides FIPS 140-2 level 2 compliance.
Azure Key Vault is a standard offering from Microsoft. For more information about Azure Key Vault, see the Microsoft Azure documentation.
Note:The Citrix ADC integration with Azure Key Vault is supported with the TLS 1.3 protocol.
Architecture overview
Azure Key Vault is a service for storing secrets securely in the Azure cloud. By storing your keys in the Azure Key Vault, you reduce the chances of keys being stolen. Once the Key Vault is set up, you can store your keys in it. Configure virtual servers on the ADC appliance to perform private key operations in the Key Vault. The ADC appliance accesses the key for each SSL handshake.
The following diagram illustrates the process to get an access token from the Azure Active Directory after authentication. This token is used with REST API calls for crypto operations using private keys.

The following diagram shows a typical RSA handshake. The client key exchange (CKE) message that is encrypted using the public key is decrypted using the private key stored in the Key Vault.

In an ECDHE handshake, the server key exchange (SKE) message sent by the Citrix ADC appliance is signed by using the private key stored in the Key Vault.
Prerequisites
You must have an Azure subscription.
(可选)在Linux机器上安装Azure CLI。For instructions, see the Azure documentationhttps://docs.microsoft.com/en-us/cli/azure/install-azure-cli-apt?view=azure-cli-latest.
Complete the configuration on the Azure portal before configuring entities on the ADC appliance.
Configure the ADC Azure Key Vault integration
First perform the configuration on the Azure portal followed by the configuration on the ADC appliance.
Perform the following steps on the Azure portal
The following flowchart shows the high-level flow for configuration required on the Azure portal.

- Create app and service principal in Azure Active Directory.
- Create Key Vault in a resource group.
- Configure the app and service principal to perform sign and decrypt operations on the Key Vault.
Create keys in the Key Vault using one of the following ways:
- By importing a key file.
- By generating a certificate.
For information about the commands to configure the preceding steps, see the Azure documentation athttps://docs.microsoft.com/en-us/azure/active-directory/develop/app-objects-and-service-principals.
Perform the following steps on the ADC appliance
The following flowchart shows the high-level flow for configuration required on the ADC appliance.

- Configure a DNS server.
- Configure root certificates to verify the certificates presented by Azure.
- 创建一个Azure应用程序。
- Create an Azure Key Vault entity.
- Create an HSM key.
- Create a certificate-key pair.
- Bind the certificate-key pair to a virtual server.
Configure a DNS server
A DNS server is required for the name resolution of Key Vault host and Azure Active Directory end point.
To configure a DNS server by using the CLI
At the command prompt, type:
add dns nameserver Example:
add dns nameserver 192.0.2.150 To configure a DNS server by using the GUI
Navigate toTraffic Management > DNS > Name Servers. ClickAdd.

- Enter values for the following parameters:
- IP Address - IP address of an external name server or, if the Local parameter is set, IP address of a local DNS server (LDNS).
- Protocol - Protocol used by the name server. UDP_TCP is not valid if the name server is a DNS virtual server configured on the appliance.

- ClickCreate.


Add and bind a root certificate
Download the root certificates of the certificate presented by Azure Key Vaulthttps://and Azure Active Directory (AAD)https://login.microsoftonline.comand load it on the ADC appliance. These certificates are required to validate the certificate presented by Azure Key Vault and AAD. Bind one or more certificates to the CA certificate groupns_callout_certs.
To add a root certificate by using the CLI
At the command prompt, type:
add ssl certkey -cert bind ssl caCertGroup Example:In the following example, the root certificate presented by Azure Key Vault and AAD is the same.
add ssl certKey rootcert -cert RootCyberTrustRoot.crt bind ssl cacertGroup ns_callout_certs rootcert To add a root certificate by using the GUI
Navigate toTraffic Management > SSL > Certificates > CA Certificates.
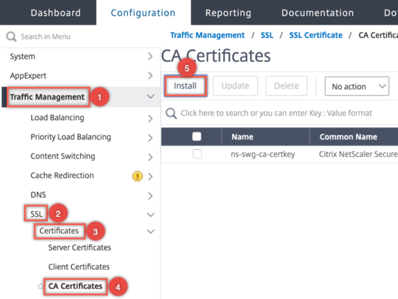
- Enter values for the following parameters:
- Certificate-key pair name
- Certificate file name
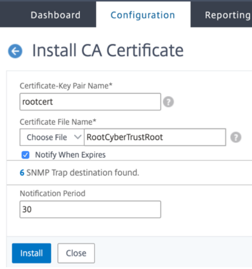
ClickInstall.
Navigate toTraffic Management > SSL > CA Certificates Group.
Selectns_callout_certsand clickShow Bindings.

ClickBind.
Select the CA certificate created earlier and clickSelect.
- ClickBind, and then clickClose.


Configure an Azure application
The Azure application entity contains the credentials required to authenticate to Azure Active Directory and obtain the access token. That is, to get authorization access to Key Vault resources and APIs, add the Azure Application ID, secret (password) and tenant ID on the ADC appliance.
When configuring the Azure Application entity using the CLI, you must enter the password. If you use the GUI, the Azure application entity contains the credentials required to authenticate to Azure Active Directory and obtain the access token.
To configure an Azure application by using the CLI
From release 13.0-61.x, a parameter, vaultResource, is added to theadd azure applicationcommand to get the domain of the resource group before the access token is granted to the application. This parameter is added because the domain name might be different for different regions. For example, the domain might bevault.azure.netorvault.usgov.net.
At the command prompt, type:
add azure application -clientID -clientSecret -tenantID -vaultResource [-tokenEndpoint ] show azure application Example:
add azure application app10 -clientiD 12345t23aaa5 -clientsecret csHzOoEzmuY= -vaultResource example.vault.azure.net -tenantID 33583ee9ca5b Done > sh azure application app10 1) Name: app10 ClientID: 12345t23aaa5 TokenEndpoint: "https://login.microsoftonline.com/33583ee9ca5b/" TenantID: 33583ee9ca5b VaultResource: example.vault.azure.net Done To configure an Azure application by using the GUI
Navigate toTraffic Management > SSL > Azure > Application.

In the details pane, clickAdd.
Enter values for the following parameters:
- Name – Name for the application object on the Citrix ADC appliance.
- Client ID – Application ID that is generated when an application is created in Azure Active Directory using either the Azure CLI or the Azure portal (GUI).
- Client Secret – Password for the application configured in Azure Active Directory. The password is specified in the Azure CLI or generated in the Azure portal (GUI).
- Tenant ID – ID of the directory inside Azure Active Directory in which the application was created.
- Vault Resource - Vault resource for which access token is granted. Example
vault.azure.net. - Token End point – URL from where the access token can be obtained. If the token end point is not specified, the default value is
https://login.microsoftonline.com/.


Configure Azure Key Vault
Create an Azure Key Vault object on the ADC appliance.
To configure Azure Key Vault by using the CLI
At the command prompt, type:
add azure keyVault -azureVaultName -azureApplication show azure keyvault Example:
add azure keyvault kv1 -azureapplication app10 -azurevaultName pctest.vault.azure.net > sh azure keyVault 1) Name: kv1 AzureVaultName: pctest.vault.azure.net AzureApplication: app10 State: "Access token obtained" Done The following table lists the different values that the state of the Azure Key Vault can take along with a brief description about each state.
| State | Description |
|---|---|
Created |
Initial state of the Key Vault object. Authentication has not been attempted. |
Could not reach token end point |
Indicates one of the following: DNS server not configured, issuer certificate not bound to a CA certificate group, or network issues. |
Authorization failed |
Incorrect application credentials. |
Token parse error |
Response from Azure Active Directory is not in the expected format. |
Access token obtained |
Successfully authenticated by Azure Active Directory. |
To configure the Azure Key Vault by using the GUI
Navigate toTraffic Management > SSL > Azure > Key Vault.

Enter values for the following parameters:
- Name - Name for the Key Vault.
- Azure Key Vault Name - Name of the Key Vault configured in Azure cloud using either the Azure CLI or the Azure portal (GUI) with domain name.
- Azure Application Name - Name of the Azure Application object created on the ADC appliance. The Azure Application object with this name is used for authentication with Azure Active Directory.


Add HSM key
Storing your private key in the HSM provides FIPS 140-2 level 2 compliance.
To add an HSM key by using the CLI
At the command prompt, type:
add ssl hsmKey [-hsmType ] [-key | -serialNum ] {-password } [-keystore ] Example:
add ssl hsmKey h1 -keystore kv1 -key san15key -hsmType KEYVAULT > sh ssl hsmKey h1 HSM Key Name: h1 Type: KEYVAULT Key: san15key Key store: kv1 State: “Created” Done The following table lists the different values that the state of an HSM key can take along with a brief description about each state.
| State | Description |
|---|---|
| Created | The HSM key is added on the ADC appliance. A key operation is not yet attempted. |
| Access token unavailable | Access token not available when key operation was attempted. |
| Unauthorized | Configured Azure application does not have permission to perform the key operation. |
| Does not exist | The key does not exist in the Azure Key Vault. |
| Unreachable | The Key Vault host is not reachable on the network. |
| Marked down | The HSM key is marked DOWN on the ADC appliance due to threshold errors during key operation. |
| Key operations successful | Success response received from the Key Vault for key operation. |
| Key operations failed | Failure response received from Key Vault for key operation. |
| Key operation throttled | The key operation request is throttled by the Key Vault. |
To add an HSM key by using the GUI
Navigate toTraffic Management > SSL > HSM.

Enter values for the following parameters.
- HSM key name - Name of the key.
- HSM type - Type of HSM.
- Key store - Name of key store object representing HSM where the key is stored. For example, name of Key Vault object or Azure Key Vault authentication object. Applies only to
KEYVAULTtype HSM.

ClickAdd


Add a certificate-key pair
Add a certificate-key pair using the HSM key created earlier.
To add a certificate-key pair by using the CLI
At the command prompt, type:
add ssl certKey (-cert [-password]) -hsmKey ] show ssl certkey Example:
add ssl certKey serverrsa_2048 -cert /nsconfig/ssl/san_certs/san15.pem -hsmKey h1 > sh ssl certkey serverrsa_2048 Name: serverrsa_2048 Status: Valid, Days to expiration:9483 Version: 3 Serial Number: F5CFF9EF1E246022 Signature Algorithm: sha256WithRSAEncryption Issuer: C=in,O=citrix,CN=ca Validity Not Before: Mar 20 05:42:57 2015 GMT Not After : Mar 12 05:42:57 2045 GMT Certificate Type: "Server Certificate" Subject: C=in,O=citrix Public Key Algorithm: rsaEncryption Public Key size: 2048 Ocsp Response Status: NONE Done To add a certificate-key pair by using the GUI
Navigate toTraffic Management > SSL > Install Certificate (HSM).

Enter values for the following parameters:
- Certificate-Key Pair Name
- Certificate File Name
- HSM Key

ClickInstall.


Bind the certificate-key pair to a virtual server
The certificate used for processing SSL transactions must be bound to the virtual server that receives the SSL data.
To bind the SSL certificate-key pair to a virtual server by using the CLI
At the command prompt, type:
bind ssl vserver -certkeyName show ssl vserver Example:
bind ssl vserver v1 -certkeyName serverrsa_2048 sh ssl vserver v1 Advanced SSL configuration for VServer v1: DH: DISABLED DH Private-Key Exponent Size Limit: DISABLED Ephemeral RSA: ENABLED Refresh Count: 0 Session Reuse: ENABLED Timeout: 120 seconds Cipher Redirect: DISABLED ClearText Port: 0 Client Auth: DISABLED SSL Redirect: DISABLED Non FIPS Ciphers: DISABLED SNI: DISABLED OCSP Stapling: DISABLED HSTS: DISABLED HSTS IncludeSubDomains: NO HSTS Max-Age: 0 HSTS Preload: NO SSLv3: ENABLED TLSv1.0: ENABLED TLSv1.1: ENABLED TLSv1.2: ENABLED TLSv1.3: DISABLED Push Encryption Trigger: Always Send Close-Notify: YES Strict Sig-Digest Check: DISABLED Zero RTT Early Data: DISABLED DHE Key Exchange With PSK: NO Tickets Per Authentication Context: 1 ECC Curve: P_256, P_384, P_224, P_521 1) CertKey Name: serverrsa_2048 Server Certificate 1) Cipher Name: DEFAULT Description: Default cipher list with encryption strength >= 128bit Done To bind an SSL certificate-key pair to a virtual server by using the GUI
Navigate to交通管理> >负载均衡虚拟服务ersand open an SSL virtual server. Click inside the Certificate section.

Click the arrow to select the certificate-key pair.
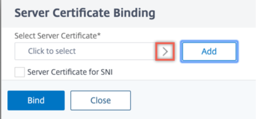
Select the certificate-key pair from the list.

Bind the certificate-key pair to the virtual server.


Limitations
- The number of concurrent calls to the Azure Key Vault for key operations is limited. Performance of the ADC appliance depends on the Key Vault limits. For more information see,Microsoft Azure Key Vault documentation.
- EC keys are not supported.
- EDT and DTLS protocols are not supported.
- ADC appliances with Intel Coleto SSL chips are not supported.
- Clustering and admin partitions are not supported.
- You cannot update the Azure Application entity, the Azure Key Vault object, and the HSM certificate-key pair after you have added them to the ADC appliance.
- A certificate bundle with HSM keys is not supported.
- An error does not appear if the HSM key and certificate do not match. While adding a certificate-key pair, ensure that the HSM key and certificate match.
- You cannot bind an HSM key to a DTLS virtual server.
- You cannot sign OCSP requests using a certificate-key pair that is created using an HSM key.
- You cannot bind a certificate-key pair to an SSL service if the certificate-key pair is created using an HSM key.
FAQ
When integrated with Azure Key Vault, are private keys stored in the ADC appliance memory?
No, private keys are not be stored in ADC appliance memory. For each SSL transaction, the appliance sends a request to Key Vault.
Is the integration FIPS 140-2 level 2 compliant?
Yes, the integrated solution provides FIPS 140-2 Level 2 support.
Which key types are supported?
Only RSA key types are supported.
What key sizes are supported?
1024-bit, 2048-bit, and 4096-bit RSA keys are supported.
Which ciphers are supported?
All ciphers supported on the ADC appliance, including TLSv1.3 ciphers with ECDHE and SHA256 are supported.
Are transactions logged?
The ADC appliance logs each transaction it makes with the Key Vault. Details such as, time, vault IP address, port, success or failure of connection, and errors are logged. The following is a sample SSL log output.
4月9日16:35:30 < local0.debug > 10.102.57.30 04/09/2019:16:35:30 GMT 0-PPE-0 : default SSLLOG SSL_HANDSHAKE_SUCCESS 896 0 : Backend SPCBId 30894 - ServerIP 104.211.224.186 - ServerPort 443 - ProtocolVersion TLSv1.2 - CipherSuite "ECDHE-RSA-AES256-GCM-SHA384 TLSv1.2 Non-Export 256-bit" - Session New - SERVER_AUTHENTICATED -SerialNumber "200005A75B04365827852D630000000005A75B" - SignatureAlgorithm "sha256WithRSAEncryption" - ValidFrom "Mar 17 03:28:42 2019 GMT" - ValidTo "Mar 17 03:28:42 2021 GMT" - HandshakeTime 40 ms Apr 9 16:35:3010.102.57.30 04/09/2019:16:35:30 GMT 0-PPE-0 : default SSLLOG SSL_HANDSHAKE_ISSUERNAME 897 0 : SPCBId 30894 - IssuerName " C=US,ST=Washington,L=Redmond,O=Microsoft Corporation,OU=Microsoft IT,CN=Microsoft IT TLS CA 2" Apr 9 16:35:30 10.102.57.30 04/09/2019:16:35:30 GMT 0-PPE-0 : default SSLLOG SSL_HANDSHAKE_SUBJECTNAME 898 0 : SPCBId 30894 - SubjectName " CN=vault.azure.net"