
Deployment Guide: Citrix SD-WAN with Azure Virtual WAN
Audience
This document is intended for cloud solution architects, network designers, technical professionals, partners, and consultants who are assessing Microsoft Azure Virtual WAN and Citrix SD-WAN solutions. It is also intended for network administrators, Citrix administrators, managed service providers or anyone looking to deploy these solutions.
Overview
This document highlights the advantages offered by Azure Virtual WAN, the benefits of a joint Azure VWAN and Citrix SD-WAN solution, the use-cases they cater to, and corresponding configuration guidance.
Broadly, the deployment guide covers how to:
Establish connectivity in Azure Virtual WAN
Hub-to-Hub connectivity
VNet-to-Hub凝视
Establish connectivity between SD-WAN and Azure VWAN.
Establish cross-region communication using SD-WAN
Configure HA on SD-WAN Expected
Use cases
This document focuses on achieving three use-cases designed to meet an organization’s typical requirements.
Use case # 1:Securely connect to resources deployed in a single Azure region from globally distributed branches.
Use case # 2:On-premises infrastructure securely connecting to resources deployed in different Azure regions.
Use case # 3:Globally distributed branch locations communicating with each other over the Azure backbone.
Azure Virtual WAN: Overview
Azure Virtual WAN (VWAN) is a networking service from Microsoft that provides a high-speed global transit network and enables secure any-to-any connectivity across branches, data-centers, hubs, and users. It supports site-to-site VPN (branch-to-Azure), user VPN (Point-to-Site), and ExpressRoute connectivity. It automatesHub-to-VNetconnectivity (between the VNet/workload virtual network and the Hub). Customers can also use the Azure VWAN to connect branches across regions using the private Azure backbone.

Reference:Azure Virtual WAN traffic paths
Better together: Benefits of a joint Azure VWAN and Citrix SD-WAN Solution
Citrix SD-WAN provides a secure and reliable WAN edge solution that reduces the cost, complexity, and time to connect branch offices to Azure by automating network deployments. It augments the benefits of Azure Virtual WAN by providing a high level of redundancy, automation, monitoring, and control on a global scale, while allowing you to take full advantage of Microsoft’s high-speed global backbone.
Benefit 1: SD-WAN to automate network deployments to connect hundreds of branch offices to Azure hub
Setting up site-to-site VPN tunnels from hundreds of on-premises locations to Azure can be very time consuming and error prone. Citrix SD-WAN’s integration with Azure virtual WAN can speed that process up by orders of magnitude. Citrix SD-WAN Orchestrator provides a single pane of glass management to connect on-premises Citrix SD-WAN appliances to Azure virtual WAN by the virtue of API integration. An alternative architecture is to deploy a Citrix SD-WAN VPX on Azure (instead of using Azure Hubs). This forms a book-ended solution with an on-premises SD-WAN appliance. It can bring benefits to make the network more resilient and improve application-experience for users. Benefits include link bonding and load balancing, subsecond failover owing to industry leading per packet load balancing technology, and selective packet duplication bi-directional QoS The SD-WAN VPX instance approach may be bandwidth limited (that is maximum 2Gbps), in which case the Azure VWAN solution provides higher throughput capabilities.
Benefit 2: SD-WAN to lower WAN Operational Costs
MPLS and ExpressRoute can provide a private, high-speed, and secure channel to connect to the Azure VWAN. However, they are typically expensive solutions, especially when having to consider all the branch sites that would require connectivity to the private intranet. SD-WAN, by aggregating multiple cost-effective connection types (4G/LTE, DSL, Internet, an so on) can help lower WAN operational costs, in addition to providing higher resiliency to connect to Azure resources from the branch. Depending on an enterprise’s security requirements, traffic from one branch may have to be back-hauled to the enterprise-HQ to ensure security-compliance, straining the circuit and leading to added latency. Deploying a virtual Citrix SD-WAN appliance on Azure can provide local internet breakout by processing security policies created with the built-in L2-L7 firewall within the Citrix SD-WAN appliance. This would limit the need to backhaul traffic to the HQ, and hence reduce the egress data charges incurred on metered plans and also help preserve user experience.
Benefit 3: SD-WAN to improve last-mile connectivity
As more workloads move to the cloud, last mile connectivity to-and-from remote offices becomes all the more important. It may not always be possible to provide MPLS or ExpressRoute connectivity to remote branches – over and above purely economic reasons, provisioning MPLS or Express Route network takes time and may not be feasible to implement. An SD-WAN deployment on a remote branch-site can help improve last-mile connectivity experience to Azure by aggregating multiple network links (which can be configured as primary and secondary) and identifying the closest Azure/Microsoft POP. By constantly monitoring the network, SD-WAN can automatically steer traffic from one link to another depending on the link quality, providing an optimal experience to remote-users.
Benefit 4: A book-ended solution to provide network resiliency and optimized WAN experience
While it is possible to connect a branch-office to Azure VWAN through native IPsec, a single IPsec tunnel may be prone to packet loss and link congestion and cannot mitigate the risks of outages. Any network outage can in cases lead to millions of dollars of productivity and revenue losses.
Taking the alternative approach of deploying a Citrix SD-WAN VPX Network Virtual Appliance (NVA) on Azure to form a book-ended solution with an on-premises SD-WAN appliance brings many benefits. These benefits include link bonding and load balancing, subsecond failover, selective packet replication, and bi-directional QoS among others to make the network more resilient and improve application experience for users.
Benefit 5: SD-WAN Orchestrator for enhanced visibility
Citrix SD-WAN orchestrator provides a single pane of glass to manage and track your network health and usage. Orchestrator’s template-based cloning simplifies large-scale deployments of SD-WAN and network expansions, helping scale changes to an entire fleet of branch-offices, and save time. SD-WAN Orchestrator also provides automated on-ramps to Microsoft Azure through point-and-click provisioning of SD-WAN VPX instances in new or existing VNets.
Reference Topology
Azure workloads deployed in a specified region (Ex: Azure VWAN East Hub) can connect to multiple branch locations using Citrix SD-WAN appliances through Internet, or 4G/LTE. Within a Virtual Network (VNet) infrastructure, the SD-WAN Standard Edition VM (SD-WAN VPX) is deployed in Gateway mode.

To achieve the use-cases outlined above, we need to establish connectivity/pairing between the following entities:
SDWAN VPX and Azure VWAN Hub over IPsec tunnels and BGP peering
Azure VWAN Hub and VNets using local and global VNet peering
SD-WAN branch appliances and SD-WAN VPX (on Azure) using Virtual Paths
Of the three, establishing connectivity between the SD-WAN branch appliance and SD-WAN VPX (3) over Citrix SD-WAN’s proprietary virtual path technology is what brings several capabilities. These features include per-packet load balancing, selective packet replication, and bi-directional QoS and provides the benefits of the joint solution. The document below walks you through the steps needed to set up Azure Virtual WAN and deploy an SD-WAN virtual appliance alongside.
Azure Provisioning & Networking
Before deploying Azure Virtual WAN from the Orchestrator, ensure that the resources related to Azure Virtual WAN have been provisioned, and that the network design has been finalized. This simplifies configuring Azure Virtual WAN from the SD-WAN Orchestrator management console.
This is a flowchart of how you can go about creating resources related to Azure Virtual WAN.

Notethat while we have followed this flow, you can create VNet’s before creating resource groups. Here’s a summary of the steps undertaken while building this topology. Each step is covered in detail in subsequent sections.
Summary of steps
- Create Resource Groups
Create a VNet each for East and West region (for the topology discussed above)
- Same would be applicable for any number of VNet’s in different regions, per the topology in Azure
- Create Azure Virtual WAN resource
- Create Azure Virtual WAN Hubs governing the East and West regions (with inherent Hub to Hub connectivity within the single Virtual WAN.
- Create Hub in the East region.
- Create Hub in the West region.
- Peer the VNet’s of East and West regions (created in step2) with their respective Hubs.
- For instance, a VNet in the East region will Peer with the Hub in the East region, so that it gets visibility to the SD-WAN subnets (that connect from on-premises to SD-WAN VPX in the Azure which eventually connects to the Hub providing the subnets via BGP)
Create Resource Groups
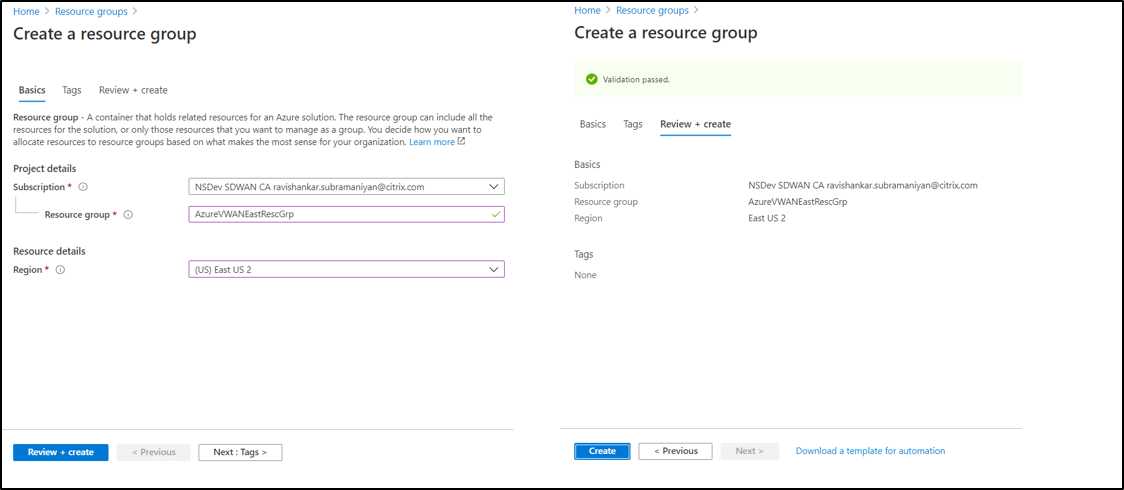
1. Create Resource Group in East region
- Create a Resource Group for the region. In this architecture, we have named it AzureVWANEastRescGrp.
- Make sure to select the region as US East (for the East region workloads/VNet’s). You can choose to provision it in any region per your topology.
Review and Create the resource group.

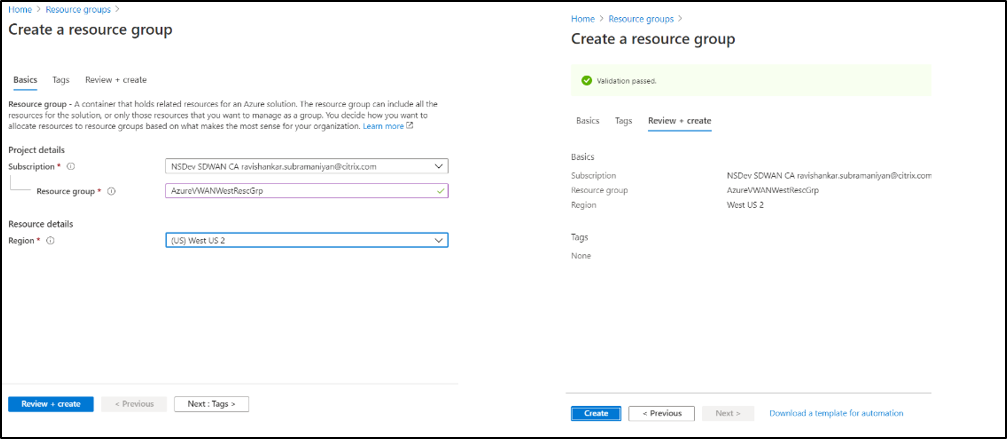
2.Create Resource Group in West region
- Create a Resource Group with a name. In this architecture we have used AzureVWANWestRescGrp.
- Make sure to select the region as US West (for the West region workloads/VNet’s).
Review and Create the resource group.

Create a VNet each in the East and West regions (per the reference topology)
You may follow thislinkto create VNet’s for the regions.
Create Azure Virtual WAN resources
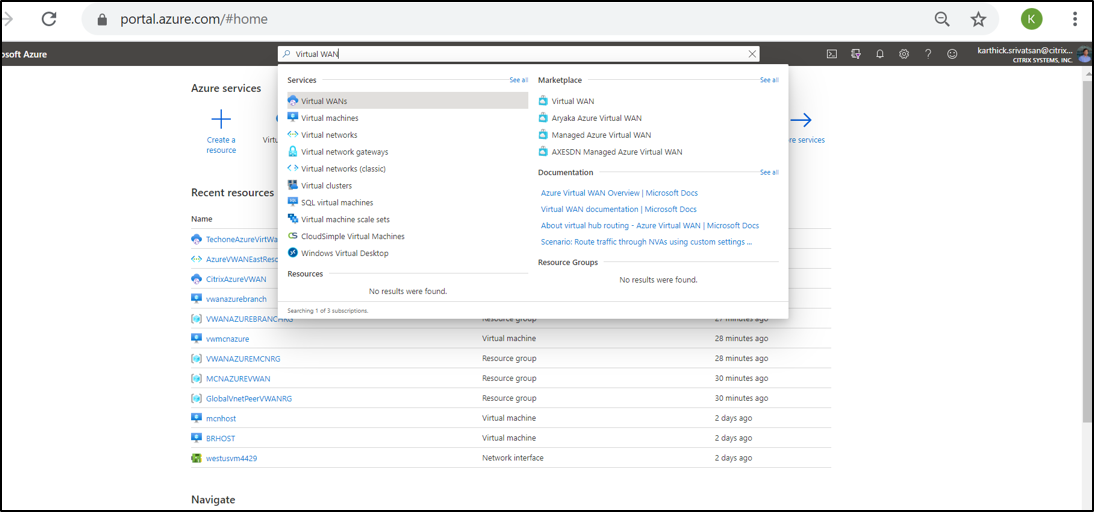
Search for Virtual WAN in the Azure search bar and clickVirtual WANs.
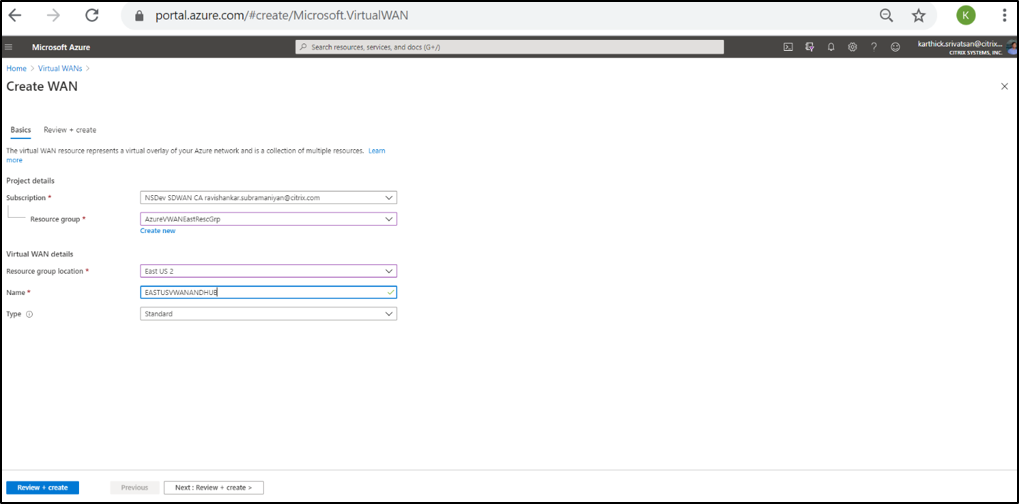
Click‘+Add’to add a new Virtual WAN

Start filling out the basic details of Azure Virtual WAN
- We have selected the East Resource group created at the start of the document, named
AzureVWANEastRescGrp - Select location as US East (per the topology above)
- Provide a name to the Azure Virtual WAN resource being created. In this document we’ve named it
EastUSVWANANDHub
Note: Select the SKU as “STANDARD” to ensure the ability to achieve hub to hub communication across regions. However, if you don’t require inter-hub communication capabilities, you may choose the “BASIC” SKU.
- We have selected the East Resource group created at the start of the document, named
When the validation passes, click Create

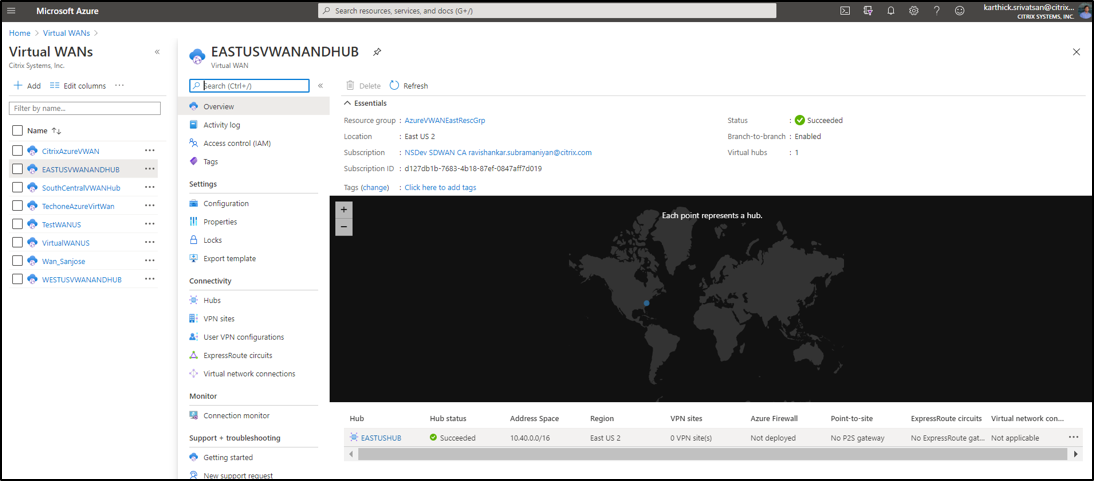
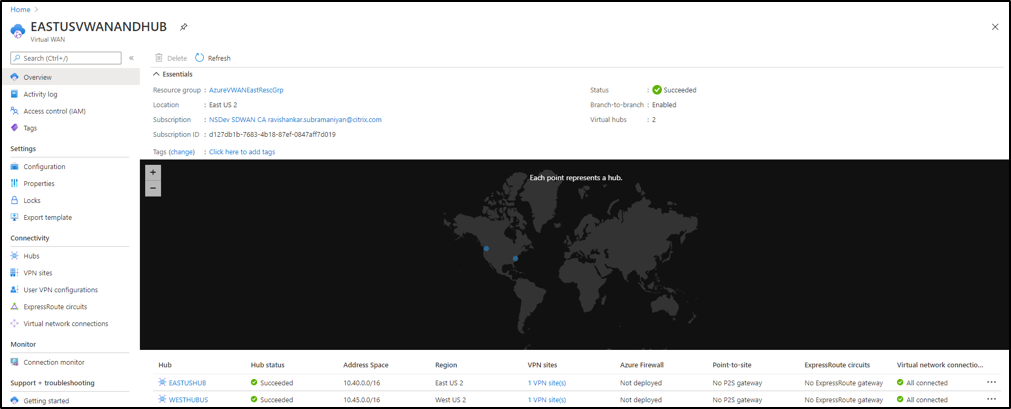
Once the resource gets created, you can find it in the Azure Virtual WAN’s global section.
As you see below, we see “EastUSVWANANDHub” listed with resource group as AzureVWANEastRescGrp and location as East US2.
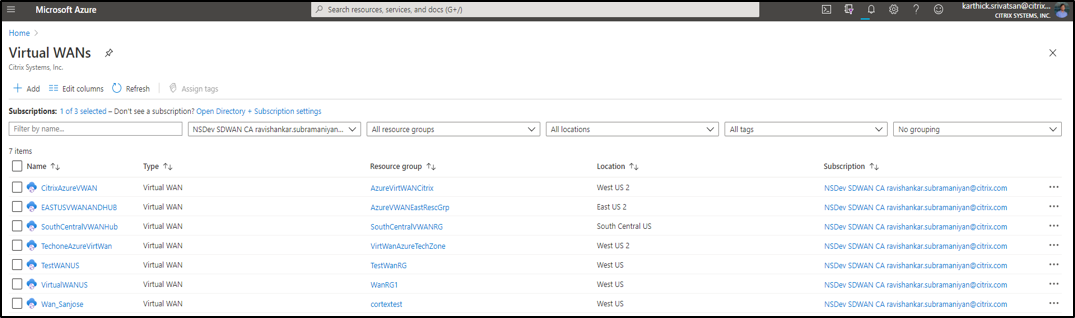


Note: While the Azure Virtual WAN Resource has been deployed in the East resource group in the East US 2 region, you may choose to deploy it in just about any region/resource group per your network topology.
Create Azure VWAN Hubs in each region
1. Azure Virtual WAN Hub creation for East region
Select the Virtual WAN Resource created in the previous step –“EastUSVWANANDHub”
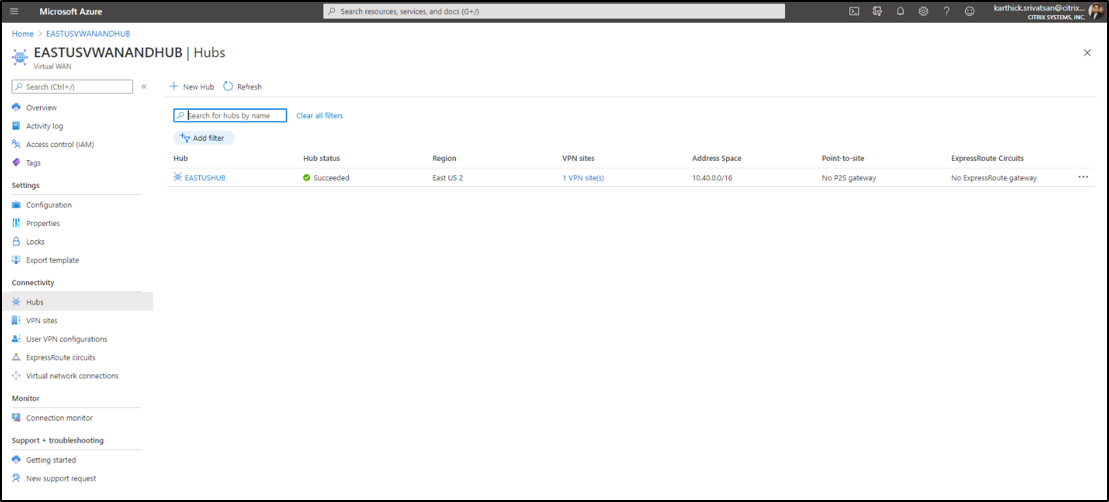
Inside the Virtual WAN resource, you will find “Hubs” under Connectivity section.
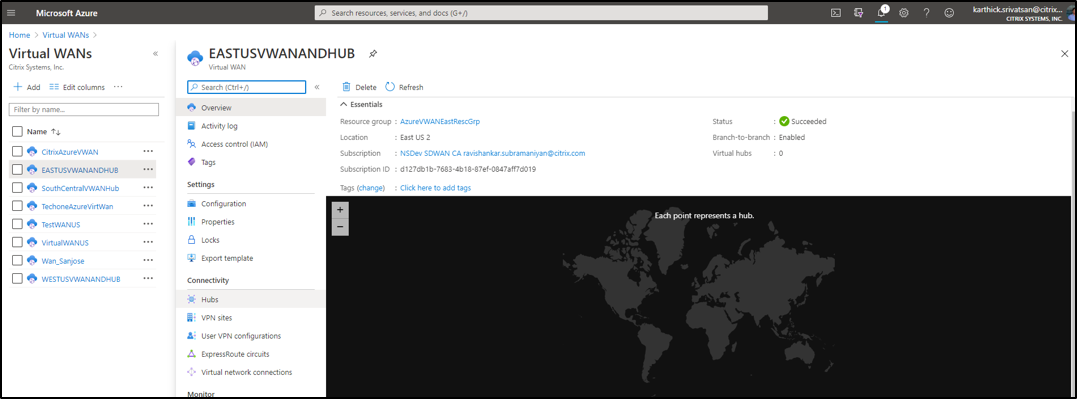
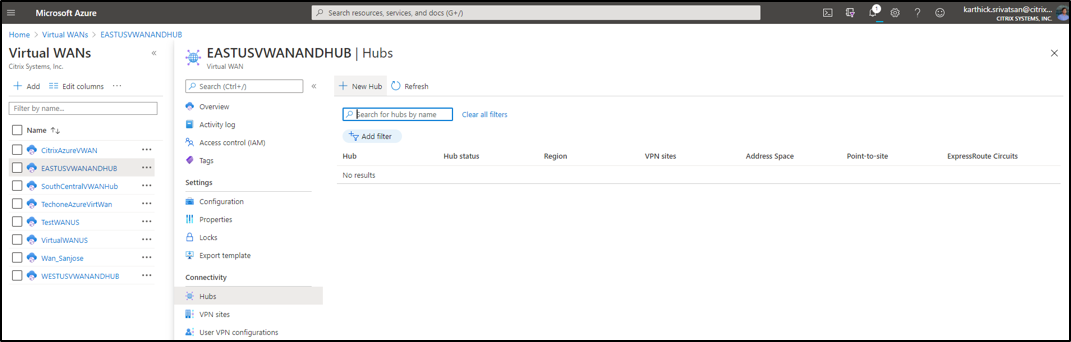
ClickHubsand you will now be able to ADD a new Hub
Click“+ New Hub”in the Hubs section and it will open a new configuration pane
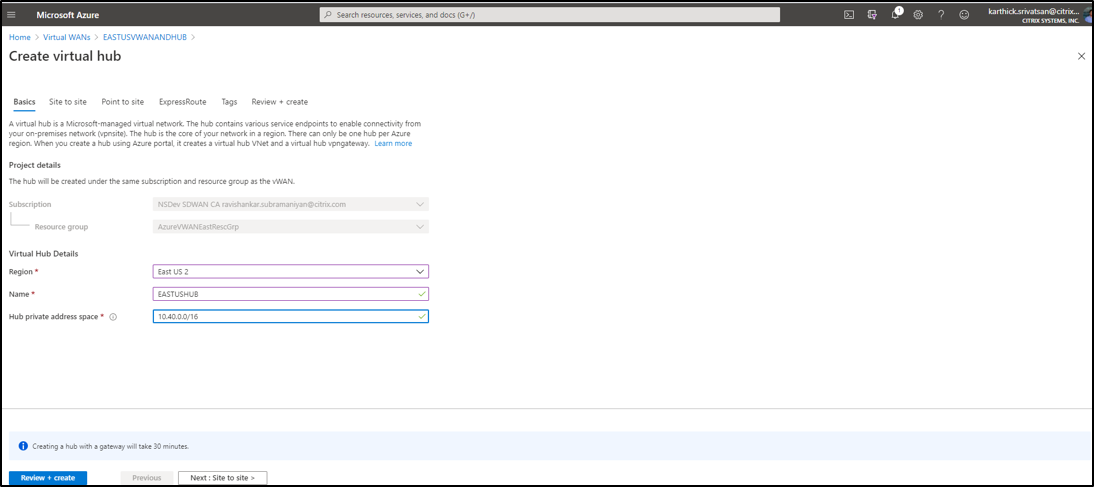
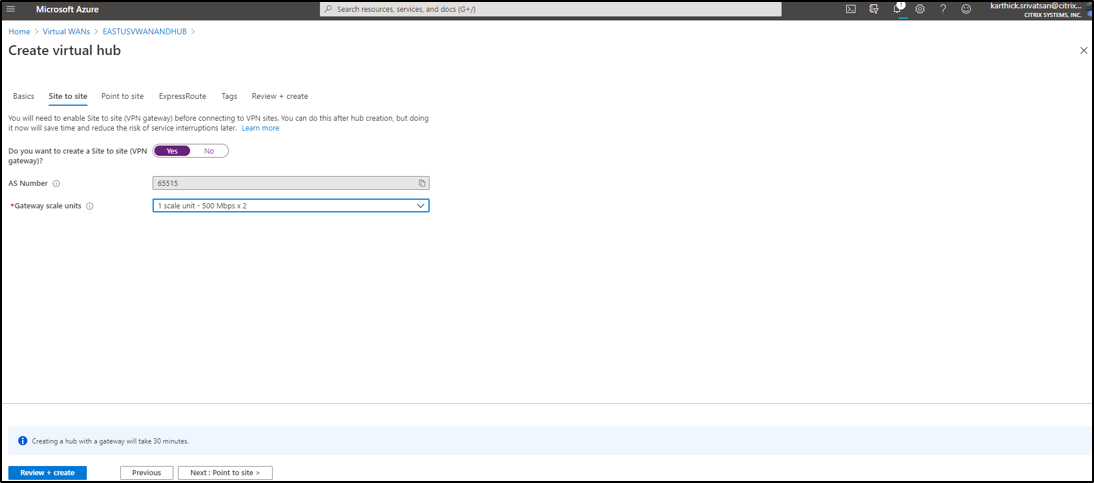
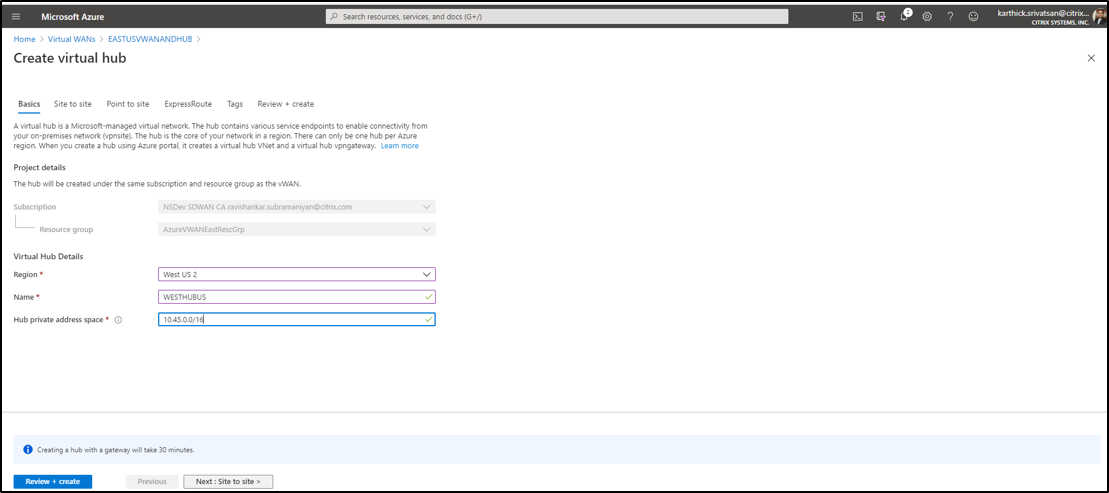
Enter the Basic details
- Select the region you want the Hub to be created in.
- In this case, the region is US East 2 (Hub will be created in this region)
- Give the hub a name. In this case, it is “EastUSHub”
- Provide a unique address space for this Hub that does not overlap or is redundant with any other subnets in this resource group
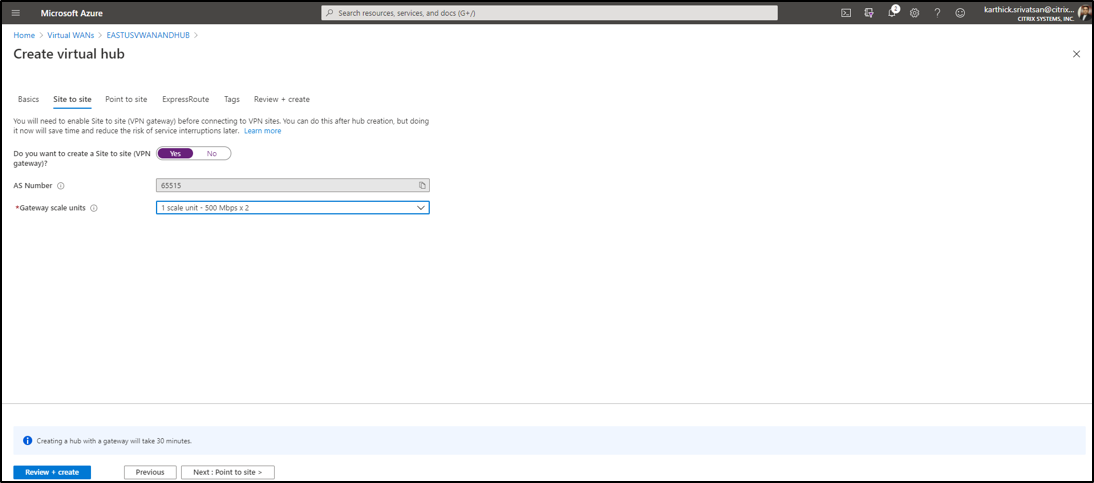
- MOST Important step is to configure the “Site to Site” section.
- Select “Yes” for Do you want to create a site to site.
- The ASN is automatically populated and for this Hub it will be 65515.
- Choose the Gateway Scale Units as per your need.
- In this case, it is selected as 1 Scale Unit – 500 Mbps x 2
Note: Leave every other section as Default
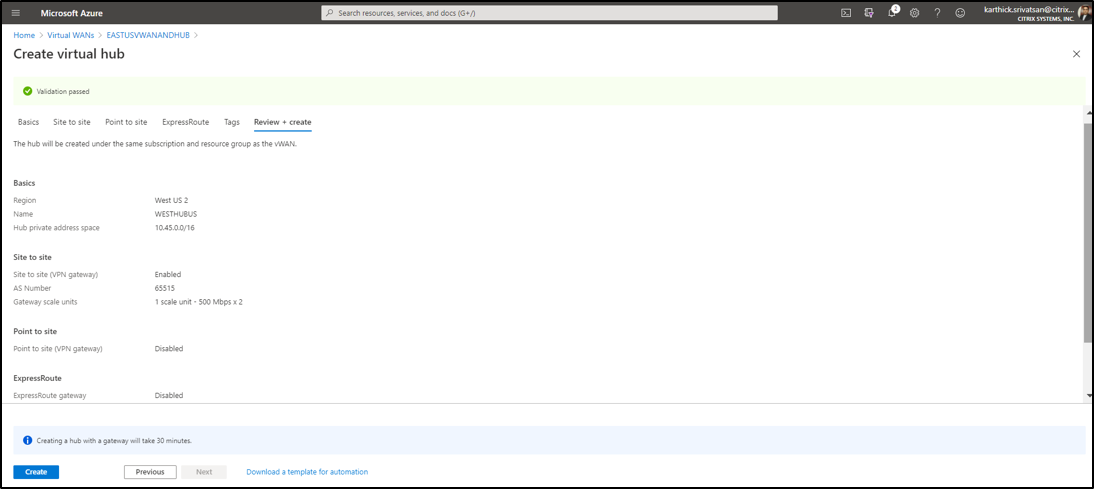
- Click“Review and Create”to create the Azure Virtual WAN Hub in the East region.
- The hub creation process may take up to 30 minutes to complete.
- After the resource gets created, in the Hub section under Virtual WAN, you will see a new entry under the Geo map, with the name of the Hub we created.
- The Hub Status reflects as “Succeeded”.
- Address space must be as we configured.
- Since there are No VPN sites still connected, the count is ‘0’. We will connect the VPN sites in subsequent steps.
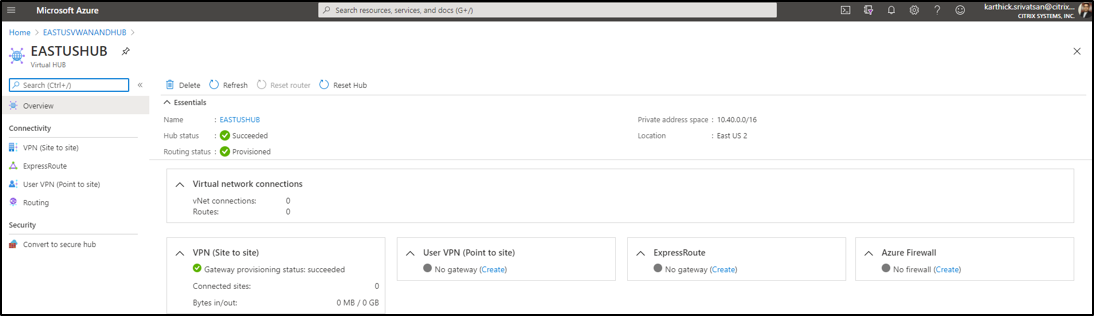
- Click theEastUSHublink under the Geo map, and verify the attributes below:
- Routing Status – Provisioned
- Hub Status – Succeeded
- 位置- - - - - -East US2
- VPN Gateway Provisioning status – Succeeded


2.Azure Virtual WAN Hub creation for West region
Inside the Virtual WAN resource EastUSVWANANDHub (where we initially provisioned our East US Hub), you will find “Hubs” under Connectivity section.
ClickHubsto add a new hub.
- Enter the Basic details
- Select the region you want the Hub to be created in.
- In this case, the region is US West 2 (the hub will be created in this region)
- Give the hub a name. In this case, it is “WestHubUS”. Provide a unique address space for this Hub that does not overlap or is redundant with any other subnets in this resource group.
- The MOST Important step is to configure the “Site to Site” section.
- Select “Yes” for Do you want to create a site to site (VPN Gateway)
- The ASN is automatically populated and for this Hub it will be 65515
- Choose the Gateway Scale Units as per your choice (Definition of throughput)
- Here, we have selected1 Scale Unit – 500 Mbps x 2.
Note: Leave every other section as default.
- Click“Review and Create”to create the Virtual WAN Hub in the West region.
The hub creation is a time-consuming process and may take somewhere around 30 minutes to finish creation.
After the resource gets created, you can check the status of theWestHubUShub by clicking theWestUSHublink, under the Geo map. It will take you into the Hub’s details section. You can verify the status of the attributes as follows:
- Routing Status – Provisioned
- Hub Status – Succeeded
- 位置- - - - - -West US2
- VPN Gateway Provisioning status – Succeeded


Peer VNet to the Hub
1. Peering the East VNet to the East Hub
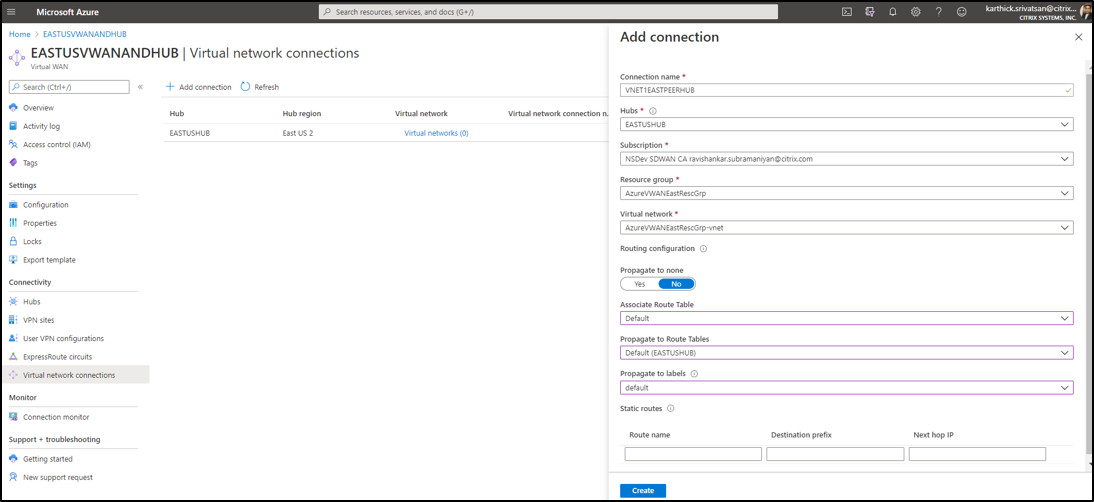
Within the Virtual WAN resource “EastUSVWANANDHub”, click“Virtual Network Connections”and click“+Add connection”.
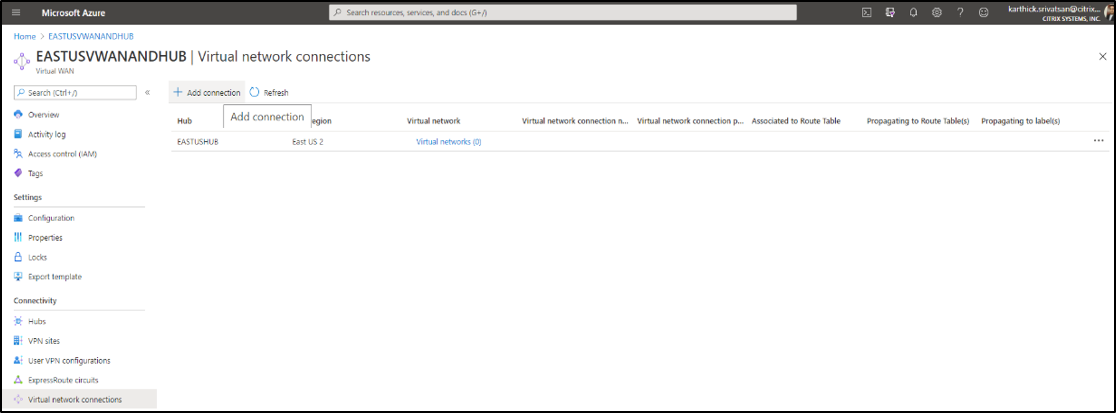

Fill out the details for the connection to peer the VNet1 in East US region to the Virtual Hub
- Connection Name – Name of the Virtual Network Connection – VNet1EastPeerHub
- Hubs – Name of the Hub to peer with – EastUSHub
- Subscription – Ensure to select the subscription as the one you used for creating the Virtual WAN and the Virtual Hub resources
- Resource Group – Will be the resource group of the East region VNet we are trying to peer with the Hub
- Virtual Network – The VNet associated to the East region resource group that we will peer
- Propagate to None – Set it to NO
- Associate Route Table - Select Default
- Propagate to Route Tables – Select Default(EastUSHub) which is the default routing table for East resource VNets
- Leave others as default
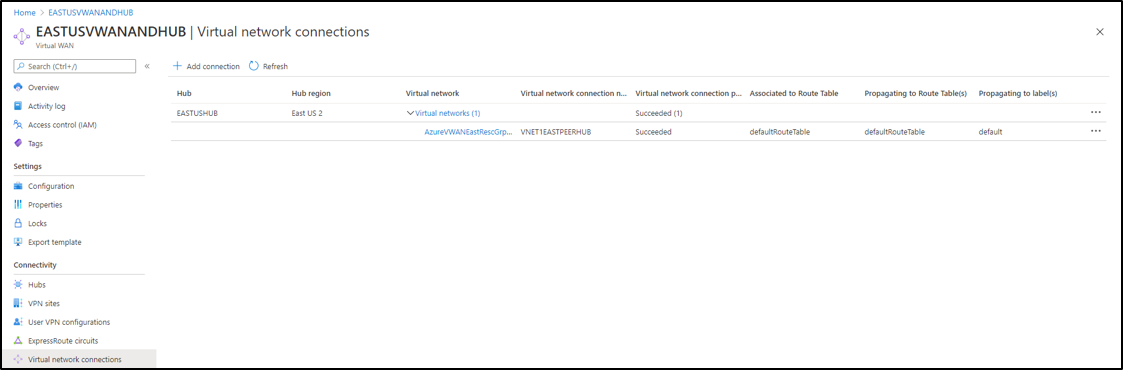
Click“Create”.

Once created, the Virtual Network will resemble the following snapshot. This enables the propagation of the East VNet prefixes to the EastUSHub (Virtual Hub), and allows the EastUSHub to propagate the prefixes that it has (via BGP) to the routing table of the East VNet.

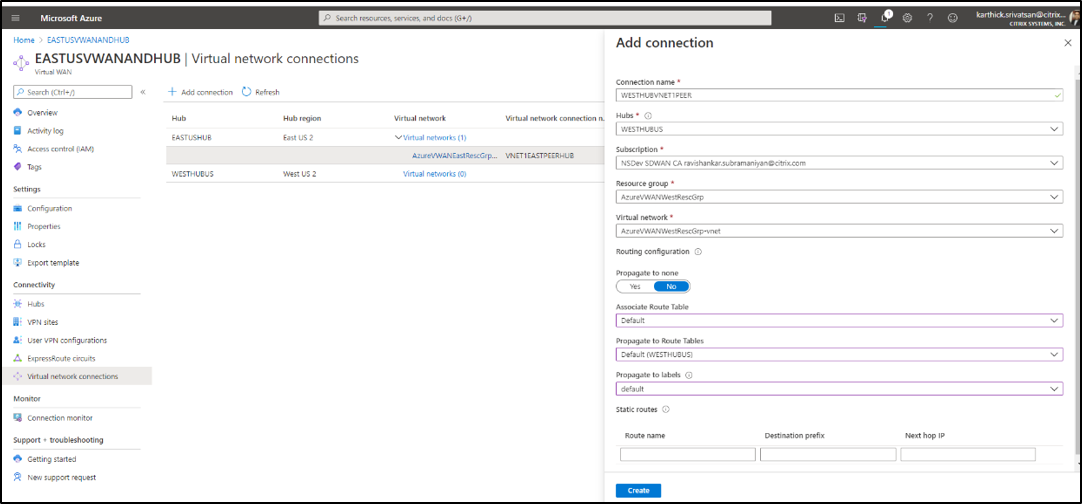
2.Peering the East VNet to the West Hub
- Within the Virtual WAN resource EastUSVWANANDHub, click“Virtual Network Connections”and click“+Add connection”.
- Connection Name – Name of the Virtual Network Connection – WestHubVNet1Peer
- Hubs – Name of the Hub to peer with – WestHubUS
- Subscription – Ensure to select the subscription as the one you used for creating the Virtual WAN and the Virtual Hub resources
- Resource Group – Will be the resource group of the West region VNet we are trying to peer with the Hub
- Virtual Network – The VNet associated to the West region resource group that we peer
- Propagate to None – Set it to NO
- Associate Route Table - Select Default
- Propagate to Route Tables – Select Default(WestHubUS) which is the default routing table for West resource VNets
- Leave others as default
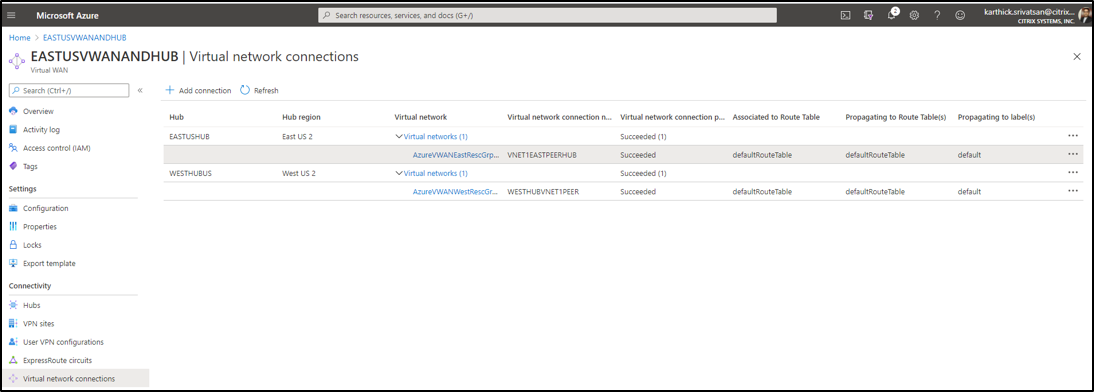
Click“Create”.

Once created, the Virtual Network Connection will resemble the snapshot below. This enables the propagation of the West VNet prefixes to the WestHubUS (Virtual Hub), and allows the WestHubUS to propagate the prefixes that it has (via BGP) to the routing table of the West VNet.

SD-WAN Orchestrator Pre-requisites
1. Provision SD-WAN instances in Azure
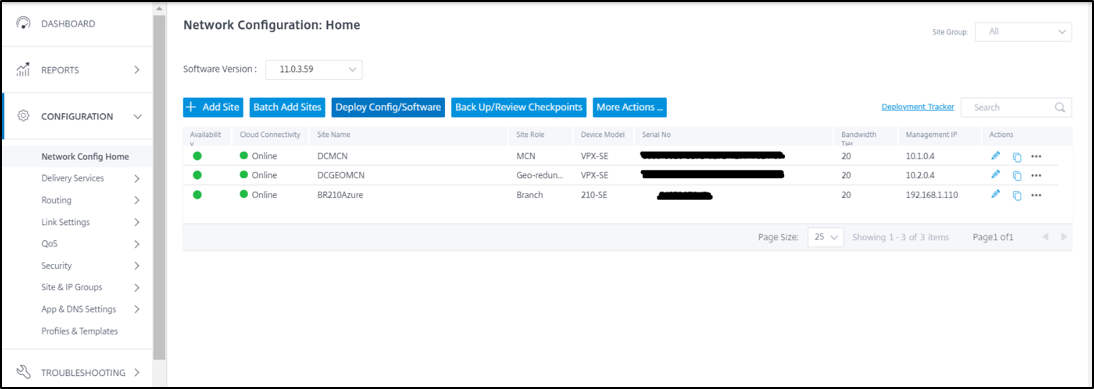
Provision an SD-WAN virtual appliance on Azure as Primary MCN (Master Control Node) and Secondary/Geo MCN on the East-US2 and West-US2 regions, respectively.
The Primary MCN and Secondary/Geo MCN serve a specific use-case (per our reference topology). However, the SD-WAN VPX can be deployed in branch mode as well.
The MCN acts as a controller in the SD-WAN network and ingests Azure APIs to establish site-to-site connectivity with Azure Virtual WAN resources. The MCN acts as the main controller for the SD-WAN overlay. The Secondary/Geo MCN provides redundancy for this controller function by taking over the role of the controller, if and when the Primary MCN goes down.
提供Citrix SD-WAN VPX Azure,你可能refer thisdocument.
NOTE: While going through the above document, you can see that 10.2 is mentioned, but when searching in the market place, you’ll find “Citrix SD-WAN Standard Edition 10.2.5” or “Citrix SD-WAN Standard Edition 11.0.3”. You may choose either of these versions based on the firmware version of the rest of your Citrix SD-WAN network.
After provisioning the Citrix SD-WAN VPX’s in Azure, we need to go through the SD-WAN Orchestrator to finish the configuration.
Note: Before starting configuration in SD-WAN Orchestrator, keep the following information handy.
2.Serial Number of the SD-WAN VPX instance in Azure
- 你可以去串行控制台在Azure和enter admin credentials in the CLI of the instance and type “system_info” and enter the command. You can find the serial number of the appliance/instance here.
Otherwise you can go to the Azure instance virtual machine, clickNetworking, and then get the Public IP of the management interface like below.
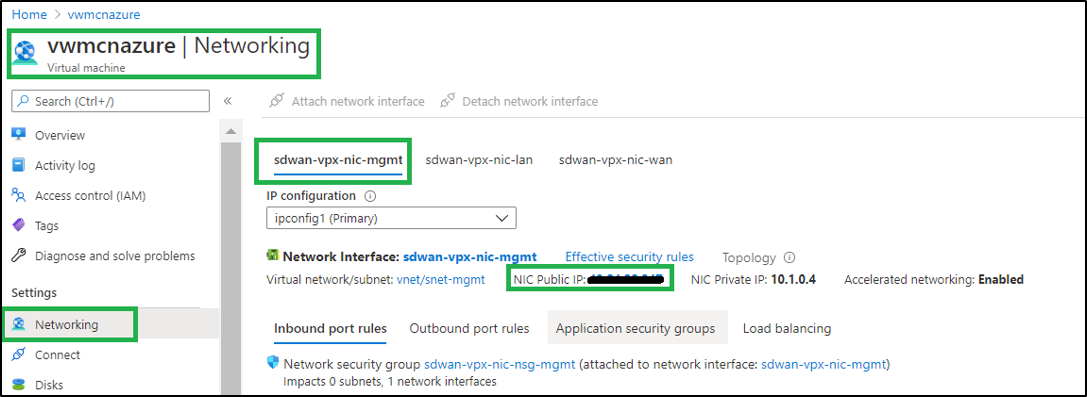
- After getting the public IP, you can access the appliance, access it in any browser (CHROME/FIREFOX/SAFARI) using
https://and provide the admin credentials to log in. - The dashboard of the appliance will open. Note the serial number for future use.

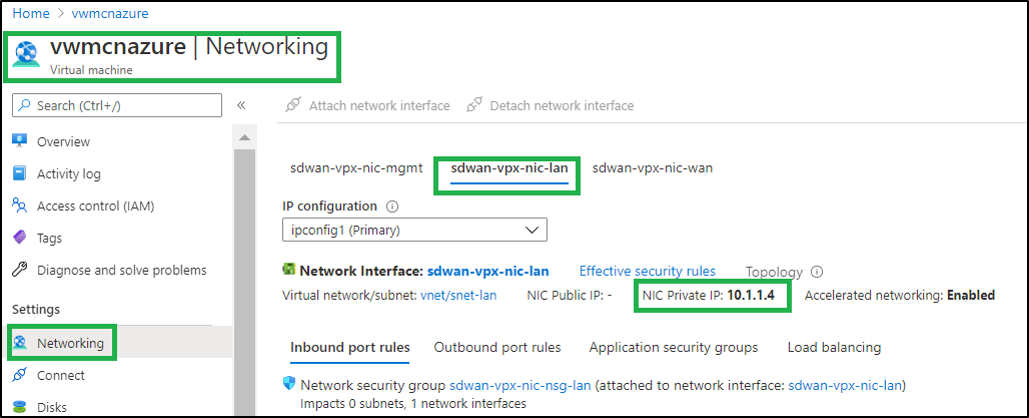
3. Obtain the LAN and WAN Interface IPs of VPXs from Azure
- Obtain the LAN and WAN Interface IPs while the provisioning the Primary MCN and Secondary/Geo MCN IPs
- You can get the same information from “Networking” section of each Azure Primary MCN and Secondary/Geo MCN
- For instance, the Primary MCN LAN IP is 10.1.1.4 (as per the snapshot below)
- Perform the same for the Secondary/Geo MCN and note its LAN IP as well
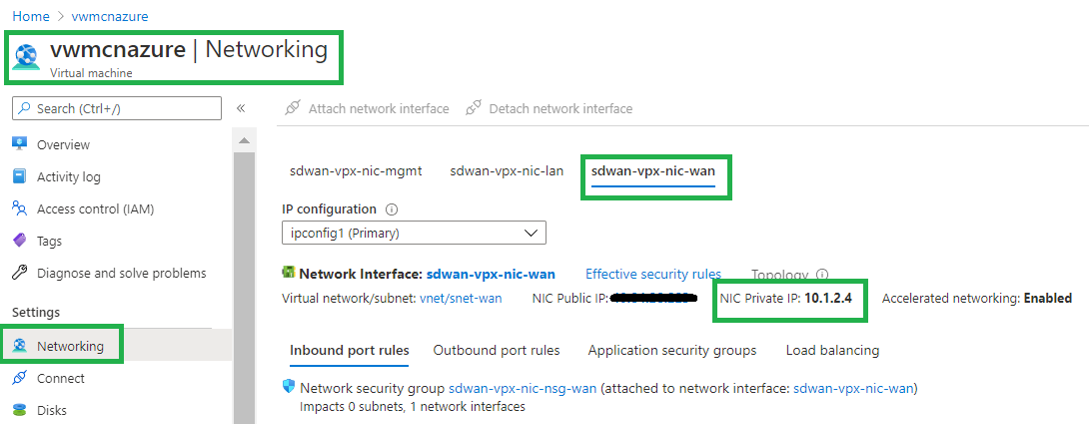
Primary MCN WAN IP is 10.1.2.4. As per the snapshot below
- Perform the same for the Secondary/Geo MCN and note its WAN IP as well


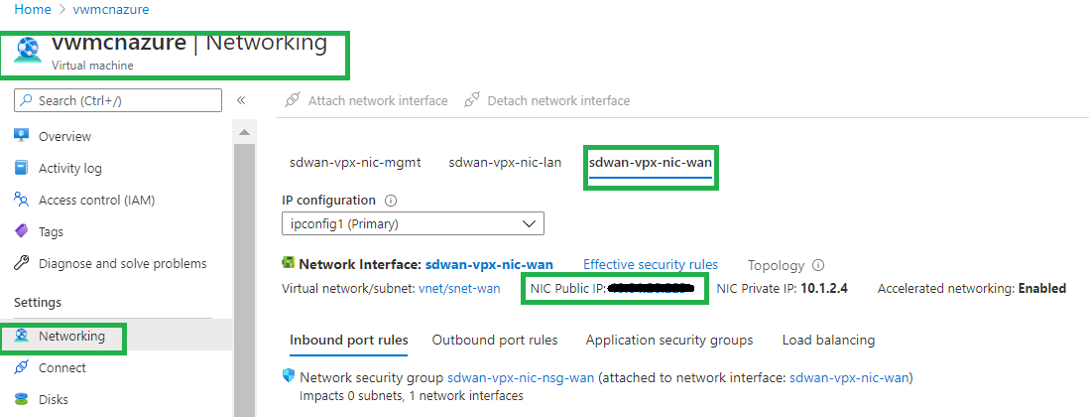
4. Obtain the PUBLIC IP address of the WAN Link of both the Primary MCN and the Secondary/Geo MCN
You can get this information in the WAN interface of the virtual machine (MCN/Geo MCN) in the Networking section.
Controllers like the Primary MCN and the Secondary/Geo MCN MUST be configured with STATIC PUBLIC IP address during the appliance’s WAN Link creation, on any management infrastructure. If however, you have deployed the VPX in branch mode, the IP address may also be obtained dynamically.
At this point, we have the following information handy.
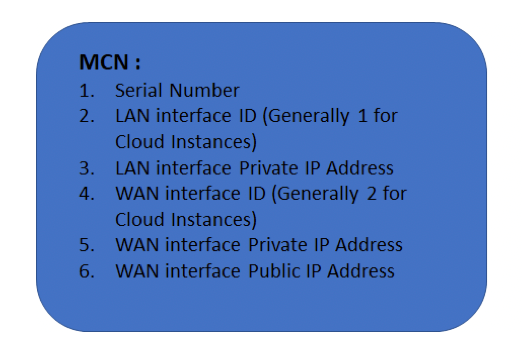


Next Steps:
- Configure the SD-WAN Orchestrator with all the above information for MCN, Secondary / Geo-MCN, and branch office. Complete the configuration on the on-prem SD-WAN appliance using standard Orchestrator configuration practices by following thislink.
5. Create an Azure Service Principal
Create an Azure Service principal in the subscription to enable a programmatic way of managing deployments (Automation) from SD-WAN Orchestrator. Microsoft Azure mandates that every resource that needs to be programmatically managed by a third party, associate an IAM role and create an app registration to take advantage of automating the resources externally.
To do so, follow the steps outlined这里. For more details, you can refer to this segment in theAppendixsection.
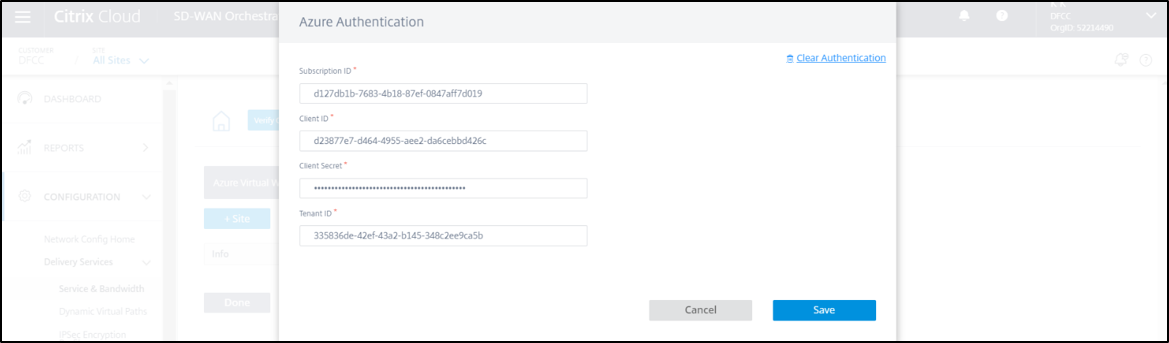
6. Fill in Azure Authentication credentials in SD-WAN Orchestrator
- Create an Azure Principal in the subscription to enable a programmatic way of managing deployments.
- Note down the Azure Principal’s CLIENT ID, CLIENT SECRET, and TENANT/DIRECTORY ID, including your Azure Subscription details.
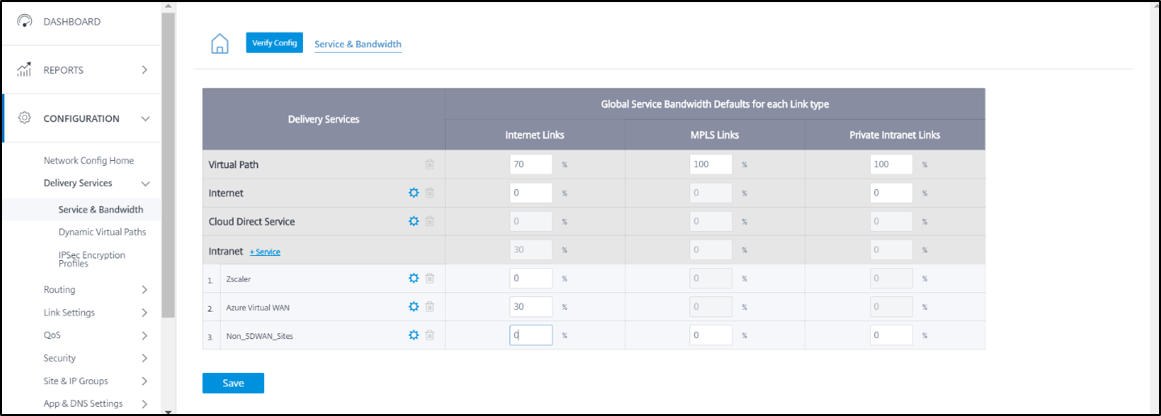
- Under Global settings, clickConfiguration -> Delivery Services -> Azure Virtual WANClick the Settings icon of the service.
- Click the Authentication link. It will pop up the details you have ready with you now.
Enter the details carefully and save. If SAVE is successful, you will see the Virtual WAN and the Hubs configured in your subscription in the next step. If you are unable to see, double check the details, clear the authentication details, and try again.

Create Azure Virtual WAN Service on SD-WAN Orchestrator
1. Pre-Requisites
If you have made it this far, you MUST have created the Azure Virtual WAN and the Virtual Hub’s inside the Virtual WAN to which you want the SD-WAN Sites to form the connectivity with. It is NOT recommended to come to this section, prior to completing the pre-requisites.
2.把DCMCN网站和虚拟WAN Resou联系在一起rce and Virtual Hub
On Global configuration, clickConfiguration -> Delivery Services -> click the Settings icon of Azure Virtual WAN.
- Once the service is selected, you will be taken to the Virtual WAN Automated configuration page.
Click“+ Site”.
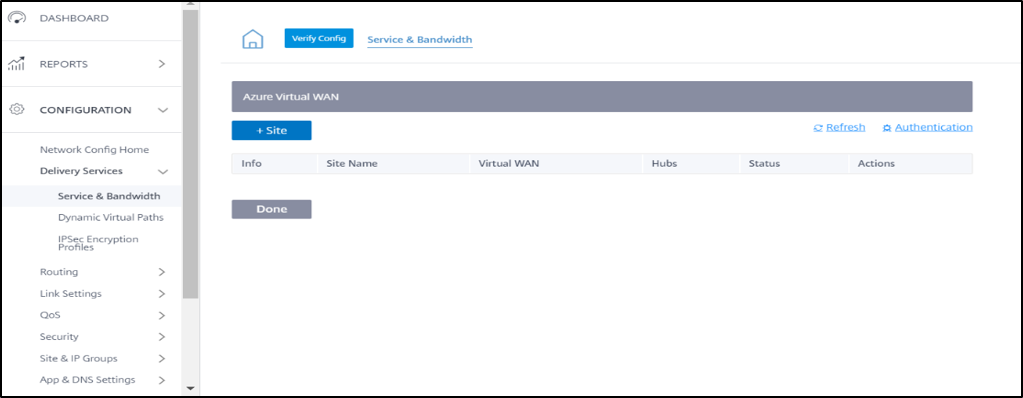
- Based on whether the authentication of Azure subscription and other principal details was successful, you will now see the Azure Virtual WAN populated with ALL VWANs configured as part of the subscription.


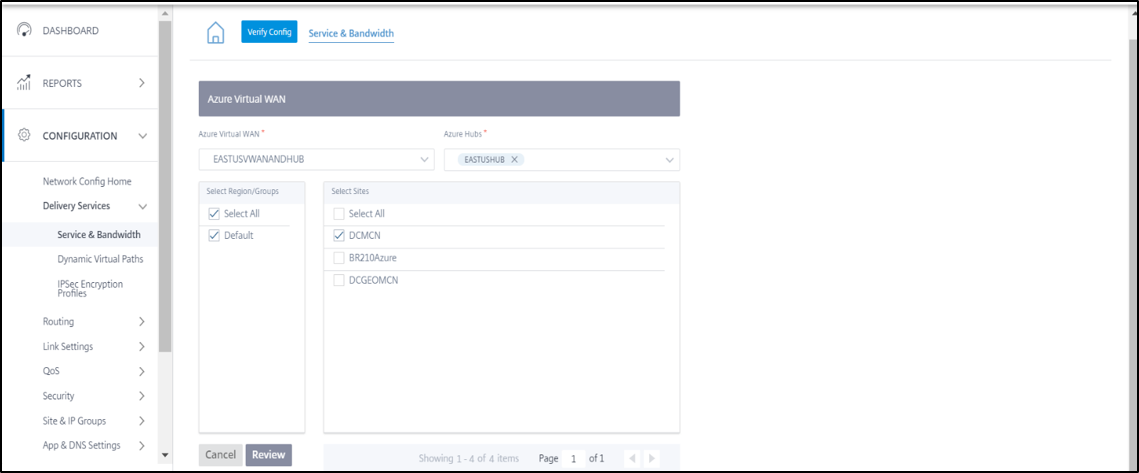
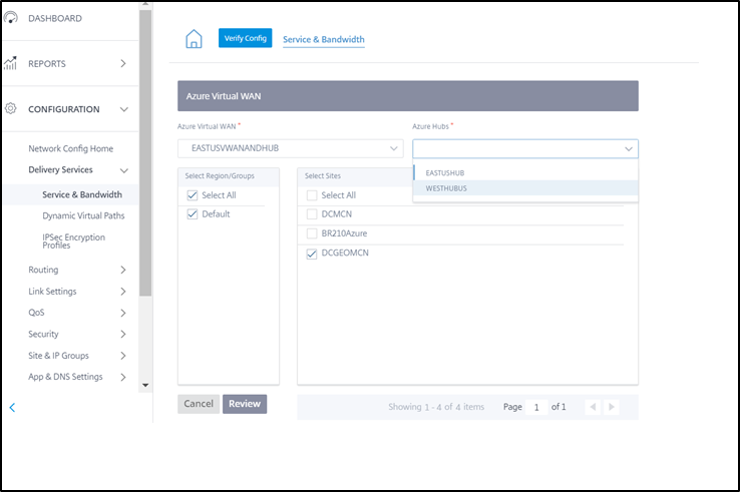
A. Add Site, Configure, and Deploy it for Virtual WAN integration**
Now for this architecture, the MCN will be associated with East REGION and connect to the EastHubUS.- Select EastUSVWANANDHub which is the Virtual WAN where we created the East and West Hubs.
Select the EastUSHub
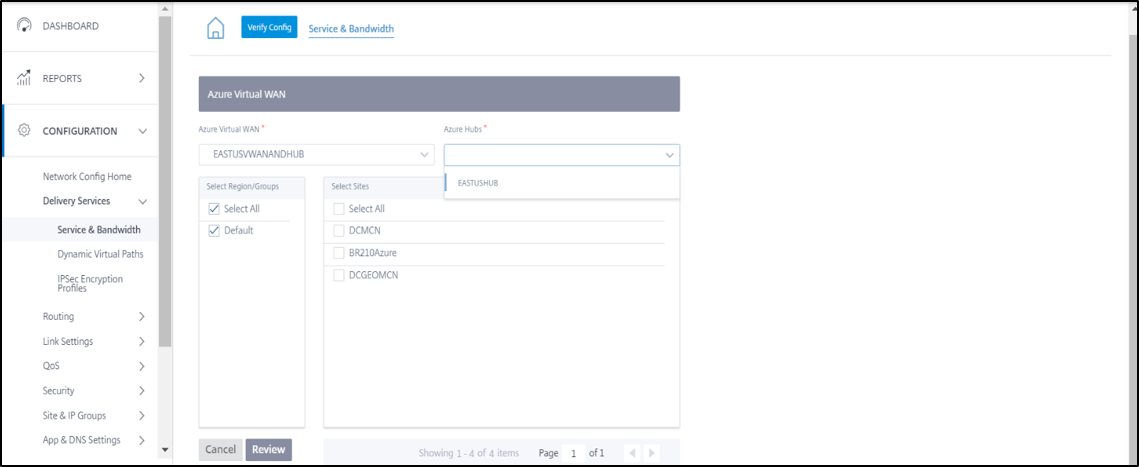
- Select the Site as “DCMCN”
- The sites are seen in this because the sites are already part of the configuration, staged and activated
Review and save the information
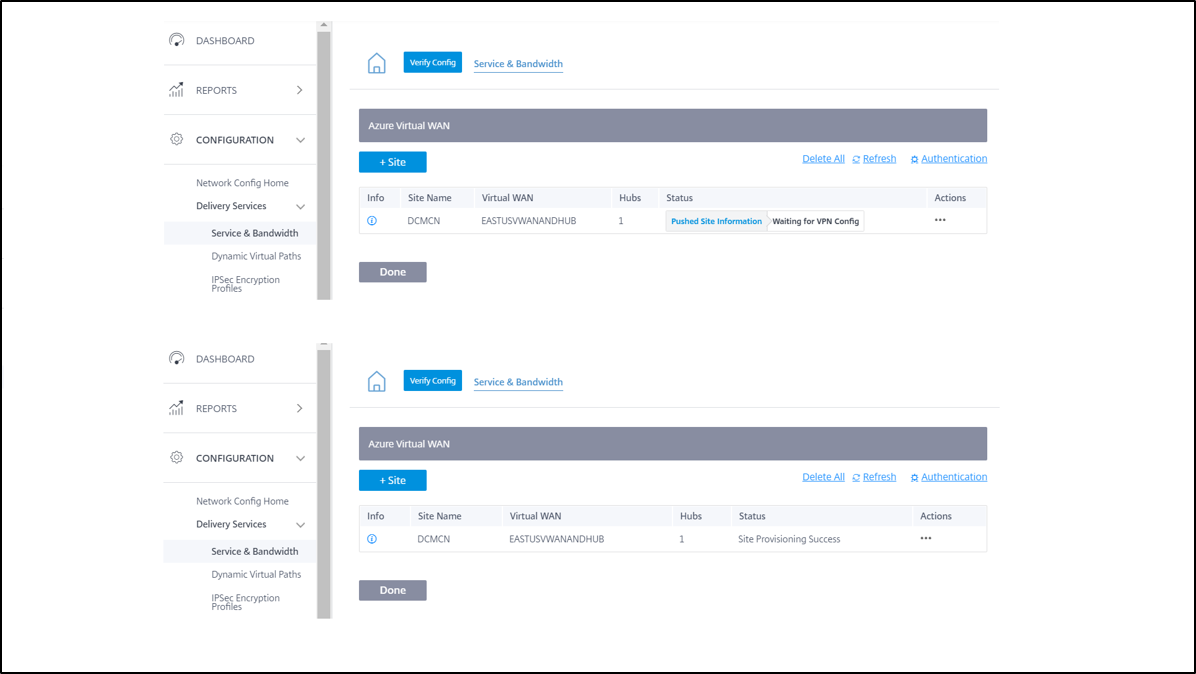
Once after you save, you will start seeing the automation kick-in and the SD-WAN will prepare the site by pushing the configuration information and configure both SD-WAN side and the Azure side for successful VPN site establishment.
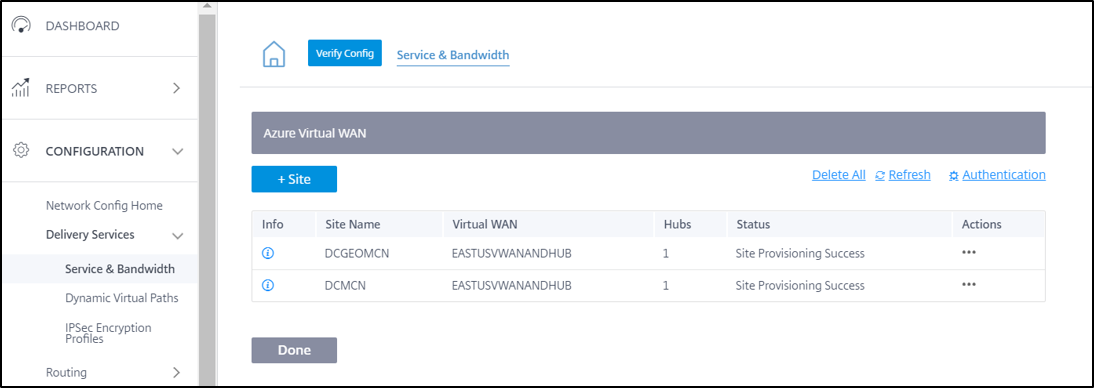
- While the configuration takes effect, you will see the “Pushed Site information – Waiting for VPN config” notification.
- 当夏娃rything is successful, it will indicateSite Provisioning Success.
- At this point, the Azure Virtual WAN configuration is automated and complete. Next, we have to activate the same on the appliance to initiate the IPsec tunnel.
As part of Azure Virtual WAN Automation, SD-WAN Orchestrator starts using the Azure API’s and prepares the SD-WAN Appliance in configuration focus (DCMCN) for automation.
- In this aspect during automation, we govern it in two aspects. Getting all the information from SD-WAN appliance to provision the IPsec and BGP endpoints on Azure.
- Talking to the Azure and getting the details to configure the IPsec and BGP endpoints on the SD-WAN appliance.
- The BGP peering is then established upon successful establishment of the IPsec tunnel.
- This enables the exchange of network prefixes learned by the DCMCN over virtual path, including its local routes to theEastUSHubvia BGP.


B. SD-WAN Side details**
- From the WAN Links available, the automation script will pick up a local BGP peer endpoint as Local IPs
- For Tunnel to form the WAN interface with the Public IP endpoint is chosen
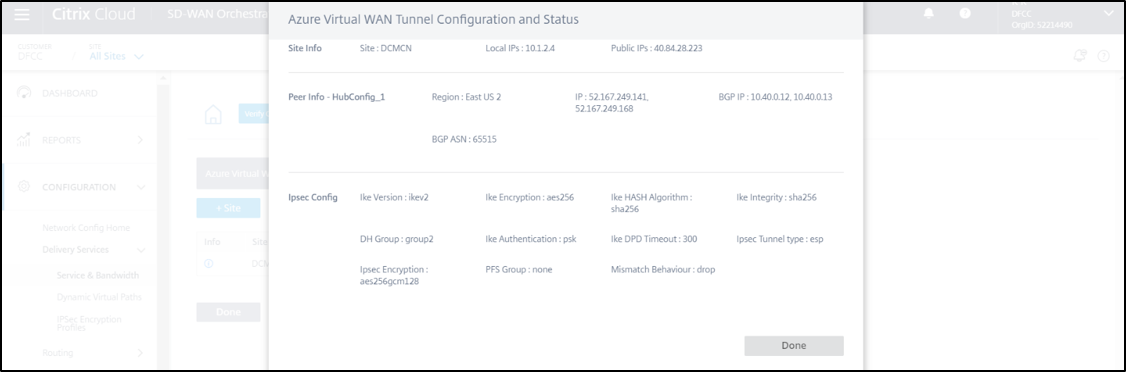
C. Azure Side Details**
- As you can see in the snapshot below, the automated script has gleaned the information from Azure for the EastUSHub to get the following details:
- Region
- Public IP Addresses – Tunnel endpoint (Active/Passive VPN Tunnel for a single Hub. But both tunnels will be established. Datapath will be processed via primary tunnel and use secondary in the eve of a failover).
- GP private endpoints obtained from the EastUSHub configuration
- BGP ASN – 65515
The Hub uses standard IPsec/IKE parameters that is obtained from Azure so that the local endpoint DCMCN can also be prepared with similar attributes to enable the formation of the IPsec tunnel post successful negotiation.

3. Prepare SD-WAN Virtual WAN Automated configuration to connect MCN to Virtual WAN Hub
After finishing the configuration for MCN and Secondary / Geo-MCN with their respective hubs, it is time to enable them to be automatically deployed on Azure-Virtual WAN in one shot.
You can see that the sites (post addition of the hubs) are in “Site provisioning success” state.


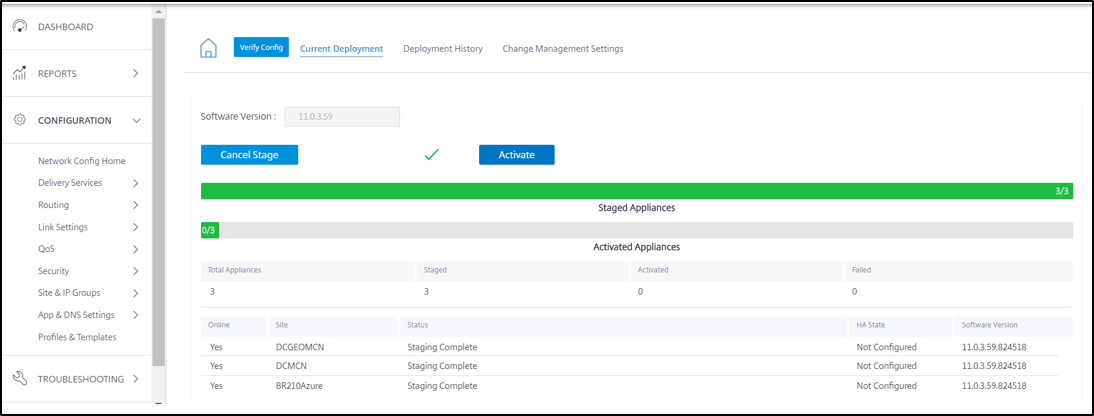
4. Activate the Configuration from SD-WAN Orchestrator to enable Azure Virtual WAN automation
SelectConfiguration > Network Configuration Home
SelectDeploy Config/Software > Stage
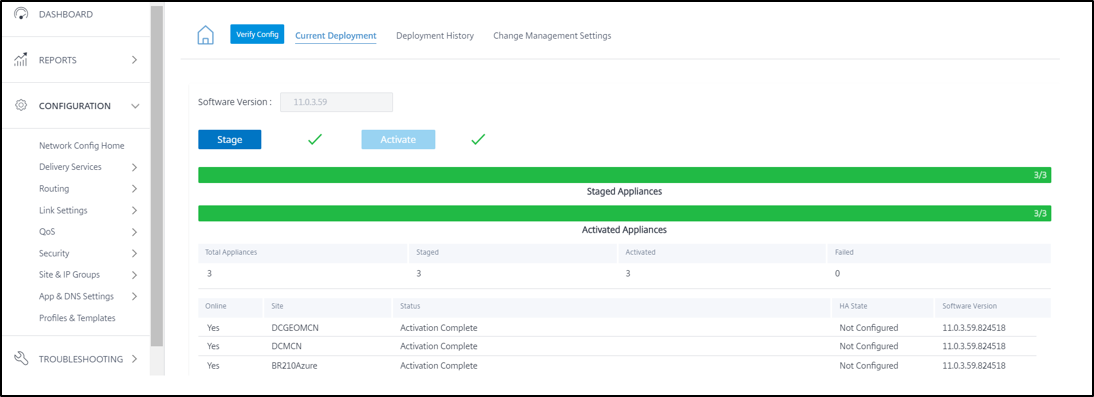
SelectActivate


Verify Virtual WAN Service status
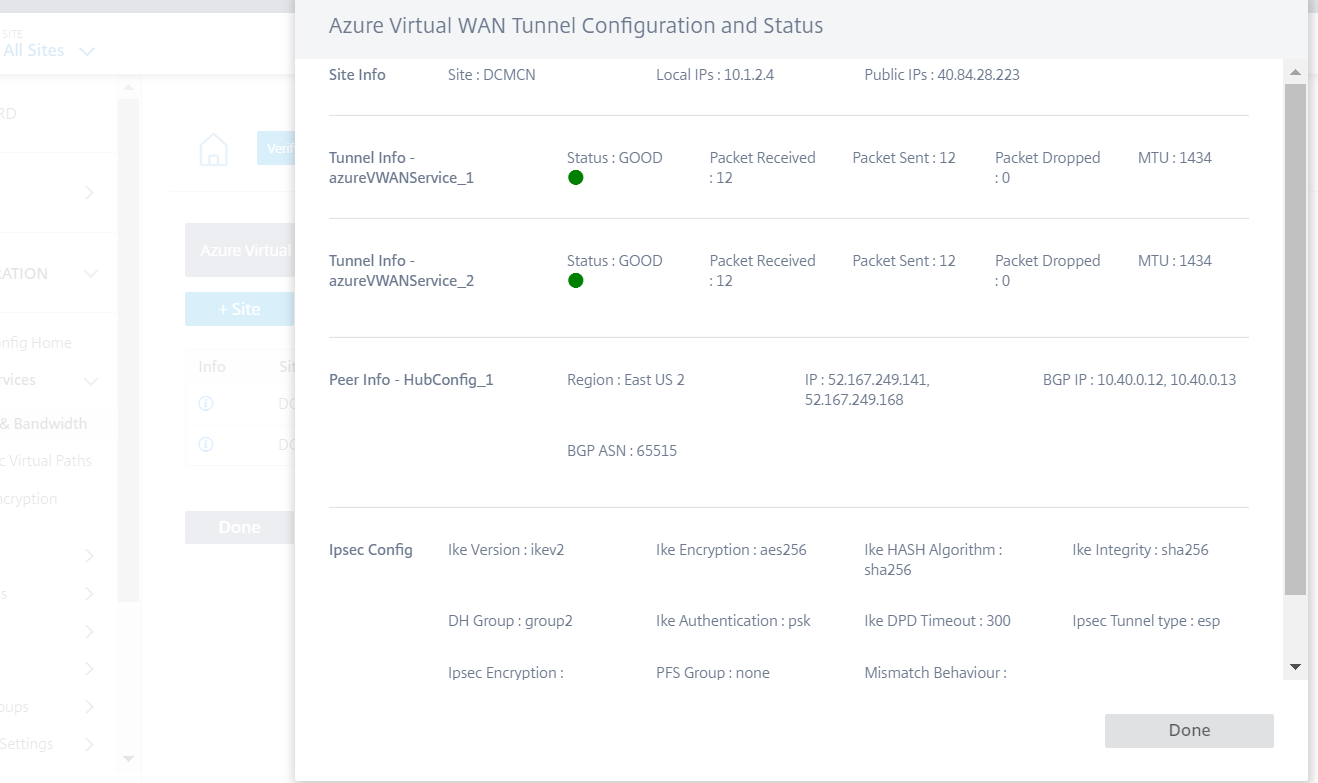
Note:Click the‘info’icon on the Azure Virtual WAN Site to obtain details about the Azure Virtual WAN Tunnel configuration and status.
Go toAll Sites -> Configuration -> Delivery Services -> Azure Virtual WAN ->Click the ‘I’ (information icon) of any activated site.
- Verify that the IPsec TUNNEL is UP and running on MCN (EastUSHub)
- We can see that there are two Azure Virtual WAN instances provisioned. The second instance functions asActive-Standbyin case of any failovers.
- The Azure Virtual WAN automation takes care of enabling the IPsec tunnel with the two instances by default so that there is no manual intervention needed at all.
- 同时也注意到,尽管隧道了nd running, there is always only ONE active tunnel processing the connections and packets on the data-path.
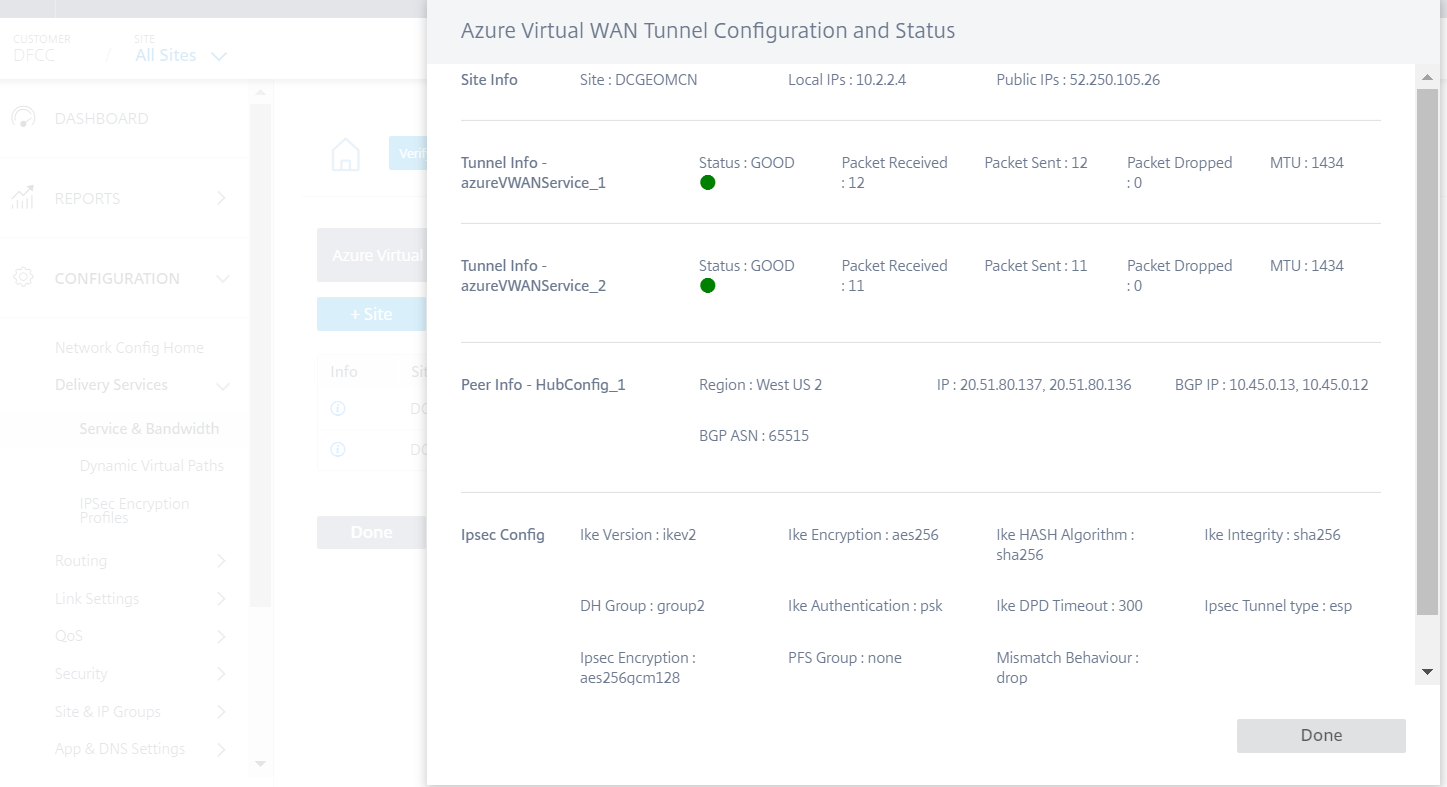
Verify IPsec TUNNEL is UP and running on Secondary MCN (WestHubUS)


Verify IPsec tunnels between SD-WAN and Hub post automated deployment
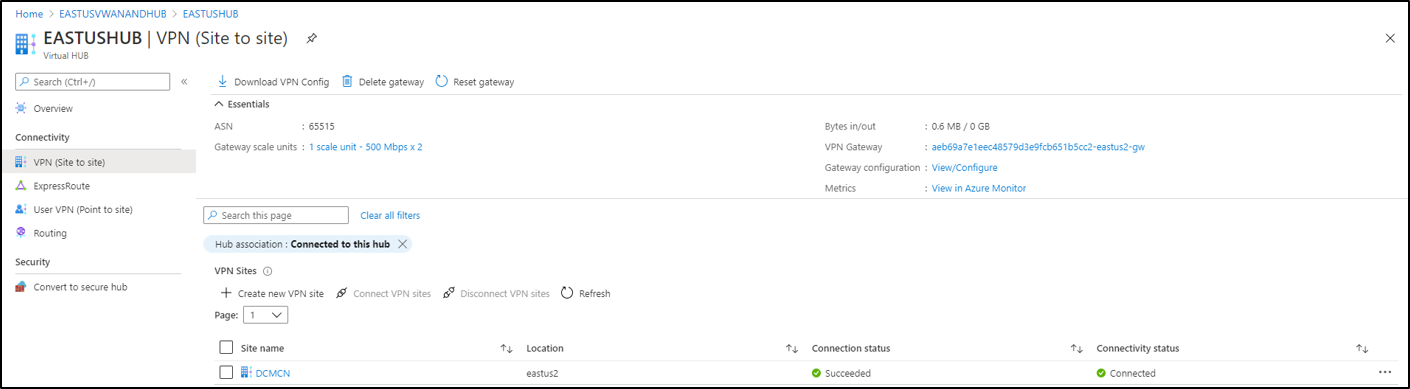
1. Verify VPN Site Creation in the EastUSHub
In this step, we verify that a NEW VPN Site is created in EastUSHub. This site will serve as the DCMCN site (Done via SD-WAN Azure Virtual WAN Automation).Notethat we see the “VPN sites” section table under the geo map indicating that the EastUSHub has 1 VPN sites connected which is our MCN device.
- Click theEastUSHublink. It will take us to the drill-down of the Hub for the East Geo.
Click‘Overview’to see the number of VPN connected sites. We see 1 connected site (with our MCN).

ClickVPN (Site to Site)and check that the connection status is“Successful”and “Connected” to DCMCN (SD-WAN MCN)


2.Verify VPN Site creation in WestHubUS
In this step, we verify that a NEW VPN Site is created in WestHubUS. This site will serve as the DCGEOMCN site (Done via SD-WAN Azure Virtual WAN Automation)Notethat we see the “VPN sites” section table under the geo map indicating that the WestHubUS has 1 VPN sites connected which is our Geo-MCN device “DCGEOMCN”.

Click theWestHubUSlink which will take us to the drill-down of the Hub for the West Geo
In this, we can see that ‘Overview’ states number of VPN connected sites which is 1 at present (with our MCN)
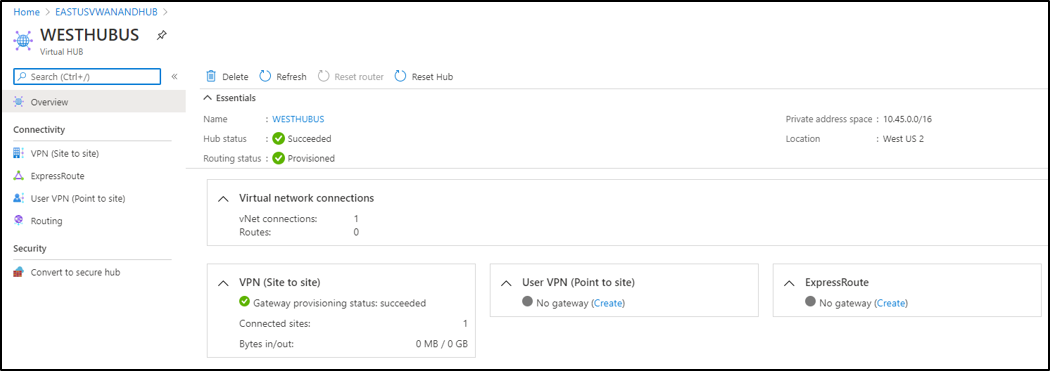
ClickVPN (Site to Site)and check that connection status is“Successful”and “Connected” to Secondary MCN (SD-WAN Geo MCN).


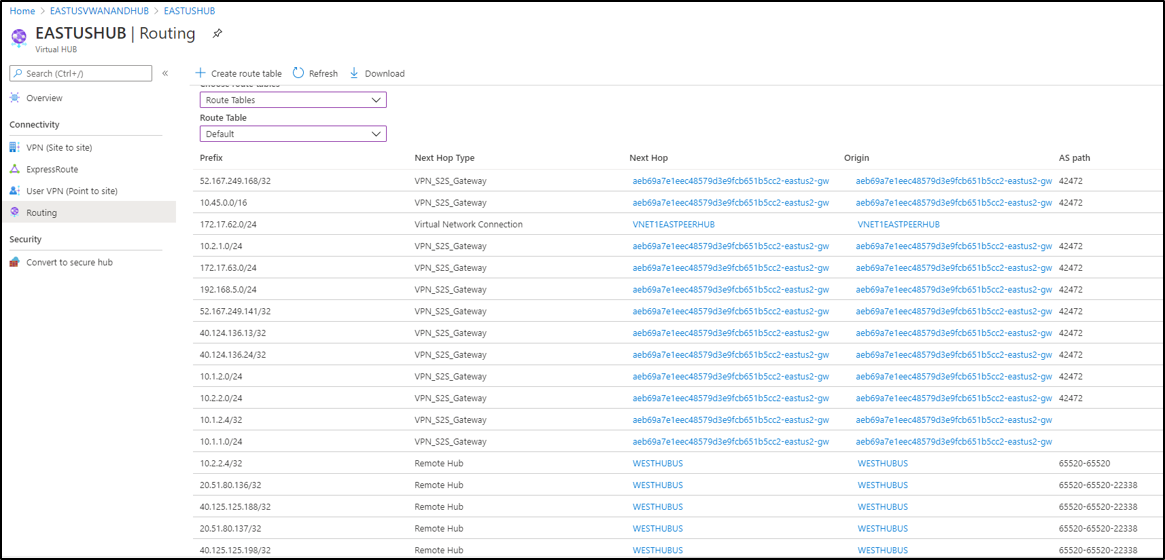
SD-WAN MCN to EastUSHub ROUTING
Next Hop Type:Most importantly, the next-hop type indicates how the routes were learned and installed in the routing table
- If the next hop type is : VPN_S2S_Gateway
- All the routes received via VPN_S2S_Gateway are the ones that have the IPsec+BGP integration with SD-WAN, where the Azure automation was deployed.
- Verify the EastUSHub routing table and check if BGP propagated SD-WAN learned routes from the MCN are as appropriate.
- In the EastUSHub routing, the major routes are installed via the MCN via the AS Number of the SD-WAN configured as 42472 (taken care of automatically during automation)
- If the next hop type is : Virtual Network Connection
- This would be all the routes installed as these are via East VNet peering between the EastUSHub and the East VNet.
- If the next hop type is : Remote Hub
- This would be all the routes propagated by the WestHubUS Hub (Which was created under the same Azure Virtual WAN instance).
- We can also see that the Remote Hub type routes have the Origin and the AS path appended appropriately to avoid routing loops.
- This table contains all the distinct VNets (peered at the West region with the West Hub) that are propagated from the EastUSHub via the WestHubUS hub.

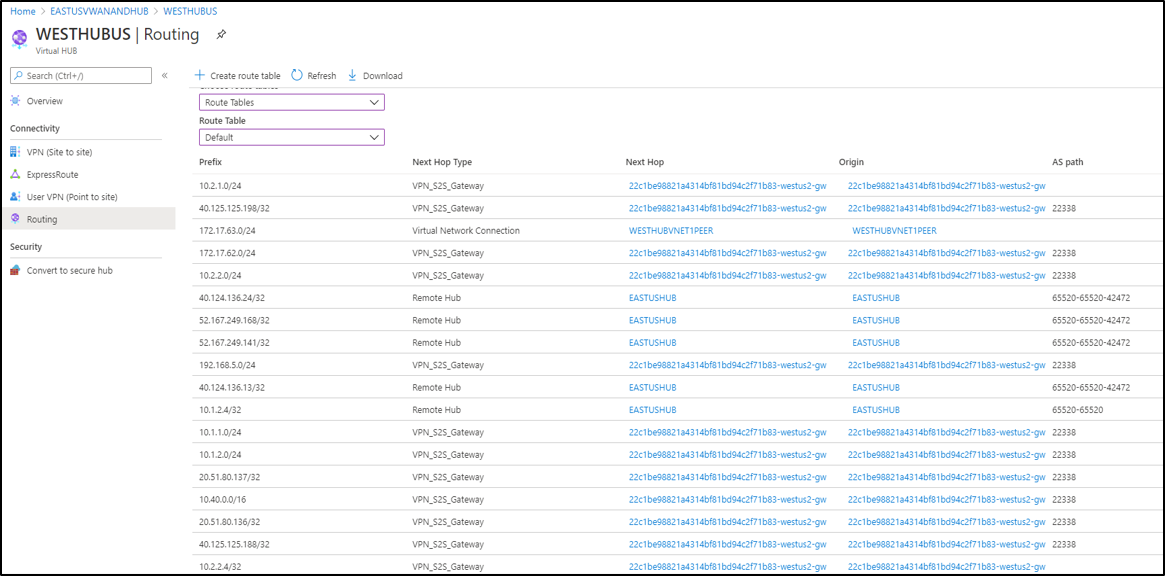
SD-WAN GEOMCN to WestHubUS ROUTING
Verify the WestHubUS routing table, and check whether BGP propagated SD-WAN learned routes from the Secondary-MCN.
Next Hop Type:Most importantly, the next-hop type indicates how the routes were learned and installed in the routing table.
- If the next hop type is : VPN_S2S_Gateway
- All the routes received via VPN_S2S_Gateway are the ones that have the IPsec+BGP integration with the SD-WAN where the Azure automation was deployed.
- Verify the WestHubUS routing table and check whether BGP propagated SD-WAN learned routes from the Secondary MCN are appropriate.
- WestHubUS路由,主要路线是英寸talled via the MCN via the AS Number of the SD-WAN configured as 22338 (taken care of automatically during automation).
- If the next hop type is : Virtual Network Connection
- This would be all the routes installed as these are via West VNet peering between the WestHubUS and the West VNet.
- If the next hop type is : Remote Hub
- This would contain all the routes propagated by the WestHubUS Hub (which was created under the same Azure Virtual WAN instance).
- We can also see that the Remote Hub type routes have the Origin and the AS path appended appropriately to avoid routing loops.
- This table contains all the distinct VNets (peered at the East region with the East Hub) that are propagated from the WestHubUS via the EastUSHub hub.

验证肾阳te Propagation from East VNet to EastTUSHub
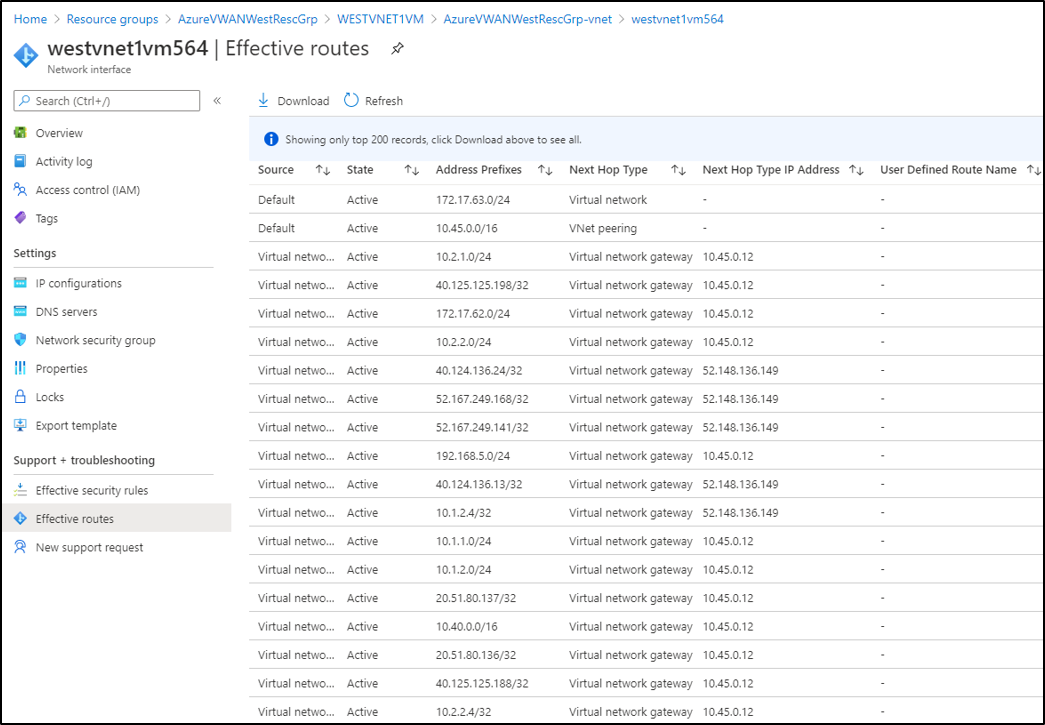
In this step, we verify that the routes are being propagated from East VNet to the East VWAN Hub – EastUSHub using Global VNet peering.
- Verify that EastUSHub has provided the visibility of MCN learned prefixes from its default route table to the VNet peered to it in the East US2 region
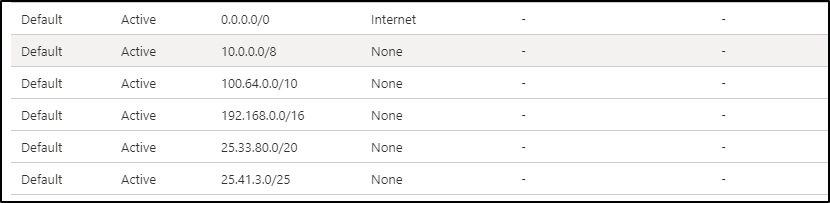
- Check the routing table of EastUS2 VNet and verify routing is in-tact
- The VNet’s are the actual origination and destination of the workloads in Azure and it is imperative that we understand that the VNets have converged to contain the right routing flow/information to reach the subnets/prefixes of SD-WAN remotely
- The majority of the routes on the VNets themselves will be directly routed via the Virtual Network Gateway which is the Hub they are connected to
- In this case the EastUSHub is the origin of all the routes in the routing table of the East VNet
- VNet peering Next hop type would be the actual prefix of the Azure Virtual WAN prefix that was created of the VNet peering with.
Virtual Network will be the local address of the VNet itself


验证肾阳te Propagation from West VNet to WestHubUS
In this step, we verify that the routes are being propagated from West VNet to the West VWAN Hub – WestHubUS using Global VNet peering
- Verify that WestHubUS has provided the visibility of GEOMCN learned prefixes from its default route table to the VNet peered to it in the West US2 region
- Check the routing table of WestUS2 VNet and verify routing is in-tact
- The VNet’s are the actual origination and destination of the workloads in Azure and it is imperative that we understand that the VNets have converged to contain the right routing flow/information to reach the subnets/prefixes of SD-WAN remotely
- The majority of the routes on the VNets themselves will be directly routed via the Virtual Network Gateway which is the Hub they are connected to
- In this case the WestHubUS is the origin of all the routes in the routing table of the West VNet
- VNet peering Next hop type would be the actual prefix of the Azure Virtual WAN prefix that was created of the VNet peering with
Virtual Network will be the local address of the VNet itself


Call to Action
In case, you haven’t tried Azure Virtual WAN yet, head over toportal.azure.com. If you want to experience the benefits of an SD-WAN solution first-hand, feel free to request a free-trial这里.
Appendix
Create an Azure Service Principal
1. Register the application
Create an Azure Service principal in the subscription for enabling programmatic way of managing deployments (Automation) from SD-WAN Orchestrator. Microsoft Azure mandates that every resource that needs to be programmatically managed by a third party associate an IAM role and create an app registration to take advantage of automating the resources externally.


Note: Once you have created the Client Secret for the App, note it down or copy it immediately to some place that you can refer later.
2.Note down the Azure Service Principal details
- 记下客户ID、客户秘密和租户/DIRECTORY ID including your Azure Subscription details.
- You will get the CLIENT ID, CLIENT SECRET and TENANT ID from the App (Azure Service principal) you created
- Subscription ID – You can get it from your “Subscriptions” section in Azure for the account
- Client ID – Also called the Application ID which you can get from the Overview section of your newly registered App below
- Directory ID – Also called the Tenant ID which you can get from the Overview section of your newly registered App below

- Client Secret – note or copy the client secret as soon as you create it. This step is very important for authenticating the subscription account and verifying that the App created is eligible to manage programmability of the resource you want automation enabled on (in Azure).

3. Associate the Azure Service Principal to the resource
- Go to the Virtual WAN Resource“EastUSVWANANDHub”
- Go toAccess control (IAM)
- Click“Add”button of theAdd a role assignmentsection highlighted below
- You can also click theRole assignmentssection, and click“+ Add”(next toDownload role assignments) to add the IAM role to the service principal.

- Once you click“Add”, you will get a popup pane on the right, to add the role
- Choose theROLE类型为“贡献者”
- LeaveAssign accessto as Default (Azure AD user, group or service principal)
- In theSelectsection, you can search for the Application you created, called “orchestrator”. (This is just a string and we can custom name this. No confusion must exist using a string called “orchestrator” as an Azure principal when automating the provisioning via Orchestrator).
- Once the search is successful, you can select the app.
- Select the “Save” button. (This concludes Azure Service Principal creation and association to the resource)

In this article
- Audience
- Overview
- Use cases
- Azure Virtual WAN: Overview
- Better together: Benefits of a joint Azure VWAN and Citrix SD-WAN Solution
- Reference Topology
- Azure Provisioning & Networking
- Create Resource Groups
- Create a VNet each in the East and West regions (per the reference topology)
- Create Azure Virtual WAN resources
- Create Azure VWAN Hubs in each region
- Peer VNet to the Hub
- SD-WAN Orchestrator Pre-requisites
- 1. Provision SD-WAN instances in Azure
- 2.Serial Number of the SD-WAN VPX instance in Azure
- 3. Obtain the LAN and WAN Interface IPs of VPXs from Azure
- 4. Obtain the PUBLIC IP address of the WAN Link of both the Primary MCN and the Secondary/Geo MCN
- 5. Create an Azure Service Principal
- 6. Fill in Azure Authentication credentials in SD-WAN Orchestrator
- Create Azure Virtual WAN Service on SD-WAN Orchestrator
- Verify Virtual WAN Service status
- Verify IPsec tunnels between SD-WAN and Hub post automated deployment
- SD-WAN MCN to EastUSHub ROUTING
- SD-WAN GEOMCN to WestHubUS ROUTING
- 验证肾阳te Propagation from East VNet to EastTUSHub
- 验证肾阳te Propagation from West VNet to WestHubUS
- Call to Action
- Appendix