
Deploy devices through the Apple Deployment Programs
The Apple Deployment Programs (ADPs) let you automatically enroll Apple devices in Endpoint Management without having to touch or prepare the devices before users get them. After a user unboxes and activates the device, the device automatically enrolls in Endpoint Management, and all management settings, apps, and books are ready for the user.
The ADPs include Apple Business Manager (ABM) for business organizations and Apple School Manager (ASM) for educational organizations. ABM and ASM are available for iOS, iPadOS, and macOS devices. For more information about device eligibility, seeApple Business Manager User GuideandApple School Manager User Guide.
Note:
ABM and ASM combine the previous Device Enroll Program and Volume Purchase Program from Apple.
This article walks you through the general deployment workflow with ABM or ASM:
- Enroll in ABM or ASM
- Connect your ABM or ASM account to Endpoint Management
- Order devices
- Assign devices to Endpoint Management
- Buy content in volume and synchronize it with Endpoint Management
- Configure deployment rules for device policies and apps
- Add delivery groups that contain users and resources assigned to them
After you complete this deployment process, the devices are ready to be unboxed and activated for an automated device enrollment.
Prerequisites
Open required ports for connectivity between Endpoint Management and Apple. For more information, seePort requirements.
Enroll in ABM or ASM
To begin deploying devices in Apple, enroll in ABM or ASM.
ABM and ASM are available for organizations and not individuals. You must provide many organization details and information to create an account. It might take time to request and receive approval for accounts.
Enroll in ABM
To enroll in ABM, go tobusiness.apple.com. ClickEnroll nowto apply for a new account.
Best practice is to use an email address for your organization, such asdeployment@company.com. The enrollment process might take a few days. After you receive your logon credentials, follow the steps provided in ABM to create an account.
Enroll in ASM
To create your ASM account, go toApple School Managerand follow the instructions to enroll. The first time that you log in to ASM, the Setup Assistant opens.
For information about ASM prerequisites, the Setup Assistant, and management tasks, see theApple School Manager User Guide.
When setting up an ASM user account, use a domain name that differs from the domain name for Active Directory. For example, prefix the domain name for ASM with something like
appleid.When you connect ASM to your roster data, ASM creates Managed Apple IDs for instructors and students. Your roster data includes instructors, students, and classes. For information about adding roster data to ASM, see the Apple School Manager User Guide, linked earlier in this list.
您可以自定义anaged Apple ID format for your institution, as described in the Apple School Manager User Guide, linked earlier in this list.
Important:
Don’t change Managed Apple IDs after you import ASM information into Endpoint Management.
If you purchased devices through resellers or carriers, link those devices to ASM. For information, see the Apple School Manager User Guide, linked earlier in this list.
Connect your ABM or ASM account to Endpoint Management
After you create your ABM or ASM account, connect it with your Endpoint Management server deployment.
Step 1: Download a public key from your Endpoint Management server
In the Endpoint Management console, go toSettings > Apple Deployment Programs.

UnderDownload Public Key, clickDownload.

Step 2: Create and download a server token file from your Apple account
- Sign in toApple Business ManagerorApple School Managerusing an administrator or device enrollment manager account.
- At the bottom of the sidebar, clickSettingsand then clickDevice Management Settings > Add MDM Server.
- In theMDM Server Namesetting, type a name for the Endpoint Management server. The server name that you type is for your reference. It’s not the server URL or name.
- UnderUpload Public Key, clickChoose File. Upload the public key that you downloaded from Endpoint Management and then save the changes.
ClickDownload Tokento download the server token file to your computer.
You upload the server token file when adding the ABM or ASM account to Endpoint Management. Your token information appears in the Endpoint Management console after you import the token file.
- UnderDefault Device Assignment, clickChange. Choose how you want to assign devices and then provide the information requested. For more information, see theABM User GuideorApple School Manager User Guide.
Step 3: Add your account to Endpoint Management
You can add multiple ABM or ASM accounts to Endpoint Management. This feature enables you to use different enrollment settings and setup assistant options by country, department, and so on. You then associate ABM or ASM accounts with different device policies.
For example, you might centralize all of your ABM or ASM accounts from different countries on the same Endpoint Management server to import and supervise all ABM or ASM devices. You first customize enrollment settings and setup assistant options per department, organizational hierarchy, or other structure. You then configure policies to provide appropriate functionality across your organization and let users receive the appropriate assistance.
In the Endpoint Management console, go toSettings > Apple Deployment Programand, underAdd Apple Deployment Program Account, clickAdd.
In theServer Tokenspage, specify your server token file and then clickUpload.
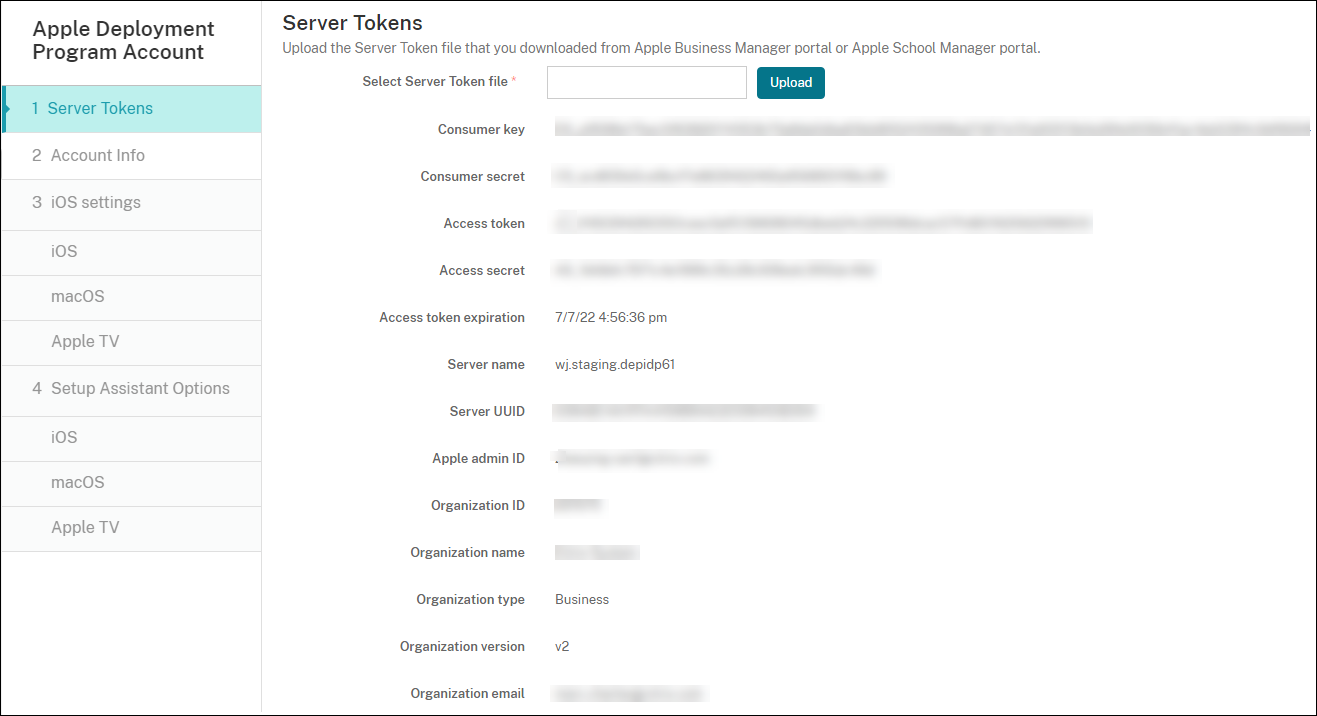
Your server token information appears.
In theAccount Infopage, specify these settings:

- Apple Deployment Program account name:A unique descriptive name for this ADP account, identifying how you organize ADP accounts, such as by country or organizational hierarchy.
- Business/Education unit:The business unit or department to which the device is assigned. This field is required.
- Unique service ID:An optional unique ID to help you further identify the account.
- 支持手机麻木er:A support phone number that users call for help during setup. This field is required.
- Support email address:An optional support email address available to end users.
- Education suffix:For ASM accounts. Type the suffix assigned to devices enrolled through this account.
IniOS Settings, specify these settings:

Enrollment settings:
- Require device enrollment:Whether to require users to enroll their devices. The default isOn.
Require credentials for device enrollment:Whether to require users to enter their credentials during ABM and ASM setup. We recommend that you require all users to enter their credentials during device enrollment, allowing only authorized users to enroll devices. The default isOn.
When you enable ABM or ASM before first-time setup and you don’t select this option, Endpoint Management creates the ABM or ASM components. This creation includes components such as user, Secure Hub, software inventory, and deployment group. If you select this option, Endpoint Management doesn’t create the components. As a result, if you later clear this option, users who haven’t entered their credentials can’t enroll in ABM or ASM because these components don’t exist. To add ABM or ASM components, in that case, disable and then enable the ABM or ASM account.
Enroll using Citrix Identity Provider:Whether to enroll using Citrix Identity Provider. This setting is available only to ABM accounts. IfOn, ADP-enabled iOS devices enroll only by using the Citrix identity provider. The default isOff.
To turn on the setting, you must first configure Citrix Identity Provider as your identify provider. Go toSettings > Identity Provider (IDP), clickAdd, and selectCitrix Identity Provider.
If this setting isOn, be aware of the following considerations:
- You cannot delete the corresponding Citrix Identity Provider configuration on theSettings > Identity Provider (IDP)page.
- When editing the corresponding Citrix Identity Provider configuration, you cannot switch to a different identity provider.
- Wait for configuration to complete setup:Whether to require users’ devices to remain in Setup Assistant mode until all MDM resources deploy to the device. This setting is available for devices in supervised mode. The default isOff.
- Apple documentation states that the following commands may not work while a device is in Setup Assistant mode:
- InviteToProgram
- InstallApplication
- ApplyRedemptionCode
- InstallMedia
- RequestMirroring
- DeviceLock
Device settings:
- Supervised mode:Set toOnif you are using the Apple Configurator to manage enrolled devices or whenWait for configuration to complete setupis enabled. The default isOn. For details on placing an iOS device in supervised mode, seeDeploy devices using Apple Configurator 2.
- Allow enrollment profile removal:Whether to allow devices to use a profile that you can remove remotely. The default isOff.
- Allow device pairing:Whether you can manage enrolled devices through Apple Music and the Apple Configurator. The default isOff.
Supervision Identities
If you use the GroundControl tool, you can add a certificate to do the following:
- Override pairing restrictions to avoid the “Trust this host” prompt.
- Escalate managed device actions over USB to perform activities such as profile installation without user interaction. Doing so allows GroundControl to enable single app mode and device lock for checkout.
- Restore a backup to ABM or ASM devices.
For more information on GroundControl, seeThe GroundControl website.
InmacOS Settings, specify these settings:

Enrollment settings:
- Require device enrollment:Whether to require users to enroll their devices. The default isOn.
Enroll using Citrix Identity Provider:Whether to enroll using Citrix Identity Provider. This setting is available only to ABM accounts. IfOn, ADP-enabled macOS devices enroll only by using the Citrix identity provider. The default isOff.
To turn on the setting, you must first configure Citrix Identity Provider as your identify provider. Go toSettings > Identity Provider (IDP), clickAdd, and selectCitrix Identity Provider.
If this setting isOn, be aware of the following considerations:
- You cannot delete the corresponding Citrix Identity Provider configuration on theSettings > Identity Provider (IDP)page.
- When editing the corresponding Citrix Identity Provider configuration, you cannot switch to a different identity provider.
- Wait for configuration to complete setup:IfOn, the macOS device doesn’t continue in the setup assistant until the MDM resource passcode gets deployed to the device. That deployment occurs before the creation of the local account. This setting is available for macOS 10.11 and higher devices. The default isOff.
Device settings:
- Allow enrollment profile removal:Whether to allow devices to use a profile that you can remove remotely. The default isOff.
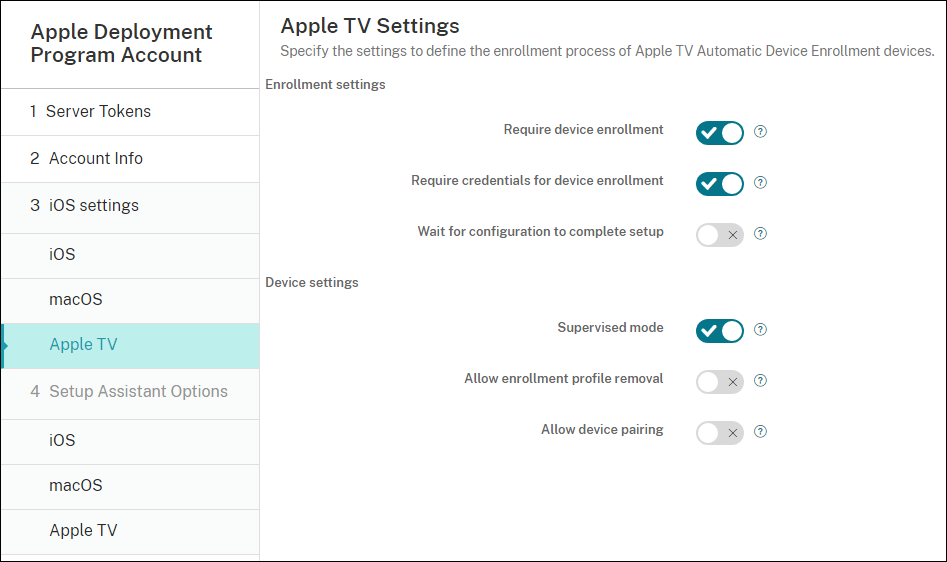
InApple TV Settings, specify these settings:
- Require device enrollment:Prevents users from skipping enrollment.
- Require Credentials for device enrollment:Challenges for credentials during enrollment. When this setting is off, Apple TV gets enrolled as the default “Device Enrollment Program user”.
- Wait for configuration to complete setup:The device waits in theSetup Assistantscreen until all resources deploy.
- Supervised mode:Gives more capability to the administrator while configuring restrictions.
- Allow enrollment profile removal:Allows users to remove the enrollment profiles.
- Allow device pairing:Allows devices enrolled through the Device Enrollment Program to be managed through Apple tools, such as the Apple App Store and the Apple Configurator.
IniOS Setup Assistant Options, select the steps that the iOS Setup Assistant skips when users start their devices the first time. When a screen is skipped, the related feature uses default settings. Users can configure the skipped features after setup completes unless you restrict access to those features completely. For more information about restricting access to features, seeRestrictions device policy. The default for all items is cleared. The following descriptions explain what occurs when a setting is selected.
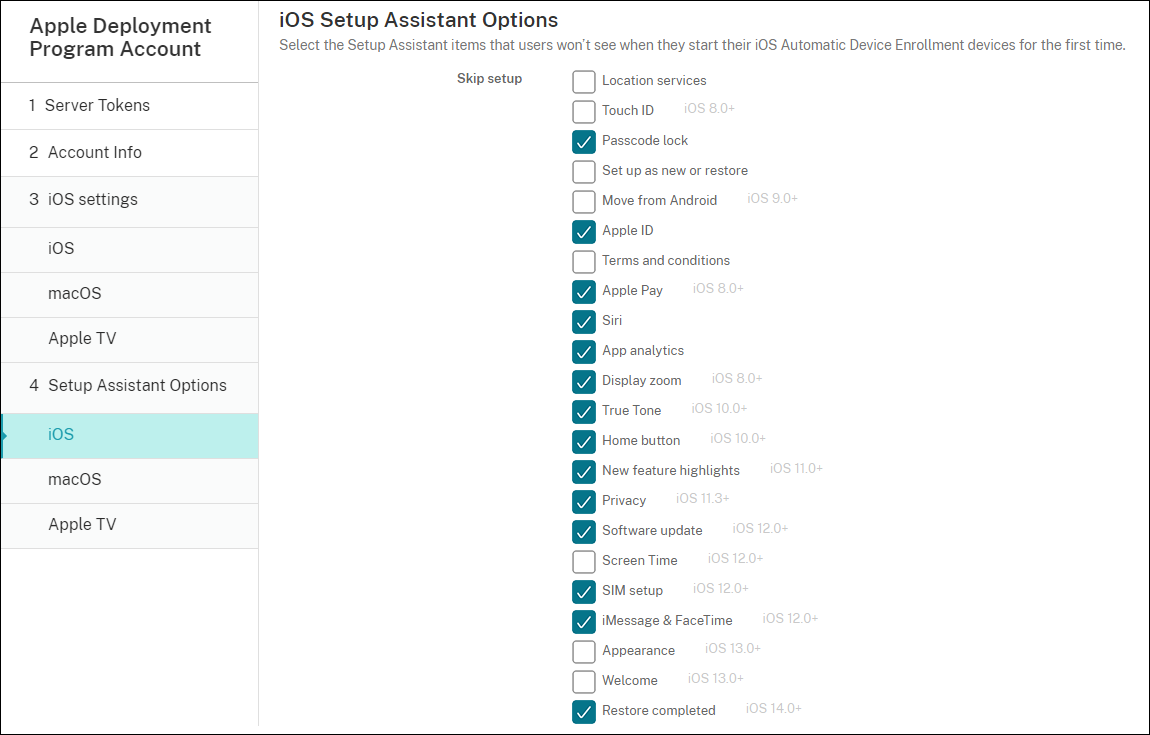
- Location services:Prevents users from setting up the location service on the device.
- Touch ID:Prevents users from setting up Touch ID or Face ID on iOS devices.
- Passcode lock:Prevents users from setting up a passcode for the device. If no passcode exists, users can’t use Touch ID or Apple Pay.
- Set up as new or restore:Prevents users from setting up the device as new or from an iCloud or Apple App Store backup.
- 从Android:Prevents users from transferring data from an Android device to an iOS device. This option is available only whenSet up as new or restoreis selected (that is, the step is skipped).
- Apple ID:Prevents users from setting up a Managed Apple ID account for the device.
- Terms and conditions:Prevents users from reading and accepting terms and conditions for use of the device.
- Apple Pay:Prevents users from setting up Apple Pay. If this setting is cleared, users must set up Touch ID and Apple ID. Ensure that those settings are cleared.
- Siri:Prevents the user from configuring Siri.
- App analytics:Prevents users from setting up whether to share crash data and usage statistics with Apple.
- Display zoom:Prevents users from setting up the display resolution (either standard or zoomed) on iOS devices.
- True Tone:Prevents users from setting up four-channel sensors to dynamically adjust the white balance of the display.
- Home button:Prevents users from setting up the Home button style of feedback.
- New feature highlights:Prevents users from seeing screens that display information about new features of Apple software.
- Privacy:Prevent users from seeing the data and privacy pane. For iOS 11.3 and later.
- Software update:Prevents users from updating iOS to the latest version. For iOS 12.0 and later.
- Screen Time:Prevents users from enabling Screen Time. For iOS 12.0 and later.
- SIM setup:Prevents users from setting up a cellular plan. For iOS 12.0 and later.
- iMessage & FaceTime:Prevents users from enabling iMessage and FaceTime. For iOS 12.0 and later.
- Appearance:Prevents users from selecting the appearance mode. For iOS 13.0 and later.
- Welcome:Prevents the user from seeing theGet Startedscreen. For iOS 13.0 and later.
- Restore completed:Prevents users from seeing whether a restore completes during setup. For iOS 14.0 and later.
- Update completed:Prevents users from seeing whether a software update completes during setup. For iOS 14.0 and later.
- App Store:Prevents users from setting up the App Store. For iOS 11.1 and later.
The account appears onSettings > Apple Deployment Program.
InmacOS Setup Assistant Options, select the steps that the macOS Setup Assistant skips when users start their devices the first time. When a screen is skipped, the related feature uses default settings. Users can configure the skipped features after setup completes unless you restrict access to those features completely. For more information about restricting access to features, seeRestrictions device policy. The default for all items is cleared. The following descriptions explain what occurs when a setting is selected.
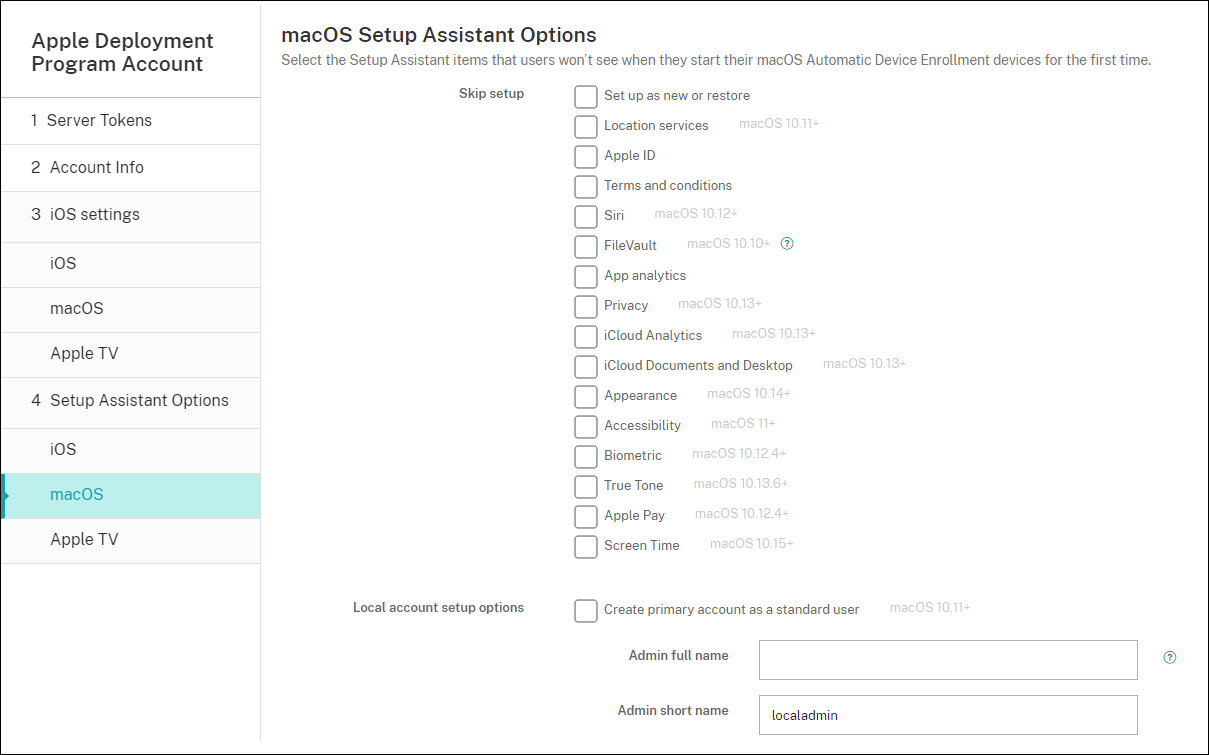
- Set up as new or restore:Prevents users from setting up the device as new or from a Time Machine backup or perform a system migration.
- Location services:Prevents users from setting up the location service on the device. For macOS 10.11 and later.
- Apple ID:Prevents users from setting up a Managed Apple ID account for the device.
- Terms and conditions:Prevents users from reading and accepting terms and conditions for use of the device.
- Siri:Prevents the user from configuring Siri. For macOS 10.12 and later.
FileVault:Use FileVault to encrypt the startup disk. Endpoint Management only applies the FileVault setting if the system has a single local user account and that account is signed into iCloud.
You can use the macOS FileVault Disk Encryption feature to protect the system volume by encrypting its contents (https://support.apple.com/en-us/HT204837). If you run the Setup assistant on a late-model portable Mac that doesn’t have FileVault turned on, you might be prompted to turn on this feature. The prompt appears on both new systems and systems upgraded to OS X 10.10 or 10.11, but only if the system has a single local administrator account and that account is signed into iCloud.
- App analytics:Prevents users from setting up whether to share crash data and usage statistics with Apple.
- Privacy:Prevent users from seeing the Data and privacy pane. For macOS 10.13 and later.
- iCloud Analytics:Prevent users from choosing whether to send diagnostic iCloud data to Apple. For macOS 10.13 and later.
- iCloud Documents and Desktop:Prevent users from setting up the iCloud Desktop and Documents. For macOS 10.13 and later.
- Appearance:Prevents users from selecting the appearance mode. For macOS 10.14 and later.
- Accessibility:Prevents the user from hearing Voice Over automatically. Only available if the device is connected to Ethernet. For macOS 11 and later.
- 生物识别:Prevents the user from setting up Touch ID and Face ID. For macOS 10.12.4 and later.
- True Tone:Prevents users from setting up four-channel sensors to dynamically adjust the white balance of the display. For macOS 10.13.6 and later.
- Apple Pay:Prevents users from setting up Apple Pay. If this setting is cleared, users must set up Touch ID and Apple ID. Make sure that theApple IDand生物识别settings are cleared.
- Screen Time:Prevents users from enabling Screen Time. For macOS 10.15 and later.
- App Store:Prevents user from setting up the App Store. For macOS 11.1 and later.
Unlock with Apple Watch:Prevents users from unlocking their Mac with an Apple Watch. For macOS 12 and later.
- Local account setup options:Specify the settings to create an account on the device. Endpoint Management first creates the local administrator account by using the information you specify here. When users activate their device, a user account is created as the primary account. TheCreate primary account as a standard useroption determines whether the primary account has administrator privileges.
Important:
You can selectCreate primary account as a standard useronly after you setWait for configuration to complete setuptoOnon themacOS settingspage.
- Create primary account as a standard user:When selected, Endpoint Management creates the user with standard permissions rather than granting the user administrator privileges on the device. Skip this option if you want to grant the user administrator privileges on the device. By default, this option is not selected.
- Admin full name:Type the name the system displays for the administrator account.
- Admin short name:Type the name that the device displays for the home folder and in the shell.
- Admin password:Type a secure password for the administrator account.
- Show administrator account in Users and Groups:If cleared, the administrator account doesn’t appear inUsers and Groupsin the macOS settings. If you create the primary account as a standard user, enable this setting to hide the administrator account that Endpoint Management first creates.
To enhance security, Endpoint Management checks whether to rotate the password of the administrator account daily. By default, Endpoint Management rotates the password every 7 days. To change the default, update the
mac.dep.admin.passwd.rotateserver property. For more information, seeServer properties.To increase password strength and security, Endpoint Management generates passwords as follows:
- 12 characters long
- 3 upper-case letters
- 3 lower-case letters
- 3 numbers
- 3 special characters:
! \@ \# \$ % \^ \* ? + = -
To view the previous password, the current password, and password change status for a device, go toManage > Devices. Click that device, clickShow more, and then view theDevice details > Generalpage. TheSecuritysection displays the following:
- Previous administrator password:Lets you view the previous password. Endpoint Management displays only the last password. ClickShow passwordto view the password.
- 当前管理员密码:Lets you view the current password.
- Change administrator password:Lets you view password change status. The following information might appear, depending on actual status:
- Password change was requested at
. - The password was changed at
. - Attempts to change the password failed at
. - The password has not yet been changed.
- Password change was requested at
InApple TV Setup Assistant Options, select the Apple TV Setup Assistant steps that your users skip when they start their devices the first time. The default for all items is cleared. Save the changes.

The account appears onSettings > Apple Deployment Program. To test connectivity between Endpoint Management and Apple, select the account and clickTest Connectivity.

A status message appears.


Order devices
You can order devices directly from the following channels:
- Apple. Provide your Apple customer numbers to the seller.
- Participating Apple Authorized Reseller or carriers. Provide your Organization ID to the seller and get its Reseller ID.
For more information about managing device suppliers, seeApple Business Manager User GuideorApple School Manager User Guide.
After your order ships, the Apple devices that you bought are added to your ABM or ASM account.
Assign devices to Endpoint Management
In the ABM or ASM portal, search for an order number and use it to assign devices in this order to your Endpoint Management. You can also add iPhone, iPad, iPod touch, and Apple TV devices to ABM or ASM by using Apple Configurator 2, regardless of where the devices were bought.
For more information, see theApple Business Manager User GuideorApple School Manager User Guide.
Buy content in volume and synchronize it to Endpoint Management
ABM and ASM let you buy, distribute, and manage licenses of apps and books in volume from a single organization account. To enable your Endpoint Management to communicate with ABM or ASM to get the license information for distribution, complete the following steps:
In the ABM or ASM portal, buy public apps and books from theApps and Booksand buy custom apps that are developed for your Endpoint Management fromCustom Apps.
Note:
如果端点管理是结合Citrix Workspace, buy theWorkspaceApp and configure it as a required app in Endpoint Management.
In the ABM or ASM portal, download the content token assigned to your Endpoint Management.
For more information about Steps 1 and 2, see theApple Business Manager User GuideorApple School Manager User Guide.
In the Endpoint Management console, create a volume purchase account based on the content token you downloaded.
For more information, seeAdding apps through Apple volume purchase.
After the volume purchase account is created, the apps and books that you bought appear inManage>Apps, and the devices that you assigned to the Endpoint Management server appear inManage > Devices.
Configure deployment rules for device policies and apps
You can associate ABM or ASM accounts with different device policies and apps when configuring device policies and apps.
- On theConfigure > Device PoliciesandConfigure > Appspages, expandDeployment Rules.
- Specify that a policy or app deploys for a particular ABM account or for all ABM accounts except the one selected.
The list of ABM accounts includes only those accounts with a status of enabled or disabled. If the ABM account is disabled, the ABM device doesn’t belong to this account. Therefore, Endpoint Management doesn’t deploy the app or policy to the device.
In the following example, a device policy deploys only for devices with the ABM account name “ABM Account NR.”
