
Citrix Content Collaboration single sign-on configuration guide for Citrix Gateway
You can configure Citrix Gateway ADC using the Citrix ADC AAA feature to function as a SAML identity provider.
In this configuration, a user signing in to Citrix Content Collaboration using a web browser or other Citrix Files clients is redirected to a virtual server on Citrix Gateway with a SAML IP policy enabled for user authentication. After successful authentication using Citrix Gateway, the user receives a SAML token that is valid to sign in to their Citrix Content Collaboration account.
The configuration is required for the SP certificate to be created so it can be imported on Citrix Gateway and bind it to your Citrix ADC AAA virtual server. It is assumed for the purposes of this document that you have already created the appropriate external and internal DNS entries to route authentication requests that Citrix Gateway listens on, and that an SSL certificate has already been created and installed on Citrix Gateway for the SSL/HTTPS communication.
Configure Citrix Content Collaboration
- Sign in to your account at
https://subdomain.sharefile.comwith a user account that has admin rights. - SelectSettings > Admin Settings。
- SelectSecurity > Login & Security Policy, scroll down and select theSingle Sign-On Configurationoption.
- UnderBasic Settings, checkEnable SAML。
- In theShareFile Issuer / Entity IDfield enter:
https://subdomain.sharefile.com/saml/acs - In theLogin URLfield, enter the URL that users are redirected to when using SAML. Example:
https://aaavip.mycompany.com/saml/login - In theLogout URL的注销URL字段中,输入用户到期’ session upon selecting the logout option in the web UI. Example:
https://aaavip.mycompany.com/cgi/tmlogout - For theX.509 Certificate, you must export the SSL certificate from your Citrix Gateway appliance that is going to be answering for your Citrix ADC AAA traffic. In the example above, this is referenced as being assigned the following FQDN:
aaavip.mycompany.com。
Follow the below steps to export this certificate.
- Sign in to your Citrix Gateway appliance using the Configuration Utility.
- SelectTraffic Management > SSL。
On the right, underneathTools, selectManage Certificates / Keys/ CSRs。
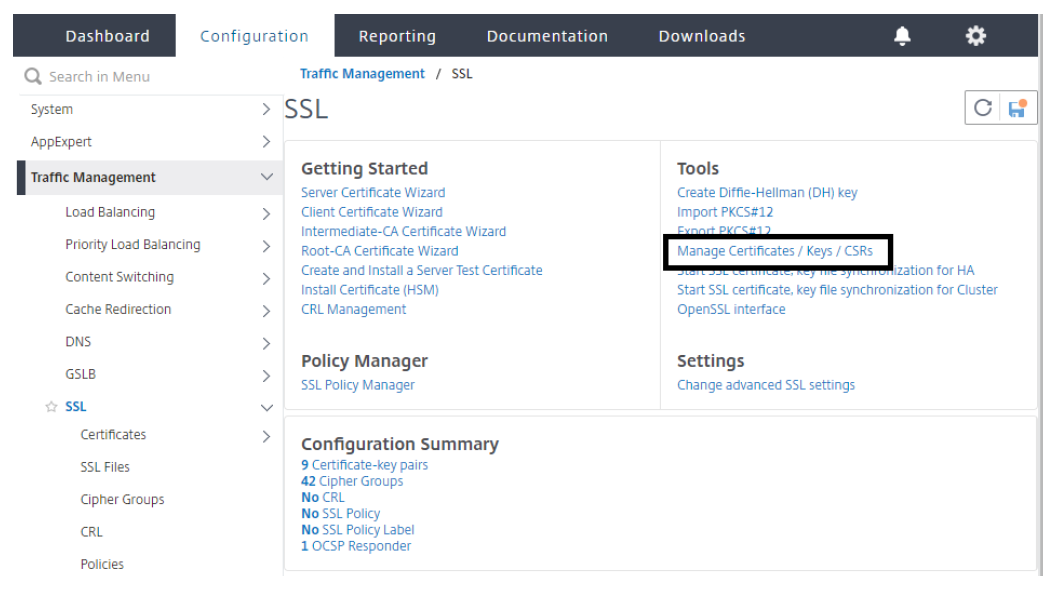
- From theManage Certificateswindow, browse to the certificate you are using for your Citrix ADC AAA virtual server. Select the certificate and choose theDownloadbutton. Save the certificate to a location of your choice.
- From the downloaded location, right-click on the certificate and open it with a text editor such as Notepad.
- Copy the entire contents of the certificate to your clipboard.
- Navigate back to your Citrix Content Collaboration account using the web browser.
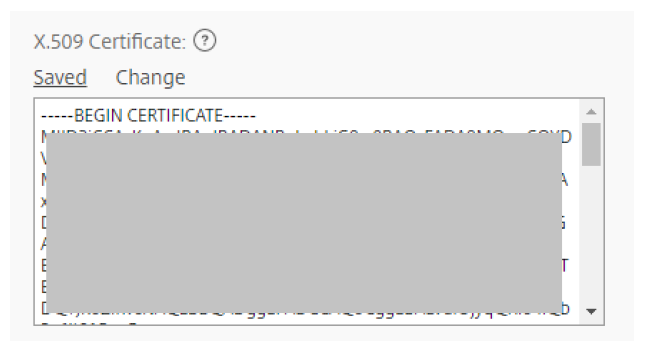
For theX.509 Certificate, selectChange。Paste the contents of the certificate you copied to your clipboard into the window.
SelectSave。
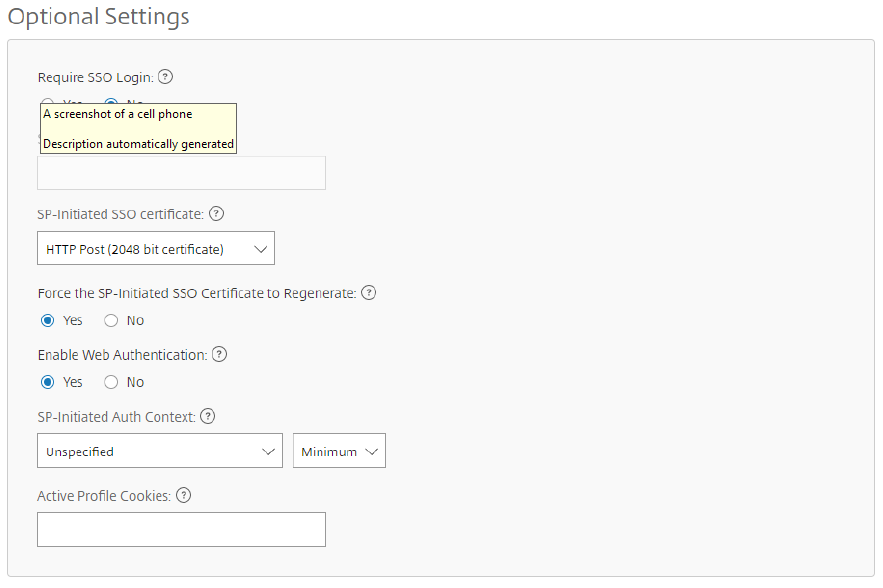
- UnderOptional Settings, switchRequire SSO Loginto yes if you want all employee users to be required to use their AD credentials to sign in.
- Select the list next toSP-Initiated SSO Certificate。From the list, selectHTTP Post (2048 bit certificate)。
- CheckYesto force the SP-Initiated SSO Certificate to regenerate.
- CheckYestoEnable Web Authentication。
UnderSP-Initiated Auth Context, chooseUnspecified。
- Select theSavebutton at the bottom of the screen.
Configure Citrix Gateway
The following configuration is required for support as a SAML identity provider:
- LDAP Authentication Policy and Server for domain authentication
- SSL Certificate with External / Internal DNS configured accordingly to the FQDN being presented by the certificate (Wildcard certificates are supported)
- ShareFile SP Certificate
- SAML IdP Policy and Profile
- Citrix ADC AAA Virtual Server
For the purposes of this material, we cover the LDAP configuration, the ShareFile SP Certificate importation on Citrix Gateway, theSAML IDPsettings, and the Citrix ADC AAA Virtual Server configuration. The SSL Certificate and DNS configurations must be in place prior to setup.
To configure domain authentication
For domain users to be able to sign in using their corporate email address, you must configure an LDAP Authentication Server and Policy on Citrix Gateway and bind it to your Citrix ADC AAA VIP. Use of an existing LDAP configuration is also supported.
- In the configuration utility, selectSecurity > AAA – Application Traffic > Policies > Authentication > Basic Policies > Policy > LDAPin the left navigation pane.
- To create an LDAP policy, on thePoliciestab, clickAdd…and then enterShareFile_LDAP_SSO_Policyas the name. In theAction Type, selectLDAP。
- In theActionfield, click+to add a server. TheCreate Authentication LDAP Serverwindow appears.
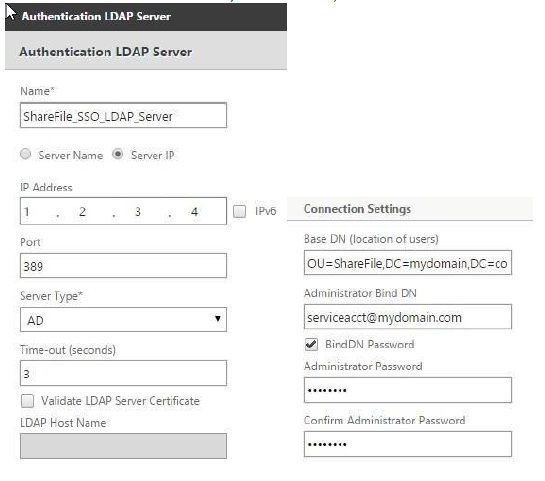
- In theNamefield, enterShareFile_LDAP_SSO_Server。
- Select the bullet forServer IP。Enter the IP address of one of your AD domain controllers. You can also point to a virtual server IP for redundancy if you are load-balancing DCs.
- Specify the port that the NSIP uses to communicate with the domain controller. Use389for LDAP or636for Secure LDAP.
- UnderConnection Settings, enter theBase DNwhere the user accounts reside in AD that you would like to allow authentication.Ex. OU=ShareFile,DC=domain,DC=com。
- In theAdministrator Bind DNfield, add a domain account (using an email address for ease of configuration) that has rights to browse the AD tree. A service account is advisable such that there are no issues with sign-ins if the account that is configured has a password expiration.
- Check the box forBind DN Passwordand supply the password twice.
- UnderOther Settings, entersAMAccountNameas theServer Logon Name Attribute。
- Under theGroup Attributefield, entermemberof。
- Under theSub Attributefield, enterCN。
- ClickMore。
- Scroll down and in theAttribute Fields, Attribute 1, entermail。
- Click theCreatebutton to complete the LDAP server settings.
- For theLDAP Policy Configuration, select the newly created LDAP server from the server menu, and in theExpressionfield, typetrue。
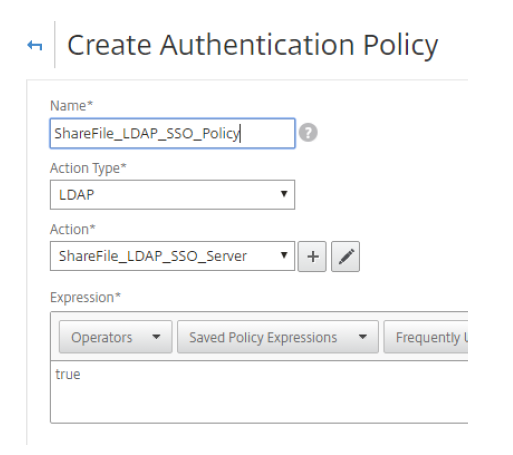
ClickCreateto complete the LDAP policy and server configuration.
To import the SP-Certificate onto Citrix Gateway
- Sign in to your account at
https://subdomain.sharefile.comwith a user account that has admin rights. - Select theSettings > Admin Settingslink near the left/center of the page. SelectSecurity > Logon & Security Policy, then scroll down toSingle Sign-On Configuration。
- UnderOptional Settings, next toSP-Initiated SSO Certificate,HTTP Post (2048 Bit Certificate)clickView。
- Copy the entire certificate hash to your clipboard and paste it into a text reader such as Notepad.
- Observe the formatting and remove any extra spaces or carriage returns at the end of the file, then save the text file asShareFile_SAML.cer。
- Navigate to the Citrix Gateway configuration utility.
- SelectTraffic Management > SSL > Certificates > CA Certificates。
- ClickInstall。
- From theInstall Certificatewindow, provide aCertificate-Key Pair Name。
- Under theCertificate File Namesection, select the menu next toBrowseand selectLocal。Browse to the location you saved theShareFile_SAML.cerfile.
- Once the file is chosen, selectInstall。
To configure the SAML IdP policy and profile
For your users to receive the SAML token to sign in to Citrix Content Collaboration, you must configure a SAML IdP policy and profile, which is bound to the Citrix ADC AAA virtual server that the users are providing their credentials to.
The following steps outline this process:
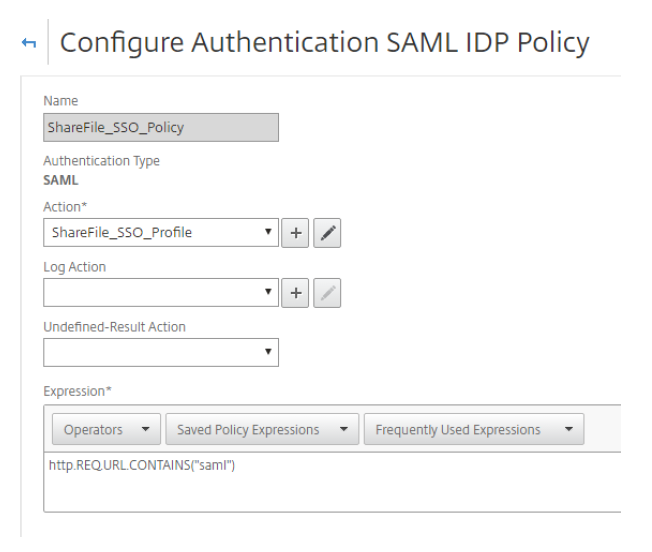
- Open the Citrix Gateway configuration utility and navigate toSecurity > AAA – Application Traffic > Policies > Authentication > Advanced Policies > SAML IDP。
- Under thePoliciestab, select theAddbutton.
- From theCreate Authentication SAML IDP Policywindow, provide a name for your policy, such asShareFile_SSO_Policy。
- To the right of theActionfield, select the+sign toAdd a new Action/Profile。
- Provide a name such asShareFile_SSO_Profileand remove the check box forImport Metadata。If you are running an older version of NetScaler, this check box might not exist.
- In theAssertion Consumer Service URLfield, enter your Citrix Content Collaboration account URL followed by /saml/acs:
Ex. https://subdomain.sharefile.com/saml/acs - In theIDP Certificate Namefield, browse to the certificate installed on Citrix Gateway that is used to secure your Citrix ADC AAA authentication virtual server.
- In theSP Certificate Namefield, select the menu and browse to the SP certificate you imported earlier and added as a CA certificate.
- ForSign Assertion, leaveASSERTION。
- ClearSend Password。
- In theIssuer Namefield, enter the URL for your Citrix ADC AAA traffic. Example –
https://aaavip.mycompany.com。 - LeaveService Provider ID空白。
- ClearReject Unsigned Requests。
- Signature Algorithm,RSA-SHA256
- Digest Method,SHA256。
- ForSAML Binding, selectPOST。
- ClickMore。
- Under theAudiencefield provide the URL for your Citrix Content Collaboration account.
- ForSkew Time, enter5。这允许一个differenc 5分钟时间e between the client, Citrix Gateway, and Citrix Content Collaboration.
- ForName ID Format, selectTransient。
In theName ID Expressionfield, type the following:
aaa.user.attribute(1)。If using NetScaler 11.x, typehttp.req.user.attribute(1)。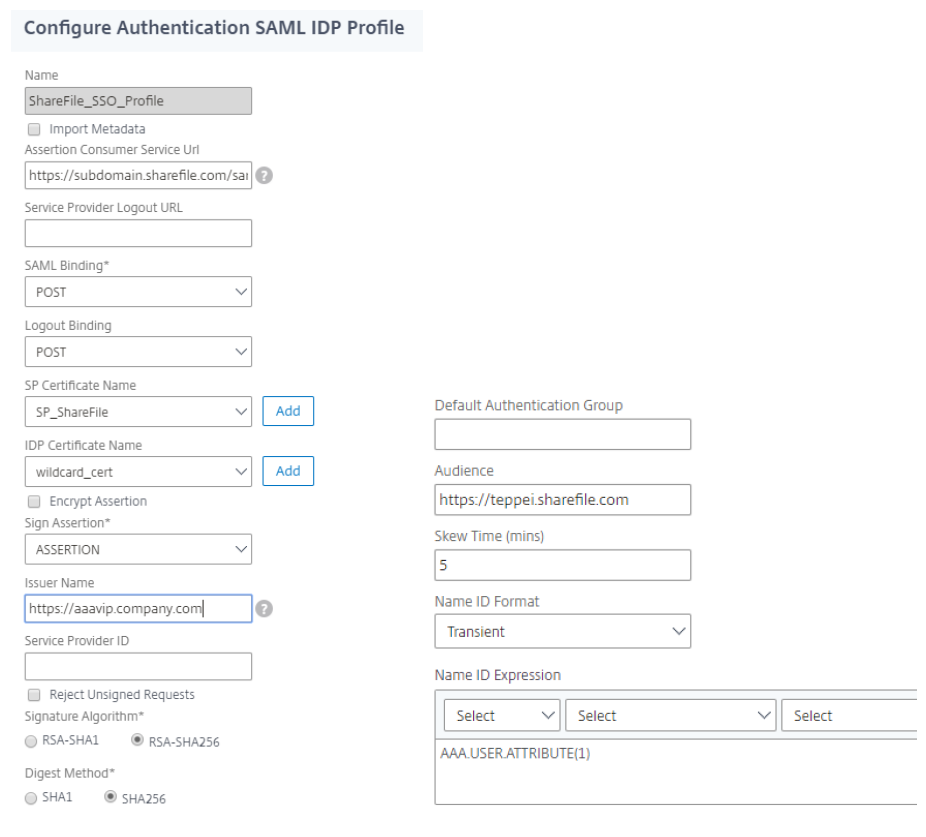
- ClickCreateto complete the SAML IdP profile configuration and return to the SAML IdP Policy creation window.
- In theExpressionfield, add the following expression:
HTTP.REQ.URL.CONTAINS(“saml”) ClickCreateto complete the SAML IdP configuration.
To configure your Citrix ADC AAA virtual server
When an employee attempts to sign in, for them to utilize their corporate credentials, they are redirected to a Citrix Gateway Citrix ADC AAA Virtual Server. This virtual server listens on port 443, which requires an SSL certificate, in addition to external and internal DNS resolution to the IP address being hosted on Citrix Gateway. The following steps require these pre-exist, assume that the DNS name resolution is already in place, and that the SSL certificate is already installed on your Citrix Gateway appliance.
- In the Configuration Utility, navigate toSecurity > AAA – Application Traffic > Virtual Serversand select theAddbutton.
- From theAuthentication Virtual Serverwindow, provide a name and an IP address.
Scroll down and make sure that theAuthenticationandStatecheck boxes are checked
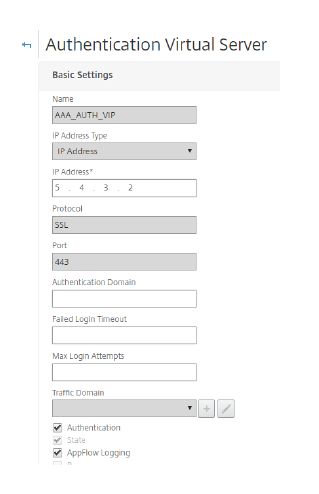
- ClickContinue。
- In theCertificatessection, clickNo Server Certificate。
- From theServer Cert Keywindow, clickBind。
- UnderSSL Certificates, choose your Citrix ADC AAA SSL Certificate and selectInsert。Note: This is NOT the ShareFile SP certificate
- ClickBind, then clickContinue。
- From theAdvanced Authentication Policiesoption, clickNo Authentication Policy。
- From thePolicy Bindingpage, selectPolicy, selectShareFile_LDAP_SSO_Policycreated earlier.
- ClickSelect, thenBind(leaving defaults) to return to the Authentication Virtual Server screen.
- UnderAdvanced Authentication Policies, clickNo SAML IDP Policy。
- UnderPolicies, select your SHAREFILE_SSO_POLICY. ClickSelect。
- From thePolicy Bindingpage (leave defaults), clickBind, thenClose。
- ClickContinueandDone。
Validate the configuration
- Go to
https://subdomain.sharefile.com/saml/login。你现在重定向到Citrix网关团体n-in form. - Sign in with your user credentials that are valid for the environment you configured. Your folders at
subdomain.sharefile.comnow appear.