
External user authentication
Authentication service in a Citrix ADC appliance can be local or external. In external user authentication, the appliance uses an external server such as LDAP, RADIUS, or TACACS+ to authenticate the user. To authenticate an external user and grant the user access into the appliance, you must apply an authentication policy. The Citrix ADC system authentication uses Advanced authentication policies with advanced policy expressions. The Advanced authentication policies are also used for the system user management in a partitioned Citrix ADC appliance.
Note
If your appliance is still using Classic policies and its expressions, you must stop using it and migrate your Classic policy usage to the Advanced policy infrastructure.
Once you create an authentication policy, you must bind it to the system global entity. You can configure an external authentication server (for example, TACACS) by binding a single authentication policy to the system global entity. Or, you can configure a cascade of authentication servers by binding multiple policies to the system global entity.
Note
When an external user logs into the appliance, the system generates an error message, “User does not exist” in the
ns.logfile. The occurrence is because the system runs the systemuser_systemcmdpolicy_binding command to initialize the GUI for the user.
LDAP authentication (using external LDAP servers)
You can configure the Citrix ADC appliance to authenticate user access with one or more LDAP servers. LDAP authorization requires identical group names in the Active directory, on the LDAP server, and on the appliance. The characters and case must also be the same.
For more information about LDAP authentication policies, seeLDAP authentication policiestopic.
By default, LDAP authentication is secured by using the SSL/TLS protocol. There are two types of secure LDAP connections. In the first type, the LDAP server accepts the SSL/TLS connection on a port separate from the port used to accept clear LDAP connections. After users establish the SSL/TLS connection, LDAP traffic can be sent over the connection. The second type allows both unsecure and secure LDAP connections and the single port handles it on the server. In this scenario, to create a secure connection, the client first establishes a clear LDAP connection. Then theLDAPcommand StartTLS is sent to the server over the connection. If the LDAP server supports StartTLS, the connection is converted to a secure LDAP connection by using TLS.
The port numbers for LDAP connections are:
- 389 for unsecured LDAP connections
- 636 for secure LDAP connections
- 3268 for Microsoft unsecure LDAP connections
- 3269 for Microsoft secure LDAP connections
LDAP connections that use the StartTLS command use port number 389. If port numbers 389 or 3268 are configured on the appliance, it tries to use StartTLS to make the connection. If any other port number is used, connection attempts use SSL/TLS. If StartTLS or SSL/TLS cannot be used, the connection fails.
When configuring the LDAP server, the case of the alphabetic characters must match that on the server and on the appliance. If the root directory of the LDAP server is specified, all subdirectories are also searched to find the user attribute. In large directories, it can affect performance. For this reason, Citrix recommends that you use a specific organizational unit (OU).
The following table lists examples of the base distinguished name (DN).
| LDAP server | Base DN |
|---|---|
| Microsoft Active Directory | DC=Citrix, DC=local |
| Novell eDirectory | dc=Citrix, dc=net |
| IBM Directory Server | cn=users |
| Lotus Domino | OU=City, O=Citrix, C=US |
| Sun ONE directory (formerly iPlanet) | ou=People, dc=Citrix, dc=com |
The following table lists examples of the bind distinguished name (DN).
| LDAP server | Bind DN |
|---|---|
| Microsoft Active Directory | CN=Administrator, CN=Users, DC=Citrix, DC=local |
| Novell eDirectory | cn=admin, dc=Citrix, dc=net |
| IBM Directory Server | LDAP_dn |
| Lotus Domino | CN=Notes Administrator, O=Citrix, C=US |
| Sun ONE directory (formerly iPlanet) | uid=admin, ou=Administrators, ou=TopologyManagement, o=NetscapeRoot |
Configure LDAP user authentication by using the CLI
Complete the following steps to configure LDAP authentication for external users
Configure LDAP policy
At the command prompt, do the following:
步骤1:创建LDAP行动。
add authentication ldapAction
Example:
add authentication ldapAction ldap_act -serverIP
For parameter description, seeAuthentication and authorization command referencetopic.
Step 2: Create a classic LDAP policy.
add authentication ldapPolicy
Example:
add authentication ldappolicy ldap_pol_classic ns_true ldap_act
Note
You can configure using a classic or an advanced LDAP policy but Citrix recommends you to use advanced authentication policy because classic policies are deprecated from the Citrix ADC 13.0 release onwards.
Step 3: Create an advanced LDAP policy
add authentication Policy
Example:
add authentication policy ldap_pol_advance -rule true -action ldap_act
Step 4: Bind the LDAP policy to system global
At the command line prompt, do the following:
bind system global
Example:
bind system global ldap_pol_advanced -priority 10
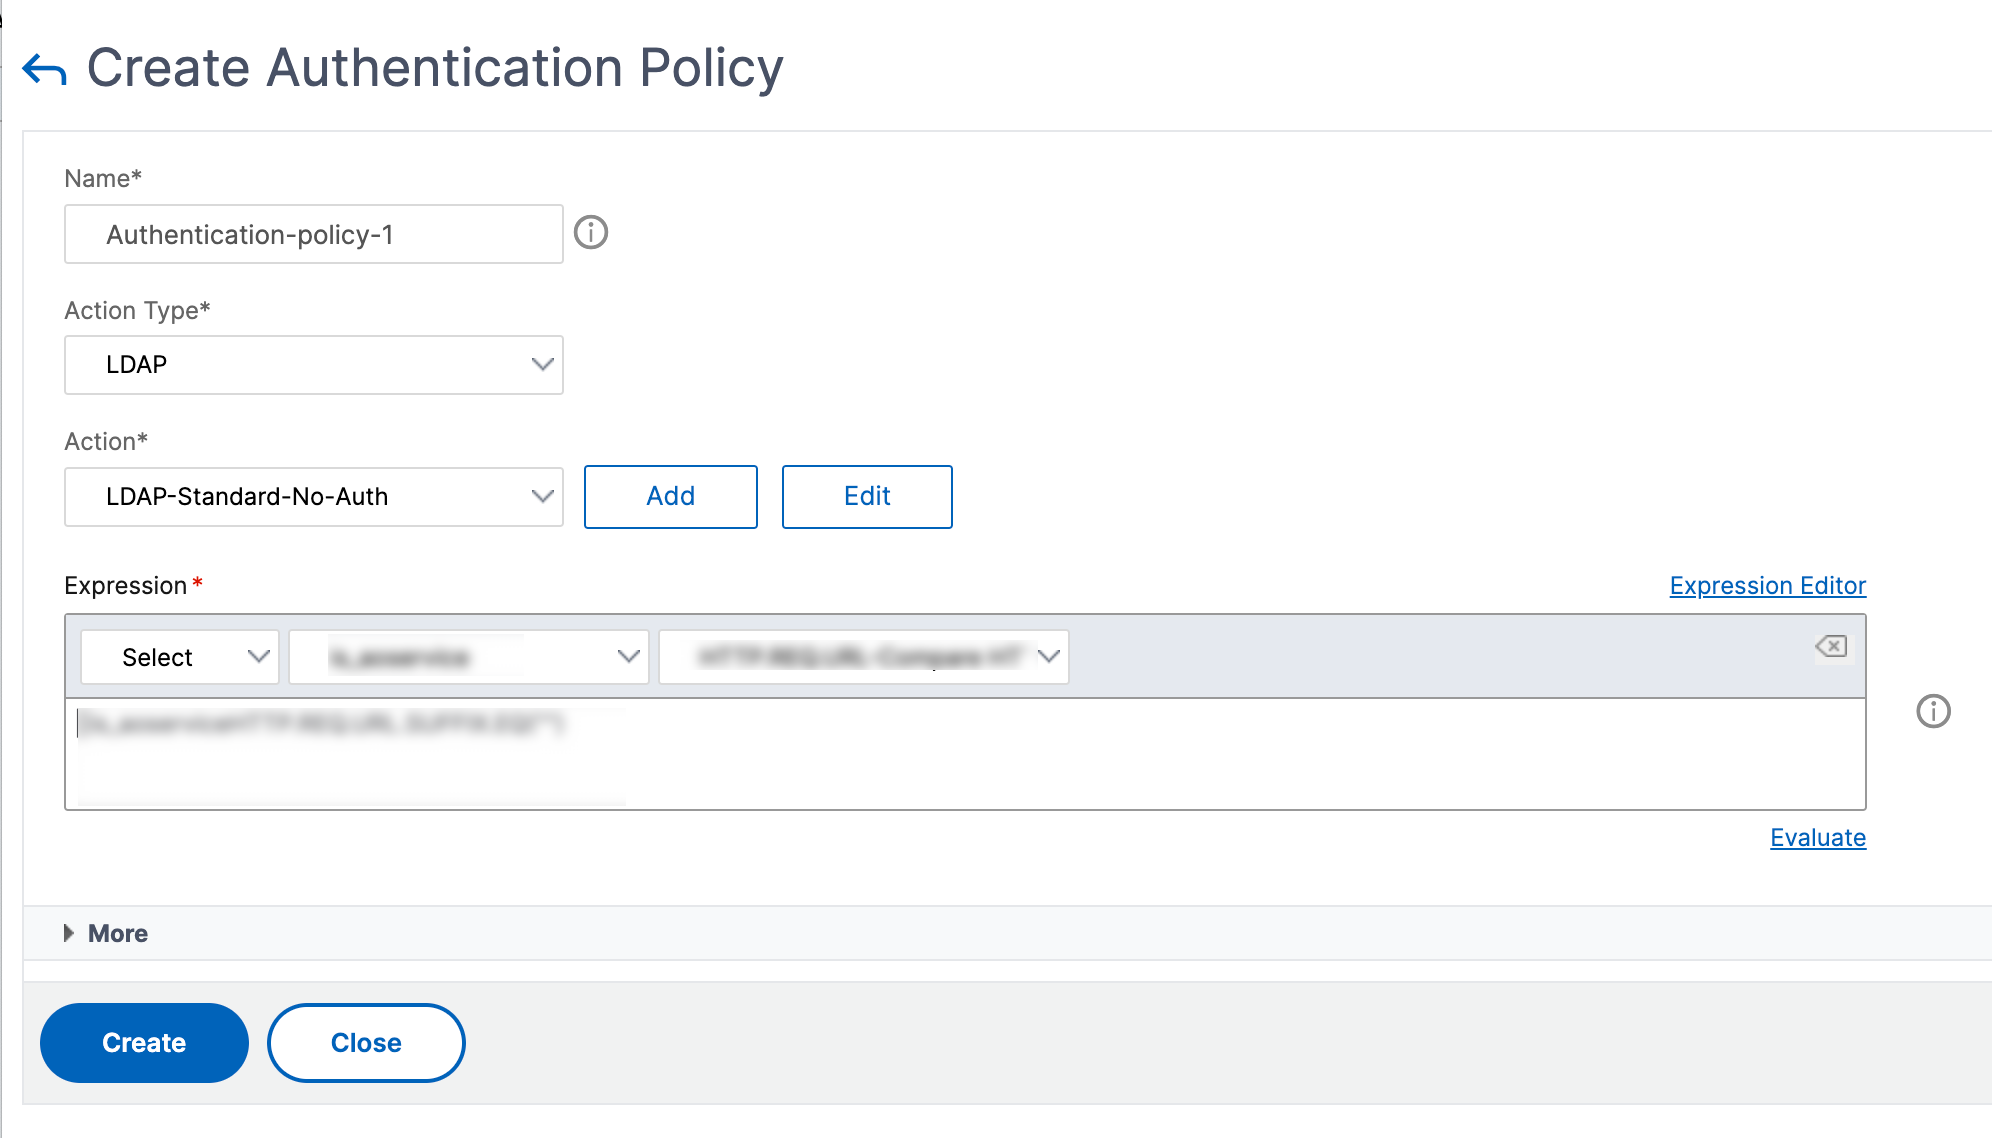
Configure LDAP user authentication by using the Citrix ADC GUI
- Navigate toSystem>Authentication>Advanced Policies>Policy.
- ClickAddto create an authentication policy of type LDAP.
- ClickCreateandClose.
Bind an authentication policy to the system global for LDAP authentication using the Citrix ADC GUI
- Navigate toSystem>Authentication>Advanced Policies>Authentication PoliciesPolicy.
- In the details pane, clickGlobal Bindingsto create system global authentication policy binding.
ClickGlobal Bindings.

Select an authentication profile.

- Select the LDAP policy.
In theSystem Global Authentication Policy Bindingpage, set the following parameters:
- Select Policy.
- Binding Details
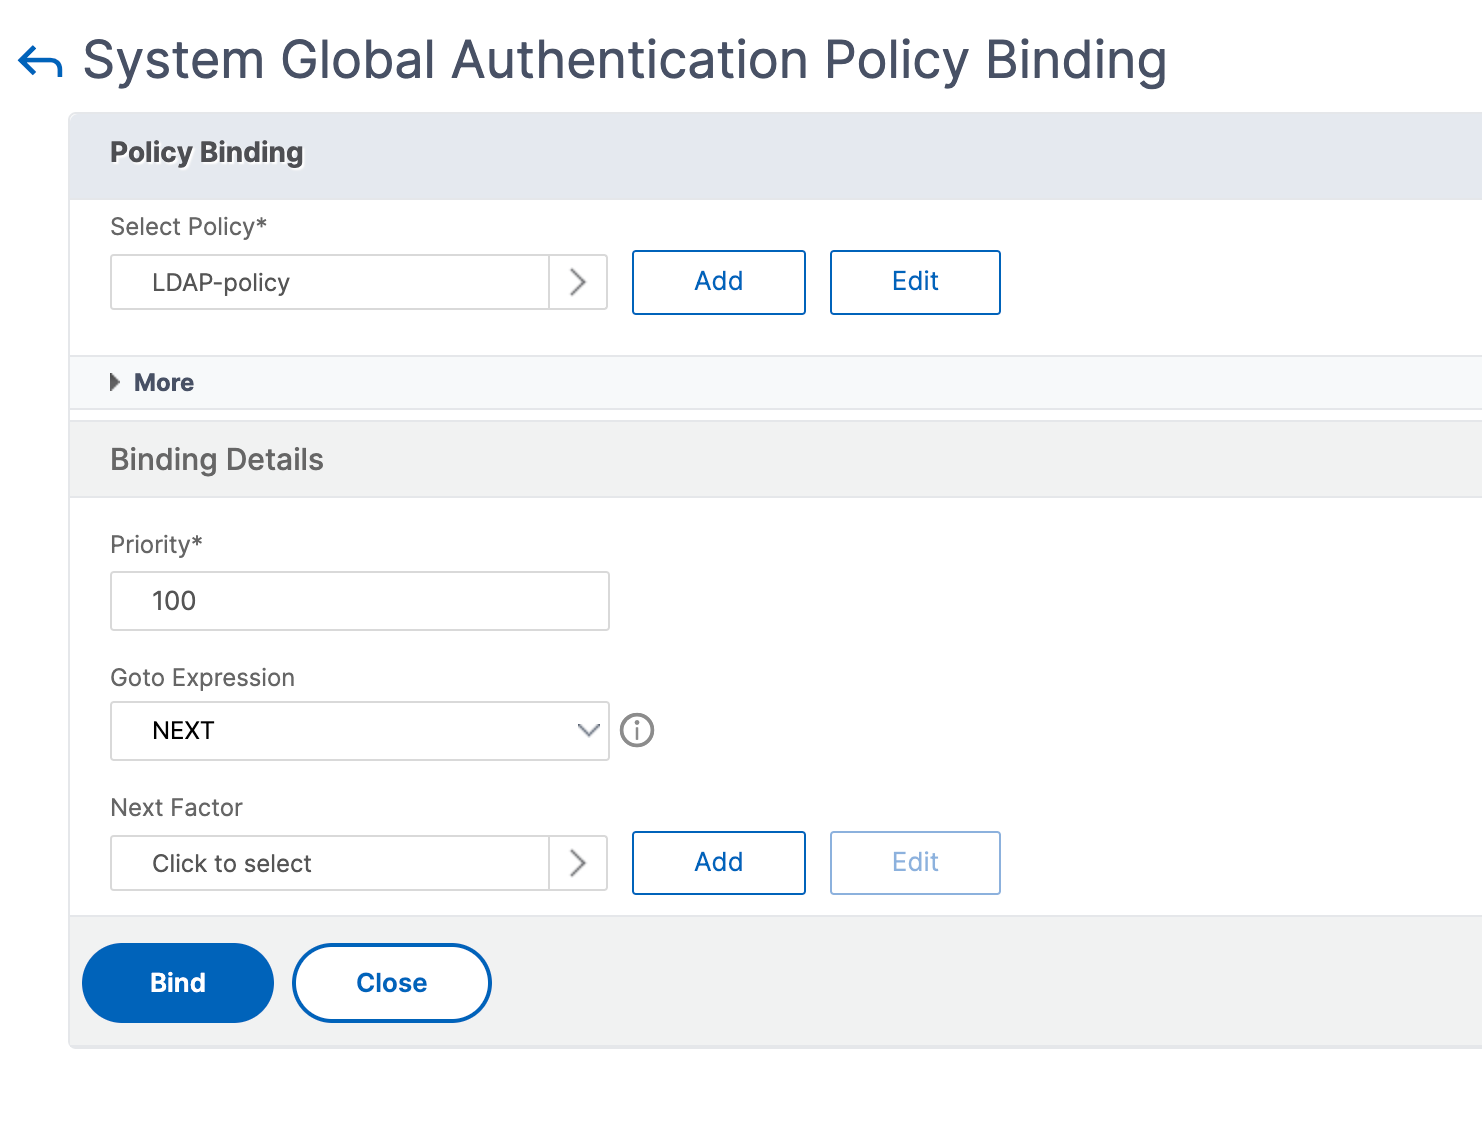
- ClickBindandDone.
ClickGlobal Bindingsto confirm the policy bounded to the system global.

Determining attributes in the LDAP directory
If you need help with determining your LDAP directory attributes, you can easily look them up with the free LDAP browser from Softerra.
You can download the LDAP browser from the Softerra LDAP Administrator website at
- The host name or IP address of your LDAP server.
- The port of your LDAP server. The default is 389.
- The base DN field can be left blank.
- The information provided by the LDAP browser can help you determine the base DN needed for the Authentication tab.
- The Anonymous Bind check determines whether the LDAP server requires user credentials for the browser to connect to it. If the LDAP server requires credentials, leave the check box cleared.
After completing the settings, the LDAP browser displays the profile name in the left pane and connects to the LDAP server.
For more information, seeLDAPtopic.
Key-based authentication support for LDAP users
With key-based authentication, you can now fetch the list of public keys that are stored on the user object in the LDAP server through SSH. The Citrix ADC appliance during the role-based authentication (RBA) process must extract public SSH keys from the LDAP server. The retrieved public key, which is compatible with SSH, must allow you to log in through the RBA method.
A new attribute “sshPublicKey” is introduced in the “add authentication ldapAction” and “set authentication ldapAction” commands. By using this attribute, you can obtain the following benefits:
- Can store the retrieved public key, and the LDAP action uses this attribute to retrieve SSH key information from LDAP server.
- Can extract attribute names of up to 24 KB.
Note
The external authentication server, such as LDAP is used only to retrieve SSH key information. It is not used for authentication purpose.
Following is an example of the flow of events through SSH:
- SSH daemon sends an AAA_AUTHENTICATE request with password field empty to authentication, authorization, and auditing daemon port.
- If LDAP is configured to store the SSH public key, authentication, authorization, and auditing responds with “sshPublicKey” attribute along with other attributes.
- SSH daemon verifies these keys with the client keys.
- SSH daemon passes user name in the request payload, and authentication, authorization, and auditing returns the keys specific to this user along with generic keys.
To configure the sshPublicKey attribute, at the command prompt type the following commands:
With add operation, you can add “sshPublicKey” attribute while configuring ldapAction command.
add authentication ldapAction{-serverIP }} [-serverPort ] … [-Attribute1 ] … [-Attribute16 ][-sshPublicKey ][-authentication off] With set operation, you can configure “sshPublicKey” attribute to an already added ldapAction command.
set authentication ldapAction[-sshPublicKey ][-authentication off]
RADIUS authentication (using external RADIUS servers)
You can configure the Citrix ADC appliance to authenticate user access with one or more RADIUS servers. If you are using RSA SecurID, SafeWord, or Gemalto Protiva products, use a RADIUS server.
For more information about RADIUS authentication policies, seeRADIUS authentication policiestopic.
Your configuration might require using a network access server IP address (NAS IP) or a network access server identifier (NAS ID). When configuring the appliance to use a RADIUS authentication server, use the following guidelines:
- If you enable use of the NAS IP, the appliance sends its configured IP address to the RADIUS server, rather than the source IP address used in establishing the RADIUS connection.
- If you configure the NAS ID, the appliance sends the identifier to the RADIUS server. If you do not configure the NAS ID, the appliance sends its host name to the RADIUS server.
- When the NAS IP address is enabled, the appliance ignores any NAS ID that it used for communicating with the RADIUS server.
Configure RADIUS user authentication by using the CLI
At the command prompt, do the following:
Step 1: Create an RADIUS action
add authentication radiusaction
Where,radVendorIDRADIUS vendor ID attribute, used for RADIUS group extraction.radAttributeTypeRADIUS attribute type, used for RADIUS group extraction.
Example:
add authentication radiusaction RADserver531 rad_action -serverip 1.1.1.1 -radkey key123 -radVendorID 66 -radattributetype 6
Step 2: Create a classic RADIUS policy.
add authentication radiusPolicy
Example:
add authentication radiuspolicy radius_pol_classic ns_true radius_act
Note
You can configure using a classic or an advanced RADIUS policy. Citrix recommends you to use the advanced authentication policy because classic policies are deprecated from the Citrix ADC 13.0 release onwards.
Step 3: Create an advanced RADIUS policy
add authentication policy
Example:
add authentication policy rad_pol_advanced -rule true -action radserver531rad_action
Step 4: Bind the RADIUS policy to the system global.
bind system global
Example:
bind system global radius_pol_advanced -priority 10
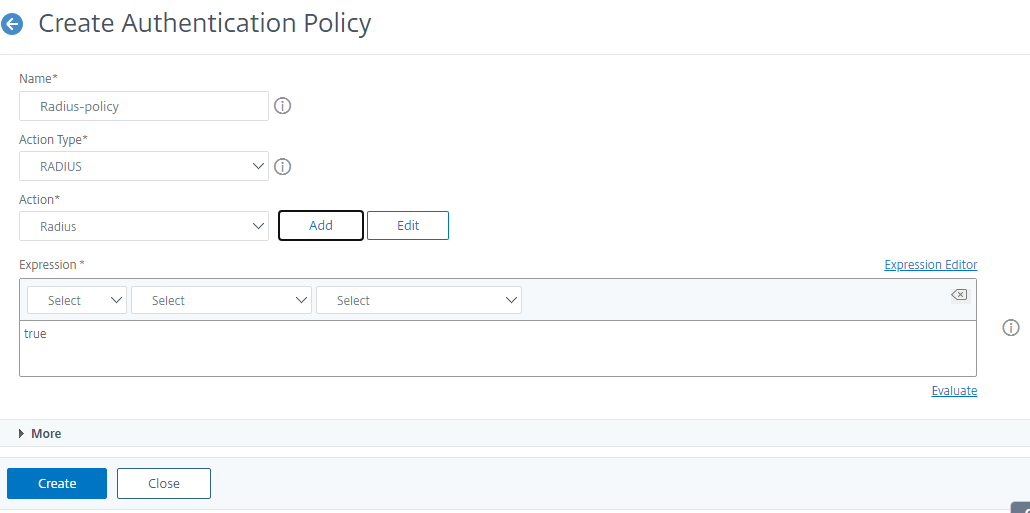
Configure RADIUS user authentication by using the GUI
- Navigate toSystem>Authentication>Advanced Policies>Policy.
- ClickAddto create an authentication policy of type RADIUS.
- ClickCreateandClose.
Bind the authentication policy to the system global for RADIUS authentication by using the GUI
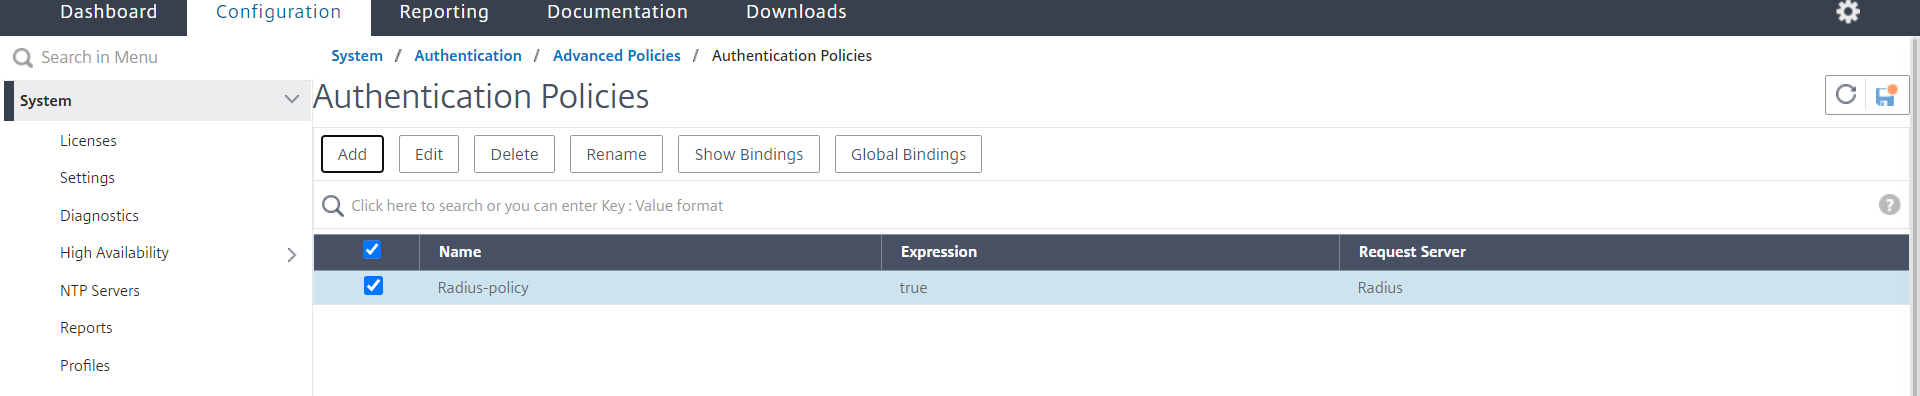
- Navigate toSystem>Authentication>Advanced Policies>Policy.
- In the details pane, clickGlobal Bindingsto create system global authentication policy binding.
ClickGlobal Bindings.
- Select RADIUS.
In theSystem Global Authentication Policy Bindingpage, set the following parameters:
- Select Policy.
- Binding Details.
- ClickBindandClose.
ClickGlobal Bindingsto confirm the policy bounded to the system global.

Choose RADIUS user authentication protocols
Citrix ADC应用ance supports implementations of RADIUS that are configured to use any of several protocols for user authentication, including:
- Password Authentication Protocol
- Challenge-Handshake Authentication Protocol (CHAP)
- Microsoft Challenge-Handshake Authentication Protocol (MS-CHAP Version 1 and Version 2)
If your deployment is configured to use RADIUS authentication and your RADIUS server is configured with a Password Authentication Protocol. You can strengthen user authentication by assigning a strong shared secret to the RADIUS server. Strong RADIUS shared secrets consist of random sequences of uppercase and lowercase letters, numbers, and punctuation, and are minimum 22 characters in length. If possible, use a random character generation program to determine RADIUS shared secrets.
To further protect RADIUS traffic, assign a different shared secret to each appliance or virtual server. When you define clients on the RADIUS server, you can also assign a separate shared secret to each client. Also, you must configure separately each policy that uses RADIUS authentication.
Configure IP address extraction
You can configure the appliance to extract the IP address from a RADIUS server. When a user authenticates with the RADIUS server, the server returns a framed IP address that is assigned to the user. The following are attributes for IP address extraction:
- Allows a remote RADIUS server to supply an IP address from the internal network for a user logged on to the appliance.
- Allows configuration for any RADIUS attribute using the type ip-address, including that are vendor encoded.
When configuring the RADIUS server for IP address extraction, you configure the vendor identifier and the attribute type.
The vendor identifier enables the RADIUS server to assign an IP address to the client from a pool of IP addresses that are configured on the RADIUS server. The vendor ID and attributes are used to make the association between the RADIUS client and the RADIUS server. The vendor ID is the attribute in the RADIUS response that provides the IP address of the internal network. A value of zero indicates that the attribute is not vendor encoded. The attribute type is the remote IP address attribute in a RADIUS response. The minimum value is one and the maximum value is 255.
A common configuration is to extract theRADIUSattributeframed IP address. The vendor ID is set to zero or is not specified. The attribute type is set to eight.
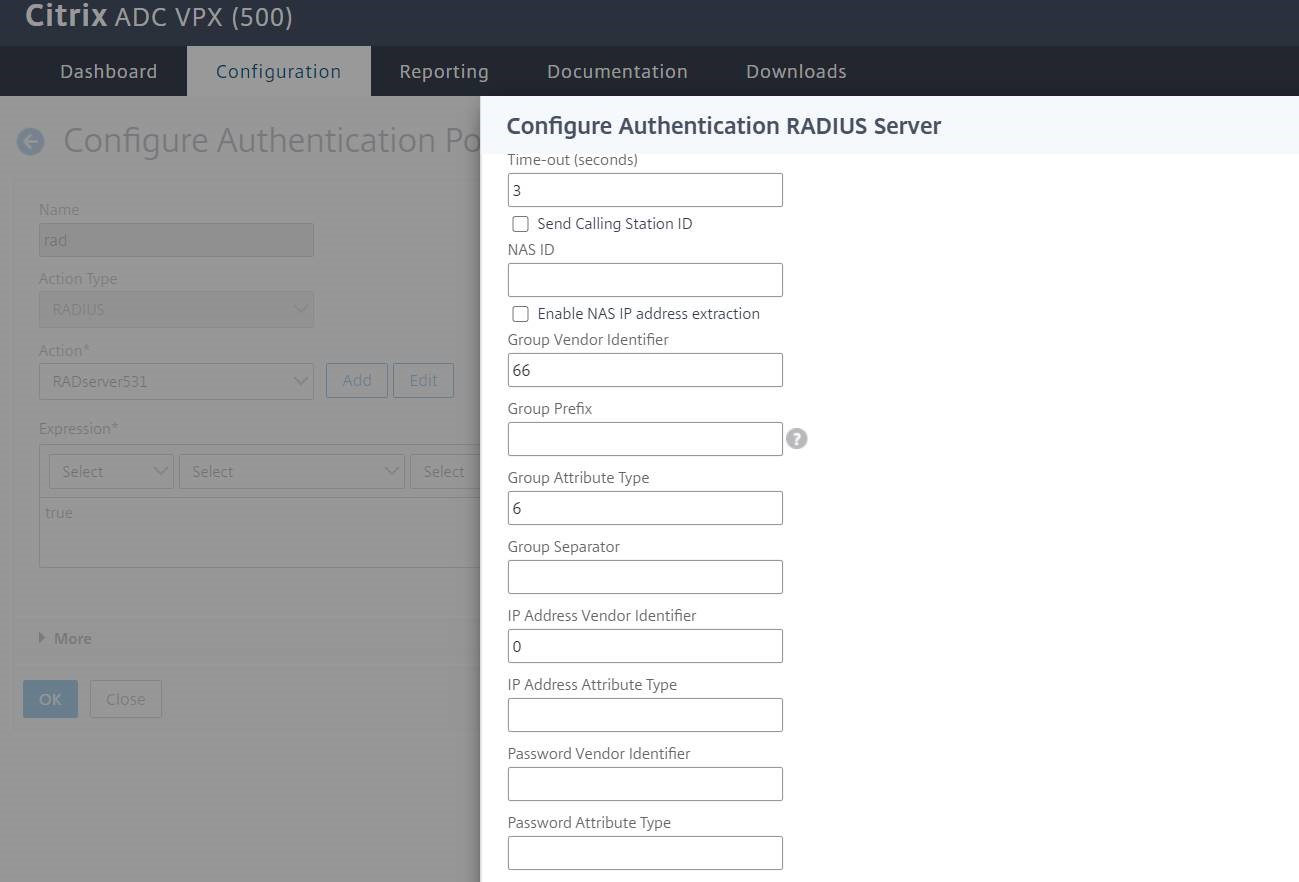
Group extraction for RADIUS by using the GUI
- Navigate toSystem>Authentication>Advanced Policies>Radius, and select a policy.
- Select or create RADIUS policy.
In theConfigure Authentication RADIUS Serverpage, set the following parameters.
- Group Vendor Identifier
- Group Attribute Type
ClickOKandClose.
TACACS+ authentication (using external TACACS+ servers)
Important
Citrix recommends you do not modify any TACACS related configurations when you run a “clear ns config” command.
TACACS related configuration related to advanced policies is cleared and reapplied when the
RBAconfigparameter is set to NO in “clear ns config” command for advanced policy.When the
RBAconfigparameter is set to NO as part of the “clear config” operation, Citrix ADC retains the management access sessions, in addition to retaining the RBA configurations and TACACS policies.
You can configure a TACACS+ server for authentication. Similar to RADIUS authentication, TACACS+ uses a secret key, an IP address, and the port number. The default port number is 49. To configure the appliance to use a TACACS+ server, provide the server IP address and the TACACS+ secret. You must specify port only when the server port number in use is something other than the default port number of 49.
For more information, seeTACACS authentication.
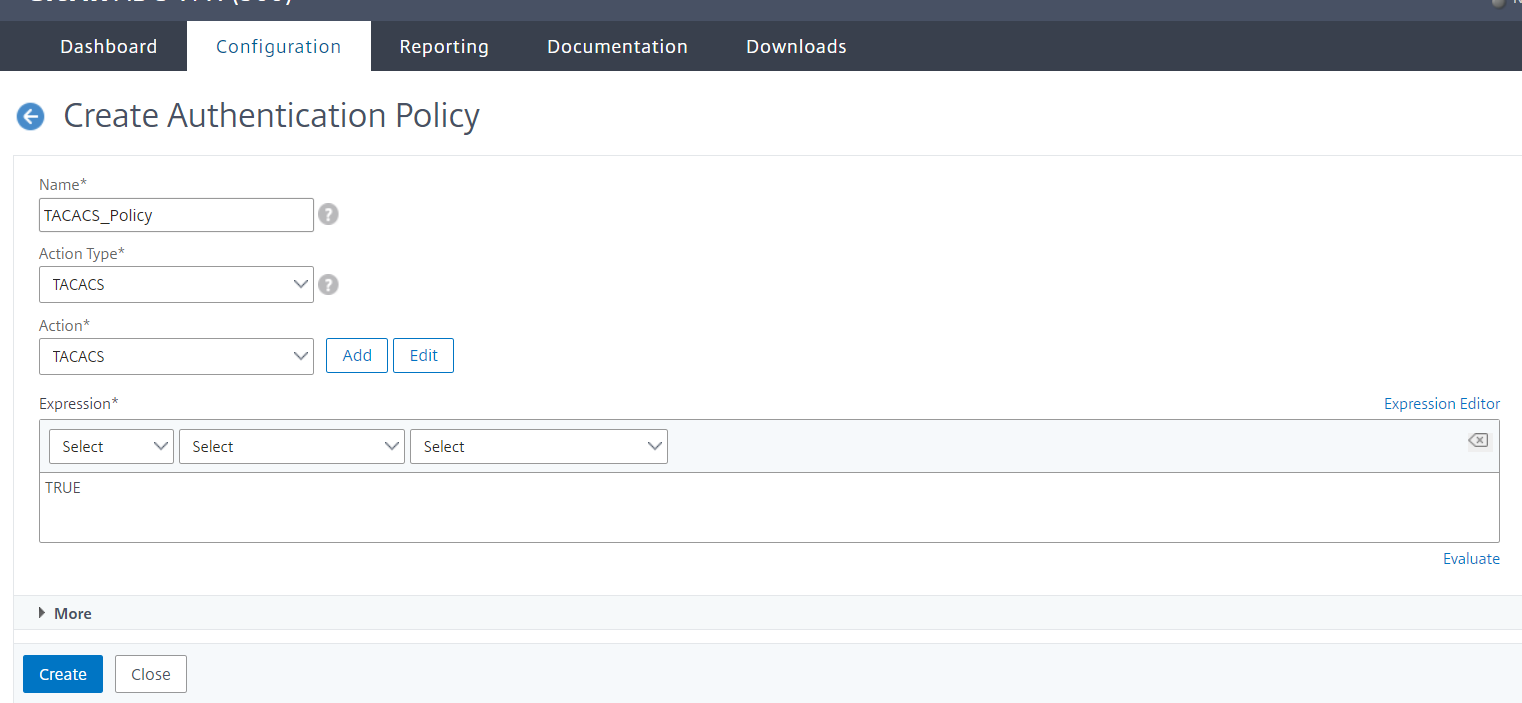
Configure TACACS+ authentication by using the GUI
- Navigate toSystem>Authentication>Advanced Policies>Policy.
- ClickAddto create an authentication policy of type TACACS.
- ClickCreateandClose.
After the TACACS+ server settings are configured on the appliance, bind the policy to the system global entity.
Bind authentication policies to the system global entity by using the CLI
When the authentication policies are configured, bind the policies to the system global entity.
At the command line prompt, do the following:
bind system global
Example:
bind system global pol_classic -priority 10
Also, read the Citrix article,CTX113820to know about external authentication using TACACS.
Bind authentication policies to the system global entity by using the GUI
- Navigate toSystem>Authentication>Advanced Policies>Authentication Policies > Policy.
- In the details pane, clickGlobal Bindingsto create system global authentication policy binding.
ClickGlobal Bindings.
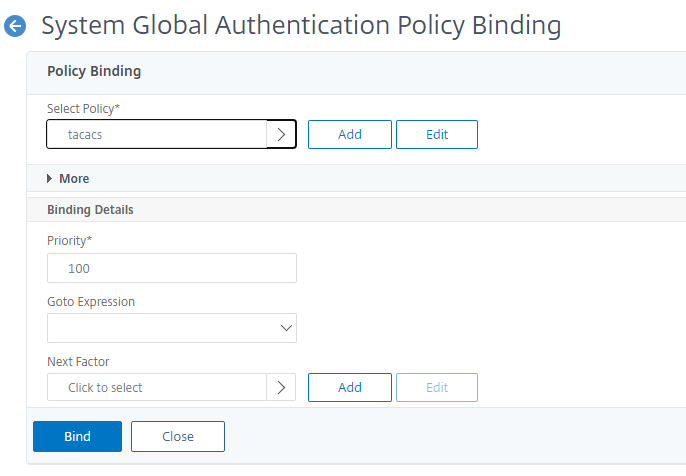
- Select the TACACS policy.
In the System Global Authentication Policy Binding page, set the following parameters:
- Select Policy.
- Binding Details
- ClickBindandClose.
ClickGlobal Bindingsto confirm the policy bounded to the system global.
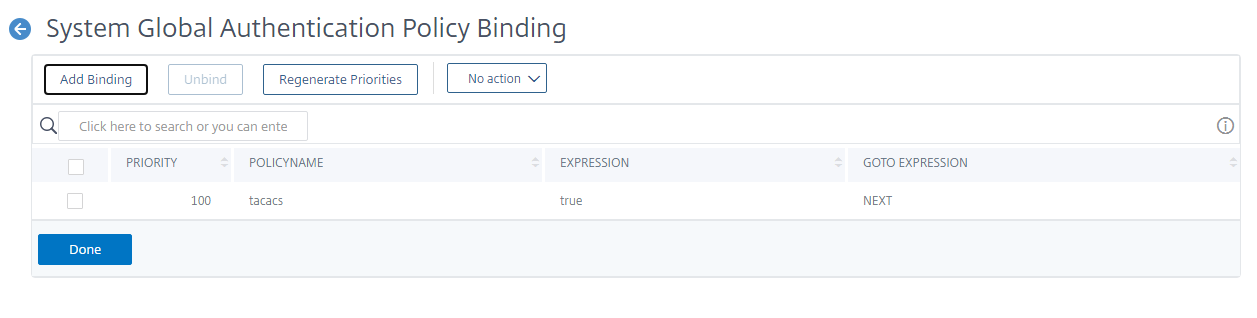
For more information about TACACS group extraction, read Citrix articleCTX220024.
Display number of unsuccessful logon attempts for external users
Citrix ADC应用ance displays the number of invalid login attempts to the external user when you attempt at least one unsuccessful login before successfully logging on to the Citrix ADC management console.
Note
目前,Citrix interacti只支持键盘ve authentication for external users with the “persistentLoginAttempts” parameter enabled in the system parameter.
At the command prompt, type:set aaa parameter -maxloginAttempts
Example:set aaa parameter –maxloginAttempts 5 -failedLoginTimeout 4 –persistentLoginAttempts ENABLED
味精后会被外部用户当he tries 1 invalid login attempt before successfully login to the ADC management access. Connection established. To escape to local shell, press 'Ctrl+Alt+]'. ############################################################################### # # # WARNING: Access to this system is for authorized users only # # Disconnect IMMEDIATELY if you are not an authorized user! # # # ############################################################################### WARNING! The remote SSH server rejected X11 forwarding request. Last login: Mon Aug 24 17:09:00 2020 from 10.10.10.10 The number of unsuccessful login attempts since the last successful login : 1 Done > The number of unsuccessful login attempts since the last successful login : 1 Done > In this article
- LDAP authentication (using external LDAP servers)
- Key-based authentication support for LDAP users
- RADIUS authentication (using external RADIUS servers)
- TACACS+ authentication (using external TACACS+ servers)
- Bind authentication policies to the system global entity by using the CLI
- Display number of unsuccessful logon attempts for external users