
Configuring the AppFlow feature
You configure AppFlow in the same manner as most other policy-based features. First, you enable the AppFlow feature. Then you specify the collectors to which the flow records are sent. After that, you define actions, which are sets of configured collectors. Then you configure one or more policies and associate an action to each policy. The policy tells the Citrix ADC appliance to select requests the flow records of which are sent to the associated action. Finally, you bind each policy either globally or to the specific virtual server to put it into effect.
You can further set AppFlow parameters to specify the template refresh interval and to enable the exporting of httpURL, httpCookie, and httpReferer information. On each collector, you must specify the Citrix ADC IP address as the address of the exporter.
Note
For information about configuring the Citrix ADC as an exporter on the collector, see the documentation for the specific collector.
The configuration utility provides tools that help users define the policies and actions. It determines exactly how the Citrix ADC appliance export records for a particular flow to a set of collectors(action.) The command line interface provides a corresponding set of CLI-based commands for experienced users who prefer a command line.
Enabling AppFlow
To be able to use the AppFlow feature, you must first enable it.
Note
AppFlow can be enabled only on nCore Citrix ADC appliances.
To enable the AppFlow feature by using the command line interface
At the command prompt, type one of the following commands:
enable ns feature AppFlow 通过使用configu启用演示applow特性ration utility
Navigate toSystem > Settings, clickConfigure Advanced Features, and select theAppFlowoption.
Specifying a Collector
A collector receives AppFlow records generated by the Citrix ADC appliance. To send the AppFlow records, you must specify at least one collector. By default, the collector listens to IPFIX messages on UDP port 4739. You can change the default port, when configuring the collector. Similarly, by default, NSIP is used as the source IP for AppFlow traffic. You can change this default source IP to a SNIP address when configuring a collector. You can also remove unused collectors.
To specify a collector by using the command line interface
Important
Starting from Citrix ADC release 12.1 build 55.13, you can specify the type of collector that you want to use. A new parameter “Transport” is introduced in the
add appflow collectorcommand. By default, the collector listens to IPFIX messages. You can change the type of collector to eitherlogstreamoripfix通过使用“运输”参数或休息。更多的我nformation on configuration, see the example.
At the command prompt, type the following commands to add a collector and verify the configuration:
- add appflow collector -IPAddress -port -netprofile -Transport - show appflow collector Example
add appflow collector col1 -IPaddress 10.102.29.251 -port 8000 -netprofile n2 -Transport ipfix To specify multiple collectors by using the command line interface
At the command prompt, type the following commands to add and send same data to multiple collectors:
add appflow collector -IPAddress add appflow collector -IPAddress add appflow action -collectors add appflow policy true bind lbvserver -policy -priority To specify one or more collectors by using the configuration utility
Navigate toSystem > AppFlow > Collectors, and create the AppFlow collector.
Configuring an AppFlow Action
An AppFlow action is a set collector, to which the flow records are sent if the associated AppFlow policy matches.
To configure an AppFlow action by using the command line interface
At the command prompt, type the following commands to configure an AppFlow action and verify the configuration:
add appflow action --collectors ... [-clientSideMeasurements (Enabled|Disabled) ] [-comment ] show appflow action Example
add appflow action apfl-act-collector-1-and-3 -collectors collector-1 collecter-3 To configure an AppFlow action by using the configuration utility
Navigate toSystem > AppFlow > Actions, and create the AppFlow action.
Configuring an AppFlow Policy
After you configure an AppFlow action, you must next configure an AppFlow policy. An AppFlow policy is based on a rule, which consists of one or more expressions.
Note
For creating and managing AppFlow policies, the configuration utility provides assistance that is not available at the command line interface.
To configure an AppFlow policy by using the command line interface
At the command prompt, type the following command to add an AppFlow policy and verify the configuration:
add appflow policy show appflow policy Example
add appflow policy apfl-pol-tcp-dsprt client.TCP.DSTPORT.EQ(22) apfl-act-collector-1-and-3 To configure an AppFlow policy by using the configuration utility
Navigate toSystem > AppFlow > Policies, and create the AppFlow policy.
To add an expression by using the Add Expression dialog box
In the Add Expression dialog box, in the first list box choose the first term for your expression.
- HTTP The HTTP protocol. Choose the option if you want to examine some aspect of the request that pertains to the HTTP protocol.
SSL
The protected websites. Choose the option if you want to examine some aspect of the request that pertains to the recipient of the request.
CLIENT
The computer that sent the request. Choose the option if you want to examine some aspect of the sender of the request. When you make your choice, the rightmost list box lists appropriate terms for the next part of your expression.
- In the second list box, choose the second term for your expression. The choices depend upon which choice you made in the previous step, and are appropriate to the context. After you make your second choice, the Help window below the Construct Expression window (which was blank) displays help describing the purpose and use of the term you just chose.
- Continue choosing terms from the list boxes that appear to the right of the previous list box, or typing strings or numbers in the text boxes that appear to prompt you to enter a value, until your expression is finished.
Binding an AppFlow Policy
To put a policy into effect, you must bind it either globally, so that it applies to all traffic that flows through the Citrix ADC, or to a specific virtual server, so that the policy applies only to the traffic related to that virtual server.
When you bind a policy, you assign it a priority. The priority determines the order in which the policies you define are evaluated. You can set the priority to any positive integer.
In the Citrix ADC operating system, policy priorities work in reverse order—the higher the number, the lower the priority. For example, if you have three policies with priorities of 10, 100, and 1000, the policy assigned a priority of 10 is performed first. Later, the policy assigned with a priority of 100, and finally the policy assigned an order of 1000.
You can leave yourself plenty of a room to add other policies in any order, and still set them to evaluate in the order you want. You can achieve by setting priorities with intervals of 50 or 100 between each policy when you globally bind it. You can then add more policies at any time without having to change the priority of an existing policy.
To globally bind an AppFlow policy by using the command line interface
At the command prompt, type the following command to globally bind an AppFlow policy and verify the configuration:
bind appflow global [] [-invoke ( )] show appflow global Example
bind appflow global af_policy_lb1_10.102.71.190 1 NEXT -type REQ_OVERRIDE -invoke vserver google To bind an AppFlow policy to a specific virtual server by using the command line interface
At the command prompt, type the following command to bind an AppFlow policy to a specific virtual server and verify the configuration:
bind lb vserver -policyname -priority Example
bind lb vserver google -policyname af_policy_google_10.102.19.179 -priority 251 To globally bind an AppFlow policy by using the configuration utility
Navigate toSystem > AppFlow, clickAppFlow policy Manager, and select the relevant Bind Point (Default Global) and Connection Type, and then bind the AppFlow policy.
To bind an AppFlow policy to a specific virtual server by using the configuration utility
Navigate toTraffic Management > Load Balancing > Virtual Servers, select the virtual server, and clickPolicies, and bind the AppFlow policy.
Enabling AppFlow for Virtual Servers
If you want to monitor only the traffic through certain virtual servers, enable AppFlow specifically for those virtual servers. You can enable AppFlow for load balancing, content switching, cache redirection, SSL VPN, GSLB, and authentication virtual servers.
To enable AppFlow for a virtual server by using the command line interface
At the command prompt, type:
set cs vserver -appflowLog ENABLED Example
set cs vserver Vserver-CS-1 HTTP 10.102.29.161 80 -appflowLog ENABLED To enable AppFlow for a virtual server by using the configuration utility
Navigate toTraffic Management > Content Switching > Virtual Servers, select the virtual server, and enable AppFlow Logging option.
Enabling AppFlow for a Service
You can enable AppFlow for services that are to be bound to the load balancing virtual servers.
To enable AppFlow for a service by using the command line interface
At the command prompt, type:
set service -appflowLog ENABLED Example
set service ser -appflowLog ENABLED To enable AppFlow for a service by using the configuration utility
Navigate toTraffic Management > Load Balancing > Services, select the service, and enable AppFlow Logging option.
Setting the AppFlow Parameters
You can set AppFlow parameters to customize the exporting of data to the collectors.
To set the AppFlow Parameters by using the command line interface
Important
Starting from Citrix ADC release 12.1 build 55.13, you can use the NSIP to send
Logstreamrecords instead of the SNIP. A new parameter “logstreamOverNSIP” is introduced in theset appflow paramcommand. By default, the “logstreamOverNSIP” parameter is DISABLED, you must “ENABLE” it. For more information on configuration, see the example.Starting from Citrix ADC release 13.0 build 58.x release, you can enable the Web SaaS application option in AppFlow feature. It can be enabled to receive the data usage of Web or SaaS applications from the Citrix Gateway service. For more information on configuration, see the example.
At the command prompt, type the following commands to set the AppFlow parameters and verify the settings:
——设置演示applow param -templateRefresh <秒>][- appnameRefresh ] [-flowRecordInterval ] [-udpPmtu ] [-httpUrl ( **ENABLED** | **DISABLED** )] [-httpCookie ( **ENABLED** | **DISABLED** )] [-httpReferer ( **ENABLED** | **DISABLED** )] [-httpMethod ( **ENABLED** | **DISABLED** )] [-httpHost ( **ENABLED** | **DISABLED** )] [-httpUserAgent ( **ENABLED** | **DISABLED** )] [-httpXForwardedFor ( **ENABLED** | **DISABLED** )][-clientTrafficOnly ( **YES** | **NO**)] [-webSaaSAppUsageReporting ( **ENABLED** | **DISABLED** )] [-logstreamOverNSIP ( **ENABLED** | **DISABLED** )] - show appflow Param Example
set appflow Param -templateRefresh 240 -udpPmtu 128 -httpUrl enabled -webSaaSAppUsageReporting ENABLED -logstreamOverNSIP ENABLED To set the AppFlow parameters by using the configuration utility
Navigate toSystem > AppFlow, clickChange AppFlow Settings, and specify relevant AppFlow parameters.
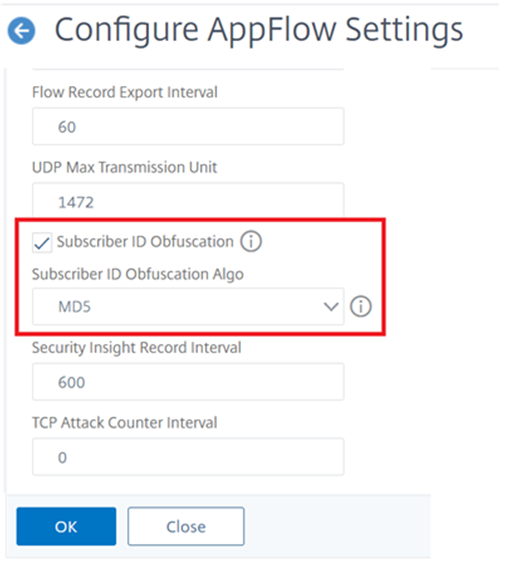
Support for subscriber ID obfuscation
Starting from Citrix ADC release 13.0 build 35.xx, the AppFlow configuration is enhanced to support “subscriberIdObfuscation” algorithm for obfuscating MSISDN in layer 4 or layer 7, AppFlow records. However, before configuring the algorithm as MD5 or SHA256, you must first enable it as an AppFlow parameter. The parameter is disabled by default.
To configure the subscriber ID obfuscation algorithm by using the CLI
At the command prompt, type:
set appflow param [-subscriberIdObfuscation ( ENABLED | DISABLED ) [-subscriberIdObfuscationAlgo ( MD5 | SHA256 )]] Example
set appflow param –subscriberIdObfuscation ENABLED – subscriberIdObfuscationAlgo SHA256 To configure the subscriber ID obfuscation algorithm by using the GUI
- Navigate toSystem > AppFlow.
- In the AppFlow detailed pane, clickChange AppFlow SettingunderSettings.
In Configure AppFlow Settings page, set the following parameters:
- Subscriber ID Obfuscation.Enable the option for obfuscation MSISDN in L4/L7 AppFlow records.
- Subscriber ID Obfuscation Algo.Select algorithm type as MD5 or SHA256.
ClickOKandClose.
Example: Configuring AppFlow for DataStream
The following example illustrates the procedure for configuring AppFlow for DataStream using the command line interface.
enable feature appflow add db user sa password freebsd add lbvserver lb0 MSSQL 10.102.147.97 1433 -appflowLog ENABLED add service sv0 10.103.24.132 MSSQL 1433 -appflowLog ENABLED bind lbvserver lb0 sv0 add appflow collector col0 -IPAddress 10.102.147.90 add appflow action act0 -collectors col0 add appflow policy pol0 "mssql.req.query.text.contains("select")" act0 bind lbvserver lb0 -policyName pol0 -priority 10 When the Citrix ADC appliance receives a database request, the appliance evaluates the request against a configured policy. If a match is found, the details are sent to the AppFlow collector configured in the policy.
In this article
- Enabling AppFlow
- Specifying a Collector
- Configuring an AppFlow Action
- Configuring an AppFlow Policy
- Binding an AppFlow Policy
- Enabling AppFlow for Virtual Servers
- Enabling AppFlow for a Service
- Setting the AppFlow Parameters
- Support for subscriber ID obfuscation
- Example: Configuring AppFlow for DataStream