
Use case 7: Configure load balancing in DSR mode by using IP Over IP
You can configure a Citrix ADC appliance to use direct server return (DSR) mode across Layer 3 networks by using IP tunneling, also calledIP over IPconfiguration. As with standard load balancing configurations for DSR mode, this allows servers to respond to clients directly instead of using a return path through the Citrix ADC appliance. This improves response time and throughput. As with standard DSR mode, the Citrix ADC appliance monitors the servers and performs health checks on the application ports.
With IP over IP configuration, the Citrix ADC appliance and the servers do not need to be on the same Layer 2 subnet. Instead, the Citrix ADC appliance encapsulates the packets before sending them to the destination server. After the destination server receives the packets, it decapsulates the packets, and then sends its responses directly to the client. This is often referred to as L3DSR.
To configure L3-DSR mode on your Citrix ADC appliance:
- Create a load balancing virtual server. Set the mode to IPTUNNEL and enable sessionless tracking.
- Create services. Create a service for each back-end application and bind the services to the virtual server.
- Configure for decapsulation. Configure either a Citrix ADC appliance or a back-end server to act as a decapsulator.
Note:
When you use a Citrix ADC appliance, the decapsulation setup is an IP tunnel between the ADC appliances with the back end doing L2DSR to the real servers.
Configure a load balancing virtual server
Configure a virtual server to handle requests to your applications. Assign the service type that matches the service, or use a type of ANY for multiple services. Set the forwarding method to IPTUNNEL and enable the virtual server to operate in sessionless mode. Configure any load balancing method that you want to use.
创建和配置一个负载均衡虚拟erver for IP over IP DSR by using the command line interface
At the command prompt type the following command to configure a load balancing virtual server for IP over IP DSR and verify the configuration:
add lb vserver serviceType IPAddress Port -lbMethod -m -sessionless [ENABLED | DISABLED] show lb vserver Example:
In the following example, we have selected the load balancing method as sourceIPhash and configured sessionless load balancing.
加磅vserver Vserver-LB-1 1.1.1.80 * -lbMethod SourceIPHash -m IPTUNNEL -sessionless ENABLED 创建和配置一个负载均衡虚拟erver for IP over IP DSR by using the GUI
- Navigate toTraffic Management > Load Balancing > Virtual Servers.
- Create a virtual server, and specify Redirection Mode asIP Tunnel Based.
Configure services for IP over IP DSR
After creating your load-balanced server, configure one service for each of your applications. The service handles traffic from the Citrix ADC appliance to those applications, and allows the Citrix ADC appliance to monitor the health of each application.
Assign the services to use USIP mode and bind a monitor of type IPTUNNEL to the service for tunnel-based monitoring.
To create and configure a service for IP over IP DSR by using the command line interface
At the command prompt, type the following commands to create a service and optionally, create a monitor and bind it to the service:
add service -usip add monitor -destip -iptunnel bind service -monitorName Example:
In the following example, a monitor of type IPTUNNEL is created.
add monitor mon_DSR PING -destip 1.1.1.80 -iptunnel yes add service svc_DSR01 2.2.2.100 ANY * -usip yes bind service svc_DSR01 -monitorName mon_DSR An alternative approach to simplify the routing at both the server and the ADC appliance is to setup both the ADC and server to use an IP from the same subnet. Doing so ensures that any traffic with a destination of a tunnel endpoint is sent over the tunnel. In the example, 10.0.1.0/30 is used.
Note:
The purpose of the monitor is to ensure that the tunnel is active by reaching the loopback of each server through the IP tunnel. If the service is not up, verify whether the outer IP routing between ADC and server is good. Also verify whether the inner IP addresses are reachable through the IP tunnel. Routes might be required on the server, or PBR is added to ADC depending on the chosen implementation.
Example:
add ns ip 10.0.1.2 255.255.255.252 -vServer DISABLED add netProfile netProfile_DSR -srcIP 10.0.1.2 add lb monitor mon_DSR PING -LRTM DISABLED -destIP 1.1.1.80 -ipTunnel YES -netProfile netProfile_DSR To configure a monitor by using the GUI
- Navigate toTraffic Management > Load Balancing > Monitors.
- Create a monitor, and selectIP Tunnel.
To create and configure a service for IP over IP DSR by using the GUI
- Navigate toTraffic Management > Load Balancing > Services.
- Create a service and, inSettingstab, selectUse Source IP Address.
To bind a service to a load balancing virtual server by using the command line interface
At the command prompt type the following command:
bind lb vserver Example:
bind lb vserver Vserver-LB-1 Service-DSR-1 To bind a service to a load balancing virtual server by using the GUI
- Navigate toTraffic Management > Load Balancing > Virtual Servers.
- Open a virtual server, and click in theServicessection to bind a service to the virtual server.
Using the client IP address in the Outer header of tunnel packets
The Citrix ADC supports using the client-source IP address as the source IP address in the outer header of tunnel packets related to direct server return mode using IP tunneling. This feature is supported for DSR with IPv4 and DSR with IPv6 tunneling modes. For enabling this feature, enable theuse client source IP addressparameter for IPv4 or IPv6. This setting is applied globally to all the DSR configurations that use IP tunneling.
To use a client-source IP address as the source IP address by using the CLI
At the command prompt, type:
set iptunnelparam -useclientsourceip [YES | NO]show iptunnelparam
To use client source IP address as the source IP address by using the GUI
- Navigate toSystem > Network.
- InSettingstab, clickIPv4 Tunnel Global Settings.
- In theConfigure IPv4 Tunnel Global Parameterspage, selectUse Client Source IPcheck box.
- ClickOK.
To use client source IP address as the source IP address by using the CLI
At the command prompt, type:
set ip6tunnelparam -useclientsourceip [YES | NO]show ip6tunnelparam
To use client source IP address as the source IP address by using the GUI
- Navigate toSystem > Network.
- InSettingstab, clickIPv6 Tunnel Global Settings.
- In theConfigure IPv6 Tunnel Global Parameterspage, selectUse Client Source IPcheck box.
- ClickOK.
Decapsulation configuration
You can configure either a Citrix ADC appliance or a back-end server as a decapsulation.
Citrix ADC decapsulation
When a Citrix ADC appliance is used as a decapsulation, an IP tunnel must be created in the Citrix ADC appliance. For more details, seeConfiguring IP Tunnels.
The Citrix ADC decapsulation setup consists of the following two virtual servers:
- The first virtual server receives the encapsulated packet and removes the outer IP encapsulation.
- 第二个虚拟服务器的IPal service on the front-end ADC and uses MAC translation to forward the packet towards the back end by using the MAC address of the bound services. This setup is typically known as L2DSR. Ensure to disable ARP on this virtual server.
Example setup:
The following illustration shows a decapsulation setup using the ADC appliances.
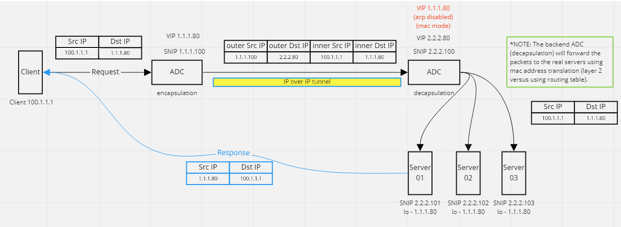
The complete configuration required for the setup is as follows.
Front-end ADC configuration:
add service svc_DSR01 2.2.2.80 ANY * -usip YES -useproxyport NO add lb vserver vip_DSR_ENCAP ANY 1.1.1.80 * -lbMethod SOURCEIPHASH -m IPTUNNEL -sessionless ENABLED bind lb vserver vip_DSR_ENCAP svc_DSR01 Back-end ADC configuration:
添加ipTunnel DSR-IPIP 1.1.1.100 255.255.255.255 *add service svc_DSR01_01 2.2.2.101 ANY * -usip YES -useproxyport NO add service svc_DSR01_02 2.2.2.102 ANY * -usip YES -useproxyport NO add service svc_DSR01_03 2.2.2.103 ANY * -usip YES -useproxyport NO add lb vserver vs_DSR_DECAP ANY 2.2.2.80 * -lbMethod SOURCEIPHASH -m IPTUNNEL -sessionless ENABLED -netProfile netProf_DSR_MBF_noIP add ns ip 1.1.1.80 255.255.255.255 -type VIP -arp DISABLED -snmp DISABLED add lb vserver vs_DSR_Relay ANY 1.1.1.80 * -lbMethod SOURCEIPHASH -m MAC -sessionless ENABLED bind lb vserver vs_DSR_DECAP svc_DSR01_01 bind lb vserver vs_DSR_DECAP svc_DSR01_02 bind lb vserver vs_DSR_DECAP svc_DSR01_03 bind lb vserver vip_DSR_Relay svc_DSR01_01 bind lb vserver vip_DSR_Relay svc_DSR01_02 bind lb vserver vip_DSR_Relay svc_DSR01_03 add netProfile netProf_DSR_MBF_noIP -MBF ENABLED add lb monitor mon_DSR_MAC PING -netProfile netProf_DSR_MBF_noIP bind service svc_DSR01_01 -monitorName mon_DSR_MAC bind service svc_DSR01_02 -monitorName mon_DSR_MAC bind service svc_DSR01_03 -monitorName mon_DSR_MAC The following example shows a testing setup using Ubuntu and Red Hat servers running apache2. These commands are set up on each back-end server.
sudo ip addr add 1.1.1.80 255.255.255.255 dev lo sudo sysctl net.ipv4.conf.all.arp_ignore=1 sudo sysctl net.ipv4.conf.all.arp_announce=2 sudo sysctl net.ipv4.conf.eth4.rp_filter=2 (The interface has the external IP with route towards the ADC) sudo sysctl net.ipv4.conf.all.forwarding=1 sudo ip link set dev lo arp on Back-end server decapsulation
When you use the back-end servers as a decapsulation, the back-end configuration varies depending upon the server OS type. You can configure a back-end server as a decapsulation by following these steps:
- Configure a loop back interface with IP for service IP.
- Create a tunnel interface.
- Add a route through tunnel interface.
- Configure interface settings as required for traffic.
Note:
Windows OS servers cannot do IP tunneling natively, so the commands are provided as examples for Linux based systems. Third-party plug-ins are available for Windows OS servers, however, that is outside the scope of this example.
The following illustration shows a decapsulation setup using the back-end servers.
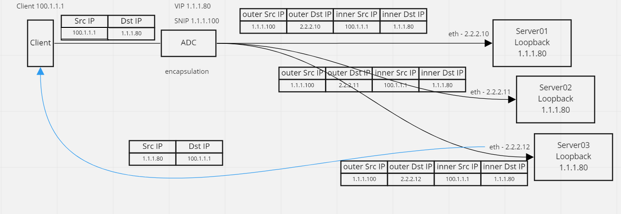
Example configuration:
In this example, 1.1.1.80 is the Citrix ADC virtual IP (VIP) address and 2.2.2.10-2.2.2.12 are the back-end server IP addresses. The VIP address is configured in the loopback interface, and a route is added through the tunnel interface. The monitors use the server IP, and tunnel the monitor packets over the IP tunnel using the tunnel endpoints.
The complete configuration required for the setup is as follows.
Front-end ADC configuration:
The following configuration creates a monitor that uses the tunnel endpoint as source. Then, send pings over tunnel to service IP address.
add ns ip 10.0.1.2 255.255.255.252 -vServer DISABLED add netProfile netProfile_DSR -srcIP 10.0.1.2 add lb monitor mon_DSR PING -LRTM DISABLED -destIP 1.1.1.80 -ipTunnel YES -netProfile netProfile_DSR The following configuration creates a VIP for service that uses the original source IP address. Then, forwards traffic over IP tunnel to back-end servers.
add service svc_DSR01 2.2.2.10 ANY * -usip YES -useproxyport NO bind service svc_DSR01 -monitorName mon_DSR add service svc_DSR02 2.2.2.11 ANY * -usip YES -useproxyport NO bind service svc_DSR02 -monitorName mon_DSR add service svc_DSR03 2.2.2.12 ANY * -usip YES -useproxyport NO bind service svc_DSR03 -monitorName mon_DSR add lb vserver vip_DSR_ENCAP ANY 1.1.1.80 * -lbMethod SOURCEIPHASH -m IPTUNNEL -sessionless ENABLED bind lb vserver vip_DSR_ENCAP svc_DSR01 bind lb vserver vip_DSR_ENCAP svc_DSR02 bind lb vserver vip_DSR_ENCAP svc_DSR03 Back-end server configuration of each server:
The following commands are required for the back-end server to receive the IPIP packet, remove the outer encapsulation, then respond from the loopback to the original client IP. Doing so ensures the IP addresses in the packet received by the client match the IP addresses in the original request.
modprobe ipip sudo ip addr add 1.1.1.80 255.255.255.255 dev lo nmcli connection add type ip-tunnel ip-tunnel.mode ipip con-name tun0 ifname tun0 remote 198.51.100.5 local 203.0.113.10 nmcli connection modify tun0 ipv4.addresses '10.0.1.1/30' nmcli connection up tun0 sudo sysctl net.ipv4.conf.all.arp_ignore=1 sudo sysctl net.ipv4.conf.all.arp_announce=2 sudo sysctl net.ipv4.conf.tun0.rp_filter=2 sudo sysctl net.ipv4.conf.all.forwarding=1 sudo ip link set dev lo arp off