
Configure DNSSEC
Perform the following steps to configure DNSSEC:
- Enable DNSSEC on the Citrix ADC appliance.
- 克雷亚te a zone signing key and a key signing key for the zone.
- Add the two keys to the zone.
- 标志the zone with the keys.
The Citrix ADC appliance does not act as a DNSSEC resolver. DNSSEC on the ADC is supported only in the following deployment scenarios:
- ADNS—Citrix ADC is the ADNS and generates the signatures itself.
- Proxy—Citrix ADC acts as a DNSSEC proxy. It is assumed that the Citrix ADC is placed in front of the ADNS/LDNS servers in a trusted mode. The ADC acts only as a proxy caching entity and does not validate any signatures.
Enable and disable DNSSEC
Enable DNSSEC on the Citrix ADC for the ADC to respond to DNSSEC-aware clients. By default, DNSSEC is enabled.
You can disable the DNSSEC feature if you do not want the Citrix ADC to respond to clients with DNSSEC-specific information.
Enable or disable DNSSEC by using the CLI
在命令提示符下,键入以下命令s to enable or disable DNSSEC and verify the configuration:
- set dns parameter -dnssec ( ENABLED | DISABLED ) - show dns parameter 例子:
> set dns parameter -dnssec ENABLED Done > show dns parameter DNS parameters: DNS retries: 5 . . . DNSEC Extension: ENABLED Max DNS Pipeline Requests: 255 Done Enable or disable DNSSEC by using the GUI
- Navigate toTraffic Management > DNS.
- In the details pane, click Change DNS settings.
- In theConfigure DNS Parametersdialog box, select or clear theEnable DNSSEC Extensioncheck box.
克雷亚te DNS keys for a zone
For each DNS zone that you want to sign, you must create two pairs of asymmetric keys. One pair, called the zone signing key (ZSK), is used to sign all the resource record sets in the zone. The second pair is called the key signing key (KSK) and is used to sign only the DNSKEY resource records in the zone.
When the ZSK and the KSK are created, thesuffix.keyis appended to the names of the public components of the keys. Thesuffix.privateis appended to the names of their private components. The appending happens automatically.
The Citrix ADC also creates a Delegation Signer (DS) record and appends the suffix .ds to the name of the record. If the parent zone is a signed zone, you must publish the DS record in the parent zone to establish the chain of trust.
When you create a key, the key is stored in the/nsconfig/dns/directory, but it is not automatically published in the zone. After you create a key by using thecreate dns keycommand, you must explicitly publish the key in the zone by using theadd dns key命令。生成一个键是规划布局的过程te from the process of publishing the key in a zone to enable you to use alternative means to generate keys. For example, you can import keys generated by other key-generation programs (such asbind-keygen) by using the Secure FTP (SFTP) and then publish the keys in the zone. For more information about publishing a key in a zone, seePublish a DNS key in a zone.
Perform the steps described in this topic to create a zone signing key and then repeat the steps to create a key signing key. The example that follows the command syntax first creates a zone signing key pair for the zone example.com. The example then uses the command to create a key signing key pair for the zone.
From release 13.0 build 61.x, the Citrix ADC appliance now supports stronger crypto algorithms, such as RSASHA256 and RSASHA512, to authenticate a DNS zone. Previously, only the RSASHA1 algorithm was supported.
克雷亚te a DNS key by using the CLI
At the command prompt, type:
create dns key -zoneName
例子:
> create dns key -zoneName example.com -keyType zsk -algorithm RSASHA256 -keySize 1024 -fileNamePrefix example.com.zsk.rsasha1.1024 File Name: /nsconfig/dns/example.com.zsk.rsasha1.1024.key (public); /nsconfig/dns/example.com.zsk.rsasha1.1024.private (private); /nsconfig/dns/example.com.zsk.rsasha1.1024.ds (ds) This operation may take some time, Please wait... Done > create dns key -zoneName example.com -keyType ksk -algorithm RSASHA512 -keySize 4096 -fileNamePrefix example.com.ksk.rsasha1.4096 File Name: /nsconfig/dns/example.com.ksk.rsasha1.4096.key (public); /nsconfig/dns/example.com.ksk.rsasha1.4096.private (private); /nsconfig/dns/example.com.ksk.rsasha1.4096.ds (ds) This operation may take some time, Please wait... Done 克雷亚te a DNS key by using the GUI
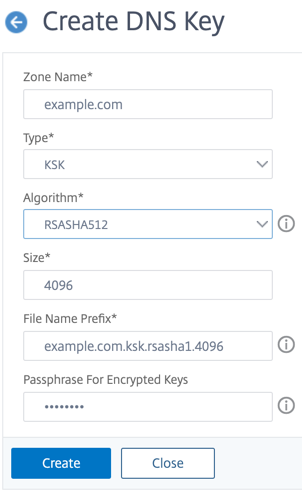
- Navigate toTraffic Management > DNS.
- In the details area, click克雷亚te DNS Key.
Enter values for the different parameters and click克雷亚te.
Note: To modify the file name prefix of an existing key:
- Click the arrow next to theBrowsebutton.
- Click eitherLocalorAppliance(depending on whether the existing key is stored on your local computer or in the
/nsconfig/dns/directory on the appliance) - Browse to the location of the key, and then double-click the key. TheFile Name Prefixbox is populated with only the prefix of the existing key. Modify the prefix accordingly.
Publish a DNS key in a zone
A key (zone signing key or key signing key) is published in a zone by adding the key to the ADC appliance. A key must be published in a zone before you sign the zone.
Before you publish a key in a zone, the key must be available in the/nsconfig/dns/directory. If you created the DNS key on another computer (for example, by using thebind-keygen程序),确保关键是添加到/nsconfig/dns/directory. Then publish the key in the zone. Use the ADC GUI to add the key to the/nsconfig/dns/directory. Or, use some other program to import the key to the directory, such as the Secure FTP (SFTP).
Use theadd dns keycommand for each public-private key pair that you want to publish in a given zone. If you created a ZSK pair and a KSK pair for a zone, use theadd dns keycommand to first publish one of the key pairs in the zone. Repeat the command to publish the other key pair. For each key that you publish in a zone, a DNSKEY resource record is created in the zone.
The example that follows the command syntax first publishes the zone signing key pair (that was created for the example.com zone) in the zone. The example then uses the command to publish the key signing key pair in the zone.
Publish a key in a zone by using the CLI
在命令提示符下,键入以下命令to publish a key in a zone and verify the configuration:
- add dns key [-expires []] [-notificationPeriod []] [-TTL ] - show dns zone [ | -type ] 例子:
> add dns key example.com.zsk example.com.zsk.rsasha1.1024.key example.com.zsk.rsasha1.1024.private Done > add dns key example.com.ksk example.com.ksk.rsasha1.4096.key example.com.ksk.rsasha1.4096.private Done > show dns zone example.com Zone Name : example.com Proxy Mode : NO Domain Name : example.com Record Types : NS SOA DNSKEY Domain Name : ns1.example.com Record Types : A Domain Name : ns2.example.com Record Types : A Done Publish a key in a DNS zone by using the GUI
Navigate toTraffic Management > DNS > Keys.
Note:For Public Key and Private Key, to add a key that is stored on your local computer, click the arrow next to theBrowsebutton, clickLocal, browse to the location of the key, and then double-click the key.
Configure a DNS key
You can configure the parameters of a key that has been published in a zone. You can modify the key’s expiry time period, notification period, and time-to-live (TTL) parameters. If you change the expiry time period of a key, the appliance automatically re-signs all the resource records in the zone with the key. The re-signing happens if the zone is signed with the particular key.
Configure a key by using the CLI
在命令提示符下,键入以下命令to configure a key and verify the configuration:
- set dns key [-expires []] [-notificationPeriod []] [-TTL ] - show dns key [] 例子:
> set dns key example.com.ksk -expires 30 DAYS -notificationPeriod 3 DAYS -TTL 3600 Done > show dns key example.com.ksk 1) Key Name: example.com.ksk Expires: 30 DAYS Notification: 3 DAYS TTL: 3600 Public Key File: example.com.ksk.rsasha1.4096.key Private Key File: example.com.ksk.rsasha1.4096.private Done Configure a key by using the GUI
Navigate toTraffic Management > DNS > Keys.
In the details pane, click the key that you want to configure, and then click Open.
In the Configure DNS Key dialog box, modify the values of the following parameters as shown:
- Expires—expires
- Notification Period—notificationPeriod
- TTL—TTL
Click OK.
标志and unsign a DNS zone
To secure a DNS zone, you must sign the zone with the keys that have been published in the zone. When you sign a zone, the Citrix ADC creates a Next Secure (NSEC) resource record for each owner name. Then, it uses the key signing key to sign the DNSKEY resource record set. Finally, it uses the ZSK to sign all the resource record sets in the zone, including the DNSKEY resource record sets and NSEC resource record sets. Each sign operation results in a signature for the resource record sets in the zone. The signature is captured in a new resource record called the RRSIG resource record.
After you sign a zone, save the configuration.
标志a zone by using the CLI
在命令提示符下,键入以下命令to sign a zone and verify the configuration:
- sign dns zone [-keyName ...] - show dns zone [ | -type (ADNS | PROXY | ALL)] - save config 例子:
> sign dns zone example.com -keyName example.com.zsk example.com.ksk Done > show dns zone example.com Zone Name : example.com Proxy Mode : NO Domain Name : example.com Record Types : NS SOA DNSKEY RRSIG NSEC Domain Name : ns1.example.com Record Types : A RRSIG NSEC Domain Name : ns2.example.com Record Types : A RRSIG Domain Name : ns2.example.com Record Types : RRSIG NSEC Done > save config Done Unsign a zone by using the CLI
在命令提示符下,键入以下命令to unsign a zone and verify the configuration:
- unsign dns zone [-keyName ...] - show dns zone [ | -type (ADNS | PROXY | ALL)] 例子:
> unsign dns zone example.com -keyName example.com.zsk example.com.ksk Done > show dns zone example.com Zone Name : example.com Proxy Mode : NO Domain Name : example.com Record Types : NS SOA DNSKEY Domain Name : ns1.example.com Record Types : A Domain Name : ns2.example.com Record Types : A Done 标志or unsign a zone by using the GUI
- Navigate toTraffic Management > DNS > Zones.
- In the details pane, click the zone that you want to sign, and then click Sign/Unsign.
- In the Sign/Unsign DNS Zone dialog box, do one of the following:
To sign the zone, select the check boxes for the keys (zone signing key and key signing key) with which you want to sign the zone.
You can sign the zone with more than one zone signing key or key signing key pair.
To unsign the zone, clear the check boxes for the keys (zone signing key and key signing key) with which you want to unsign the zone.
You can unsign the zone with more than one zone signing key or key signing key pair.
- Click OK.
View the NSEC records for a given record in a zone
You can view the NSEC records that the Citrix ADC automatically creates for each owner name in the zone.
View the NSEC record for a given record in a zone by using the CLI
在命令提示符下,键入以下命令to view the NSEC record for a given record in a zone:
show dns nsecRec [
例子:
> show dns nsecRec example.com 1) Domain Name : example.com Next Nsec Name: ns1.example.com Record Types : NS SOA DNSKEY RRSIG NSEC Done View the NSEC record for a given record in a zone by using the GUI
- Navigate toTraffic Management > DNS > Records > Next Secure Records.
- In the details pane, click the name of the record for which you want to view the NSEC record. The NSEC record for the record you select is displayed in the Details area.
Remove a DNS key
Remove a key from the zone in which it is published when the key has expired or if the key has been compromised. When you remove a key from the zone, the zone is automatically unsigned with the key. Removing the key with this command does not remove the key files present in the /nsconfig/dns/ directory. If the key files are no longer needed, they have to be explicitly removed from the directory.
Remove a key from the Citrix ADC by using the CLI
在命令提示符下,键入以下命令to remove a key and verify the configuration:
- rm dns key - show dns key 例子:
> rm dns key example.com.zsk Done > show dns key example.com.zsk ERROR: No such resource [keyName, example.com.zsk] Remove a key from the Citrix ADC by using the GUI
- Navigate toTraffic Management > DNS > Keys.
- In the details pane, click the name of the key that you want to remove from the ADC, and then click Remove.