
How to record a packet trace on Citrix ADC
This troubleshooting article explains how an administrator can record a network packet trace using the Citrix ADC GUI.
Points to remember
Citrix recommends you to use the recent Wireshark version from the “automated build section” available in the following webpage:http://www.wireshark.org/download/automated.
In Citrix ADC version 11.1 or later, to decrypt the capture and ensure ECC (Elliptic Curve Cryptography), Session Reuse, and DH parameters are disabled from the virtual server. It is done before the trace is captured.
Record packet trace on NetScaler version 11.1
- Navigate toSystem>Diagnosticspage.
click theStart new tracelink in theDiagnosticpage, as shown in the following screenshot.

Update the packet size to 0 in thePacket sizefield.

- ClickStartto start recording the network packet trace.
ClickStop and Downloadto stop recording the network packet trace after the test is complete.

Select the required file and clickSelectand clickDownload.

Open the network packet trace file with the Wireshark utility to display the content of the file.
Note: Select Decrypted SSL packets (SSLPLAIN) to decrypt the packet trace without the private key.

Capture SSL master keys
In the 11.0, 11.1 version and above there is an option to capture the session keys which is valid only for that particular session/nstrace, and this option can be used if you do not want to share the private key or use SSLPLAIN mode. For more information, seehttps://support.citrix.com/article/CTX135889.
Export Session Keys without sharing Private key
In most of the scenarios the private key is not available or shared. In such scenarios we can suggest exporting theSSL sessionkeys instead of the private key. Read, [How to Export and Use SSL Session Keys to Decrypt SSL Traces Without Sharing the SSL Private Key, seehttps://support.citrix.com/article/CTX135889.
Filters
Also, it is always recommended to add IP based filters while taking traces. The process ensures that you capture only interested traffic which eases your troubleshooting. Adding filters will also decrease the load on the appliance while taking traces.

Simple IP-based filters are enough to get the right captures. For more information about ns trace filters and examples, seeCitrix Documentationpage.
Use case to capture a packet trace with virtual server IP filter (both front-end and back end)
Using a filter of the virtual server IP address and enabling the option “–link” in CLI or select the option “Trace filtered connection peer traffic” in GUI (available 10.1 and above), you can capture both the front end and back-end traffic for that particular IP address. With this option it is not recommended to mention a source IP or destination IP filter.
nstrace造0开始过滤“CONNECTION.IP.EQ(1。1.1.1)" -link ENABLED show nstrace State: RUNNING Scope: LOCAL TraceLocation: "/var/nstrace/24Mar2017_16_00_19/..." Nf: 24 Time: 3600 Size: 0 Mode: TXB NEW_RX Traceformat: NSCAP PerNIC: DISABLED FileName: 24Mar2017_16_00_19 Filter: "CONNECTION.IP.EQ(1.1.1.1)" Link: ENABLED Merge: ONSTOP Doruntimecleanup: ENABLED TraceBuffers: 5000 SkipRPC: DISABLED Capsslkeys: DISABLED InMemoryTrace: DISABLED 
Capturing cyclic traces
It is always challenging to troubleshoot an intermittent issue. Cyclic tracing is best suited for issues which are intermittent. The traces can be run over a span of few hours or days before the issue occurs. Also, you can use a specific filter and evaluate the size of the trace files that are generated before you run it for a longer time.
Run the following command from the CLI:
start nstrace -nf 60 -time 30 -size 0 This particular trace will create 60 files each of them for 30 sec. This means the files will start getting overwritten after 60 trace files or 30 mins Show nstrace à To check the status of the nstrace Stop nstrace à To stop the nstrace. Best Practices
On a unit handling GB of traffic per second, capturing traffic is a very resource intensive process. The impact to resources is mainly in terms of the CPU and the disk space. Disk space impact can be reduced by using filtering expressions. However, the impact on the CPU remains and sometimes causes a slight increase as the appliance now needs to process packets according to the filter before capturing them.
The best practice about tracing is:
- The duration for which the trace is run must be as limited as possible when you still ensure the packets of interest are captured.
- Schedule the tracing activity to happen at a time when the number of users (and hence the traffic) is greatly reduced, such as during off hours.
More resources
Disable session reuse on virtual server from the GUI
Session reuse is disabled when you capture a trace to complete an SSL handshake in the trace. When it is enabled, you can capture a partial handshake in the trace. Ensure you enable the option after the trace collection. Do not disable an SSL session reuse when the persistence method issslsession, as it breaks the persistence for existing connections. For more information refer tohttps://support.citrix.com/article/CTX121925.
- Open the virtual server and navigate to SSL Parameters.
Disable Enable Session Reuse if enabled.

Disable session reuse on virtual server from the CLI
- SSH to the appliance console.
Run the following command to disable DH Param from the virtual server:
set ssl vserver "vServer_Name" -sessReuse DISABLED
Disable DH parameter on virtual server from the GUI
Refer tohttps://support.citrix.com/article/CTX213335. To understand about DH Parameter.
- Open the virtual server and navigate to SSL Parameters.
Disable DH Param if enabled.
Disable DH parameter on virtual server from the CLI
- SSH to the appliance console.
Run the following command to disable DH Param from the virtual server:
set ssl vserver "vServer_Name" -dh DISABLED
Disable ECC curve on virtual server from the GUI
ECC curve is disabled to decrypt the captured SSL trace with private key. Do not disable the keys if the related SSL ciphers are used. For more information about the ECC curve, seehttps://support.citrix.com/article/CTX205289
Open the virtual server and navigate to ECC Curve.

If there is no ECC Curve bound to the virtual server then no other action is required.

If any ECC Curve is bound to the virtual server then click the ECC Curve and Unbind it from the virtual server.
Disable ECC curve on virtual server from the CLI
- SSH to the appliance console.
Run the following command for each ECC Curve bound to the virtual server:
unbind ssl vserver "vServer_Name" -eccCurveName "ECC_Curve_Name"
How the Citrix ADC traces are decrypted
本节解释如何确保Citrix ADC traces are decrypted.
Points to remember
You ensure that several configuration settings for SSL virtual server and ServiceGroups are done. It helps to make sure that traces are decrypted. Citrix also provides additional information on what is needed and how to take the traces. It helps in capturing relevant data.
Instructions to ensure Citrix ADC traces are decrypted
While taking a Citrix ADC trace, you must start determining what kind of traces you are taking. Also, you must be aware of all the components involved. Consider an example, a content switch might redirect to a load balancing virtual server with a Service Group, or a Gateway virtual server. It might point the Session Profile to the load balancing virtual server, which uses a Service Group. Citrix recommends you to remove the load balancer to simplify troubleshooting. If that is not possible, you suspect the load balancer as part of the problem. You have three options (Gateway virtual server, load balance virtual server, and load balance Service Group) to modify and ensure traces are decrypted.
Note
The steps to decrypt the traces remain the same for content switching and other SSL virtual servers.
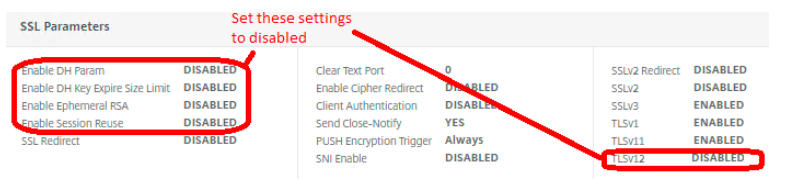
Gateway virtual server. In Gateway virtual server, modify the SSL parameters as per the following:
- Disable DH param
- Disable DH Key Expire Size
- Disable Ephemeral RSA
- Disable Session Reuse
- Disable TLS 1.2, but ensure TLS 1.1 and 1.0 is enabled
Load balancing SSL virtual server. The settings in a load balancing SSL virtual server remains the same as the Gateway virtual server.
- Disable DH param
- Disable DH Key Expire Size
- Disable Ephemeral RSA
- Disable Session Reuse
- Disable TLS 1.2, but ensure TLS 1.1 and 1.0 is enabled
Finally, adjust the Service Group.
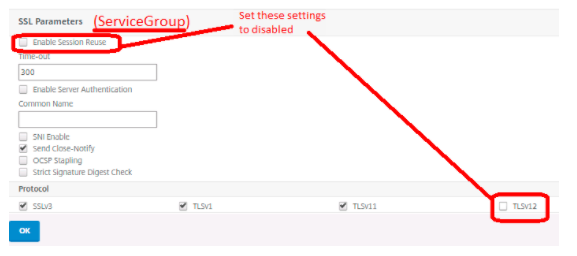
Service Group SSL parameters (no SSL profile)
- Disable Session Reuse
- Disable TLS 1.2, but ensure TLS 1.1 and is enabled
Note
You repeat this step for each service if using individual services. Also, if using an SSL Profile, you have to adjust it, either for each Service or for the Service Group.
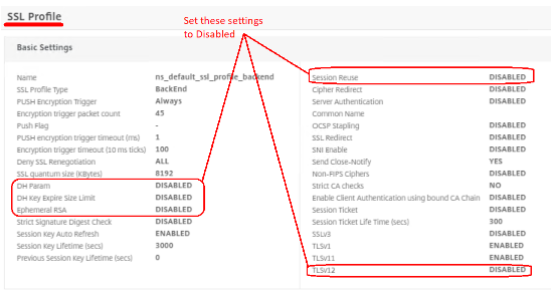
Service Group SSL Profile or individual services
- Disable DH param
- Disable DH Key Expire Size
- Disable Ephemeral Reuse
- Disable session Reuse
- Disable TLS 1.2, but ensure TLS 1.1 and 1.0 is enabled
Ensure the following settings are done to set up the trace. Do not modify the rest of the settings.
- Packet Size: 0
- File Size: 0
- Trace Filtered connections peer traffic: Checked
- Capture SSL Master Keys: Checked
- Click Start. You receive a warning. Click OK.
- You receive a notice that the trace is started.
Open a new incognito browser window. It is for the SSL Client Hello, so it is not missed. If using a mobile device, close all the apps before beginning, it is important. If the beginning of the SSL handshake is not captured, the Citrix ADC cannot decrypt the traces. You ensure the trace is started before accessing a login webpage or opening any mobile app.
Login and duplicate the issue. Once the issue is duplicated, wait for 1-2 minutes. The waiting time might be because of an interruption or loading error or ICA timeout. It results in a RESET packet being sent and if you do not wait, you might miss the reset, which can contain valuable information.
You can stop the trace once the issue is replicated and have waited as recommended. Download both the
sslkeysfiles (there can be more than 1) and the ns trace file.Gather IPs of all relevant devices: Citrix ADC, Client, Gateway URL, back-end Server, VDA if ICA traffic, and StoreFront.
Now that you have the traces and IPs, generate a new Support file from the Citrix ADC. You can do it after taking the traces. It allows you to corelate logs and counters from the support file with events in the traces. It can be essential when troubleshooting the complex issues.
The following section describes the purpose and impact of the settings:
SSL Session Reuse. It is a mechanism that speeds up the SSL transaction, which speeds up the client communication. The impact of disabling is that some clients using SSL Reuse might have to reconnect to the SSL Session. However, you cannot always decrypt when Session Reuse is enabled.
DH Parameters. DH refers to Diffie-Hellman and ciphers which use DH often do not decrypt. It is better to disable DH parameters to ensure decryption.
Ephemeral RSA. You disable Ephemeral RSA to prevent the Citrix ADC from trying to use ECC curve ciphers, which you cannot decrypt. Users reconnect if using the ECC Curves when disabled.
TLS 1.2. It is not necessary to disable TLS 1.2. However, you tend to have fewer decryption issues when disabling TLS 1.2. Users have to reconnect if using TLS 1.2, when disabled.